

Waterless Strawberry Growing might sound like something out of a science fiction movie, but trust me, it’s a real, achievable, and incredibly rewarding way to cultivate delicious strawberries right in your own backyard! Forget lugging around heavy watering cans and constantly worrying about over or under-watering; this method is all about efficiency and sustainability.
Strawberries have a rich history, enjoyed for centuries across various cultures. From ancient Roman gardens to medieval monastery plots, these vibrant berries have always held a special place in our hearts (and stomachs!). But traditional strawberry cultivation can be water-intensive, a concern in many regions today.
That’s where the magic of waterless strawberry growing comes in. In this article, I’m going to share some fantastic DIY tricks and hacks that will allow you to enjoy a bountiful harvest of juicy, red strawberries while significantly reducing your water consumption. Imagine, fresh, homegrown strawberries without the guilt of excessive water usage! We’ll explore innovative techniques like using self-watering containers, mulching effectively to retain moisture, and selecting drought-resistant strawberry varieties. These methods are perfect for busy gardeners, those living in water-scarce areas, or anyone looking to embrace a more eco-friendly approach to gardening. So, grab your gardening gloves, and let’s dive into the wonderful world of waterless strawberry growing!
DIY Waterless Strawberry Growing: A Guide to Thriving Berries with Minimal Effort
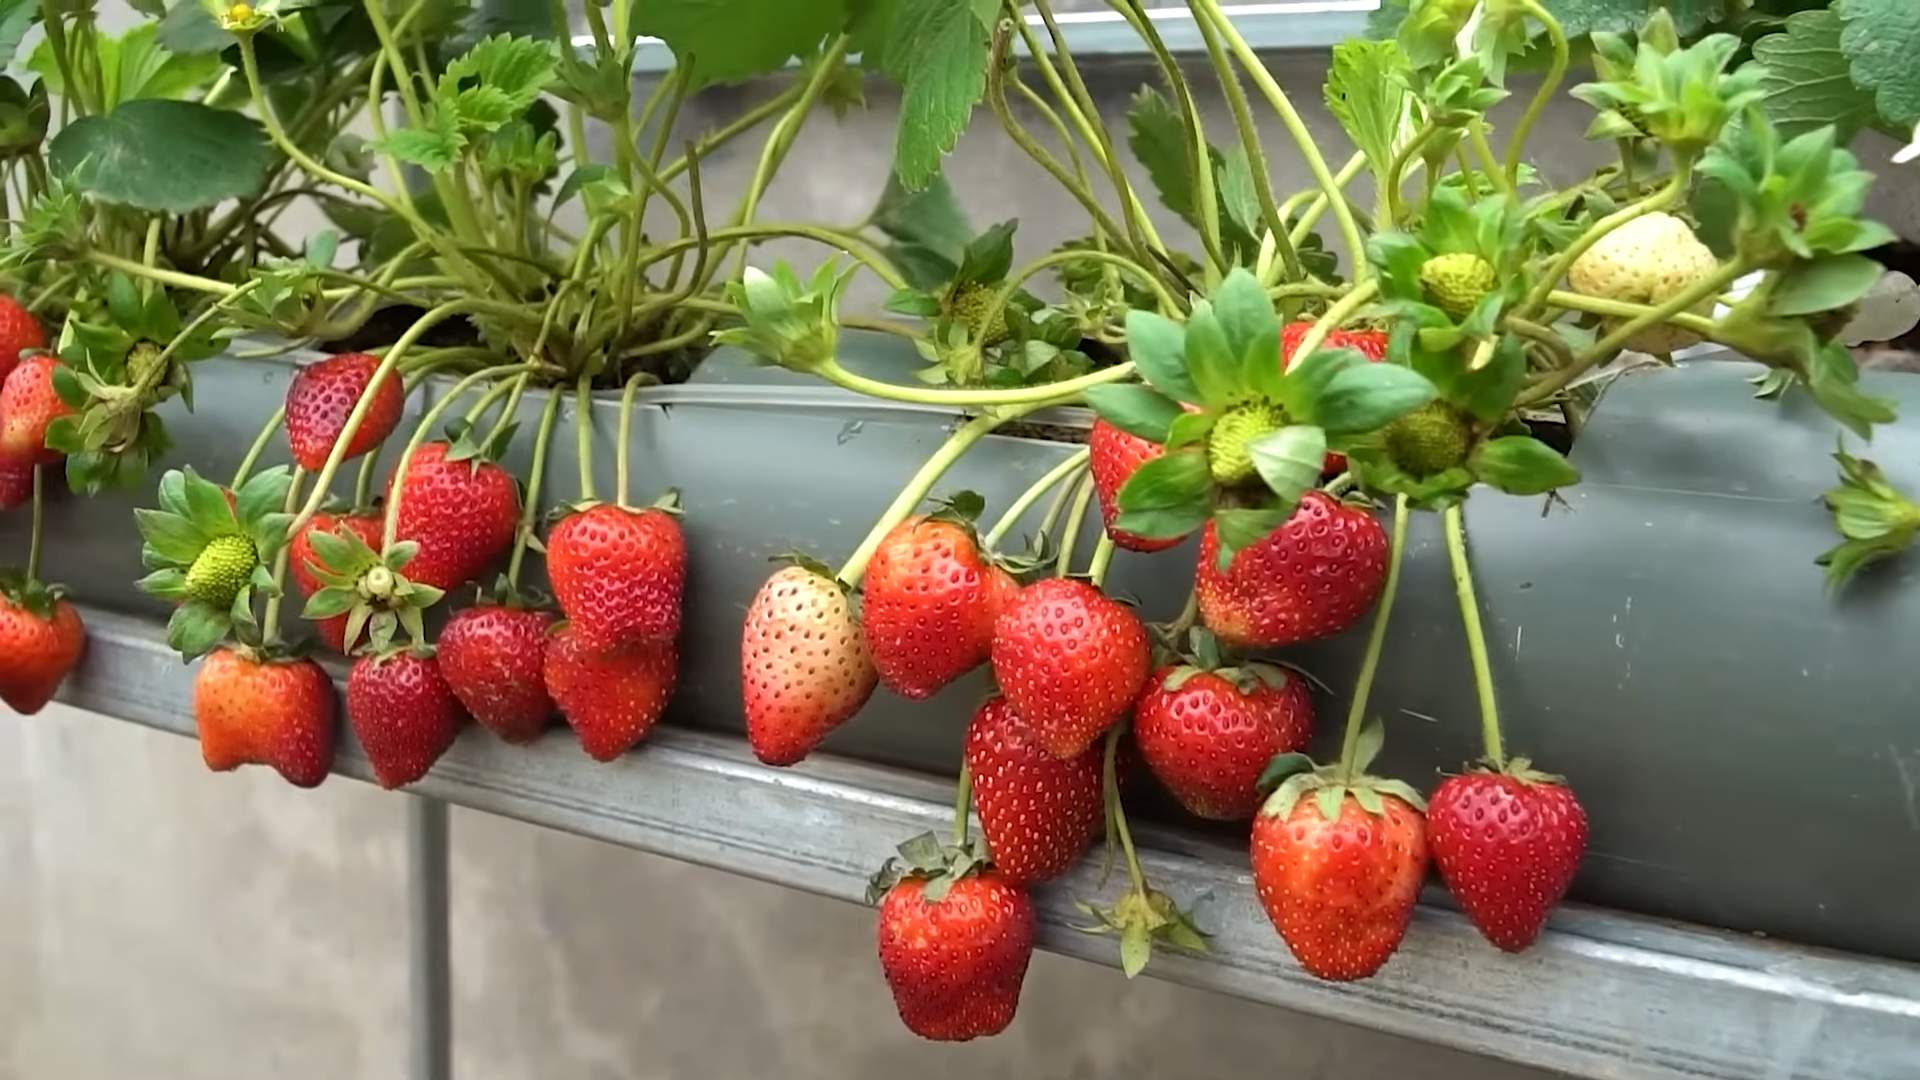
Hey there, fellow gardening enthusiasts! Are you tired of constantly watering your strawberry plants, battling weeds, and dealing with soil-borne diseases? Well, I have a fantastic solution for you: waterless strawberry growing! This method, using a stacked pipe system, is not only incredibly efficient but also saves water, reduces weeding, and provides a beautiful, space-saving display for your delicious berries. Let’s dive in!
What is Waterless Strawberry Growing?
Essentially, we’re creating a self-contained ecosystem within a vertical pipe structure. The pipe is filled with a growing medium that retains moisture, and the strawberry plants are placed in holes along the pipe’s surface. The beauty of this system is that the growing medium acts as a reservoir, slowly releasing moisture to the plants as needed. This drastically reduces the need for frequent watering and minimizes water waste. Plus, the elevated structure keeps your strawberries away from soil pests and diseases.
Materials You’ll Need
Before we get started, let’s gather all the necessary materials. This will make the process much smoother and more enjoyable.
* **PVC Pipe:** A large diameter PVC pipe (e.g., 6-inch or 8-inch diameter) will form the main structure. The length depends on how tall you want your strawberry tower to be. I recommend starting with a 4-6 foot length for easy management.
* **Smaller PVC Pipe (for irrigation):** A smaller diameter PVC pipe (e.g., 1-inch or 1.5-inch diameter) will run through the center of the larger pipe to provide irrigation. It should be slightly longer than the larger pipe.
* **End Cap for Large PVC Pipe:** This will seal the bottom of the large PVC pipe.
* **End Cap for Small PVC Pipe:** This will seal the bottom of the small PVC pipe.
* **Drill with Hole Saw Attachment:** You’ll need a hole saw attachment that’s appropriately sized for your strawberry plants (usually 2-3 inches in diameter).
* **Drill with Smaller Drill Bit:** For drilling drainage holes in the small PVC pipe.
* **Measuring Tape or Ruler:** For accurate measurements.
* **Permanent Marker:** For marking the pipe.
* **Safety Glasses:** Always protect your eyes!
* **Gloves:** To protect your hands.
* **Growing Medium:** A well-draining, moisture-retentive mix is crucial. I recommend a mix of coco coir, perlite, and compost. You can also add some slow-release fertilizer for added nutrients.
* **Strawberry Plants:** Choose everbearing varieties for a continuous harvest throughout the growing season.
* **Gravel or Small Stones:** For drainage at the bottom of the large PVC pipe.
* **Landscape Fabric (optional):** To line the inside of the large PVC pipe and prevent soil from escaping through the holes.
* **PVC Pipe Cement (optional):** For a more secure seal on the end caps.
Step-by-Step Instructions: Building Your Waterless Strawberry Tower
Okay, let’s get our hands dirty and build this amazing strawberry tower!
Phase 1: Preparing the PVC Pipes
1. **Measure and Mark the Large PVC Pipe:** Using your measuring tape and permanent marker, mark the locations for the strawberry plant holes on the large PVC pipe. Space the holes evenly around the pipe, staggering them vertically. I usually aim for about 6-8 inches between holes. Remember to leave some space at the top and bottom of the pipe.
2. **Drill the Holes:** Put on your safety glasses and gloves. Using the hole saw attachment on your drill, carefully drill the holes at the marked locations. Take your time and apply even pressure to avoid cracking the pipe.
3. **Prepare the Small PVC Pipe (Irrigation Pipe):** Using the smaller drill bit, drill small drainage holes along the length of the small PVC pipe. Space these holes about 2-3 inches apart. This will allow water to slowly seep out and irrigate the growing medium.
4. **Wrap with Landscape Fabric (Optional):** If you’re using landscape fabric, cut a piece that’s slightly larger than the inside circumference of the large PVC pipe and long enough to line the entire length. Secure it to the inside of the pipe using tape or staples. This will help prevent soil from escaping through the holes.
Phase 2: Assembling the Strawberry Tower
1. **Attach the End Cap to the Large PVC Pipe:** Apply PVC pipe cement (if using) to the inside of the end cap and the bottom of the large PVC pipe. Firmly press the end cap onto the pipe and hold it in place for a few seconds until the cement sets. If you’re not using cement, make sure the end cap fits snugly.
2. **Add Drainage Material:** Pour a layer of gravel or small stones into the bottom of the large PVC pipe. This will improve drainage and prevent the growing medium from becoming waterlogged. A layer of about 4-6 inches should be sufficient.
3. **Insert the Small PVC Pipe:** Carefully insert the small PVC pipe into the center of the large PVC pipe, ensuring that it extends slightly above the top of the large pipe.
4. **Attach the End Cap to the Small PVC Pipe:** Apply PVC pipe cement (if using) to the inside of the end cap and the bottom of the small PVC pipe. Firmly press the end cap onto the pipe and hold it in place for a few seconds until the cement sets. If you’re not using cement, make sure the end cap fits snugly.
Phase 3: Planting Your Strawberries
1. **Fill with Growing Medium:** Slowly fill the large PVC pipe with your prepared growing medium. As you fill, gently pack the medium around the small PVC pipe to ensure it’s evenly distributed.
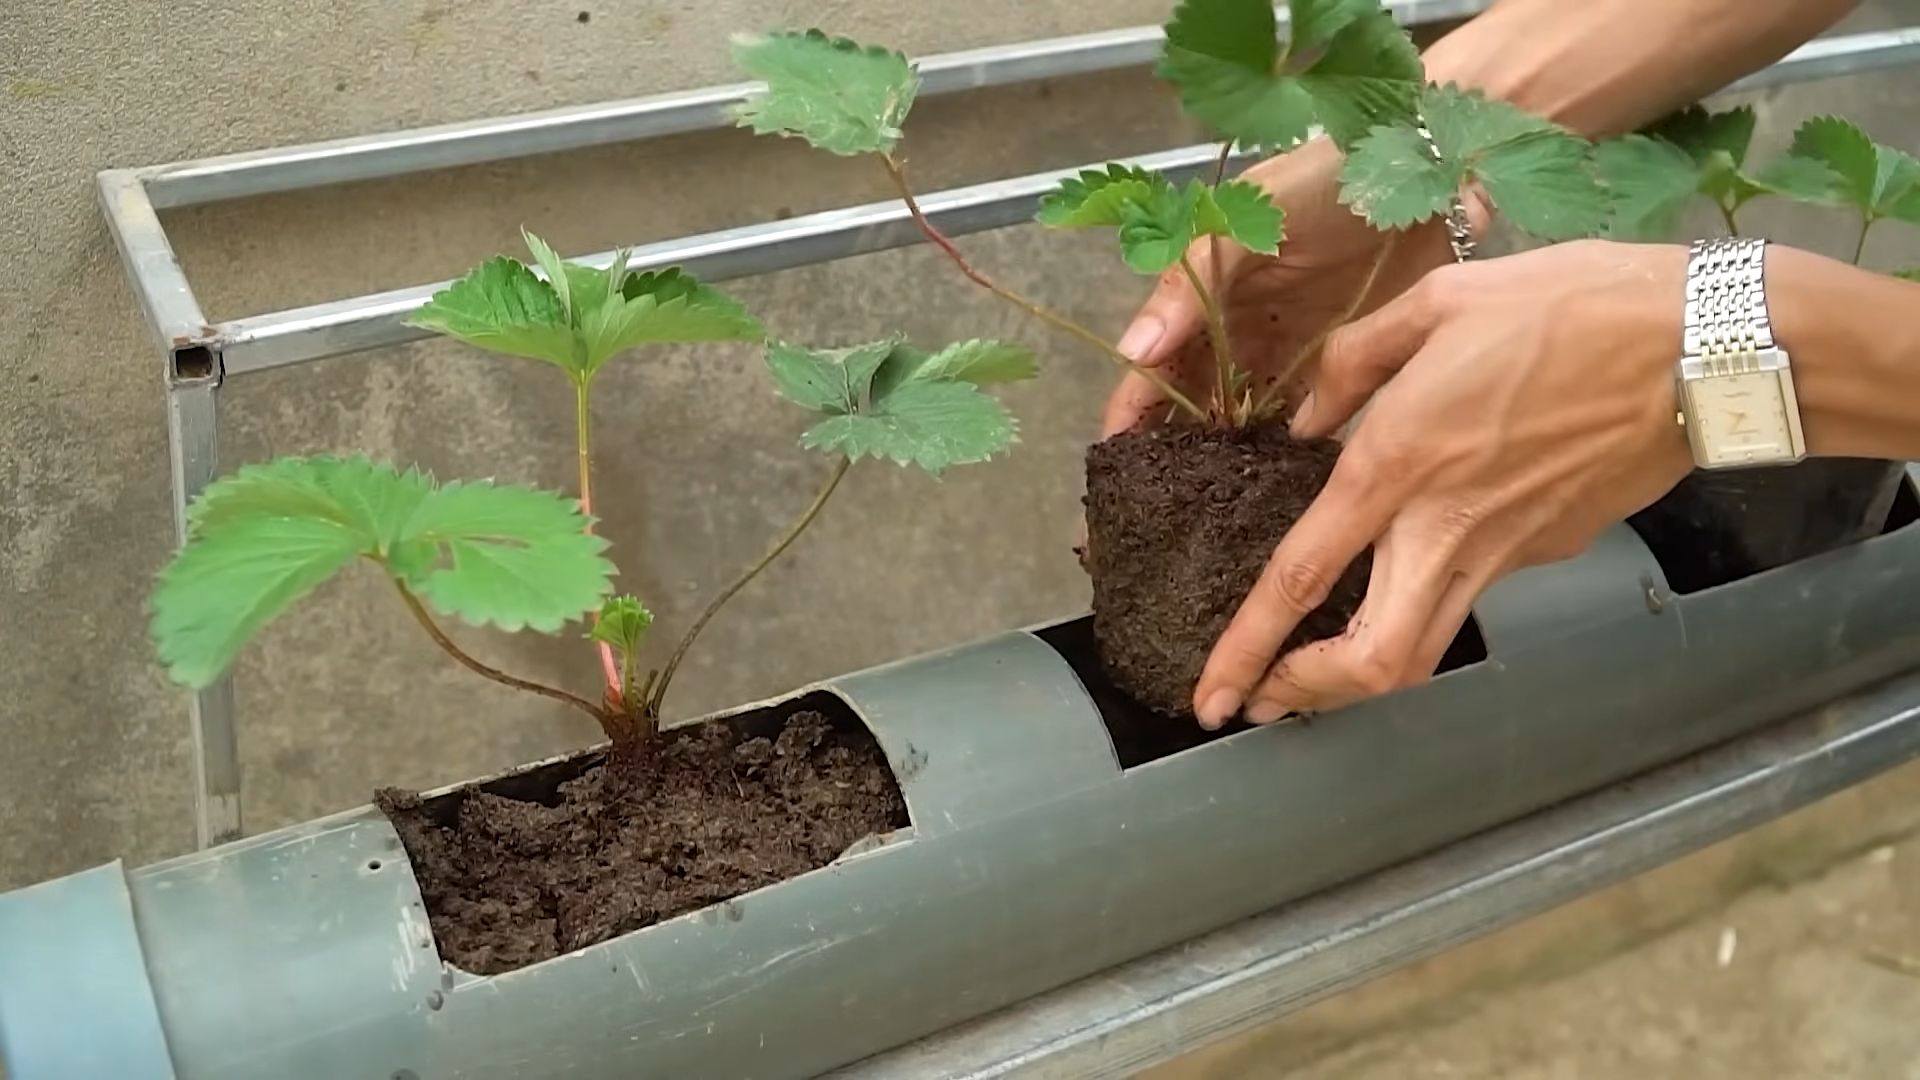
2. **Plant the Strawberry Plants:** Carefully remove the strawberry plants from their containers. Gently loosen the roots and place each plant into a hole in the large PVC pipe. Make sure the crown of the plant (where the stems meet the roots) is level with the surface of the growing medium.
3. **Secure the Plants:** Gently pack more growing medium around the roots of each plant to secure them in place.
4. **Water Thoroughly (Initial Watering):** For the first watering, slowly pour water into the top of the small PVC pipe until the growing medium is thoroughly saturated. This will help settle the medium and encourage root growth. You might see some water draining from the bottom initially, which is fine.
Maintaining Your Waterless Strawberry Tower
Now that your strawberry tower is built and planted, here are some tips for maintaining it and ensuring a bountiful harvest:
* **Watering:** The beauty of this system is that you won’t need to water as frequently as with traditional methods. Check the moisture level of the growing medium by sticking your finger into the soil near the top of the tower. If it feels dry, add water to the small PVC pipe until the medium is saturated. The frequency of watering will depend on the weather and the drainage of your growing medium. I usually water mine every 2-3 days during hot weather and less frequently during cooler periods.
* **Fertilizing:** Even with slow-release fertilizer in the growing medium, your strawberry plants will benefit from regular feeding. Use a liquid fertilizer specifically formulated for strawberries, following the instructions on the label. I usually fertilize mine every 2-3 weeks during the growing season.
* **Sunlight:** Strawberry plants need at least 6-8 hours of sunlight per day to thrive. Place your strawberry tower in a sunny location where it will receive plenty of light.
* **Pruning:** Regularly prune your strawberry plants by removing any dead or yellowing leaves. This will help improve air circulation and prevent disease. Also, remove any runners (long stems that grow out from the plant) unless you want to propagate new plants.
* **Pest Control:** While the elevated structure helps reduce pest problems, it’s still important to monitor your plants for any signs of infestation. If you notice any pests, such as aphids or spider mites, treat them with an appropriate organic insecticide.
* **Winter Protection:** In colder climates, you’ll need to protect your strawberry plants from frost and freezing temperatures. You can wrap the strawberry tower with burlap or move it to a sheltered location, such as a garage or greenhouse.
* **Harvesting:** Harvest your strawberries when they are fully ripe and red. Gently twist the berries off the plant, being careful not to damage the stems.
Troubleshooting
Even with the best planning, you might encounter some challenges along the way. Here are some common problems and how to address them:
* **Yellowing Leaves:** This could be a sign of overwatering, underwatering, nutrient deficiency, or disease. Check the moisture level of the growing medium and adjust your watering accordingly. Fertilize your plants regularly and inspect them for any signs of disease.
* **Small or Few Strawberries:** This could be due to insufficient sunlight, lack of nutrients, or poor pollination. Make sure your strawberry tower is in a sunny location and fertilize your plants regularly. You can also hand-pollinate the flowers by gently brushing them with a small paintbrush.
* **
Conclusion
So, there you have it! The waterless strawberry growing method – a game-changer for anyone looking to enjoy fresh, juicy strawberries without the constant worry of watering schedules and potential overwatering issues. This isn’t just a gardening hack; it’s a pathway to a more sustainable and efficient way to cultivate these delicious berries.
Why is this a must-try? Because it simplifies the entire process. Imagine enjoying a bountiful harvest of sweet, sun-ripened strawberries, knowing you’ve minimized water waste and maximized your yield. The self-watering system, created with readily available materials, provides a consistent and controlled moisture supply, leading to healthier plants and more flavorful fruit. It’s perfect for busy individuals, those with limited space, or anyone simply seeking a more eco-friendly approach to gardening.
But the beauty of this method lies in its adaptability. Feel free to experiment with different container sizes and materials. Upcycle old buckets, plastic bins, or even repurposed tires to create your waterless strawberry garden. Consider adding a layer of mulch on top of the soil to further retain moisture and suppress weeds. You can also adjust the wicking material based on your climate and the specific needs of your strawberry variety. For example, in drier climates, you might opt for a thicker, more absorbent wicking material.
Furthermore, don’t limit yourself to just strawberries! This waterless growing technique can be adapted for other shallow-rooted plants like herbs, lettuce, and even some vegetables. Imagine a self-sufficient herb garden on your balcony, thriving with minimal effort. The possibilities are endless!
We truly believe that this waterless strawberry growing method will revolutionize your gardening experience. It’s a simple, effective, and environmentally conscious way to enjoy the fruits (literally!) of your labor.
Now, it’s your turn! We encourage you to give this DIY trick a try. Gather your materials, follow the steps outlined, and prepare to be amazed by the results. Don’t be afraid to get creative and personalize the method to suit your specific needs and preferences.
Most importantly, we want to hear about your experience! Share your photos, tips, and success stories in the comments section below. Let’s build a community of waterless strawberry growers and learn from each other. Together, we can make gardening more accessible, sustainable, and enjoyable for everyone. Happy growing!
Frequently Asked Questions (FAQ)
What exactly is “waterless” about this method? Does it mean I never have to add water?
The term “waterless” is a bit of a misnomer. It doesn’t mean you *never* add water. Instead, it refers to the self-watering aspect of the system. You initially fill the reservoir with water, and the wicking material draws moisture up to the soil as needed. This eliminates the need for frequent, direct watering of the plants. You’ll still need to check the reservoir periodically and refill it when it’s low, but the frequency is significantly reduced compared to traditional watering methods. The key is the consistent and controlled moisture delivery, preventing both overwatering and underwatering.
What type of wicking material is best to use?
Several materials can work effectively as wicking agents. Cotton rope, strips of old t-shirts (natural fibers are best), felt, and even commercially available wicking mats are all viable options. The ideal choice depends on the size of your container and the water requirements of your strawberry variety. Thicker materials generally wick more water, while thinner materials wick less. Experiment to find what works best for your specific setup. Avoid synthetic materials, as they may not wick water as effectively and can potentially leach harmful chemicals into the soil.
What kind of soil should I use for waterless strawberry growing?
A well-draining potting mix is crucial for success. Avoid using garden soil, as it tends to compact and doesn’t provide adequate drainage. A mix of peat moss, perlite, and vermiculite is a good starting point. You can also add compost to enrich the soil with nutrients. The ideal soil should retain enough moisture to support the plants but also allow excess water to drain away, preventing root rot. Consider a soil mix specifically formulated for container gardening, as these are often designed with optimal drainage in mind.
How often do I need to refill the water reservoir?
The frequency of refilling the reservoir depends on several factors, including the size of the container, the climate, the strawberry variety, and the stage of growth. During hot, sunny weather, the plants will transpire more water, and you’ll need to refill the reservoir more frequently. As a general guideline, check the reservoir every few days and refill it when it’s about half empty. Over time, you’ll develop a better understanding of your plants’ water needs and can adjust the refilling schedule accordingly.
Can I use this method indoors?
Yes, you can absolutely use the waterless strawberry growing method indoors. However, strawberries need plenty of sunlight to thrive. If you’re growing them indoors, you’ll need to supplement natural light with grow lights. Place the plants under the grow lights for at least 6-8 hours per day. Also, ensure good air circulation to prevent fungal diseases. Indoor growing can be a great option for extending the growing season or for those who live in climates with harsh winters.
What are the best strawberry varieties to grow using this method?
Day-neutral strawberry varieties are generally well-suited for container gardening and the waterless growing method. These varieties produce fruit throughout the growing season, rather than just during a specific period. Some popular day-neutral varieties include Albion, Seascape, and Tristar. Everbearing varieties can also be grown successfully, but they typically produce two main crops per year. Research different varieties to find one that is well-suited to your climate and growing conditions.
How do I fertilize my strawberries when using this waterless method?
You can add a slow-release fertilizer to the soil mix at the time of planting. Alternatively, you can use a liquid fertilizer diluted in the water reservoir. Be sure to follow the instructions on the fertilizer packaging carefully to avoid over-fertilizing. Strawberries benefit from regular feeding, especially during the fruiting season. Look for a fertilizer that is specifically formulated for strawberries or other berry-producing plants.
What if I see mold or algae growing in the water reservoir?
The presence of mold or algae in the water reservoir is not uncommon, especially in warm, humid conditions. While it’s generally not harmful to the plants, it can be unsightly. To prevent mold and algae growth, you can add a small amount of hydrogen peroxide to the water reservoir. Alternatively, you can clean the reservoir periodically with a mild bleach solution (be sure to rinse it thoroughly before refilling). Ensuring good air circulation around the container can also help to prevent mold and algae growth.
My strawberries are producing lots of leaves but no fruit. What could be the problem?
Several factors can contribute to a lack of fruit production. Insufficient sunlight is a common cause. Strawberries need at least 6-8 hours of direct sunlight per day to produce fruit. Over-fertilizing with nitrogen can also promote leafy growth at the expense of fruit production. Ensure you’re using a balanced fertilizer or one that is specifically formulated for berry-producing plants. Pollination can also be an issue, especially if you’re growing strawberries indoors. You may need to hand-pollinate the flowers using a small brush. Finally, stress from pests or diseases can also inhibit fruit production. Inspect your plants regularly for signs of problems and take appropriate action.
Can I overwinter my strawberry plants in the waterless container?
Yes, you can overwinter your strawberry plants in the waterless container, but you’ll need to take some precautions to protect them from the cold. In colder climates, move the container to a sheltered location, such as a garage or shed. You can also insulate the container with bubble wrap or burlap. Water the plants sparingly during the winter months, only when the soil is dry to the touch. In milder climates, you may be able to leave the container outdoors, but be sure to protect the plants from frost. Prune away any dead or damaged leaves in the spring to encourage new growth.
Leave a Comment