

Wall Grown Tomatoes No Garden? Absolutely! Imagine plucking juicy, sun-ripened tomatoes right off your wall, even if you don’t have a traditional garden. Sounds like a dream, right? Well, it’s a dream that can become a delicious reality with a few clever DIY tricks. For centuries, people have sought innovative ways to cultivate food in limited spaces. From ancient rooftop gardens in bustling cities to modern vertical farms, the desire to connect with nature and grow our own food has always been strong.
But why should you bother with wall grown tomatoes no garden? In today’s world, space is often a luxury. Many of us live in apartments, condos, or homes with small yards, making traditional gardening a challenge. Plus, let’s be honest, who doesn’t love the taste of a homegrown tomato? They’re bursting with flavor that you just can’t find in store-bought varieties. This DIY guide will empower you to create a thriving tomato garden on your wall, regardless of your space constraints. I’m going to show you simple, cost-effective methods to transform your wall into a vibrant, edible landscape. Get ready to impress your friends and neighbors with your green thumb and enjoy the freshest tomatoes imaginable!
Grow Tomatoes Upside Down: A DIY Wall Garden Project
Hey there, fellow gardening enthusiasts! Ever dreamed of fresh, juicy tomatoes right outside your door, even without a sprawling garden? Well, I’m here to tell you it’s totally possible! We’re going to build an upside-down tomato planter that hangs right on your wall. It’s a fun, space-saving project, and the results are absolutely delicious. Trust me, there’s nothing quite like plucking a sun-ripened tomato you grew yourself.
What You’ll Need
Before we dive in, let’s gather our supplies. This is a pretty straightforward project, so you probably have some of these items lying around already.
* A sturdy 5-gallon bucket: This will be our main container. Make sure it’s clean!
* A drill with various sized drill bits: We’ll need these for drainage and hanging.
* A 2-3 inch hole saw: This is crucial for creating the opening for our tomato plant.
* Landscape fabric: This will help retain moisture and prevent soil from falling out.
* Potting soil: Choose a high-quality potting mix specifically formulated for vegetables.
* A healthy tomato seedling: Select a variety that’s well-suited for container gardening, like a determinate or bush variety.
* Heavy-duty chain or rope: For hanging the bucket securely.
* S-hooks or carabiners: To attach the chain/rope to the bucket and the wall.
* Wall anchors: Choose anchors appropriate for the type of wall you’re hanging the planter on (brick, drywall, etc.).
* Gloves: To keep your hands clean.
* Measuring tape or ruler: For accurate drilling.
* Safety glasses: Protect your eyes!
* Watering can or hose: For watering your tomato plant.
Preparing the Bucket
Okay, let’s get our hands dirty! The first step is prepping our bucket to become a tomato haven.
1. Drill Drainage Holes: Flip the bucket upside down. Using a drill bit (around 1/4 inch), drill several drainage holes in the bottom of the bucket. I usually go for about 6-8 holes, evenly spaced. This is super important to prevent waterlogging, which can kill your tomato plant.
2. Create the Planting Hole: This is where the hole saw comes in. In the center of the bottom of the bucket (where you just drilled the drainage holes), use the 2-3 inch hole saw to cut a large hole. This is where your tomato plant will grow out of. Be careful and go slowly!
3. Reinforce the Hole (Optional): If you’re worried about the plastic around the hole cracking, you can reinforce it with duct tape or a plastic ring. I’ve found it’s usually not necessary, but it’s an option for added security.
4. Drill Hanging Holes: Now, we need to create a way to hang the bucket. Drill two holes near the top rim of the bucket, on opposite sides. These holes should be large enough to accommodate your chain or rope. Make sure they’re strong enough to hold the weight of the bucket, soil, and plant.
Planting Your Tomato Seedling
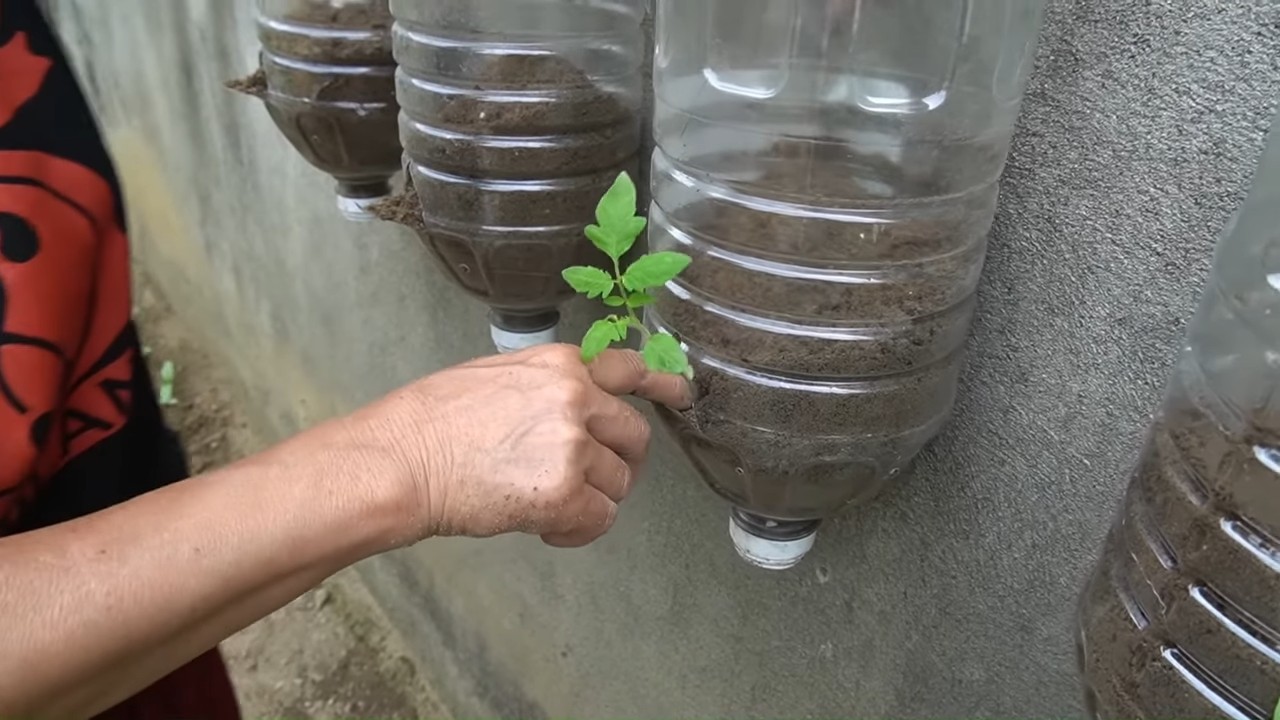
This is the fun part! We’re going to carefully plant our tomato seedling upside down.
1. Line the Hole with Landscape Fabric: Cut a piece of landscape fabric slightly larger than the hole you created. Gently push it into the hole, creating a sort of “cup” to hold the soil around the roots of the tomato plant. This will prevent soil from falling out when you first hang the bucket.
2. Carefully Insert the Tomato Seedling: Gently remove the tomato seedling from its container. Loosen the roots slightly. Carefully feed the root ball through the hole in the bottom of the bucket. The leaves and stem should be hanging down. This might feel a little awkward, but be gentle and patient.
3. Add Potting Soil: While holding the tomato plant in place, carefully add potting soil to the bucket. Gently pack the soil around the root ball, ensuring it’s snug and secure. Fill the bucket almost to the top, leaving a few inches of space.
4. Water Thoroughly: Once the bucket is filled with soil, water the tomato plant thoroughly. This will help settle the soil and ensure the roots are well-hydrated.
Hanging Your Upside-Down Tomato Planter
Almost there! Now we need to securely hang our tomato planter.
1. Attach the Chain/Rope: Attach the chain or rope to the hanging holes you drilled in the bucket. Use S-hooks or carabiners to make the connection secure. Make sure the chain/rope is long enough to hang the planter at a comfortable height.
2. Install Wall Anchors: Choose a location on your wall that receives at least 6-8 hours of sunlight per day. Install wall anchors appropriate for your wall type. Follow the manufacturer’s instructions carefully.
3. Hang the Planter: Carefully lift the bucket and attach the chain/rope to the wall anchors using S-hooks or carabiners. Make sure the planter is hanging securely and level.
Caring for Your Upside-Down Tomato Plant
Now that your tomato plant is hanging, it’s time to provide it with the care it needs to thrive.
1. Watering: Water your tomato plant regularly, especially during hot weather. Check the soil moisture by sticking your finger into the soil. If the top inch feels dry, it’s time to water. Water deeply, until water drains out of the drainage holes.
2. Fertilizing: Feed your tomato plant with a balanced liquid fertilizer every 2-3 weeks. Follow the instructions on the fertilizer label.
3. Sunlight: Ensure your tomato plant receives at least 6-8 hours of sunlight per day. If it’s not getting enough sunlight, the tomatoes may not ripen properly.
4. Pruning: Prune any suckers (small shoots that grow between the main stem and branches) to encourage fruit production.
5. Pest Control: Keep an eye out for pests like aphids, whiteflies, and tomato hornworms. Treat any infestations promptly with insecticidal soap or other appropriate methods.
6. Support (Optional): As the tomato plant grows and the tomatoes get heavier, you may need to provide additional support to the branches. You can use twine or plant clips to tie the branches to the chain or rope.
Troubleshooting
Sometimes, things don’t go exactly as planned. Here are a few common issues you might encounter and how to address them:
* Soil Falling Out: If soil is falling out of the hole, add more landscape fabric or use a thicker piece. You can also try using a soil mix that’s more cohesive.
* Plant Drying Out: If the plant is drying out quickly, water more frequently or add some water-retaining crystals to the soil.
* Yellowing Leaves: Yellowing leaves can be a sign of overwatering, underwatering, or nutrient deficiency. Adjust your watering schedule and fertilize as needed.
* Lack of Fruit: If your tomato plant isn’t producing fruit, it may not be getting enough sunlight or it may need to be pollinated. You can hand-pollinate the flowers by gently shaking the plant or using a small brush to transfer pollen from one flower to another.
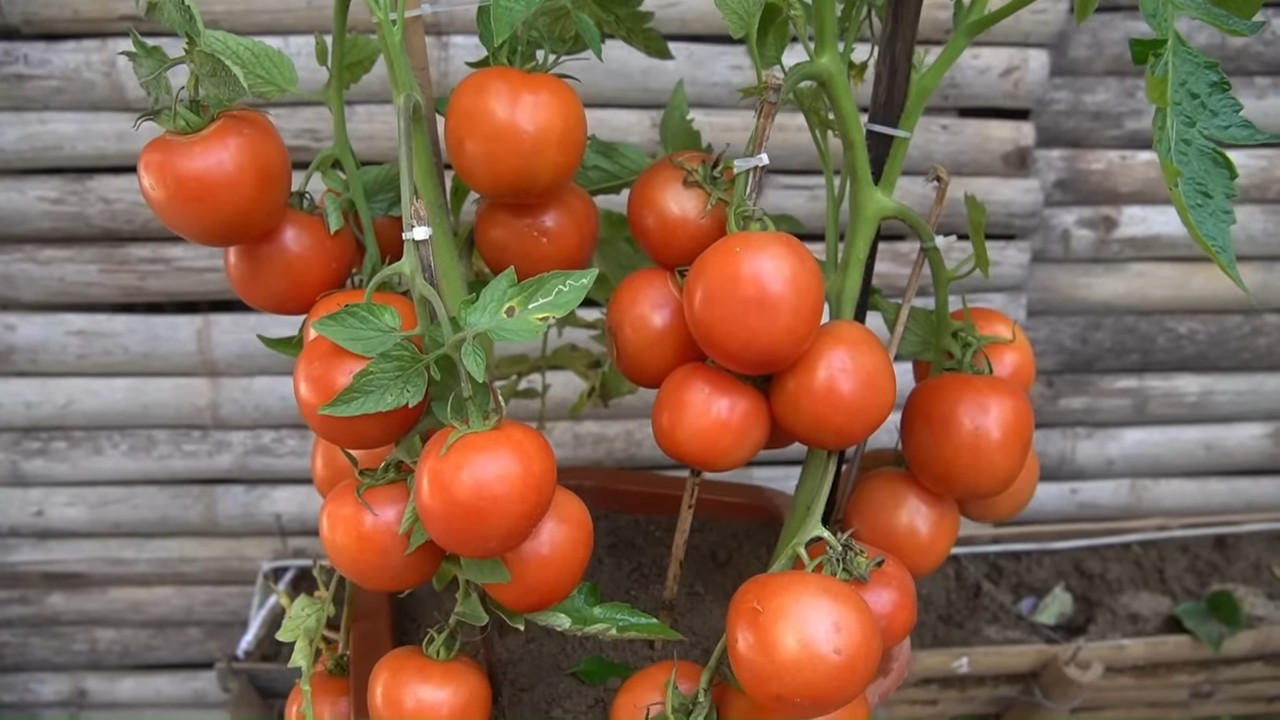
Enjoy Your Harvest!
With a little care and attention, your upside-down tomato plant will reward you with a bountiful harvest of delicious tomatoes. Enjoy them fresh off the vine, in salads, sauces, or however you like! This project is a great way to add some fresh produce to your life, even if you don’t have a traditional garden. Happy gardening!
Conclusion
So, there you have it! Growing your own tomatoes, even without a traditional garden, is not only possible but surprisingly rewarding. This DIY wall-grown tomato trick transforms even the smallest of spaces into a thriving edible landscape. We’ve walked you through the simple steps, highlighted the benefits, and hopefully, inspired you to embrace a more sustainable and delicious lifestyle.
But why is this method a must-try? Beyond the sheer satisfaction of harvesting your own sun-ripened tomatoes, this technique offers several compelling advantages. Firstly, it’s incredibly space-efficient. Perfect for apartment dwellers, balcony gardeners, or anyone with limited yard space, wall-grown tomatoes maximize vertical space, allowing you to cultivate a surprising amount of produce in a compact area. Secondly, it can be more manageable than traditional gardening. The elevated position reduces bending and stooping, making it easier on your back and knees. Plus, it can offer better protection from ground-dwelling pests and diseases.
Think of the possibilities! Imagine fresh, juicy tomatoes gracing your salads, sandwiches, and sauces, all grown just steps from your kitchen. The flavor of homegrown tomatoes is simply unmatched, bursting with sweetness and tang that you won’t find in store-bought varieties.
Now, let’s talk about variations. While we’ve focused on a simple container-based system, you can adapt this technique to suit your specific needs and preferences. Consider using different types of containers, such as hanging baskets or repurposed materials like old buckets or even fabric grow bags. Experiment with different tomato varieties, choosing determinate (bush) varieties for smaller spaces or indeterminate (vining) varieties for larger walls, providing adequate support as they grow. You can also incorporate companion plants like basil, marigolds, or nasturtiums to deter pests and attract beneficial insects.
Don’t be afraid to get creative with your wall design. Use trellises, netting, or even repurposed pallets to create a visually appealing and functional support system for your tomato plants. You can even paint your containers to match your outdoor décor or add decorative elements to personalize your wall garden.
This DIY wall-grown tomato trick is more than just a gardening technique; it’s an invitation to connect with nature, cultivate your own food, and transform your living space into a vibrant and productive oasis. It’s about embracing sustainability, reducing your carbon footprint, and enjoying the simple pleasures of homegrown goodness.
We wholeheartedly encourage you to give this DIY project a try. It’s easier than you might think, and the rewards are well worth the effort. Once you’ve harvested your first batch of delicious, wall-grown tomatoes, we’d love to hear about your experience! Share your photos, tips, and stories with us in the comments below. Let’s create a community of wall-grown tomato enthusiasts and inspire others to embrace this innovative and rewarding gardening technique. Happy growing!
Frequently Asked Questions (FAQ)
What type of tomatoes are best for wall growing?
The best type of tomatoes for wall growing depends on the size of your space and the type of support system you’re using. Determinate (bush) varieties are generally more compact and well-suited for smaller containers and limited spaces. They tend to produce a single, concentrated harvest. Indeterminate (vining) varieties, on the other hand, require more space and a sturdy support system like a trellis or netting. They produce tomatoes throughout the growing season. Cherry tomatoes, grape tomatoes, and Roma tomatoes are popular choices for wall growing due to their manageable size and prolific yields. However, don’t be afraid to experiment with other varieties to find your favorites!
How much sunlight do wall-grown tomatoes need?
Tomatoes thrive in full sun, meaning they need at least 6-8 hours of direct sunlight per day. Choose a location for your wall garden that receives ample sunlight throughout the day. If you’re growing tomatoes indoors or in a shaded area, you may need to supplement with grow lights to ensure they get enough light. Insufficient sunlight can lead to leggy growth, poor fruit production, and bland-tasting tomatoes.
What kind of soil should I use for wall-grown tomatoes?
Use a high-quality potting mix specifically formulated for vegetables. Avoid using garden soil, as it can be too heavy and compacted for container gardening. A good potting mix will provide adequate drainage, aeration, and nutrients for your tomato plants. You can also amend your potting mix with compost or other organic matter to improve its fertility and water-holding capacity.
How often should I water my wall-grown tomatoes?
Water your tomatoes regularly, especially during hot and dry weather. The frequency of watering will depend on the size of your containers, the type of soil you’re using, and the weather conditions. Check the soil moisture regularly by sticking your finger into the soil. If the top inch or two feels dry, it’s time to water. Water deeply, until water drains out of the bottom of the container. Avoid overwatering, as this can lead to root rot.
Do I need to fertilize my wall-grown tomatoes?
Yes, tomatoes are heavy feeders and require regular fertilization to produce abundant fruit. Use a balanced fertilizer specifically formulated for tomatoes, following the instructions on the package. You can also use organic fertilizers like compost tea or fish emulsion. Fertilize your tomatoes every 2-3 weeks throughout the growing season.
How do I prevent pests and diseases in my wall-grown tomatoes?
Prevention is key when it comes to pests and diseases. Choose disease-resistant tomato varieties, provide adequate spacing between plants to improve air circulation, and water at the base of the plants to avoid wetting the foliage. Regularly inspect your plants for signs of pests or diseases. If you spot any problems, take action immediately. You can use organic pest control methods like insecticidal soap or neem oil to control pests. For diseases, remove infected leaves and stems and apply a fungicide if necessary.
How do I support my wall-grown tomato plants?
Support is essential for indeterminate tomato varieties, as they can grow quite tall and heavy. Use trellises, netting, or stakes to provide support for your plants. Tie the stems of the tomato plants to the support structure as they grow. This will prevent the plants from falling over and breaking.
Can I grow tomatoes on a north-facing wall?
While tomatoes prefer full sun, you may be able to grow them on a north-facing wall if it receives at least some direct sunlight during the day. Choose tomato varieties that are more tolerant of shade, such as cherry tomatoes or early-maturing varieties. You may also need to supplement with grow lights to ensure they get enough light.
How do I know when my tomatoes are ripe?
Tomatoes are ripe when they are fully colored and slightly soft to the touch. The color will vary depending on the variety. Gently twist the tomato from the vine. If it comes off easily, it’s ripe.
What if I don’t have a sunny wall?
If you lack a sunny wall, consider using grow lights. Full-spectrum LED grow lights can provide the necessary light for tomato growth, even indoors. Position the lights close to the plants and adjust the height as they grow. You can also rotate your plants regularly to ensure they receive even light exposure.

Leave a Comment