

Upside Down Eggplant Growing: Imagine plucking plump, juicy eggplants from hanging baskets right outside your door! Sounds like something out of a futuristic garden, doesn’t it? Well, it’s not science fiction; it’s the surprisingly simple and incredibly rewarding technique of upside down eggplant growing, and I’m here to show you how to do it yourself!
While the exact origins of upside down gardening are a bit hazy, the concept of hanging plants dates back centuries, with evidence found in ancient civilizations using hanging gardens for both aesthetic and practical purposes. Today, we’re taking that age-old idea and applying it to our favorite purple vegetable.
Why should you consider upside down eggplant growing? Well, for starters, it’s a fantastic space-saver, perfect for balconies, patios, or small gardens. Plus, it helps to keep pests and diseases at bay by elevating your precious plants off the ground. But the real magic lies in the increased airflow and sunlight exposure, which can lead to bigger, healthier, and more abundant harvests. Let’s be honest, who doesn’t want more eggplants? This DIY project is not only fun and engaging, but it also provides a unique and efficient way to cultivate your own delicious eggplants. So, grab your tools, and let’s get started on this exciting gardening adventure! I promise, you’ll be amazed at the results.

Grow Eggplants Upside Down: A Fun and Productive DIY Project!
Hey there, fellow gardening enthusiasts! I’m so excited to share one of my favorite gardening hacks with you: growing eggplants upside down! It’s a fantastic way to save space, deter pests, and even get a bigger yield. Plus, it’s just plain cool to see those beautiful eggplants dangling down. Trust me, your neighbors will be impressed!
This guide will walk you through everything you need to know to successfully grow eggplants upside down. Let’s get started!
What You’ll Need:
Before we dive into the nitty-gritty, let’s gather our supplies. Here’s a list of everything you’ll need for this project:
* A sturdy 5-gallon bucket (or similar container): Make sure it’s clean and has drainage holes. You can even recycle an old bucket!
* Eggplant seedlings: Choose a variety that you love! Smaller varieties tend to do better in containers, but you can experiment.
* Potting mix: Use a high-quality potting mix that drains well. Avoid using garden soil, as it can compact and suffocate the roots.
* Landscape fabric or burlap: This will help prevent the soil from falling out of the hole we’ll be making.
* A sharp knife or scissors: For cutting the landscape fabric and making a hole in the bucket.
* Water-soluble fertilizer: Eggplants are heavy feeders, so regular fertilization is key.
* A strong hook or chain: To hang the bucket securely.
* Gloves: To protect your hands.
* Watering can or hose: For watering your eggplant.
* Optional: Mulch (like straw or wood chips) to help retain moisture.
Preparing the Bucket:
Okay, let’s get our hands dirty! The first step is preparing the bucket to house our eggplant.
1. Drill Drainage Holes: If your bucket doesn’t already have them, drill several drainage holes in the bottom. This is crucial to prevent waterlogging, which can lead to root rot. I usually aim for about 4-5 holes, each about 1/2 inch in diameter.
2. Cut the Hole: Now, we need to create a hole in the bottom of the bucket for the eggplant seedling to grow through. The size of the hole is important. Too small, and the plant will be constricted. Too large, and the soil will fall out. I recommend a hole that’s about 2-3 inches in diameter. Use your knife or scissors to carefully cut a circular hole in the center of the bucket’s bottom.
3. Line the Hole: This is where the landscape fabric or burlap comes in. Cut a piece of fabric that’s slightly larger than the hole. Then, carefully insert it into the hole, creating a sort of “collar” around the edges. This will help prevent the potting mix from falling out when we turn the bucket upside down. Secure the fabric with a bit of tape or glue if needed, but make sure it’s plant-safe.
Planting the Eggplant Seedling:
Now for the fun part – planting our eggplant!
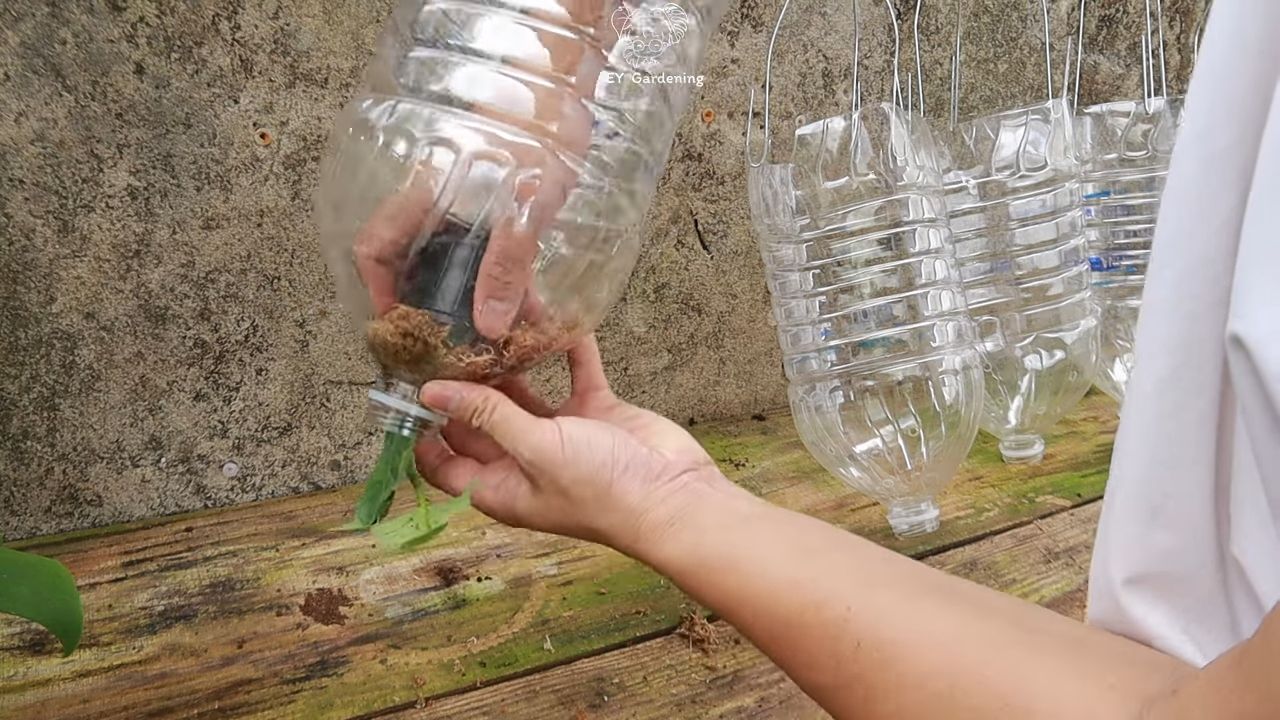
1. Gently Remove the Seedling: Carefully remove the eggplant seedling from its container. Be gentle to avoid damaging the roots. If the roots are tightly bound, gently loosen them with your fingers.
2. Insert the Seedling: This is where things get a little tricky. Carefully thread the eggplant seedling through the hole in the bottom of the bucket. The leaves should be facing downwards, and the roots should be inside the bucket. Be extra careful not to break the stem.
3. Add Potting Mix: While holding the seedling in place, start adding potting mix to the bucket. Gently pack the soil around the roots, making sure to fill all the gaps. Leave about an inch or two of space at the top of the bucket.
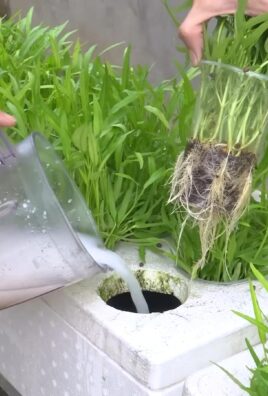
4. Water Thoroughly: Once the bucket is filled with potting mix, water the eggplant thoroughly. This will help settle the soil and ensure that the roots are well-hydrated.
Hanging the Bucket:
Time to get this baby hanging!
1. Attach the Hook or Chain: Attach your strong hook or chain to the handle of the bucket. Make sure it’s securely fastened and can support the weight of the bucket, soil, and mature eggplant.
2. Choose a Location: Select a location that receives at least 6-8 hours of sunlight per day. Eggplants need plenty of sun to thrive. Also, make sure the location is sheltered from strong winds, which can damage the plant.
3. Hang the Bucket: Carefully hang the bucket in your chosen location. Double-check that the hook or chain is secure and that the bucket is hanging level.
Caring for Your Upside-Down Eggplant:
Congratulations! You’ve successfully planted your eggplant upside down. Now, let’s talk about how to keep it happy and healthy.
1. Watering: Water your eggplant regularly, especially during hot, dry weather. Check the soil moisture by sticking your finger into the soil. If the top inch feels dry, it’s time to water. Water deeply, until water drains out of the drainage holes.
2. Fertilizing: Eggplants are heavy feeders, so regular fertilization is essential. Use a water-soluble fertilizer specifically formulated for vegetables. Follow the instructions on the fertilizer package. I usually fertilize my eggplants every 2-3 weeks.
3. Pest Control: Keep an eye out for pests like aphids, flea beetles, and spider mites. If you spot any pests, treat them with an appropriate insecticide or insecticidal soap. You can also try organic pest control methods, such as introducing beneficial insects like ladybugs. The upside-down method helps a lot with pest control, but you still need to be vigilant.
4. Pruning: Pruning can help improve air circulation and encourage fruit production. Remove any yellowing or dead leaves. You can also pinch off suckers (small shoots that grow from the base of the plant) to encourage the plant to focus its energy on producing fruit.
5. Support: As the eggplants grow larger, they may need some support. You can use twine or netting to support the branches and prevent them from breaking.
6. Mulching: Adding a layer of mulch to the top of the soil can help retain moisture and suppress weeds. Use organic mulch like straw or wood chips.
Harvesting Your Eggplants:
The moment you’ve been waiting for!
1. Check for Ripeness: Eggplants are typically ready to harvest when they are firm, glossy, and have a deep, rich color. The skin should be smooth and unblemished.
2. Harvest Carefully: Use a sharp knife or pruning shears to cut the eggplant from the plant. Leave about an inch of stem attached to the fruit.
3. Enjoy Your Harvest: Now, it’s time to enjoy the fruits (or rather, vegetables) of your labor! Eggplants can be used in a variety of dishes, from eggplant parmesan to baba ghanoush.
Troubleshooting:
Even with the best care, you might encounter some problems along the way. Here are a few common issues and how to address them:
* Yellowing Leaves: This could be a sign of overwatering, underwatering, nutrient deficiency, or pest infestation. Check the soil moisture, fertilize regularly, and inspect the plant for pests.
* Blossom End Rot: This is a common problem in eggplants, caused by a calcium deficiency. Make sure your soil is rich in calcium and water regularly. You can also add calcium supplements to the soil.
* Lack of Fruit: This could be due to insufficient sunlight, poor pollination, or nutrient deficiency. Make sure your eggplant is getting enough sun, hand-pollinate the flowers if necessary, and fertilize regularly.
Tips for Success:
Here are a few extra tips to help you succeed with your upside-down eggplant garden:
* Start with Healthy Seedlings: Choose healthy, vigorous seedlings from a reputable nursery.
* Use High-Quality Potting Mix: Don’t skimp on the potting mix. Use a high-quality mix that drains well and provides essential nutrients.
* Water Consistently: Consistent watering is key to success. Don’t let the soil dry out completely.
* Fertilize Regularly: Eggplants are heavy feeders, so regular fertilization is essential.
* Monitor for Pests: Keep an eye out for pests and treat them promptly.
* Be Patient: Growing eggplants takes time and patience. Don’t get discouraged if you don’t see results immediately.
Growing eggplants upside down is a rewarding and fun gardening project. With a little bit of care and attention, you can enjoy a bountiful harvest of delicious eggplants. So, what are you waiting for? Get started today! I hope you found this guide helpful, and happy
Conclusion
So, there you have it! Growing eggplant upside down isn’t just a quirky gardening trend; it’s a genuinely effective method for producing healthier, more abundant harvests, especially when space is at a premium. We’ve explored the numerous benefits, from improved air circulation and reduced pest infestations to the sheer novelty and aesthetic appeal of hanging, fruit-laden plants. This method truly unlocks the potential of your eggplant plants.
Think about it: no more battling ground-dwelling pests, no more painstakingly staking sprawling plants, and no more wasted space in your garden. The upside-down approach simplifies the entire process, making it accessible even to novice gardeners. Plus, the visual impact of cascading eggplant is undeniably stunning, transforming your patio, balcony, or garden into a conversation starter.
But the advantages don’t stop there. By suspending the eggplant, you’re promoting better air circulation around the plant, which helps to prevent fungal diseases that can often plague traditional ground-grown eggplant. The improved airflow also allows for more efficient pollination, leading to larger and more numerous fruits. And because the eggplant is hanging, it’s less likely to come into contact with soil-borne pathogens, further reducing the risk of disease.
Ready to take your eggplant game to the next level? Don’t be afraid to experiment! Try different varieties of eggplant to see which ones thrive best in an upside-down container. Consider adding companion plants like marigolds or basil to your container to further deter pests and attract beneficial insects. You can even customize your containers with decorative paint or embellishments to add a personal touch to your hanging garden.
For those looking to maximize their yield, consider using a larger container to accommodate a more robust root system. You can also supplement your regular watering with a liquid fertilizer specifically formulated for fruiting vegetables. And don’t forget to monitor your plants regularly for any signs of pests or diseases, addressing any issues promptly to prevent them from spreading.
We encourage you to embrace this innovative technique and experience the joy of harvesting your own homegrown eggplant. Whether you’re a seasoned gardener or just starting out, growing eggplant upside down is a rewarding and surprisingly easy way to enjoy fresh, delicious produce.
So, grab your containers, your potting mix, and your eggplant seedlings, and get ready to turn your gardening world upside down! We’re confident that you’ll be amazed by the results. And most importantly, don’t forget to share your experiences with us! We’d love to see your photos, hear your tips, and learn from your successes. Let’s create a community of upside-down eggplant enthusiasts and inspire others to embrace this unique and rewarding gardening method. Share your photos and stories on social media using #UpsideDownEggplant and let’s grow together!
Frequently Asked Questions (FAQ)
What type of eggplant is best for upside-down growing?
While most eggplant varieties can be grown upside down, smaller, more compact varieties tend to perform best. Look for cultivars like ‘Patio Baby’, ‘Fairy Tale’, or ‘Hansel’. These varieties are less likely to become top-heavy and are better suited to container growing. However, don’t let that limit you! Experiment with other varieties and see what works best in your climate and growing conditions. Just be sure to provide adequate support if you’re growing a larger variety.
What size container should I use for upside-down eggplant growing?
A container that holds at least 5 gallons of potting mix is recommended. This will provide enough space for the eggplant’s roots to grow and develop. Larger containers (7-10 gallons) are even better, especially if you’re growing a larger variety or plan to add companion plants. Make sure the container has drainage holes to prevent waterlogging.
How often should I water my upside-down eggplant?
Watering frequency will depend on the weather, the size of your container, and the type of potting mix you’re using. Generally, you’ll need to water your upside-down eggplant more frequently than you would a ground-grown plant, as the container will dry out more quickly. Check the soil moisture regularly by sticking your finger into the soil. If the top inch or two feels dry, it’s time to water. Water deeply until water drains out of the drainage holes. Avoid overwatering, as this can lead to root rot.
What kind of potting mix should I use?
Use a high-quality potting mix that is well-draining and rich in organic matter. Avoid using garden soil, as it can become compacted in containers and doesn’t provide adequate drainage. A mix of peat moss, perlite, and vermiculite is a good option. You can also add compost or other organic amendments to improve the soil’s fertility.
How much sunlight does upside-down eggplant need?
Eggplant needs at least 6-8 hours of direct sunlight per day to thrive. Choose a location for your upside-down eggplant that receives plenty of sunlight. If you live in a hot climate, you may need to provide some afternoon shade to prevent the plant from overheating.
How do I fertilize my upside-down eggplant?
Eggplant is a heavy feeder, so it’s important to fertilize regularly. Start fertilizing a few weeks after transplanting, using a balanced fertilizer or one specifically formulated for fruiting vegetables. Follow the instructions on the fertilizer package. You can also supplement with liquid fertilizer every few weeks.
How do I prevent pests and diseases?
Growing eggplant upside down can help to reduce pest and disease problems, but it’s still important to be vigilant. Inspect your plants regularly for signs of pests or diseases. If you find any problems, address them promptly. You can use organic pest control methods, such as insecticidal soap or neem oil. To prevent fungal diseases, ensure good air circulation around the plant and avoid overwatering.
How do I harvest my eggplant?
Harvest eggplant when the fruits are glossy and firm. Use a sharp knife or pruners to cut the fruit from the plant, leaving a short stem attached. Don’t wait too long to harvest, as the fruits can become bitter and seedy if they are allowed to overripen.
Can I grow other vegetables upside down?
Yes! Tomatoes, peppers, cucumbers, and herbs are all good candidates for upside-down growing. The same principles apply: choose a suitable container, use a well-draining potting mix, provide plenty of sunlight, and water and fertilize regularly.
What if my upside-down eggplant plant falls out of the container?
This is a common concern, especially as the plant grows larger and heavier. To prevent this, make sure the opening in the bottom of the container is large enough to accommodate the plant’s stem and root ball, but not so large that the plant can easily slip through. You can also use a piece of burlap or landscape fabric to help secure the plant in place. If the plant does start to fall out, gently push it back into the container and add more potting mix to fill any gaps. You may also need to provide additional support, such as tying the plant to a stake or trellis.


Leave a Comment