

Tomato garden for family: Imagine biting into a sun-warmed, juicy tomato, bursting with flavor, knowing you grew it yourself, right in your backyard! There’s nothing quite like the taste of homegrown tomatoes, and creating a thriving tomato garden for your family is easier than you might think. For centuries, cultivating tomatoes has been a cherished tradition, dating back to the Aztecs and Incas who first domesticated this vibrant fruit. Today, growing your own tomatoes is not just about fresh produce; it’s about connecting with nature, teaching your children valuable skills, and enjoying the satisfaction of nurturing life from seed to table.
But let’s be honest, sometimes gardening can feel overwhelming. That’s where these DIY tricks and hacks come in! I’m here to share some simple, effective strategies to help you cultivate a bountiful tomato garden for family, even if you’re a complete beginner. From clever container gardening ideas to natural pest control solutions, these tips will save you time, money, and frustration. So, ditch the store-bought tomatoes and get ready to experience the joy of harvesting your own delicious, homegrown goodness. Let’s get started!
Your Own Family Tomato Garden: Here’s How!
I love harvesting fresh tomatoes straight from the garden! Nothing tastes better than a sun-ripened tomato that you’ve grown yourself. And the best part: it’s not that hard to start your own tomato garden. In this article, I’ll show you step-by-step how you can easily do it yourself – even if you have no experience. Let’s get started!
What you need for your tomato garden:
Before we begin, here is a list of everything you’ll need for your tomato garden:
- Tomato seeds or young plants: Choose varieties that you like the taste of and that are suited to your climate. I recommend experimenting with a few different varieties.
- Seed starting mix: Special soil for starting plants, which is low in nutrients and loose.
- Pots or seed trays: For starting the tomatoes indoors.
- Potting soil: Nutrient-rich soil for planting the tomatoes out.
- Fertilizer: Tomato fertilizer or organic fertilizer to provide the plants with enough nutrients.
- Stakes or tomato cages: To support the plants so they don’t break.
- Watering can or garden hose: For regularly watering the tomatoes.
- Garden tools: Spade, shovel, hoe, etc.
- Mulch material: Straw, wood chips, or grass clippings to keep the soil moist and suppress weeds.
- A sunny location: Tomatoes need at least 6-8 hours of sun per day.
Preparation: Starting the Tomatoes
If you want to grow your tomatoes from seed, you should start about 6-8 weeks before the last frost. This gives the plants enough time to grow strong before they go outdoors.
- Sowing: Fill your seed trays or pots with seed starting mix. Lightly press the soil and sow the tomato seeds about 0.5-1 cm (0.2-0.4 inches) deep. Cover the seeds with soil and water them gently.
- Location: Place the seed trays in a warm and bright spot. A windowsill or a greenhouse is ideal. The ideal germination temperature is 20-25°C (68-77°F).
- Moisture: Keep the soil moist, but not wet. It’s best to spray the soil regularly with a spray bottle.
- Pricking Out: Once the tomato plants have developed their first true leaves (besides the seed leaves), it’s time to prick them out. This means you transplant each plant individually into a larger pot.
- Fill the larger pots with potting soil.
- Carefully lift the small tomato plants out of the seed trays. Be careful not to damage the roots.
- Place each plant in its own pot and fill the pot with soil.
- Water the plants gently.
Planting Out: Off to the Outdoors!
Once the temperatures rise and there is no more danger of frost (usually mid-May), you can plant your tomato plants outdoors.
- Preparing the Bed: Choose a sunny location for your tomato bed. Loosen the soil thoroughly and remove weeds. Work compost or organic fertilizer into the soil to enrich it with nutrients.
- Spacing: Tomato plants need enough space to develop. Maintain a planting distance of about 50-60 cm (20-24 inches) between plants and 80-100 cm (32-40 inches) between rows.
- Planting: Dig holes that are large enough to accommodate the root balls of the tomato plants. Place the plants in the holes and fill them with soil. Gently press the soil and water the plants thoroughly.
- Supporting: Place stakes or tomato cages next to the plants to support them. Gently tie the plants to the stakes as they grow taller.
- Mulching: Cover the soil around the tomato plants with mulch material. This helps to keep the soil moist, suppress weeds, and protect the soil from erosion.
Care: Watering, Fertilizing, Pruning
Regular care is important for your tomato plants to thrive and produce a lot of fruit.
- Watering: Tomatoes need regular water, especially during the hot summer months. It’s best to water the plants in the morning or evening so the water doesn’t evaporate as quickly. Avoid watering the leaves, as this can promote fungal diseases. Instead, water directly at the roots.
- Fertilizing: Tomatoes are heavy feeders and need a lot of nutrients. Fertilize the plants regularly with tomato fertilizer or organic fertilizer. Start about 2-3 weeks after planting and repeat the fertilization every 2-3 weeks.
- Pruning (Removing Suckers): Pruning is an important step to maximize the harvest. This involves removing the side shoots (suckers) that form in the leaf axils. This ensures that the plant puts its energy into developing fruit and not into the growth of unnecessary shoots.
- Look for the side shoots that grow between the main stem and the leaves.
- Gently break off the side shoots with your fingers. It’s best to do this when the shoots are still small (about 5-10 cm or 2-4 inches long).
- Be careful not to damage the main stem.
- Diseases and Pests: Watch for signs of diseases or pests. Common problems with tomatoes are late blight, early blight, aphids, and whiteflies. You can use organic pesticides if necessary.
The Harvest: Finally, Tomatoes!
Depending on the variety and weather, you can harvest the first tomatoes about 60-80 days after planting.
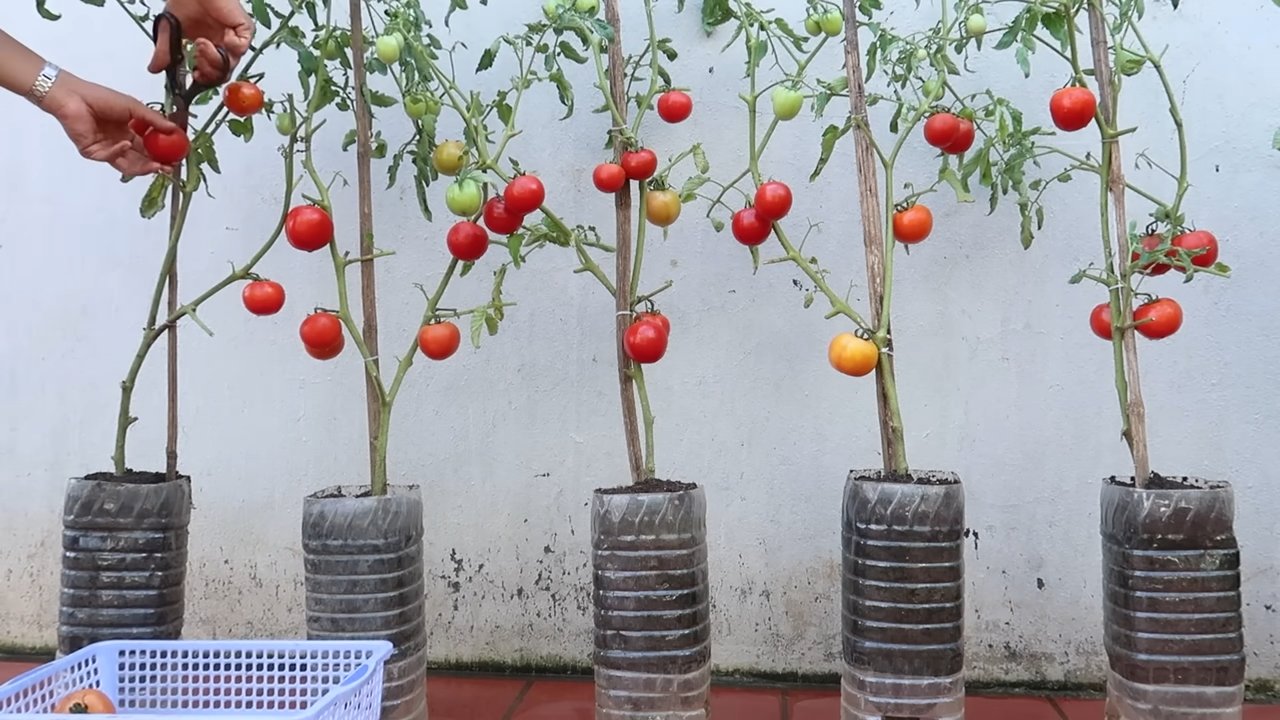
- Recognizing Ripeness: Ripe tomatoes have an intense color and give slightly when gently pressed.
- Harvesting: Carefully pick the tomatoes from the plant. It’s best to use scissors or a knife to cut the stem.
- Storage: Store the tomatoes in a cool and dry place. Avoid storing them in the refrigerator, as this can affect their taste.
Additional Tips for Your Tomato Garden:
- Variety Selection: Choose varieties that suit your climate and preferences. There is a huge selection of tomato varieties, from small cherry tomatoes to large beefsteak tomatoes.
- Crop Rotation: Don’t plant tomatoes in the same spot every year. Rotate the plants to prevent diseases and pests.
- Companion Plants: Plant companion plants like basil, marigolds, or nasturtiums next to your tomatoes. These plants can repel pests and promote the growth of the tomatoes.
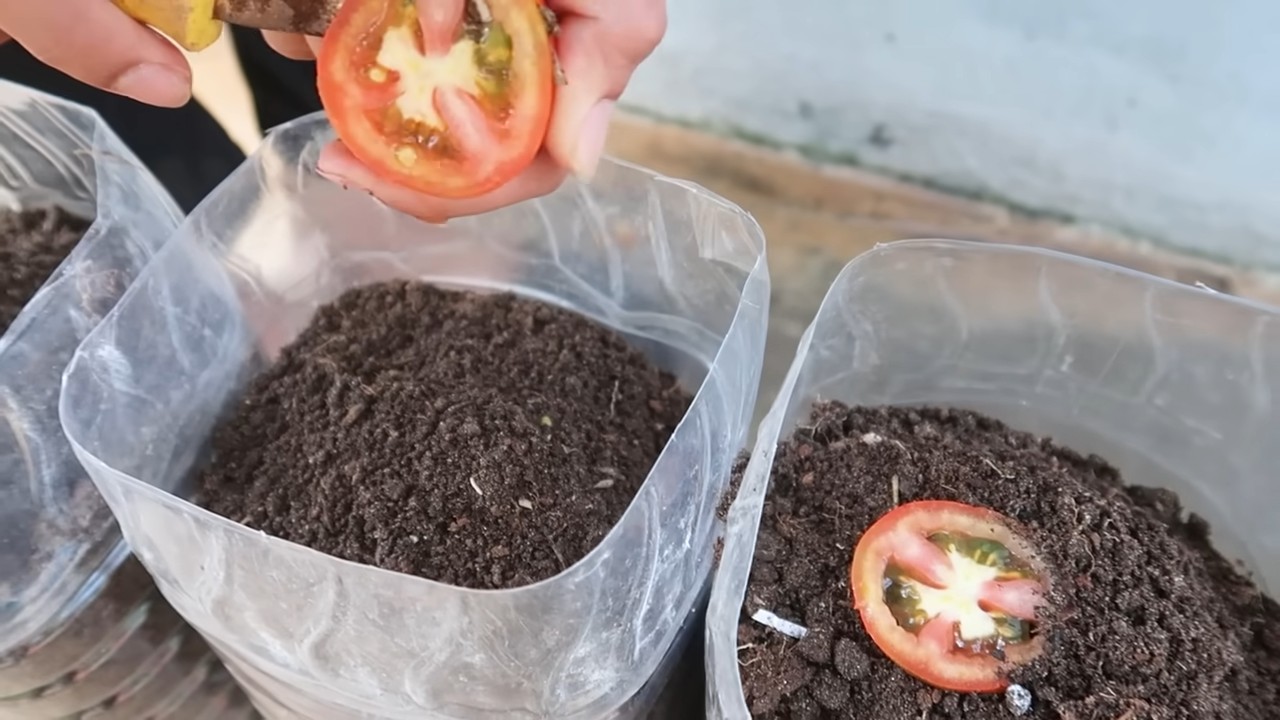
- Saving Your Own Seeds: If you’ve found a particularly tasty tomato variety, you can save the seeds for next year yourself. Let the tomato fully ripen and remove the seeds. Clean the seeds and let them dry before storing them.
I hope this guide helps you create your own tomato garden. With a little patience and care, you will soon be rewarded with a bountiful harvest.
Conclusion
So, there you have it! Transforming your outdoor space into a thriving tomato garden for your family is not only achievable but also incredibly rewarding. We’ve explored the essential steps, from selecting the perfect spot and preparing the soil to choosing the right tomato varieties and providing consistent care. But the real magic lies in the DIY trick we’ve shared: creating your own self-watering containers using readily available materials.
Why is this DIY trick a must-try? Because it simplifies the entire process, especially for beginners. It addresses two of the most common challenges faced by tomato gardeners: inconsistent watering and nutrient deficiencies. By creating a reservoir of water at the base of the plant, you ensure a steady supply of moisture, preventing the dreaded blossom end rot and promoting healthy growth. The addition of compost or slow-release fertilizer to the soil mix provides a continuous source of nutrients, eliminating the need for frequent feeding.
Beyond the practical benefits, this DIY approach fosters a deeper connection with your garden. You’re not just passively observing; you’re actively involved in creating a nurturing environment for your plants. And the satisfaction of harvesting your own homegrown tomatoes, bursting with flavor and freshness, is simply unparalleled.
Variations and Suggestions:
* Experiment with Container Sizes: While we’ve suggested a specific size, feel free to adjust it based on the variety of tomato you’re growing. Larger varieties, like beefsteaks, will benefit from larger containers.
* Explore Different Mulch Options: Straw, wood chips, or even shredded newspaper can be used as mulch to retain moisture and suppress weeds.
* Add Companion Plants: Basil, marigolds, and onions are excellent companion plants for tomatoes, helping to deter pests and improve flavor.
* Consider Vertical Gardening: If you’re short on space, try growing your tomatoes in hanging baskets or using trellises to support the vines.
* Customize Your Soil Mix: While our suggested mix is a great starting point, you can tailor it to your specific soil conditions. Adding perlite or vermiculite can improve drainage, while adding peat moss can increase water retention.
We understand that gardening can sometimes feel daunting, especially if you’re new to it. But don’t let that deter you! This DIY tomato garden project is designed to be accessible and enjoyable for everyone, regardless of their experience level. The key is to start small, be patient, and learn from your mistakes.
We wholeheartedly encourage you to give this DIY trick a try. Imagine the joy of biting into a juicy, sun-ripened tomato that you grew yourself. Picture your family gathered around the table, savoring the delicious flavors of your homegrown harvest. This is more than just a gardening project; it’s an opportunity to create lasting memories and connect with nature.
So, grab your supplies, get your hands dirty, and embark on this exciting adventure. And most importantly, don’t forget to share your experience with us! We’d love to hear about your successes, your challenges, and any variations you’ve tried. Share your photos and stories on our social media channels using #DIYTomatoGarden. Let’s build a community of passionate tomato gardeners and inspire others to grow their own food. Happy gardening!
Frequently Asked Questions (FAQ)
What type of tomatoes are best for container gardening?
Determinate tomato varieties are generally better suited for container gardening because they are bushier and more compact than indeterminate varieties. Determinate tomatoes grow to a certain size and then produce all their fruit at once, making them ideal for smaller spaces. Some popular determinate varieties for containers include Roma, Celebrity, and Patio. Indeterminate varieties, on the other hand, continue to grow and produce fruit throughout the season, requiring more space and support. However, if you have a large container and a sturdy trellis, you can successfully grow indeterminate varieties like cherry tomatoes or grape tomatoes.
How often should I water my self-watering tomato containers?
The frequency of watering depends on several factors, including the size of the container, the weather conditions, and the type of tomato you’re growing. In general, you should check the water reservoir every few days and refill it when it’s empty. During hot, dry weather, you may need to water more frequently. The beauty of the self-watering container is that it provides a consistent supply of moisture, so you don’t have to worry about overwatering or underwatering. Just make sure the reservoir is always filled, and your tomatoes will thrive.
What kind of soil should I use for my tomato garden?
A well-draining, nutrient-rich soil is essential for growing healthy tomatoes. A good starting point is a mix of equal parts potting soil, compost, and perlite or vermiculite. Potting soil provides a good base for the plants to grow in, compost adds essential nutrients, and perlite or vermiculite improves drainage and aeration. You can also add slow-release fertilizer to the soil mix to provide a continuous source of nutrients throughout the growing season. Avoid using garden soil in containers, as it can become compacted and prevent proper drainage.
How much sunlight do tomatoes need?
Tomatoes need at least 6-8 hours of direct sunlight per day to thrive. Choose a location for your tomato garden that receives plenty of sunlight throughout the day. If you don’t have a sunny spot, you can supplement with grow lights. Insufficient sunlight can lead to leggy growth, reduced fruit production, and increased susceptibility to diseases.
How do I prevent blossom end rot?
Blossom end rot is a common problem in tomatoes caused by calcium deficiency. It manifests as a dark, leathery spot on the bottom of the fruit. The most common cause of blossom end rot is inconsistent watering, which prevents the plant from absorbing calcium properly. The self-watering container helps to prevent blossom end rot by providing a consistent supply of moisture. You can also add calcium to the soil by incorporating bone meal or crushed eggshells.
How do I deal with pests and diseases in my tomato garden?
Regularly inspect your tomato plants for signs of pests or diseases. Common tomato pests include aphids, whiteflies, and tomato hornworms. You can control these pests by handpicking them off the plants, using insecticidal soap, or introducing beneficial insects like ladybugs. Common tomato diseases include early blight, late blight, and septoria leaf spot. You can prevent these diseases by providing good air circulation, avoiding overhead watering, and using disease-resistant tomato varieties. If you notice signs of disease, remove the affected leaves or plants immediately.
Can I grow tomatoes indoors using this DIY method?
Yes, you can grow tomatoes indoors using this DIY method, but you’ll need to provide adequate light. A sunny windowsill may not be enough, so consider using grow lights to supplement the natural light. Choose compact, determinate varieties that are well-suited for indoor growing. Also, be sure to pollinate the flowers manually, as there won’t be any bees or other pollinators indoors.
How long does it take to grow tomatoes from seed?
It typically takes 6-8 weeks to grow tomato seedlings from seed indoors before transplanting them outdoors. Start your seeds indoors in early spring, about 6-8 weeks before the last expected frost. Once the seedlings have developed several sets of true leaves and the weather has warmed up, you can transplant them into your DIY self-watering containers.
What are some good companion plants for tomatoes?
Companion planting can help to deter pests, attract beneficial insects, and improve the flavor of your tomatoes. Some good companion plants for tomatoes include basil, marigolds, onions, garlic, carrots, and parsley. Basil helps to repel tomato hornworms and whiteflies, while marigolds deter nematodes and other soil pests. Onions and garlic help to repel aphids and other insects. Carrots and parsley attract beneficial insects like ladybugs and lacewings, which prey on pests.
How do I know when my tomatoes are ripe?
Tomatoes are ripe when they have reached their full color and are slightly soft to the touch. The color will vary depending on the variety of tomato. Gently squeeze the tomato; if it gives slightly, it’s ripe. Avoid picking tomatoes that are still green or hard, as they won’t ripen properly off the vine.

Leave a Comment