

Sugarcane in recycled bottles? Yes, you read that right! Forget sprawling fields; we’re bringing the sweet taste of homegrown sugarcane right to your balcony or backyard with this incredibly simple and rewarding DIY project. Have you ever imagined harvesting your own sugarcane, ready to be juiced or enjoyed as a sweet treat, all from repurposed plastic bottles? It’s easier than you think!
Sugarcane has a rich history, dating back thousands of years to Southeast Asia, where it was first cultivated. It gradually spread across the globe, becoming a vital crop and a symbol of sweetness and prosperity in many cultures. Now, we’re taking this ancient plant and giving it a modern, eco-friendly twist.
Why should you try growing sugarcane in recycled bottles? Well, for starters, it’s a fantastic way to reduce plastic waste and contribute to a more sustainable lifestyle. Plus, imagine the satisfaction of harvesting your own fresh sugarcane – the taste is simply unbeatable! But beyond the environmental and gustatory benefits, this DIY project is incredibly accessible, even if you have limited space or gardening experience. I’m going to show you how to easily grow your own sugarcane, saving you money and giving you a fun, rewarding project. Let’s get started!
Growing Sugarcane in Recycled Bottles: A Sweet DIY Project
Hey there, fellow plant enthusiasts! Ever thought about growing your own sugarcane? It might sound like a tropical dream, but trust me, it’s totally doable, even if you don’t live in a tropical paradise. And the best part? We’re going to do it using recycled bottles! This project is not only fun and rewarding, but it’s also a great way to give those plastic bottles a new lease on life. So, grab your gardening gloves, and let’s get started!
What You’ll Need
Before we dive in, let’s gather our supplies. Here’s a list of everything you’ll need to successfully grow sugarcane in recycled bottles:
* Sugarcane stalks: You can usually find these at local nurseries, farmers’ markets, or even some grocery stores that carry specialty produce. Look for healthy stalks with visible nodes (the little bumps where roots will sprout).
* Recycled plastic bottles: Choose bottles that are at least 2-3 liters in size. The taller, the better, as sugarcane can grow quite tall. Make sure they’re clean and free of any residue.
* Potting mix: A well-draining potting mix is crucial. You can use a standard potting mix or create your own by mixing equal parts of garden soil, compost, and perlite or vermiculite.
* Sharp knife or scissors: For cutting the sugarcane stalks and the plastic bottles.
* Water: For watering your sugarcane.
* Optional: Rooting hormone: This can help speed up the rooting process, but it’s not essential.
* Optional: Fertilizer: A balanced liquid fertilizer can help your sugarcane thrive.
Preparing the Sugarcane Stalks
This is a crucial step, so pay close attention! We need to prepare the sugarcane stalks to encourage root growth.
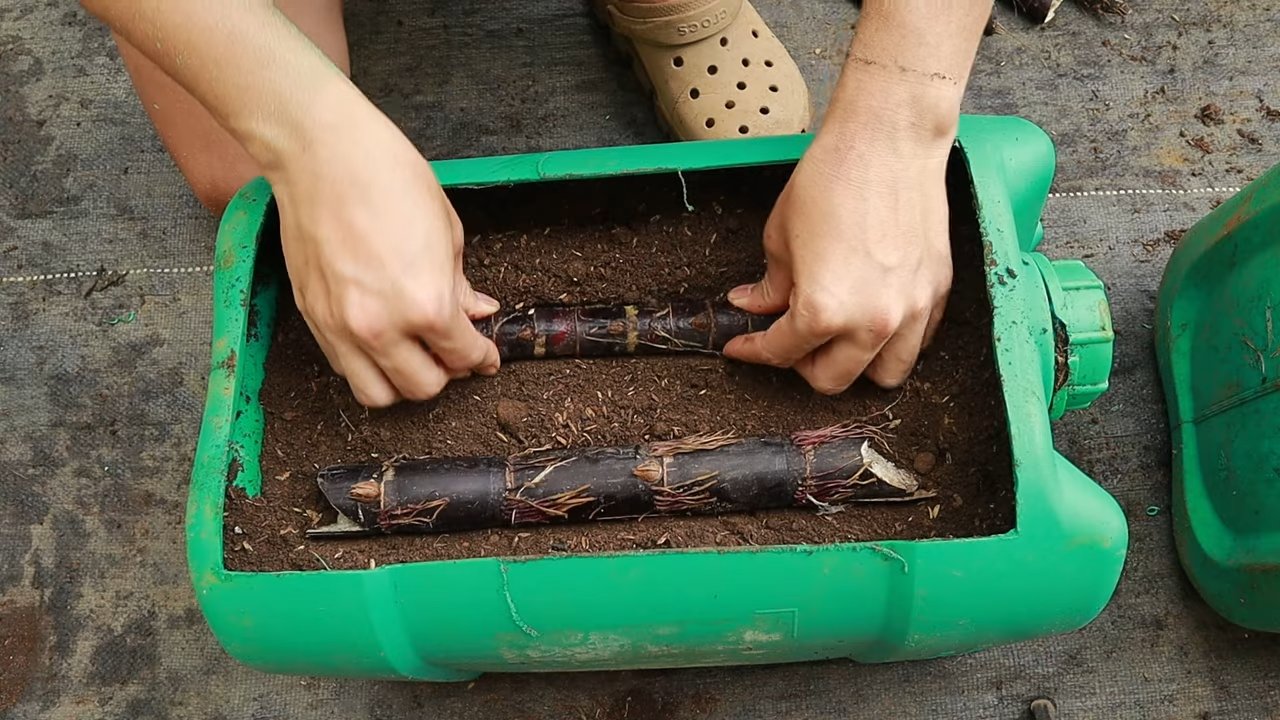
1. Cut the stalks into sections: Using your sharp knife or scissors, cut the sugarcane stalks into sections that are about 6-8 inches long. Each section should have at least two nodes. These nodes are where the roots and new shoots will emerge.
2. Inspect the nodes: Make sure the nodes are healthy and undamaged. Avoid using sections with damaged or dried-out nodes.
3. Optional: Apply rooting hormone: If you’re using rooting hormone, dip the cut ends of the sugarcane sections into the hormone powder or liquid. This will encourage faster root development.
Preparing the Recycled Bottles
Now, let’s get those recycled bottles ready to be our sugarcane planters!
1. Clean the bottles thoroughly: Wash the bottles with soap and water to remove any dirt or residue. Rinse them well and let them dry completely.
2. Cut the bottles: There are a couple of ways you can cut the bottles, depending on your preference:
* Option 1: Cut off the top: Cut off the top portion of the bottle, about 4-6 inches from the top. This will create a wide opening for planting and watering.
* Option 2: Cut in half: Cut the bottle in half horizontally. You can then use the bottom half as a planter and the top half as a makeshift greenhouse to help retain moisture and warmth, especially in cooler climates. If you choose this option, you’ll need to invert the top half and place it over the bottom half after planting.
3. Drill drainage holes: This is super important! Sugarcane needs well-draining soil, so you need to create drainage holes in the bottom of the bottles. Use a drill or a sharp object to create several holes.
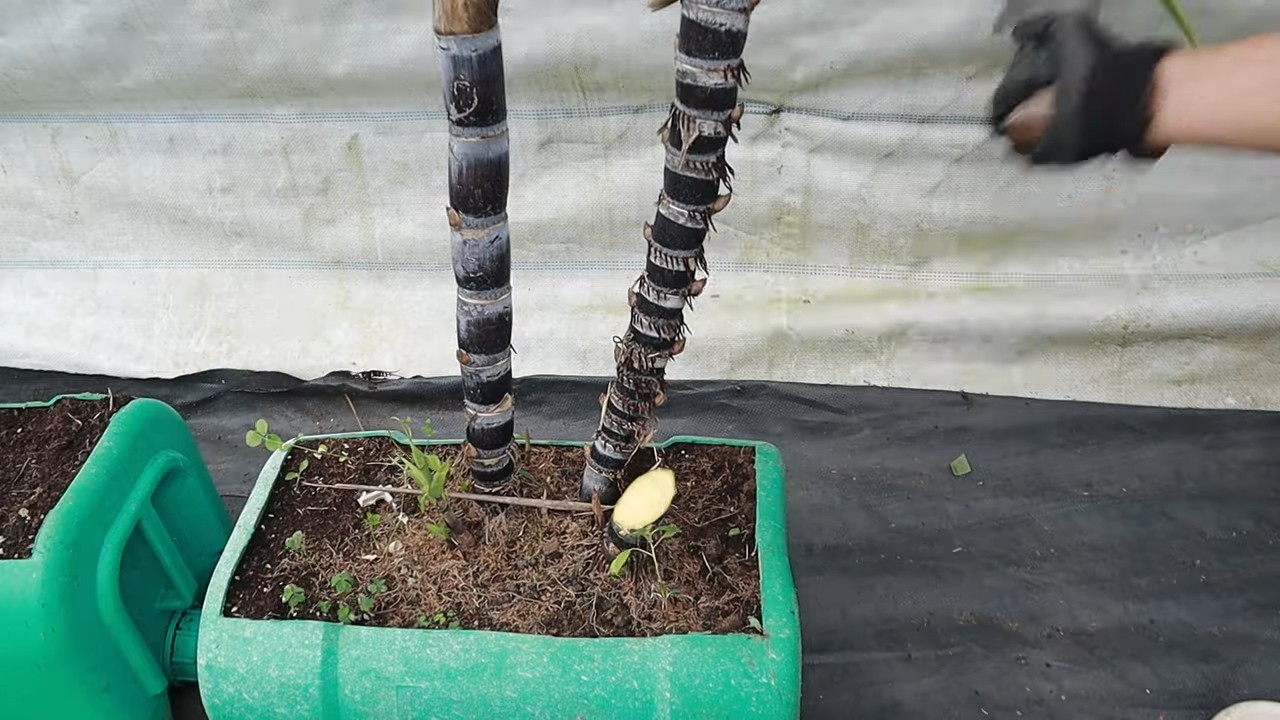
Planting the Sugarcane
Alright, the moment we’ve been waiting for! Let’s get those sugarcane sections planted.
1. Fill the bottles with potting mix: Fill the prepared bottles with potting mix, leaving about an inch of space at the top.
2. Plant the sugarcane sections: Place the sugarcane sections horizontally on top of the potting mix, with the nodes facing upwards. Gently press them into the soil, ensuring that the nodes are partially covered.
3. Cover with more potting mix: Add a thin layer of potting mix over the sugarcane sections, leaving the nodes exposed.
4. Water thoroughly: Water the soil thoroughly until water drains out of the drainage holes. This will help settle the soil and provide moisture for the sugarcane sections to start rooting.
Caring for Your Sugarcane
Now that your sugarcane is planted, it’s time to provide it with the care it needs to thrive.
1. Location: Sugarcane needs plenty of sunlight, so place your bottles in a location that receives at least 6-8 hours of direct sunlight per day. A south-facing window or a sunny balcony is ideal.
2. Watering: Keep the soil consistently moist, but not waterlogged. Water when the top inch of soil feels dry to the touch. In hot weather, you may need to water more frequently.
3. Fertilizing: Feed your sugarcane with a balanced liquid fertilizer every 2-4 weeks during the growing season (spring and summer). Follow the instructions on the fertilizer label.
4. Temperature: Sugarcane prefers warm temperatures, ideally between 70-90°F (21-32°C). Protect your plants from frost and cold temperatures. If you live in a colder climate, you may need to bring your sugarcane indoors during the winter.
5. Support: As your sugarcane grows taller, it may need some support to prevent it from falling over. You can use stakes or trellises to provide support.
6. Pest control: Keep an eye out for pests such as aphids, spider mites, and mealybugs. If you notice any pests, treat them with an appropriate insecticide or insecticidal soap.
Harvesting Your Sugarcane
After several months of care, your sugarcane should be ready for harvest!
1. Maturity: Sugarcane typically takes 9-12 months to mature. You’ll know it’s ready to harvest when the stalks are thick and juicy, and the leaves start to turn yellow or brown.
2. Harvesting: To harvest your sugarcane, use a sharp knife or saw to cut the stalks at the base.
3. Processing: You can chew on the sugarcane stalks to extract the sweet juice, or you can use a sugarcane juicer to extract the juice for making sugarcane juice or other beverages.
Troubleshooting
Even with the best care, you might encounter some challenges along the way. Here are some common problems and how to address them:
* Yellowing leaves: This could be a sign of overwatering, underwatering, or nutrient deficiency. Adjust your watering schedule and fertilize your plants as needed.
* Slow growth: This could be due to insufficient sunlight, poor soil, or cold temperatures. Make sure your plants are getting enough sunlight, use a well-draining potting mix, and protect them from cold temperatures.
* Pests: Inspect your plants regularly for pests and treat them promptly with an appropriate insecticide or insecticidal soap.
* No root growth: This could be due to using unhealthy sugarcane sections or planting them incorrectly. Make sure you’re using healthy sections with visible nodes and planting them with the nodes facing upwards.
Tips for Success
Here are a few extra tips to help you succeed with your sugarcane project:
* Choose the right variety: Some sugarcane varieties are better suited for container growing than others. Look for varieties that are known to be more compact and manageable.
* Start with healthy stalks: The healthier the sugarcane stalks you start with, the better your chances of success. Choose stalks that are thick, juicy, and free of any signs of disease or damage.
* Be patient: Sugarcane can take several months to mature, so don’t get discouraged if you don’t see results right away. Just keep providing it with the care it needs, and you’ll eventually be rewarded with a sweet harvest.
* Experiment: Don’t be afraid to experiment with different techniques and methods to see what works best for you. Gardening is all about learning and adapting.
Why Grow Sugarcane in Recycled Bottles?
Besides being a fun and rewarding project, growing sugarcane in recycled bottles offers several benefits:
* Sustainability: It’s a great way to recycle plastic bottles and reduce waste.
* Space-saving: Container gardening is ideal for small spaces, such as apartments and balconies.
* Control: You have more control over the growing environment, such as soil, water, and sunlight.
* Educational: It’s a great way to learn about plant growth and the importance of sustainable practices.
* Unique: It’s a conversation starter and a unique addition to your garden or home.
So, there you have it! Growing sugarcane in recycled bottles is a fun, sustainable, and rewarding project that anyone can do. With a little patience and care, you
Conclusion
So, there you have it! Transforming recycled bottles into miniature sugarcane farms is not just a fun project; it’s a sustainable way to enjoy fresh, homegrown sweetness. This DIY trick offers a multitude of benefits, from reducing plastic waste to providing you with a readily available source of sugarcane for juicing, snacking, or even adding a touch of natural sweetness to your favorite beverages.
Why is this a must-try? Because it’s empowering! You’re taking control of your food source, understanding the growing process, and contributing to a more eco-conscious lifestyle. Imagine the satisfaction of harvesting your own sugarcane, knowing you nurtured it from a simple cutting within a repurposed bottle. It’s a conversation starter, a learning experience, and a delicious reward all rolled into one.
But the fun doesn’t stop there. Feel free to experiment with different varieties of sugarcane. Some varieties are known for their higher sugar content, while others boast unique flavors. You can also explore different soil mixtures to find what works best in your climate. Consider adding companion plants like basil or marigolds around your sugarcane bottles to deter pests naturally.
For those with limited space, this method is a game-changer. It allows you to grow sugarcane even on a small balcony or patio. And for educators, this project is an excellent way to teach children about plant life cycles, sustainability, and the importance of recycling.
Don’t be afraid to get creative with your bottle designs! Paint them, decorate them, or even create a vertical garden using multiple bottles. The possibilities are endless.
We wholeheartedly encourage you to try this DIY sugarcane growing trick. It’s a rewarding experience that connects you with nature and promotes sustainable practices. Once you’ve given it a go, we’d love to hear about your journey! Share your photos, tips, and experiences in the comments below. Let’s build a community of bottle-grown sugarcane enthusiasts and inspire others to embrace this simple yet impactful way to grow their own food. Let us know what challenges you faced and what solutions you found. Did you find a particular type of soil worked better? Did you discover a unique way to support the growing stalks? Your insights will be invaluable to others embarking on this adventure.
Remember, every small step towards sustainability makes a difference. By repurposing plastic bottles and growing your own sugarcane, you’re contributing to a healthier planet and a more delicious future. So, grab those bottles, get your hands dirty, and experience the joy of growing your own sugarcane!
Frequently Asked Questions (FAQ)
What kind of sugarcane is best for growing in bottles?
The best type of sugarcane for growing in bottles depends on your climate and personal preference. However, generally, smaller varieties that don’t grow too tall are ideal. Consider varieties like ‘Purple Sugarcane’ or ‘Lakha’ if you can find them. These tend to be more manageable in a confined space. Local nurseries or agricultural extension offices can provide recommendations for sugarcane varieties that thrive in your specific region. Remember to research the specific needs of the variety you choose, such as sunlight requirements and disease resistance.
How often should I water my sugarcane plants in bottles?
Watering frequency depends on several factors, including the climate, the type of soil you’re using, and the size of the bottle. Generally, you should water your sugarcane plants when the top inch of soil feels dry to the touch. Avoid overwatering, as this can lead to root rot. Ensure the bottle has adequate drainage to prevent water from pooling at the bottom. During hotter months, you may need to water more frequently, perhaps even daily. In cooler months, you can reduce the watering frequency. Observe your plants closely and adjust your watering schedule accordingly. The leaves will often droop slightly when the plant needs water.
What kind of soil is best for growing sugarcane in bottles?
Sugarcane thrives in well-draining, nutrient-rich soil. A good mix would be equal parts of potting soil, compost, and perlite or vermiculite. The potting soil provides a base, the compost adds essential nutrients, and the perlite or vermiculite improves drainage and aeration. You can also add a small amount of slow-release fertilizer to the soil mix to provide a steady supply of nutrients. Avoid using heavy clay soils, as they can become waterlogged and suffocate the roots. Consider testing the pH of your soil; sugarcane prefers a slightly acidic to neutral pH (around 6.0 to 7.0).
How much sunlight does sugarcane need when grown in bottles?
Sugarcane needs plenty of sunlight to thrive. Aim for at least 6-8 hours of direct sunlight per day. If you don’t have access to that much sunlight, you can supplement with grow lights. Place your sugarcane bottles in a sunny location, such as a south-facing window or a balcony that receives ample sunlight. Rotate the bottles regularly to ensure that all sides of the plant receive equal exposure to sunlight. Insufficient sunlight can lead to stunted growth and reduced sugar content.
How do I fertilize sugarcane grown in bottles?
Sugarcane is a heavy feeder, so regular fertilization is essential. Use a balanced fertilizer (e.g., 10-10-10) diluted to half strength every 2-3 weeks during the growing season (spring and summer). You can also use organic fertilizers like compost tea or fish emulsion. Avoid over-fertilizing, as this can burn the roots. Look for signs of nutrient deficiencies, such as yellowing leaves, and adjust your fertilization schedule accordingly. Stop fertilizing in the fall and winter when the plant’s growth slows down.
How long does it take to harvest sugarcane grown in bottles?
The time it takes to harvest sugarcane grown in bottles depends on the variety, climate, and growing conditions. Generally, it takes about 9-12 months for sugarcane to mature. You’ll know it’s ready to harvest when the stalks are thick and the leaves begin to dry out. The sugar content will also be at its highest at this time. To harvest, simply cut the stalks near the base of the plant.
How do I prevent pests and diseases from affecting my sugarcane plants in bottles?
Prevention is key when it comes to pests and diseases. Start by using healthy sugarcane cuttings and well-draining soil. Regularly inspect your plants for signs of pests or diseases. Common pests that affect sugarcane include aphids, mealybugs, and spider mites. You can control these pests with insecticidal soap or neem oil. Diseases that can affect sugarcane include rust and smut. Ensure good air circulation around your plants to prevent fungal diseases. Remove any infected leaves or stalks immediately. Consider using organic pest control methods to avoid harming beneficial insects.
Can I grow sugarcane indoors year-round in bottles?
Yes, you can grow sugarcane indoors year-round in bottles, but you’ll need to provide adequate light and humidity. Use grow lights to supplement natural sunlight, especially during the winter months. Maintain a humidity level of around 50-60% by misting the plants regularly or using a humidifier. Ensure good air circulation to prevent fungal diseases. You may need to adjust your watering and fertilization schedule depending on the season.
What do I do with the sugarcane after I harvest it?
After harvesting your sugarcane, you can use it in a variety of ways. You can chew on the stalks for a sweet treat, juice them to make sugarcane juice, or use them to add flavor to beverages and desserts. Sugarcane juice is a popular drink in many parts of the world and is known for its refreshing and hydrating properties. You can also use sugarcane to make molasses or jaggery. Store harvested sugarcane in a cool, dry place to prevent it from spoiling.

Leave a Comment