

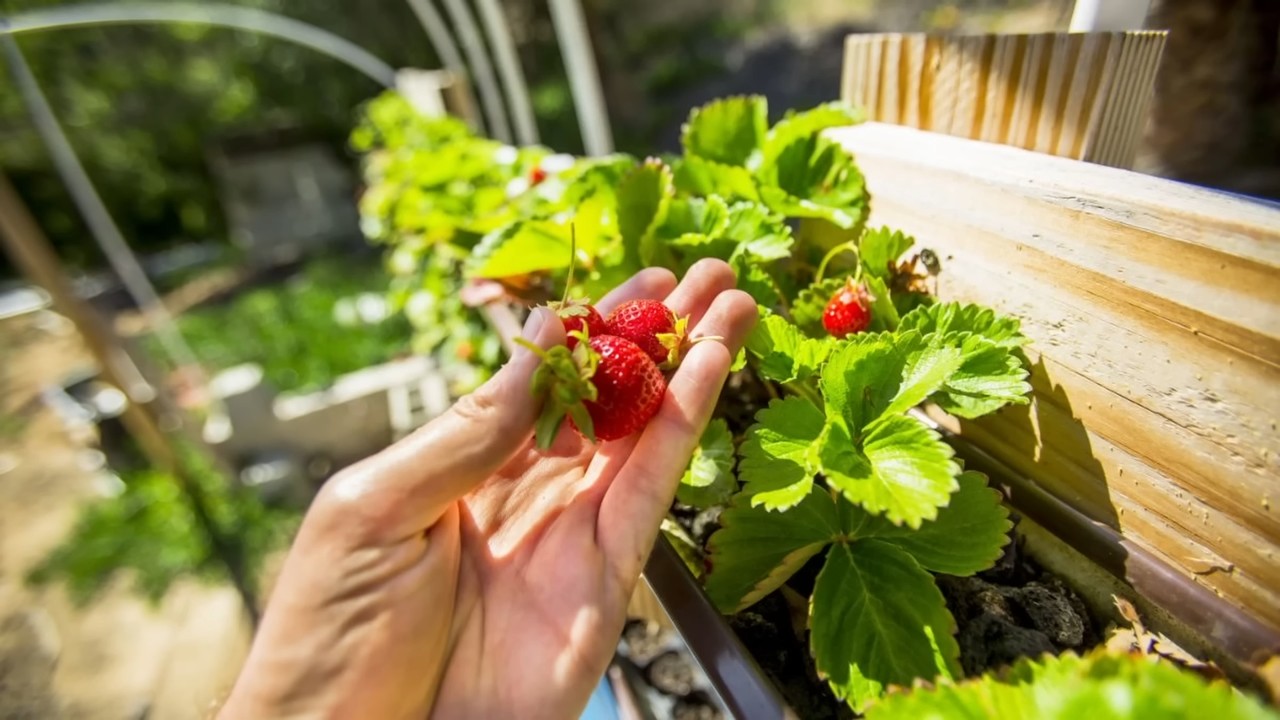
Strawberry raised bed gardening: Imagine stepping outside your door and plucking juicy, sun-ripened strawberries straight from your own garden. Sounds like a dream, right? Well, it doesn’t have to be! For centuries, humans have cultivated strawberries, from the wild varieties enjoyed by ancient Romans to the carefully bred cultivars we savor today. But let’s face it, traditional gardening can be tough on your back and your precious plants. That’s where the magic of raised beds comes in!
I’m here to show you how to create your own thriving strawberry paradise with a DIY raised bed. This isn’t just about growing delicious berries; it’s about creating a beautiful, manageable, and productive space. Raised beds offer better drainage, improved soil quality, and easier access for planting, weeding, and harvesting. Plus, they look fantastic! Whether you’re a seasoned gardener or a complete beginner, this guide will walk you through every step of building and maintaining your very own strawberry raised bed gardening haven. Get ready to enjoy a bountiful harvest of sweet, homegrown strawberries – you deserve it!
DIY Strawberry Raised Bed: A Bumper Crop Awaits!
Hey there, fellow gardening enthusiasts! I’m so excited to share my favorite way to grow juicy, delicious strawberries: a DIY raised bed! Not only does it look fantastic, but it also makes tending to your strawberry plants a breeze. Plus, you’ll get a much better yield compared to growing them directly in the ground. Trust me, once you taste homegrown strawberries, you’ll never go back!
This guide will walk you through every step of building your own strawberry paradise. Let’s get started!
Materials You’ll Need
Before we dive in, let’s gather all the necessary supplies. This will save you time and frustration later on.
* Lumber: I recommend using untreated cedar or redwood for your raised bed. These woods are naturally rot-resistant and won’t leach harmful chemicals into your soil. You’ll need enough to create the sides of your bed. The dimensions are up to you, but I find a 4ft x 8ft bed is a good size to start with. For this size, you’ll need:
* Two 8-foot long boards (for the long sides)
* Two 4-foot long boards (for the short sides)
* Four corner posts (approximately 12-18 inches long – these can be 4×4 posts or cut from the same lumber as the sides)
* Hardware:
* Deck screws (3-inch are ideal)
* Landscape fabric or weed barrier
* Staple gun and staples (for attaching the landscape fabric)
* Soil:
* A mix of topsoil, compost, and peat moss. This provides excellent drainage and nutrients for your strawberry plants.
* Tools:
* Saw (circular saw or hand saw)
* Drill with screwdriver bits
* Measuring tape
* Level
* Shovel or garden fork
* Gloves
* Safety glasses
* Staple gun
* Strawberry Plants:
* Bare-root or potted strawberry plants. Choose a variety that suits your climate and taste preferences. Everbearing varieties are great for a continuous harvest throughout the season.
Planning Your Raised Bed
Before you start building, take a moment to plan the location and size of your raised bed.
* Sunlight: Strawberries need at least 6-8 hours of direct sunlight per day. Choose a spot in your yard that gets plenty of sunshine.
* Drainage: Make sure the area you choose has good drainage. Strawberries don’t like to sit in soggy soil.
* Size: Consider the amount of space you have available and how many strawberry plants you want to grow. A 4ft x 8ft bed is a good starting point, but you can adjust the size to fit your needs.
* Accessibility: Think about how easy it will be to access your raised bed for watering, weeding, and harvesting. Leave enough space around the bed to move comfortably.
Building the Raised Bed: Step-by-Step
Okay, let’s get our hands dirty! Here’s how to build your strawberry raised bed:
1. Cut the Lumber: If you haven’t already, cut your lumber to the desired lengths. Remember, you’ll need two 8-foot boards and two 4-foot boards for a 4ft x 8ft bed. Also, cut your corner posts to the desired length (12-18 inches). I like to use a circular saw for this, but a hand saw will work just fine. Just be sure to measure twice and cut once!
2. Assemble the Frame: Now it’s time to put the frame together.
* Place one of the 8-foot boards on its edge.
* Position one of the 4-foot boards against the end of the 8-foot board, forming a corner.
* Attach the boards together using deck screws. Pre-drilling pilot holes will prevent the wood from splitting. I usually use two or three screws per corner.
* Repeat this process for the other three corners until you have a complete rectangular frame.
3. Attach the Corner Posts: The corner posts will provide extra support and stability to your raised bed.
* Position a corner post inside one of the corners of the frame, making sure it’s flush with the top and bottom edges.
* Attach the post to the frame using deck screws. Again, pre-drilling pilot holes is a good idea. Use at least two screws per side of the post.
* Repeat this process for the other three corners.
4. Line the Bed with Landscape Fabric: This step is crucial for preventing weeds from growing up into your strawberry bed and for keeping the soil from washing out.
* Lay the landscape fabric inside the raised bed, making sure it covers the bottom and sides completely.
* Overlap the edges of the fabric slightly.
* Use a staple gun to attach the fabric to the inside of the frame. Make sure the staples are secure.
* Trim off any excess fabric with scissors or a utility knife.
5. Prepare the Site: Before placing your raised bed, prepare the ground underneath.
* Clear the area of any grass, weeds, or rocks.
* Level the ground as much as possible. This will help ensure that your raised bed is stable and level.
* If the soil is compacted, loosen it with a shovel or garden fork. This will improve drainage.
6. Place the Raised Bed: Carefully lift the assembled raised bed and place it in the prepared location.
* Use a level to make sure the bed is sitting evenly. If necessary, add soil or shims under the corners to level it.
7. Fill the Bed with Soil: Now for the fun part – filling your raised bed with soil!
* Mix together equal parts of topsoil, compost, and peat moss. This will create a rich, well-draining soil mix that strawberries love.
* Fill the raised bed with the soil mix, leaving a few inches of space at the top.
* Gently pat down the soil to remove any air pockets.
* Water the soil thoroughly.
Planting Your Strawberries
With your raised bed built and filled with soil, it’s time to plant your strawberry plants!
1. Choose Your Strawberry Variety: There are three main types of strawberries: June-bearing, everbearing, and day-neutral. June-bearing varieties produce a large crop of strawberries in early summer. Everbearing varieties produce two or three crops throughout the growing season. Day-neutral varieties produce strawberries continuously from spring to fall. Choose a variety that suits your climate and desired harvest schedule. I personally love everbearing varieties for a continuous supply of fresh strawberries.
2. Prepare the Plants: If you’re using bare-root strawberry plants, soak the roots in water for about 30 minutes before planting. This will help rehydrate them. If you’re using potted strawberry plants, gently remove them from their containers and loosen the roots.
3. Planting:
* Dig small holes in the soil, spacing them about 12 inches apart.
* For bare-root plants, make a small mound of soil in the center of each hole. Place the plant on top of the mound, spreading the roots out around it. Make sure the crown of the plant (where the roots meet the stem) is level with the soil surface.
* For potted plants, simply place the plant in the hole, making sure the top of the root ball is level with the soil surface.
* Fill the holes with soil and gently pat it down around the plants.
4. Watering: Water the newly planted strawberries thoroughly.
5. Mulching: Add a layer of mulch around the strawberry plants. Straw mulch, pine straw, or wood chips are all good options. Mulch helps to retain moisture, suppress weeds, and keep the strawberries clean.
Caring for Your Strawberry Plants
Now that your strawberry plants are in their new home, it’s important to provide them with the care they need to thrive.
* Watering: Water your strawberry plants regularly, especially during dry periods. Strawberries need about 1 inch of water per week. Water deeply and evenly, avoiding getting the foliage wet. Drip irrigation is a great way to water strawberries.
* Fertilizing: Fertilize your strawberry plants every few weeks with a balanced fertilizer. Follow the instructions on the fertilizer package.
* Weeding: Keep your strawberry bed free of weeds. Weeds compete with the strawberry plants for nutrients and water. Hand-pull weeds regularly.
* Pest Control: Keep an eye out for pests, such as slugs, snails, and aphids. Hand-pick pests off the plants or use organic pest control methods.
* Pruning:

Conclusion
So, there you have it! Transforming your gardening experience with a DIY strawberry raised bed is not just a project; it’s an investment in fresh, delicious, and easily accessible strawberries right at your fingertips. We’ve walked you through the process, highlighting the benefits of improved drainage, reduced pest problems, and the sheer joy of cultivating your own little strawberry paradise.
Why is this a must-try? Because it simplifies strawberry cultivation, making it accessible even to those with limited space or gardening experience. No more back-breaking weeding or battling slugs at ground level! A raised bed elevates your strawberries, literally and figuratively, providing them with the ideal environment to thrive. Plus, the aesthetic appeal of a well-constructed raised bed adds a touch of charm to any garden or patio.
But don’t stop there! The beauty of a DIY project lies in its adaptability. Feel free to experiment with different materials for your raised bed. Reclaimed wood adds a rustic touch, while concrete blocks offer durability and a modern aesthetic. Consider adding companion plants like basil or marigolds to deter pests naturally. You can also tailor the size and shape of your raised bed to perfectly fit your available space. For those in colder climates, consider building an insulated raised bed to extend your growing season. And if you’re feeling particularly ambitious, explore vertical strawberry towers for an even more space-efficient solution.
Remember, the key to successful strawberry raised bed gardening is proper planning and execution. Choose a sunny location, use high-quality soil, and provide consistent watering. With a little effort and attention, you’ll be rewarded with a bountiful harvest of sweet, juicy strawberries that are far superior to anything you can buy in the store.
We’re confident that you’ll find this DIY project both rewarding and enjoyable. So, gather your materials, roll up your sleeves, and get ready to create your own strawberry haven. We can’t wait to hear about your experiences! Share your photos, tips, and challenges in the comments below. Let’s build a community of strawberry enthusiasts and inspire others to embrace the joys of homegrown goodness. Happy gardening!
Frequently Asked Questions (FAQ)
What are the benefits of using a raised bed for strawberries compared to planting them directly in the ground?
Raised beds offer several advantages for strawberry cultivation. Firstly, they provide superior drainage, preventing root rot, a common problem for strawberries. The elevated structure also warms up faster in the spring, allowing for an earlier start to the growing season. Weeding is significantly easier in a raised bed, and you have better control over the soil composition and nutrient levels. Furthermore, raised beds can deter pests like slugs and snails, which often target ground-level strawberry plants. Finally, they are more accessible, reducing back strain during planting, weeding, and harvesting.
What type of soil is best for strawberries in a raised bed?
Strawberries thrive in well-draining, slightly acidic soil with a pH between 5.5 and 6.5. A good mix consists of equal parts garden soil, compost, and peat moss or coconut coir. The compost provides essential nutrients, while the peat moss or coconut coir improves drainage and aeration. Avoid heavy clay soils, as they retain too much moisture and can lead to root rot. You can also purchase a pre-mixed raised bed soil specifically formulated for fruits and vegetables. Before planting, amend the soil with a slow-release fertilizer formulated for berries to provide a steady supply of nutrients throughout the growing season.
How deep should my strawberry raised bed be?
A depth of at least 12 inches is recommended for a strawberry raised bed. This provides ample space for the roots to develop and access nutrients. If you plan to grow everbearing or day-neutral varieties, which tend to have deeper root systems, consider a depth of 18 inches or more. The width of the bed should be no more than 4 feet to allow easy access to all plants for weeding and harvesting. The length can be customized to fit your available space.
How often should I water my strawberries in a raised bed?
Strawberries in raised beds require consistent watering, especially during dry periods. Check the soil moisture regularly by inserting your finger about an inch deep. If the soil feels dry, it’s time to water. Water deeply and thoroughly, ensuring that the entire root zone is moistened. Avoid overhead watering, as this can promote fungal diseases. Drip irrigation or soaker hoses are ideal for delivering water directly to the roots. During hot weather, you may need to water daily. Mulching around the plants with straw or wood chips helps to retain moisture and suppress weeds.
What are some common pests and diseases that affect strawberries in raised beds, and how can I prevent them?
Common pests include slugs, snails, aphids, and spider mites. Diseases include gray mold (Botrytis), leaf spot, and root rot. To prevent pest and disease problems, choose disease-resistant varieties, provide good air circulation, and avoid overcrowding the plants. Regularly inspect your plants for signs of pests or diseases and take action promptly. Handpick slugs and snails, use insecticidal soap for aphids and spider mites, and apply a fungicide for fungal diseases. Proper watering practices and good drainage are essential for preventing root rot. Companion planting with herbs like basil or marigolds can also help to deter pests.
Can I grow strawberries in a raised bed in containers?
Yes, you can absolutely grow strawberries in containers within a raised bed, or even as a standalone container garden. This is a great option for those with limited space or who want to move their plants indoors during the winter. Choose containers that are at least 12 inches in diameter and have drainage holes. Use a well-draining potting mix and follow the same watering and fertilization guidelines as for raised bed strawberries. Container-grown strawberries may require more frequent watering and fertilization, as the soil dries out more quickly.
What are the best strawberry varieties to grow in a raised bed?
The best strawberry varieties depend on your climate and personal preferences. June-bearing varieties produce a large crop of strawberries in early summer. Everbearing varieties produce two or three crops throughout the growing season. Day-neutral varieties produce strawberries continuously from spring to fall. Some popular varieties include ‘Earliglow’ (June-bearing), ‘Ozark Beauty’ (everbearing), and ‘Albion’ (day-neutral). Consider your local climate and growing conditions when selecting your strawberry varieties. Consult with your local nursery or extension office for recommendations.
How do I overwinter my strawberry plants in a raised bed?
In colder climates, strawberry plants need protection during the winter. After the first frost, cut back the foliage to about 2 inches above the crown. Apply a thick layer of mulch, such as straw or pine needles, to insulate the plants and protect them from freezing temperatures. In very cold regions, you may need to cover the raised bed with a tarp or blanket for added protection. Remove the mulch in the spring when the weather warms up and new growth begins to emerge.
How often should I fertilize my strawberries in a raised bed?
Fertilize your strawberries in the spring, after the first flush of growth, and again after the first harvest. Use a balanced fertilizer formulated for berries, following the instructions on the package. Avoid over-fertilizing, as this can lead to excessive foliage growth and reduced fruit production. You can also amend the soil with compost or aged manure to provide a slow-release source of nutrients.
How do I propagate strawberries from my raised bed?
Strawberries naturally propagate through runners, which are horizontal stems that grow from the mother plant. These runners will develop roots and form new plants. To propagate strawberries, simply clip the runner from the mother plant after the new plant has developed roots. You can then transplant the new plant to a new location in your raised bed or to a separate container. This is a great way to expand your strawberry patch and share your plants with friends and family.


Leave a Comment