

Sprout Beans at Home Easily and unlock a world of fresh, nutritious goodness right from your kitchen counter! Have you ever wondered how to bring the vibrant energy of a garden indoors, even without a sprawling backyard? Well, you’re in the right place! This DIY guide is your passport to cultivating delicious bean sprouts, a culinary staple with a rich history that spans continents.
Sprouting beans isn’t just a modern health trend; it’s an ancient practice. For centuries, cultures across Asia have valued bean sprouts for their nutritional benefits and ease of cultivation. Think of the crisp bean sprouts in your favorite Pad Thai or the refreshing crunch they add to a Vietnamese spring roll – these little powerhouses are packed with vitamins and minerals, and now you can grow them yourself!
Why should you learn this simple DIY trick? In today’s world, where fresh produce can be expensive and its origin uncertain, sprouting your own beans offers a sustainable and cost-effective solution. Plus, it’s incredibly rewarding to watch these tiny seeds transform into edible sprouts in just a few days. I’m excited to share my favorite methods for sprouting beans at home easily, ensuring you have a constant supply of fresh, healthy ingredients at your fingertips. Let’s get started and bring a little bit of the garden into your home!
Easily Grow Bean Sprouts at Home: A Step-by-Step Guide
Hello dear DIY friends! Do you fancy fresh, crunchy bean sprouts but don’t want to buy them at the supermarket? Don’t worry, I’ll show you how you can grow them easily and cheaply at home. It’s super simple and a lot of fun! Plus, homegrown sprouts are much fresher and healthier. Let’s get started!
What you need:
- Beans: Mung beans, adzuki beans, or soybeans are best. Make sure they are untreated and suitable for consumption. Organic quality is always a good choice!
- A sprouting jar or a large mason jar: You can also use a regular jar, but a sprouting jar with a special lid is more practical.
- A fine-mesh sieve or a piece of cheesecloth: You’ll need this to rinse the beans and drain the water.
- A rubber band: To secure the sieve or cheesecloth to the jar.
- Water: Preferably filtered water or boiled, cooled water.
- A dark place: The beans sprout best in the dark.
- Patience: Growing sprouts takes a few days, but it’s worth it!
Preparing the Beans:
- Select and wash the beans: First, choose your beans. I usually use mung beans because they sprout quickly and have a mild taste. Put the beans in a sieve and rinse them thoroughly under running water. Remove any damaged or discolored beans.
- Soak the beans: Now comes the most important step: soaking. Put the washed beans in your sprouting jar or mason jar. Fill the jar with plenty of water so that the beans are well covered. The beans will swell and absorb the water.
- Soaking time: Let the beans soak for at least 8 hours, or even better, overnight (12-24 hours). I always set my jar up in the evening, so I can take care of it the next morning. You will see that the beans have become significantly larger.
The Sprouting Process:
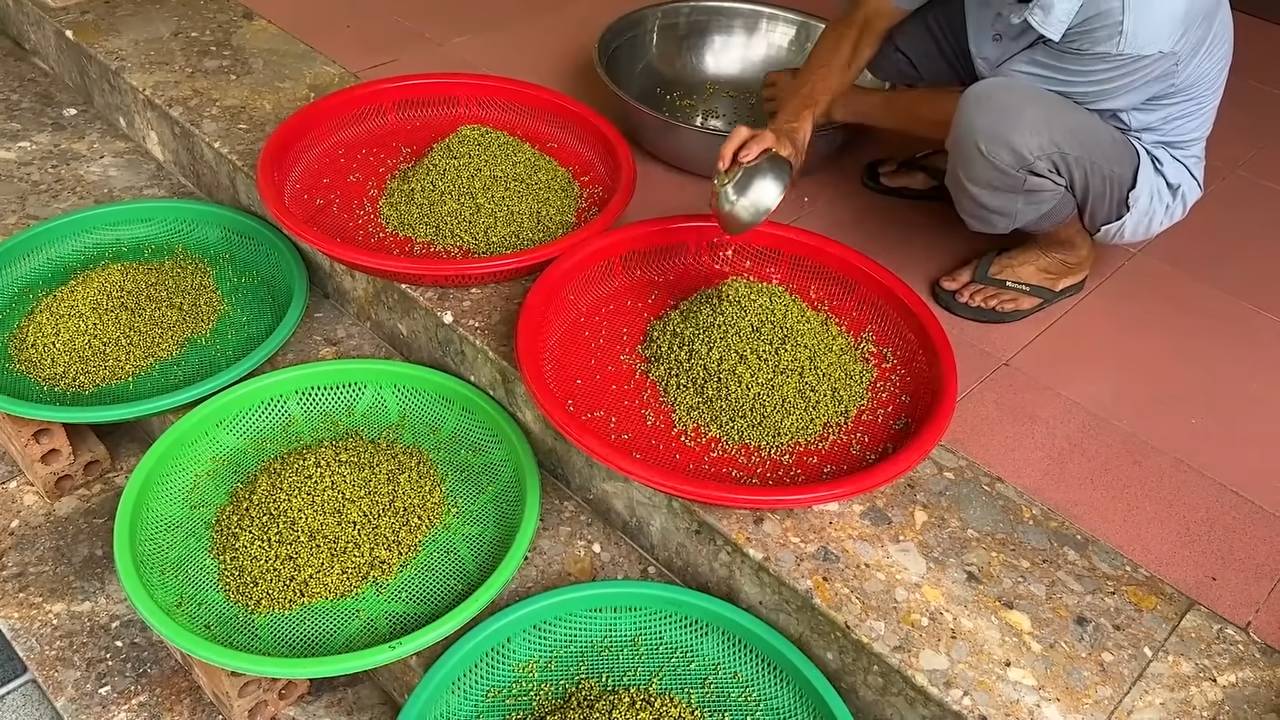
- Drain water and rinse: After soaking, pour off the water. Use your sieve or the cheesecloth, which you secure to the jar with the rubber band. Rinse the beans thoroughly with fresh water. This is important to prevent mold.
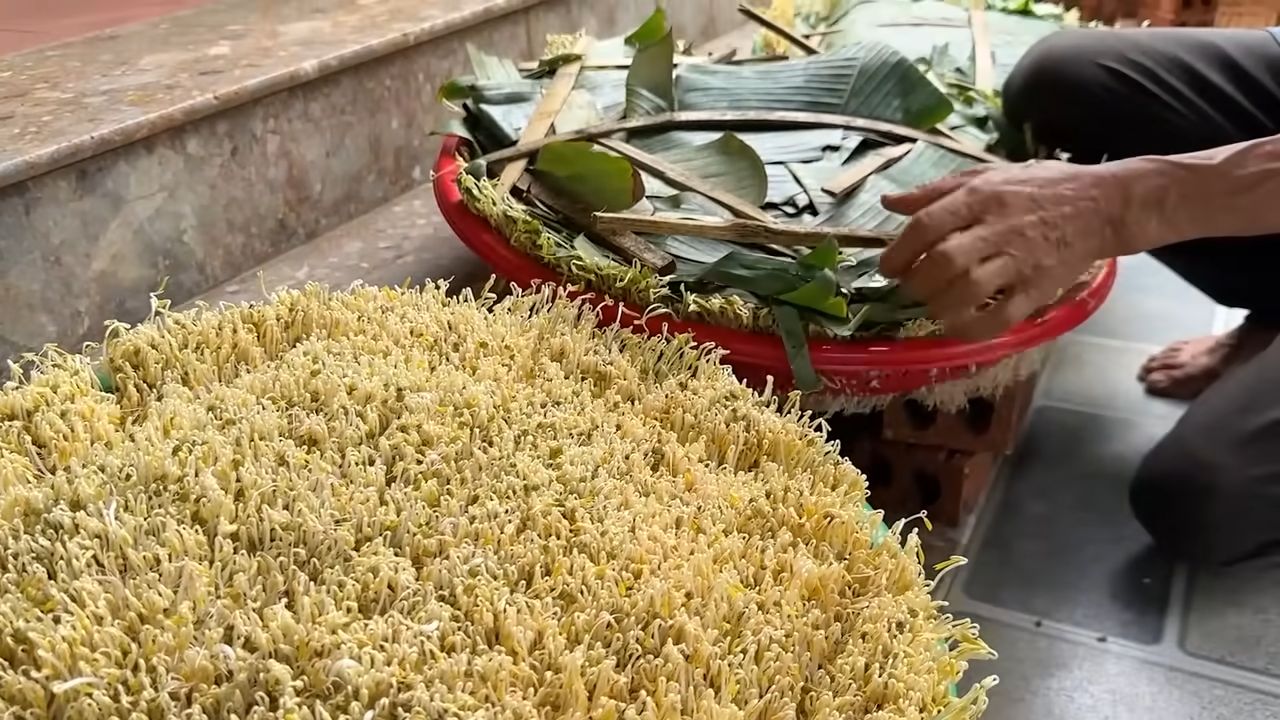
- Position the jar: Place the jar at an angle so that the remaining water can drain well. I usually place it in a bowl or on a draining rack. Make sure the jar is not in direct sunlight. A dark place is ideal.
- Rinse regularly: This is the key to success! Rinse the beans at least twice a day, or even better, three to four times a day with fresh water. Pour off the water and place the jar at an angle again. Regular rinsing keeps the beans moist and prevents mold.
- Observe and be patient: Now it’s time to wait and watch. After one to two days, you should see the first small sprouts. Depending on the type of bean and the temperature, it will take different amounts of time for the sprouts to be ready.
Harvest and Storage:
- Harvest time: The sprouts are ready when they have reached the desired length. I like them best when they are about 2-3 cm long. But you can also let them grow longer, depending on your taste.
- Final rinse: Before harvesting, rinse the sprouts thoroughly one last time. Remove all loose hulls.
- Let them drain: Let the sprouts drain well before you store them.
- Storage: Store the sprouts in an airtight container in the refrigerator. They will keep for about 3-5 days.
Tips and Tricks for Perfect Bean Sprouts:
- Hygiene is important: Make sure all utensils are clean to prevent mold.
- Not too many beans: Don’t use too many beans at once, as they expand a lot when sprouting.
- Good ventilation: Ensure good ventilation to prevent mold.
- Regular rinsing: Regular rinsing is the be-all and end-all for healthy sprouts.
- Darkness: The beans sprout best in the dark.
- Taste test: Try the sprouts regularly to determine the optimal harvest time.
Possible Problems and Solutions:
- Mold: If you discover mold, discard the sprouts immediately. Next time, ensure better hygiene and more regular rinsing.
- No germination: If the beans do not sprout, it may be because they are too old or have not been stored properly. Use fresh beans and pay attention to the storage conditions.
- Slimy sprouts: Slimy sprouts can be a sign of bacterial growth. Rinse the sprouts more thoroughly and ensure good ventilation.
Using the Bean Sprouts:
Bean sprouts are incredibly versatile and can be used in many dishes. Here are a few ideas:
- Salads: Add the sprouts to your salad for a fresh and crunchy kick.
- Soups: Use the sprouts as a topping for your soups.
- Wok dishes: Add the sprouts to your stir-fry dishes at the end of the cooking process.
- Sandwiches: Top your sandwiches with sprouts for a healthy and delicious meal.
- Spring rolls: Fill your spring rolls with sprouts.
- Plain: You can also just nibble on the sprouts plain.
Why You Should Grow Your Own Bean Sprouts:
- Freshness: Homegrown sprouts are much fresher than store-bought ones.
- Taste: They taste more intense and aromatic.
- Health: They are rich in vitamins and minerals.
- Cost: It is much cheaper to grow sprouts yourself.
- Sustainability: You save on packaging waste and support a sustainable lifestyle.
- Fun: It’s just fun to watch the little sprouts grow!
Conclusion:
Growing your own bean sprouts is really child’s play and a great way to integrate fresh and healthy ingredients into your diet. Give it a try, I’m sure you’ll be thrilled! Happy sprouting!
Conclusion
So, there you have it! Sprouting beans at home is not only incredibly easy and cost-effective, but it’s also a fantastic way to boost the nutritional value of your meals and add a fresh, vibrant element to your cooking. Forget those expensive, pre-packaged sprouts from the grocery store – with just a few simple supplies and a little patience, you can cultivate your own miniature garden right in your kitchen.
This DIY trick is a must-try for several compelling reasons. First and foremost, you have complete control over the process, ensuring that your sprouts are grown in a clean and safe environment, free from harmful chemicals or additives. Secondly, the taste is simply unparalleled. Home-sprouted beans offer a crisp, fresh flavor that store-bought varieties often lack. And finally, it’s an incredibly rewarding experience to watch these tiny seeds transform into nutrient-packed powerhouses right before your eyes.
But the fun doesn’t stop there! Feel free to experiment with different types of beans and seeds to discover your favorite flavor combinations. Mung beans are a classic choice, known for their mild, slightly sweet taste and versatility. Lentils sprout beautifully and add a hearty texture to salads and soups. Adzuki beans offer a slightly nutty flavor, while alfalfa seeds provide a delicate, grassy taste. You can even try sprouting a mix of different beans and seeds for a more complex and interesting flavor profile.
Consider adding your freshly sprouted beans to salads, sandwiches, wraps, stir-fries, or even as a garnish for soups and stews. They’re a fantastic way to add a boost of protein, fiber, and essential vitamins and minerals to any dish. For a spicy kick, try adding a pinch of chili flakes to your sprouting jar. Or, for a more savory flavor, consider adding a dash of garlic powder or onion powder.
We’re confident that once you try this simple DIY trick, you’ll be hooked. It’s a fun, easy, and rewarding way to add a healthy and delicious element to your diet. So, gather your supplies, choose your favorite beans, and get sprouting!
We encourage you to try this method of sprouting beans at home and share your experiences with us. Let us know what types of beans you tried, what variations you experimented with, and what delicious dishes you created with your homegrown sprouts. Share your photos and tips in the comments below – we can’t wait to see what you come up with! Happy sprouting!
Frequently Asked Questions (FAQ)
What types of beans are best for sprouting?
The best beans for sprouting are those that are specifically intended for sprouting. These are typically found in the bulk section of health food stores or online retailers specializing in sprouting supplies. Common and easy-to-sprout beans include:
* Mung beans: These are the most popular and easiest to sprout, offering a mild flavor and quick sprouting time.
* Lentils: Lentils sprout well and add a hearty texture to dishes.
* Adzuki beans: These have a slightly nutty flavor and sprout readily.
* Garbanzo beans (chickpeas): These require a bit more attention but can be sprouted successfully.
* Alfalfa seeds: While technically seeds, alfalfa sprouts are a common and nutritious addition to salads and sandwiches.
Avoid sprouting dried beans from the grocery store that are intended for cooking, as they may not be suitable for sprouting and could contain harmful bacteria.
How long does it take for beans to sprout?
The sprouting time varies depending on the type of bean and the environmental conditions (temperature, humidity). Generally, you can expect to see sprouts within 2-5 days. Mung beans typically sprout the fastest, often showing signs of sprouting within 24-48 hours. Lentils and adzuki beans usually take 2-3 days. Keep in mind that warmer temperatures will generally speed up the sprouting process, while cooler temperatures may slow it down.
How do I know when my sprouts are ready to eat?
Sprouts are ready to eat when they have a small tail (the sprout itself) that is about 1/4 to 1/2 inch long. The sprouts should be crisp and fresh-looking, with no signs of mold or discoloration. Taste a few sprouts to ensure they have a pleasant flavor and texture. If they taste bitter or have an off-putting smell, discard them.
How do I store sprouted beans?
Once your sprouts are ready, rinse them thoroughly with cold water and drain them well. Store them in an airtight container lined with a paper towel in the refrigerator. The paper towel will help absorb excess moisture and keep the sprouts fresh. Sprouted beans can typically be stored in the refrigerator for up to a week, but it’s best to consume them as soon as possible for optimal flavor and nutritional value.
Can I eat the bean hulls (seed coats)?
Yes, the bean hulls are generally safe to eat. However, some people find them to be slightly bitter or tough. If you prefer, you can remove the hulls by gently rubbing the sprouts between your hands under running water. The hulls will float to the surface and can be easily discarded.
What if my sprouts start to smell bad?
A foul odor is a sign that your sprouts have become contaminated with bacteria or mold. Discard them immediately and thoroughly clean your sprouting jar or container before starting a new batch. To prevent spoilage, ensure that you are rinsing your sprouts thoroughly at least twice a day and that they are draining properly.
Are there any risks associated with eating sprouted beans?
While sprouting beans at home is generally safe, there is a small risk of bacterial contamination. To minimize this risk, always use clean equipment, rinse your sprouts thoroughly, and store them properly. Pregnant women, young children, and individuals with weakened immune systems should exercise extra caution and may want to consult with their doctor before consuming raw sprouts. Cooking the sprouts can further reduce the risk of bacterial contamination.
Can I sprout beans in a jar without a sprouting lid?
Yes, you can sprout beans in a jar without a sprouting lid. Simply cover the mouth of the jar with a piece of cheesecloth or a fine-mesh screen and secure it with a rubber band. This will allow for proper drainage and ventilation.
Do I need to use special water for sprouting?
Tap water is generally fine for sprouting beans. However, if your tap water is heavily chlorinated, you may want to use filtered water or let the tap water sit out for a few hours to allow the chlorine to dissipate.
Can I sprout beans in the dark?
Sprouts don’t need light to germinate, but exposing them to indirect sunlight during the last day or two of sprouting can help them develop chlorophyll, which gives them a more vibrant green color and enhances their nutritional value. Avoid direct sunlight, as it can overheat the sprouts and cause them to dry out.

Leave a Comment