

Spinach in plastic bottles? Yes, you read that right! Forget sprawling gardens and endless weeding; we’re diving into the surprisingly effective world of vertical gardening using something you probably already have lying around: plastic bottles. I know, it sounds a little unconventional, but trust me, the results are delicious and incredibly rewarding.
For centuries, humans have sought innovative ways to cultivate food, especially in limited spaces. From the hanging gardens of Babylon to the ingenious terrace farming techniques in the Andes, the desire to grow our own sustenance has always driven creativity. While our plastic bottle gardens might not be as grand as those ancient wonders, they embody the same spirit of resourcefulness and ingenuity.
Why should you try this DIY trick? Well, imagine fresh, vibrant spinach readily available right outside your door, or even on your balcony! No more trips to the grocery store for wilted greens. Plus, growing spinach in plastic bottles is a fantastic way to recycle, reduce your carbon footprint, and enjoy the satisfaction of nurturing your own food. It’s perfect for apartment dwellers, urban gardeners, or anyone looking for a fun and easy gardening project. Let’s get started and transform those discarded bottles into a thriving vertical spinach farm!
Growing Spinach in Plastic Bottles: A DIY Garden Project for Everyone
Hello, dear garden friends! Do you also feel like garden space is always shrinking, but the desire for fresh vegetables is always growing? Don’t worry, I have a great solution for you: growing spinach in plastic bottles! This is not only space-saving and sustainable, but also a real eye-catcher. I’ll show you how you can conjure up small spinach oases from old plastic bottles. Let’s get started!
What you need for your spinach bottle project:
- Plastic bottles: Large PET bottles (e.g., from water or juice) are best. Make sure they are clean and undamaged. The more bottles, the more spinach!
- Soil: Good potting soil or vegetable soil is ideal. You can also mix your own soil, e.g., with compost.
- Spinach seeds: Choose a variety that you like and that is suitable for growing in pots. There are many different varieties, so take a look around!
- Knife or scissors: For cutting the bottles. Be careful with your safety!
- Drill or nail and hammer: For the drainage holes.
- Watering can or spray bottle: For watering your spinach.
- Optional: Twine or wire for hanging the bottles.
- Optional: Small stones or clay shards for drainage.
The Preparation: Cutting and Preparing the Bottles
- Clean the bottles: First, you need to clean the plastic bottles thoroughly. Remove all labels and rinse them with warm water and dish soap. Let them dry well.
- Cut the bottles: Now comes the exciting part: cutting the bottles. There are different ways you can do this. I’ll show you two variations:
- Variant 1: Horizontal cutting: Cut the bottle horizontally in the middle. You will get two halves. You can later insert the top half upside down into the bottom half to form a small pot.
- Variant 2: Vertical cutting: Cut the bottle vertically, but not all the way through. Leave a few centimeters at the bottom so that the bottle still holds together. This creates a kind of “pocket” into which you can fill the soil.
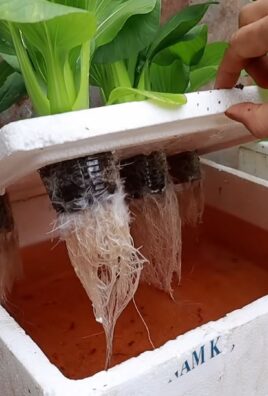
- Drill drainage holes: To allow the water to drain well and prevent waterlogging, you need to drill drainage holes in the bottom of the bottles. This is best done with a drill or a nail and hammer. Make a few holes so that the water can drain well.
- Optional: Create drainage: To improve drainage, you can place a layer of small stones or clay shards on the bottom of the bottles before you fill in the soil. This prevents the soil from clogging the drainage holes.
Sowing and Planting Spinach: How to Do It Right
- Fill with soil: Fill the prepared bottles with soil. Leave a few centimeters free at the top so that the water does not overflow when watering.
- Sow spinach seeds: Distribute the spinach seeds evenly on the soil. Make sure they are not too close together so that the plants have enough space to grow. Cover the seeds with a thin layer of soil.
- Water: Water the soil gently, preferably with a spray bottle, so that the seeds are not washed away. The soil should be moist, but not wet.
- Choose a location: Place the planted bottles in a sunny or semi-shady spot. Spinach doesn’t like it too hot, so make sure it is protected from the midday sun.
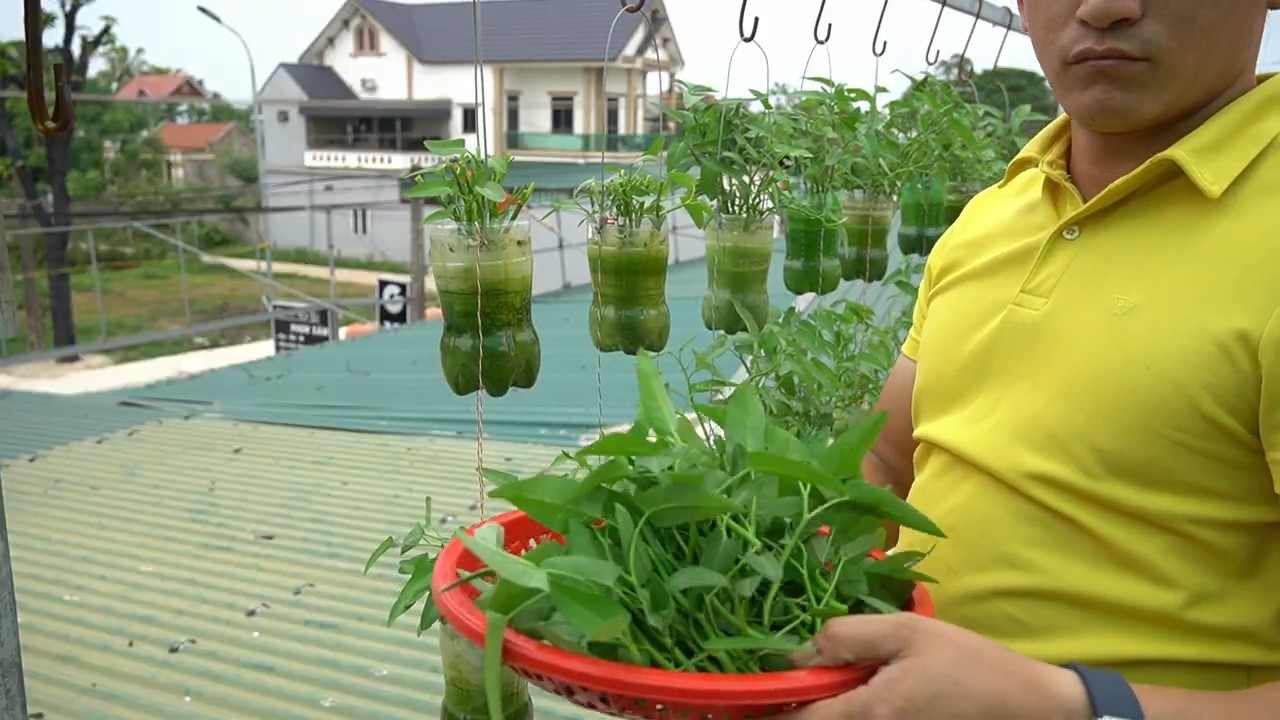
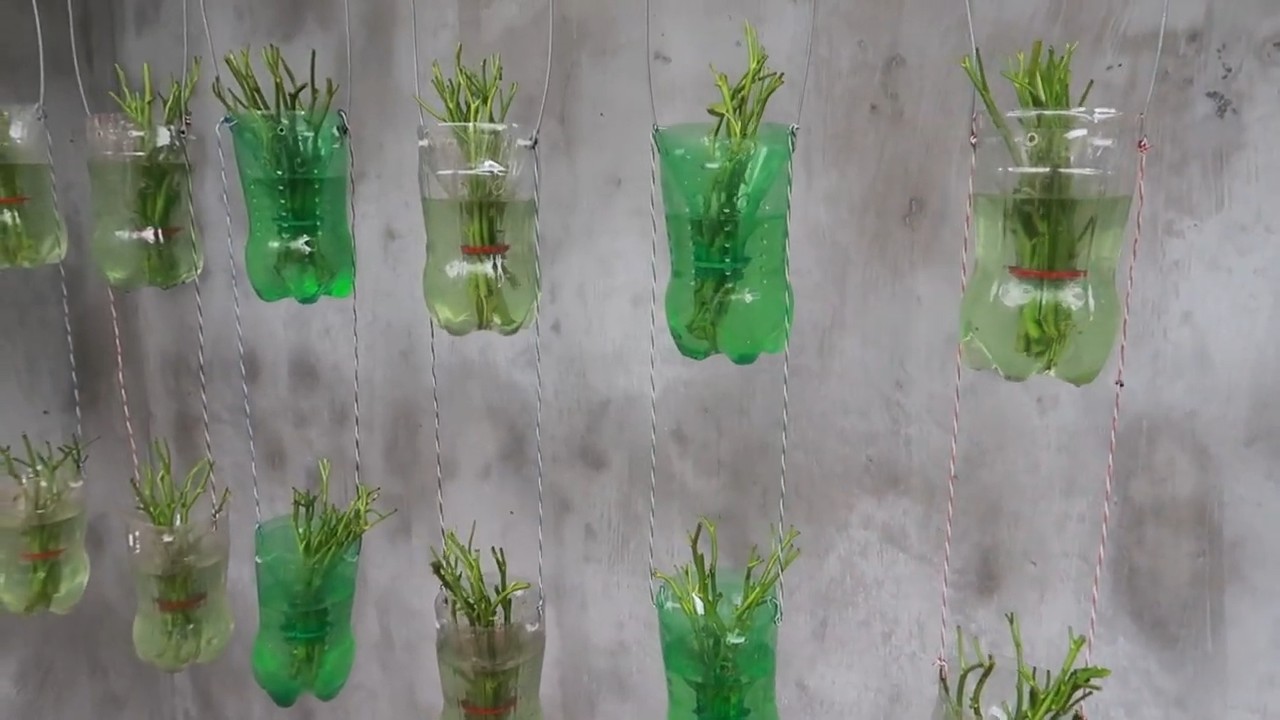
- Optional: Hang the bottles: If you want to hang the bottles, you can attach them to a railing, balcony, or fence with twine or wire. Make sure they hang securely and cannot fall down.
The Care: Watering, Fertilizing, and Harvesting
- Watering: Water the spinach regularly, especially on hot days. The soil should always be moist, but not wet. Avoid waterlogging, as this can lead to root rot.
- Fertilizing: Spinach is a heavy feeder and needs sufficient nutrients. Fertilize it regularly with an organic fertilizer or compost. Pay attention to the dosage instructions of the fertilizer.
- Pests and diseases: Check the spinach regularly for pests and diseases. Aphids, slugs, and fungal diseases can affect the spinach. If there is an infestation, you can use natural control methods.
- Harvesting: Depending on the variety and location, you can harvest the spinach after about 6-8 weeks. Cut the leaves with a knife or scissors. Leave the roots in the soil so that the spinach can continue to grow.
More Tips and Tricks for Your Spinach Bottle Garden
- Variety selection: Choose spinach varieties that are suitable for growing in pots. There are many different varieties that differ in taste, size, and growth speed.
- Crop rotation: Pay attention to crop rotation when you plant the spinach in your garden. Spinach belongs to the cruciferous family and should not be planted after other cruciferous plants such as cabbage or radishes.
- Overwintering: Spinach is hardy and can also be grown in winter. Protect it from severe frost with a fleece or foil.
- Creative design: You can design your spinach bottle garden individually. Paint the bottles with bright colors, decorate them with patterns, or label them with the names of the spinach varieties.
- Upcycling: Use old plastic bottles to grow your spinach. This is not only sustainable but also a great way to avoid waste.
I hope you enjoyed this guide and that it inspires you to create your own spinach bottle garden. It’s a great project that is fun and rewards you with fresh, homegrown spinach. Good luck with your gardening! And don’t forget to share your experiences and results with me!
Conclusion
So, there you have it! Growing spinach in plastic bottles isn’t just a quirky gardening experiment; it’s a game-changer for anyone looking to maximize space, minimize waste, and enjoy a continuous supply of fresh, delicious greens. We’ve walked you through the simple steps, highlighting the benefits of this innovative approach. From the reduced risk of soilborne diseases to the ease of pest control and the sheer portability of your mini-garden, the advantages are undeniable.
This method is a must-try because it empowers you to take control of your food source, even with limited resources. Imagine stepping outside your door and harvesting vibrant, nutrient-rich spinach leaves for your salad, smoothie, or stir-fry, knowing exactly where they came from and how they were grown. That’s the power of this DIY trick.
But don’t stop there! Feel free to experiment with different types of plastic bottles. Larger bottles can accommodate more plants, while smaller bottles are perfect for starting seedlings. You can also explore different potting mixes to find what works best for your local climate and spinach variety. Consider adding companion plants like marigolds or basil to your bottle gardens to deter pests naturally.
For those in colder climates, you can even bring your bottle gardens indoors during the winter months, ensuring a year-round supply of fresh spinach. Just make sure they have access to adequate sunlight or supplement with grow lights.
We’re confident that once you try growing spinach in plastic bottles, you’ll be amazed by the results. It’s a rewarding, sustainable, and incredibly satisfying way to connect with nature and nourish your body.
Now, it’s your turn! Grab some plastic bottles, gather your supplies, and embark on this exciting gardening adventure. Don’t be afraid to get your hands dirty and experiment along the way. We encourage you to share your experiences with us. Post photos of your bottle gardens on social media using [Your Hashtag Here], or leave a comment below to let us know how it’s going. We’re eager to see your creations and learn from your successes (and even your challenges!).
Ultimately, growing spinach in plastic bottles is more than just a gardening technique; it’s a step towards a more sustainable and self-sufficient lifestyle. It’s a way to reduce your environmental impact, improve your health, and connect with the natural world. So, what are you waiting for? Get started today and experience the joy of growing your own fresh, delicious spinach!
Frequently Asked Questions (FAQ)
What type of plastic bottles are best for growing spinach?
Ideally, you should use food-grade plastic bottles, such as those that previously contained water, juice, or soda. Make sure to thoroughly clean the bottles with soap and water to remove any residue. Avoid using bottles that have contained harsh chemicals or pesticides. The size of the bottle will depend on how many spinach plants you want to grow in each container. Larger bottles (2-3 liters) are suitable for multiple plants, while smaller bottles (500ml-1 liter) are better for individual plants or starting seedlings.
How often should I water my spinach plants in plastic bottles?
The watering frequency will depend on several factors, including the climate, the type of potting mix you’re using, and the size of the bottle. Generally, you should water your spinach plants when the top inch of soil feels dry to the touch. Avoid overwatering, as this can lead to root rot. Ensure that the bottles have adequate drainage holes to prevent water from accumulating at the bottom. During hot weather, you may need to water your plants more frequently. A good rule of thumb is to check the soil moisture daily and water as needed.
What kind of soil should I use for growing spinach in plastic bottles?
A well-draining potting mix is essential for growing healthy spinach in plastic bottles. You can use a commercially available potting mix or create your own by combining equal parts of compost, perlite, and vermiculite. Compost provides nutrients, perlite improves drainage, and vermiculite helps retain moisture. Avoid using garden soil, as it can be too heavy and may contain pests or diseases. The ideal pH for spinach is between 6.0 and 7.0.
How much sunlight do spinach plants need when grown in plastic bottles?
Spinach thrives in full sun to partial shade. Ideally, your spinach plants should receive at least 4-6 hours of direct sunlight per day. If you live in a hot climate, providing some afternoon shade can help prevent the leaves from wilting. If you’re growing your spinach indoors, you may need to supplement with grow lights to ensure they receive adequate light. Rotate the bottles regularly to ensure that all sides of the plants receive equal exposure to sunlight.
How do I fertilize my spinach plants in plastic bottles?
Spinach is a heavy feeder, so it’s important to provide them with adequate nutrients. You can fertilize your spinach plants every 2-3 weeks with a balanced liquid fertilizer, such as a 10-10-10 or 20-20-20 formula. Follow the instructions on the fertilizer label carefully. Alternatively, you can use organic fertilizers, such as compost tea or fish emulsion. Avoid over-fertilizing, as this can lead to leaf burn.
How do I protect my spinach plants from pests and diseases when growing them in plastic bottles?
Growing spinach in plastic bottles can help reduce the risk of soilborne diseases and pests. However, it’s still important to take precautions. Regularly inspect your plants for signs of pests, such as aphids, spider mites, or caterpillars. You can remove pests by hand or spray your plants with insecticidal soap or neem oil. To prevent fungal diseases, ensure that your plants have good air circulation and avoid overwatering. If you notice any signs of disease, remove the affected leaves immediately.
When is the best time to harvest spinach grown in plastic bottles?
You can start harvesting spinach leaves when they are about 4-6 inches long. Harvest the outer leaves first, leaving the inner leaves to continue growing. This will encourage continuous production. Avoid harvesting more than one-third of the plant at a time. Spinach is best harvested in the morning, when the leaves are crisp and cool.
Can I grow other vegetables in plastic bottles besides spinach?
Yes, absolutely! The plastic bottle gardening method is versatile and can be used to grow a variety of other vegetables and herbs, such as lettuce, kale, chard, herbs like basil and mint, and even smaller varieties of tomatoes and peppers. The key is to choose plants that are well-suited to container gardening and to provide them with adequate space, sunlight, and nutrients.
What are the benefits of growing spinach in plastic bottles compared to traditional gardening methods?
Growing spinach in plastic bottles offers several advantages:
* **Space-saving:** Ideal for small spaces like balconies, patios, or even indoors.
* **Reduced soilborne diseases:** Minimizes contact with contaminated soil.
* **Pest control:** Easier to monitor and control pests.
* **Portability:** Easy to move plants to optimal sunlight or shelter.
* **Recycling:** Repurposes plastic bottles, reducing waste.
* **Water conservation:** Can be more efficient with water usage.
How do I prepare the plastic bottles for planting spinach?
First, thoroughly clean the plastic bottles with soap and water. Remove any labels or residue. Then, cut the bottle in half horizontally. You can either use the top half inverted as a self-watering system (with the cap removed and fabric acting as a wick) or discard it and use only the bottom half. Drill drainage holes in the bottom of the bottle to prevent waterlogging.

Leave a Comment