

Salt cleaning hacks – who knew something so simple could be so powerful around the house? I’m always on the lookout for easy, affordable ways to keep my home sparkling, and let me tell you, salt has become my new best friend! For centuries, salt has been valued not just for its flavor-enhancing properties in the kitchen, but also for its incredible cleaning abilities. Think back to ancient civilizations; salt was a precious commodity used for preserving food and, yes, even cleaning!
But why should you care about salt cleaning hacks? Well, in today’s world, we’re all trying to be more conscious of the products we use. Many commercial cleaners are packed with harsh chemicals that can be harmful to our health and the environment. That’s where salt comes in! It’s a natural, non-toxic alternative that’s readily available and incredibly effective.
In this article, I’m going to share some of my favorite DIY salt cleaning tricks that will save you time, money, and a trip to the store. From scrubbing stubborn stains to deodorizing smelly spaces, you’ll be amazed at what this humble ingredient can do. Get ready to unlock the cleaning power of salt cleaning hacks and transform your home into a sparkling sanctuary!

DIY Salt Cleaning Hacks: Unleash the Power of Sodium Chloride!
Hey there, fellow DIY enthusiasts! I’m super excited to share some amazing cleaning hacks using something you probably already have in your kitchen: good old salt! Forget those expensive, chemical-laden cleaners; salt is a natural, effective, and budget-friendly alternative for tackling a surprising number of household messes. Let’s dive in!
Cleaning Cast Iron Like a Pro
Cast iron cookware is a kitchen staple, but cleaning it can be a bit intimidating. Fear not! Salt is your secret weapon for removing stuck-on food without damaging the seasoning.
What you’ll need:
* Coarse salt (kosher or sea salt works best)
* A clean, dry cloth or sponge
* Vegetable oil or other cooking oil
* Paper towels
Step-by-step instructions:
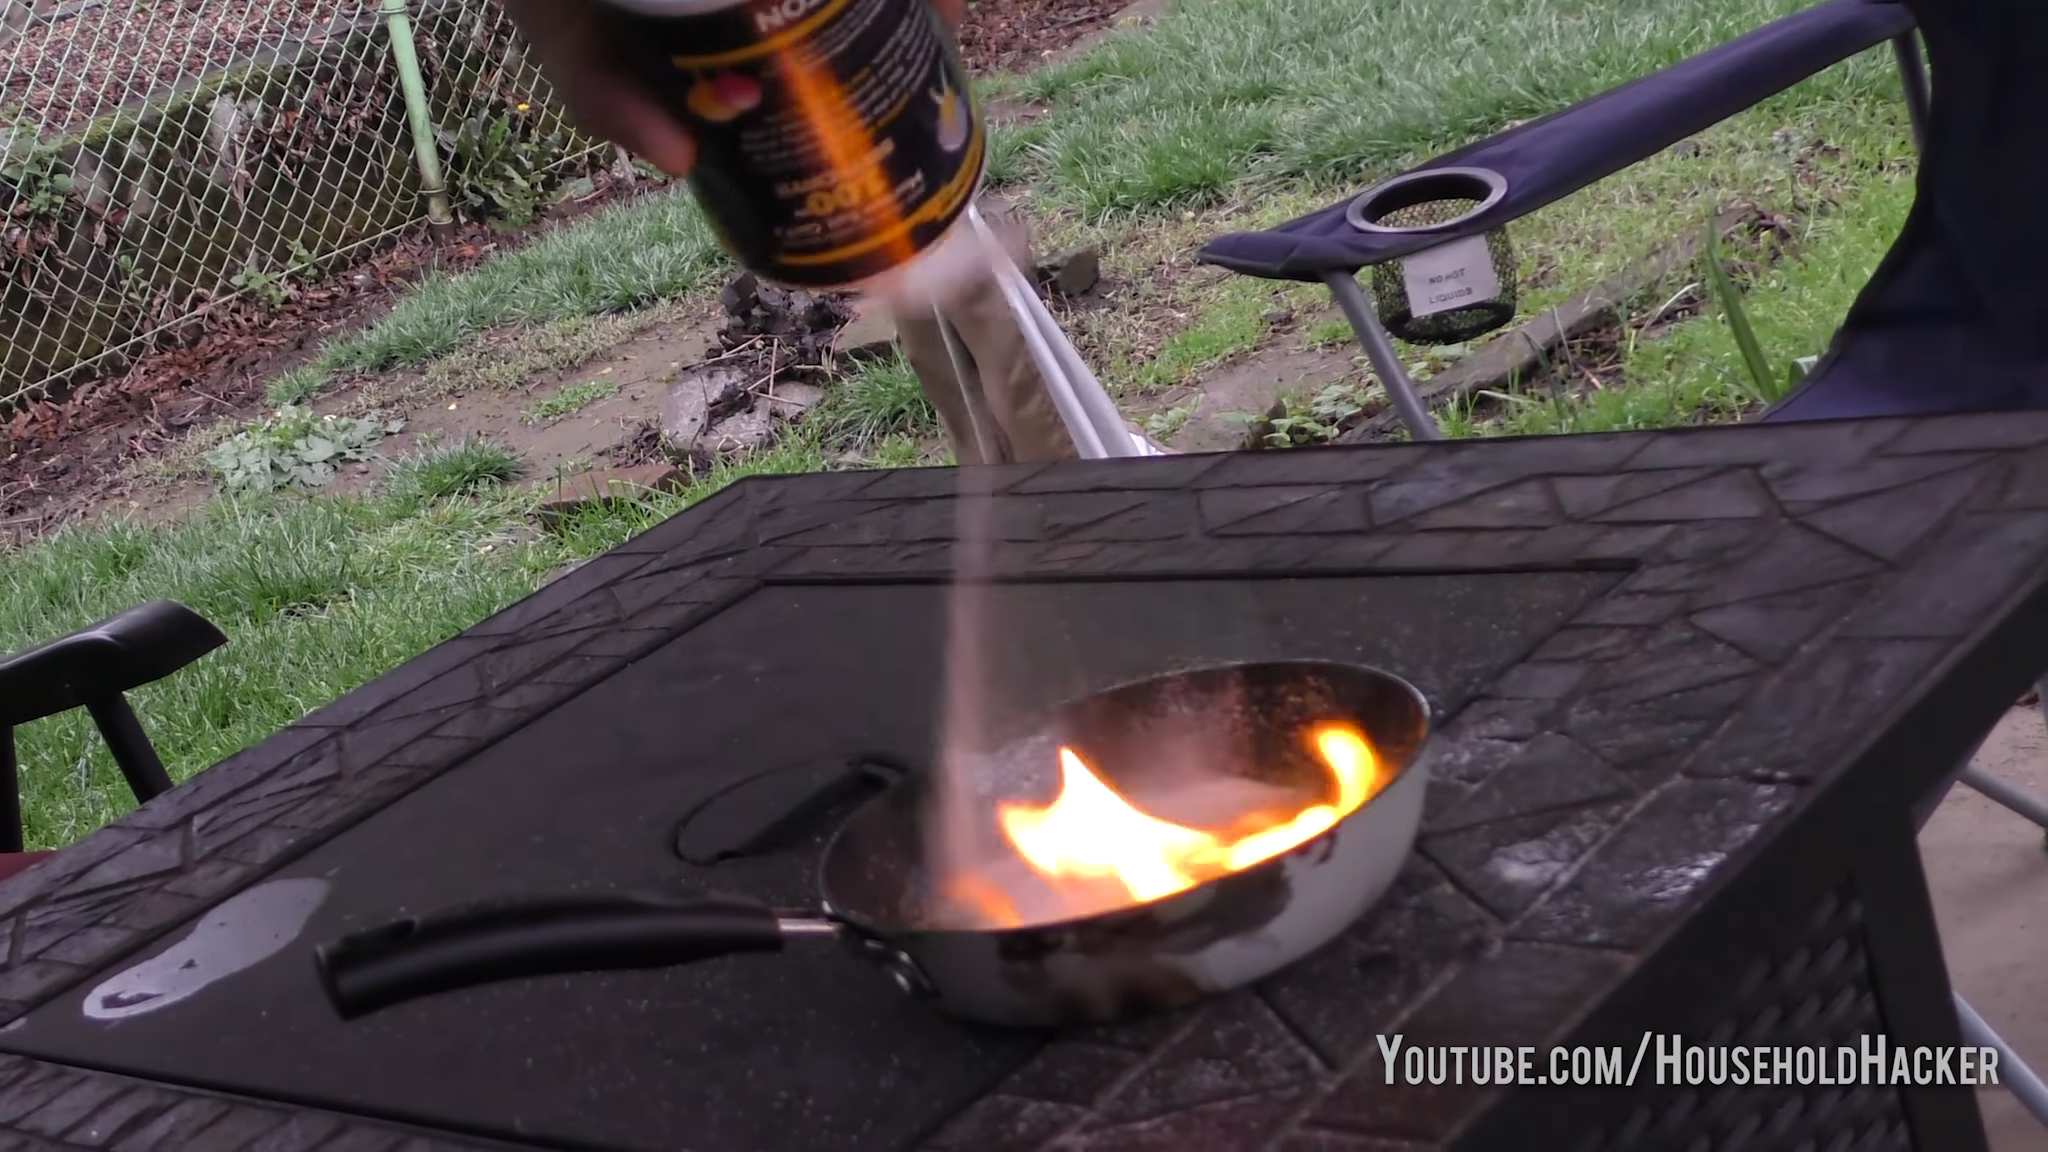
1. Scrape off any loose food particles: After cooking, use a spatula or scraper to remove any large pieces of food from your cast iron skillet while it’s still warm (but not hot enough to burn you!).
2. Add salt and scrub: Pour a generous amount of coarse salt into the skillet. Using a dry cloth or sponge, scrub the skillet vigorously in a circular motion. The salt acts as a gentle abrasive, loosening stuck-on food without scratching the seasoning. I usually spend a few minutes on this step, really getting into all the nooks and crannies.
3. Rinse (optional, but recommended): If there’s a lot of residue, you can rinse the skillet with warm water. However, avoid using soap, as it can strip away the seasoning. If you do rinse, make sure to dry the skillet immediately and thoroughly.
4. Dry thoroughly: This is crucial! Use a clean cloth or paper towels to dry the skillet completely. You can also place it on a burner over low heat for a few minutes to ensure all moisture is gone.
5. Season the skillet: Pour a small amount of vegetable oil (about a teaspoon) into the skillet. Use a paper towel to rub the oil all over the inside and outside of the skillet, including the handle. You want a very thin layer of oil, not a greasy coating.
6. Heat the skillet: Place the skillet upside down in a preheated oven at 350°F (175°C) for about an hour. This will help the oil polymerize and create a protective layer of seasoning. Place a baking sheet on the rack below to catch any drips.
7. Let it cool: Turn off the oven and let the skillet cool completely inside the oven before removing it. This prevents warping.
Reviving Dull Copper
Copper pots, pans, and decorative items can lose their shine over time. Salt, combined with vinegar or lemon juice, makes a fantastic copper cleaner.
What you’ll need:
* Salt
* White vinegar or lemon juice
* A soft cloth or sponge
Step-by-step instructions:
1. Make a paste: In a small bowl, mix equal parts salt and white vinegar (or lemon juice) to form a paste. I usually start with a tablespoon of each and adjust as needed.
2. Apply the paste: Apply the paste to the copper item, focusing on areas with tarnish.
3. Scrub gently: Using a soft cloth or sponge, gently scrub the copper in a circular motion. You’ll start to see the tarnish lift away.
4. Rinse thoroughly: Rinse the copper item with warm water to remove all traces of the paste.
5. Dry completely: Dry the copper item thoroughly with a clean cloth. Buff it to a shine.
Cleaning a Scorched Iron
Accidentally scorched your iron? Don’t panic! Salt can help remove the burnt residue.
What you’ll need:
* Salt
* A clean cotton cloth or towel
* An iron
Step-by-step instructions:
1. Sprinkle salt on the cloth: Spread a generous layer of salt on a clean cotton cloth or towel.
2. Heat the iron: Set your iron to the highest setting, but make sure the steam function is turned off.
3. Iron the salt: Iron the salt-covered cloth in a circular motion for a few minutes. The salt will help to loosen and remove the burnt residue from the iron’s soleplate.
4. Wipe clean: Once the iron has cooled down, wipe the soleplate with a clean, damp cloth to remove any remaining salt and residue.
Unclogging Drains Naturally
Chemical drain cleaners can be harsh and harmful to the environment. Salt, combined with baking soda and vinegar, offers a more natural and effective solution for unclogging drains.
What you’ll need:
* 1/2 cup baking soda
* 1/4 cup salt
* 1 cup white vinegar
* Boiling water
Step-by-step instructions:
1. Pour in the baking soda and salt: Pour the baking soda and salt down the drain.
2. Add the vinegar: Pour the vinegar down the drain after the baking soda and salt. You’ll hear a fizzing sound – that’s the chemical reaction working to break down the clog.
3. Let it sit: Let the mixture sit for at least 30 minutes, or even overnight for stubborn clogs.
4. Flush with boiling water: Carefully pour a pot of boiling water down the drain to flush away the loosened debris.
5. Repeat if necessary: If the drain is still clogged, repeat the process.
Cleaning Your Cutting Board
Cutting boards can harbor bacteria and odors. Salt is a great way to sanitize and deodorize them.
What you’ll need:
* Coarse salt
* Lemon (cut in half)
Step-by-step instructions:
1. Sprinkle salt on the cutting board: Sprinkle a generous layer of coarse salt over the entire surface of the cutting board.
2. Scrub with lemon: Use the cut side of a lemon half to scrub the salt into the cutting board. The lemon juice acts as a natural disinfectant and helps to remove odors.
3. Rinse and dry: Rinse the cutting board thoroughly with warm water and dry it completely.
Freshening Up Sponges
Sponges can quickly become breeding grounds for bacteria and develop unpleasant odors. A salt water soak can help to freshen them up.
What you’ll need:
* 1/4 cup salt
* 1 quart warm water
Step-by-step instructions:
1. Dissolve the salt: Dissolve the salt in the warm water.
2. Soak the sponge: Submerge the sponge in the salt water solution and let it soak for several hours, or even overnight.
3. Rinse and dry: Rinse the sponge thoroughly with clean water and squeeze out any excess water. Allow it to air dry completely.
Cleaning Your Ironing Board Cover
Ironing board covers can get stained and dirty over time. Salt can help to remove these stains and freshen up the cover.
What you’ll need:
* Salt
* Damp cloth
Step-by-step instructions:
1. Sprinkle salt on the stained area: Sprinkle a generous amount of salt on the stained area of the ironing board cover.
2. Rub with a damp cloth: Rub the salt into the stain with a damp cloth.
3. Let it sit: Let the salt sit on the stain for about 30 minutes.
4. Vacuum or wipe away the salt: Vacuum or wipe away the salt with a clean, damp cloth.
5. Allow to dry: Allow the ironing board cover to dry completely.
Preventing Fruit from Browning
This is a simple trick, but it’s a lifesaver! If you’re prepping fruit ahead of time, a little salt water can prevent it from browning.
What you’ll need:
* 1/2 teaspoon salt
* 4 cups water
* Cut fruit
Step-by-step instructions:
1. Dissolve the salt: Dissolve the salt in the water.
2. Soak the fruit: Soak the cut fruit in the salt water solution for a few minutes.
3. Rinse and dry: Rinse the fruit with clean water and dry it thoroughly. The fruit will stay fresh and prevent browning for longer. You won’t taste the salt!
Cleaning Egg Residue
Ever tried cleaning a bowl or pan right after scrambling eggs? It’s a sticky mess! Salt makes it much easier.
What you’ll need:
* Salt
* Water
* Sponge or cloth
Step-by-step instructions:
1.
Conclusion
So, there you have it! We’ve explored the surprisingly powerful world of salt cleaning hacks, and hopefully, you’re now convinced that this humble kitchen staple is more than just a flavor enhancer. It’s a versatile, eco-friendly, and incredibly effective cleaning agent that can tackle a wide range of household messes.
Why is this DIY trick a must-try? Because it’s simple, affordable, and readily available. You likely already have salt in your pantry, eliminating the need to rush out and buy expensive, chemical-laden cleaning products. Beyond the cost savings, you’re also making a conscious choice to reduce your environmental impact by opting for a natural alternative. Think about it: fewer plastic bottles, fewer harsh chemicals polluting our waterways, and a cleaner, healthier home for you and your family.
But the benefits don’t stop there. Salt is incredibly versatile. We’ve discussed using it to scrub cast iron, deodorize drains, remove stains from fabrics, and even polish copper. The possibilities are truly endless!
Ready to take your salt cleaning hacks to the next level? Consider these variations:
* **Infused Salt Scrubs:** Add a few drops of your favorite essential oil (like lemon, lavender, or tea tree) to your salt for an extra boost of cleaning power and a pleasant aroma. This is especially effective for cleaning sinks and bathtubs.
* **Salt and Vinegar Power:** Combine salt with white vinegar to create a potent cleaning paste for tackling stubborn stains and grime. This works wonders on grout and tile.
* **Salt and Baking Soda Blend:** Mix equal parts salt and baking soda for a gentle yet effective abrasive cleaner. This is perfect for delicate surfaces like stainless steel.
* **Coarse vs. Fine Salt:** Keep both coarse and fine salt on hand. Coarse salt is ideal for scrubbing tough messes, while fine salt is gentler on more delicate surfaces.
We’re confident that once you experience the cleaning power of salt, you’ll be hooked. It’s a game-changer for anyone looking for a natural, effective, and budget-friendly way to keep their home sparkling clean.
Don’t just take our word for it, though. We encourage you to try these salt cleaning hacks for yourself. Experiment with different variations, find what works best for you, and most importantly, share your experiences with us! Let us know in the comments below which salt cleaning hacks you’ve tried, what worked well, and any tips or tricks you’ve discovered along the way. Together, we can unlock the full potential of this amazing natural cleaner and create a cleaner, healthier world, one salt crystal at a time. We are eager to hear how these salt cleaning hacks have helped you!
Frequently Asked Questions (FAQ)
What kind of salt should I use for cleaning?
The type of salt you use depends on the cleaning task. For general scrubbing and abrasive cleaning, coarse salt (like sea salt or kosher salt) is ideal. Its larger crystals provide more scrubbing power. For more delicate surfaces or when you need a finer abrasive, fine salt (like table salt) is a better choice. Epsom salt can also be used for specific cleaning tasks, such as unclogging drains or removing mildew. Experiment to see what works best for your needs.
Is salt safe to use on all surfaces?
While salt is generally safe, it’s essential to exercise caution on certain surfaces. Avoid using coarse salt on delicate materials like polished wood, painted surfaces, or soft plastics, as it can scratch them. Always test a small, inconspicuous area first to ensure that the salt doesn’t cause any damage. When in doubt, opt for a gentler cleaning method.
Can salt damage my stainless steel appliances?
Salt can potentially damage stainless steel if used improperly. Avoid using coarse salt or scrubbing too vigorously, as this can scratch the surface. Instead, use fine salt mixed with a mild detergent or vinegar, and gently wipe the stainless steel in the direction of the grain. Rinse thoroughly with water and dry with a soft cloth to prevent water spots.
How do I use salt to deodorize my drains?
Salt is an excellent natural deodorizer for drains. Pour about half a cup of salt down the drain, followed by a cup of hot water. Let it sit for 30 minutes to an hour, then flush with cold water. The salt will help to dislodge any buildup and neutralize odors. For a more powerful deodorizing effect, combine salt with baking soda and vinegar.
Can salt remove stains from fabric?
Yes, salt can be effective at removing certain types of stains from fabric. For fresh stains, immediately cover the stain with a generous amount of salt. The salt will absorb the stain and prevent it from setting. After a few hours, vacuum or brush away the salt. For more stubborn stains, create a paste of salt and water or lemon juice and apply it to the stain. Let it sit for a while, then rinse with cold water. Always test the salt solution on a hidden area of the fabric first to ensure that it doesn’t cause any discoloration.
How do I clean a cast iron skillet with salt?
Cleaning a cast iron skillet with salt is a simple and effective way to remove food residue without damaging the seasoning. After cooking, while the skillet is still warm, pour in about a cup of coarse salt and use a clean cloth or sponge to scrub the bottom and sides of the skillet. The salt will act as an abrasive, loosening any stuck-on food. Rinse the skillet with hot water and dry it thoroughly. Then, apply a thin layer of oil to the skillet to maintain the seasoning.
Is salt an environmentally friendly cleaning option?
Yes, salt is a highly environmentally friendly cleaning option. It’s a natural, non-toxic substance that doesn’t contain any harsh chemicals or pollutants. Using salt for cleaning reduces your reliance on synthetic cleaning products, which can be harmful to the environment and your health. Salt is also biodegradable and doesn’t contribute to water pollution.
How often should I use salt for cleaning?
The frequency of using salt for cleaning depends on the specific task and your needs. For daily cleaning tasks like wiping down countertops or scrubbing sinks, you can use salt as often as needed. For more intensive cleaning tasks like unclogging drains or removing stubborn stains, you may only need to use salt occasionally. Pay attention to the condition of the surfaces you’re cleaning and adjust your cleaning schedule accordingly.
Can I use salt to remove mildew?
Yes, salt can be used to remove mildew. Create a paste of salt and vinegar and apply it to the affected area. Let it sit for several hours, then scrub with a brush and rinse with water. The salt will help to kill the mildew and remove the stains. For more stubborn mildew, you may need to repeat the process or use a stronger cleaning solution.
Where can I find more information about salt cleaning hacks?
You can find more information about salt cleaning hacks online through various websites, blogs, and social media platforms. Search for “salt cleaning hacks,” “natural cleaning with salt,” or “DIY salt cleaners” to find a wealth of information and tips. You can also consult books and magazines on natural cleaning and home remedies. Remember to always verify the information you find and use caution when trying new cleaning methods.

Leave a Comment