

Rooftop Bok Choy Gardening: Imagine stepping onto your rooftop and harvesting fresh, crisp Bok Choy, ready to add a vibrant, healthy touch to your dinner. Sounds idyllic, right? Well, it’s more achievable than you might think! For centuries, urban dwellers have sought ways to bring nature closer, and rooftop gardens, while perhaps not always featuring Bok Choy specifically, represent a beautiful continuation of that tradition. From ancient hanging gardens to modern-day green roofs, the desire to cultivate our own food in limited spaces is deeply ingrained.
But why Rooftop Bok Choy Gardening, you ask? Because this leafy green is surprisingly adaptable and thrives in containers, making it perfect for rooftop environments. Plus, with increasing concerns about food security and the desire to eat locally and sustainably, growing your own produce is more relevant than ever. This article is your ultimate guide to unlocking the secrets of successful rooftop Bok Choy cultivation. I’m going to share simple, effective DIY tricks and hacks that will transform your rooftop into a flourishing edible oasis, even if you’re a complete beginner. Get ready to ditch the grocery store Bok Choy and embrace the satisfaction of harvesting your own fresh, delicious greens!
Your Own Rooftop Bok Choy Garden: A DIY Guide
Hello garden friends! Have you ever thought about growing your own vegetables on the roof? I think it’s a fantastic way to enjoy fresh, healthy food while making the most of unused space. Today, I’ll show you how to create your own Bok Choy garden on your rooftop. Bok Choy is super easy to grow, grows quickly, and is incredibly delicious! So, let’s get started!
What You Need for Your Rooftop Garden
Before we begin, here is a list of the things you will need:
- Suitable containers: Planter boxes, pots, or even recycled containers with good drainage.
- High-quality potting soil: Look for a mix that drains well and is rich in nutrients.
- Bok Choy seeds or seedlings: You can either sow seeds or buy pre-grown seedlings.
- Watering can or hose: For watering your plants.
- Garden shovel or trowel: For filling the containers with soil and for planting.
- Fertilizer: An organic fertilizer is ideal for promoting growth.
- Mulch: Helps to retain moisture in the soil and suppress weeds.
- Sun protection (optional): If your roof is very sunny, a shade net can be helpful.
- Snail bait (optional): Unfortunately, Bok Choy is very popular with snails.
- Gloves: To keep your hands clean.
Safety First!
Before you even start, you should make sure that your roof is suitable for a garden.
- Check load-bearing capacity: Ask a structural engineer if your roof can support the weight of the containers, soil, and plants. This is super important!
- Check the waterproofing: Make sure the roof’s waterproofing is intact to avoid water damage.
- Secure access: Ensure safe access to the roof, for example, with a sturdy ladder or stairs.
- Railing: A railing is essential to prevent falls.
Step-by-Step Guide: Growing Bok Choy on the Roof
Here is a detailed guide on how to create your own Bok Choy garden on the roof.
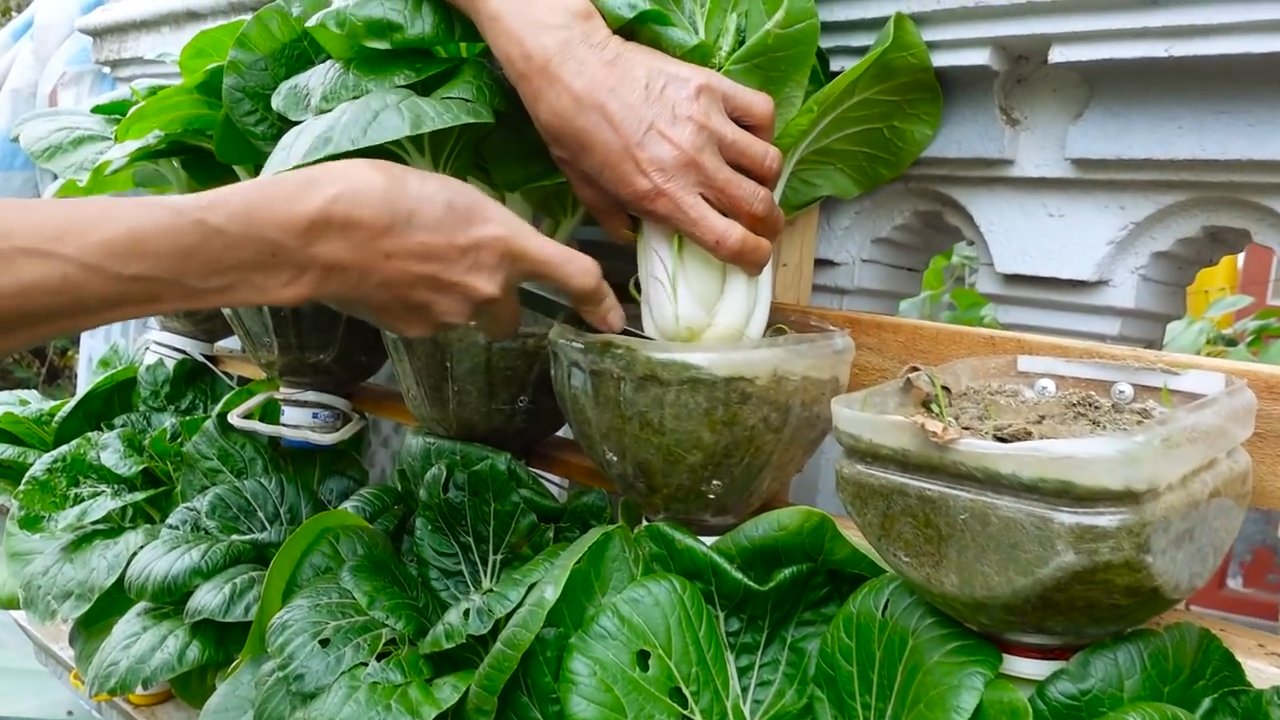
1. Preparing the Containers
- Cleaning: Clean the containers thoroughly with soap and water to prevent pests and diseases.
- Drainage: Make sure the containers have enough drainage holes so that excess water can run off. If not, drill additional holes.
- Drainage layer: Place a layer of gravel, clay shards, or expanded clay at the bottom of the containers to improve drainage. This prevents waterlogging, which Bok Choy does not like at all.
- Fleece (optional): Cover the drainage layer with a fleece to prevent soil from getting into the drainage layer and clogging it.
2. Filling the Containers with Soil
- Fill with soil: Fill the containers with high-quality potting soil. Leave about 5 cm of space to the rim of the container.
- Loosen the soil: Loosen the soil with a garden shovel or trowel to aerate it.
- Moisten the soil: Lightly moisten the soil with water before planting the seeds or seedlings.
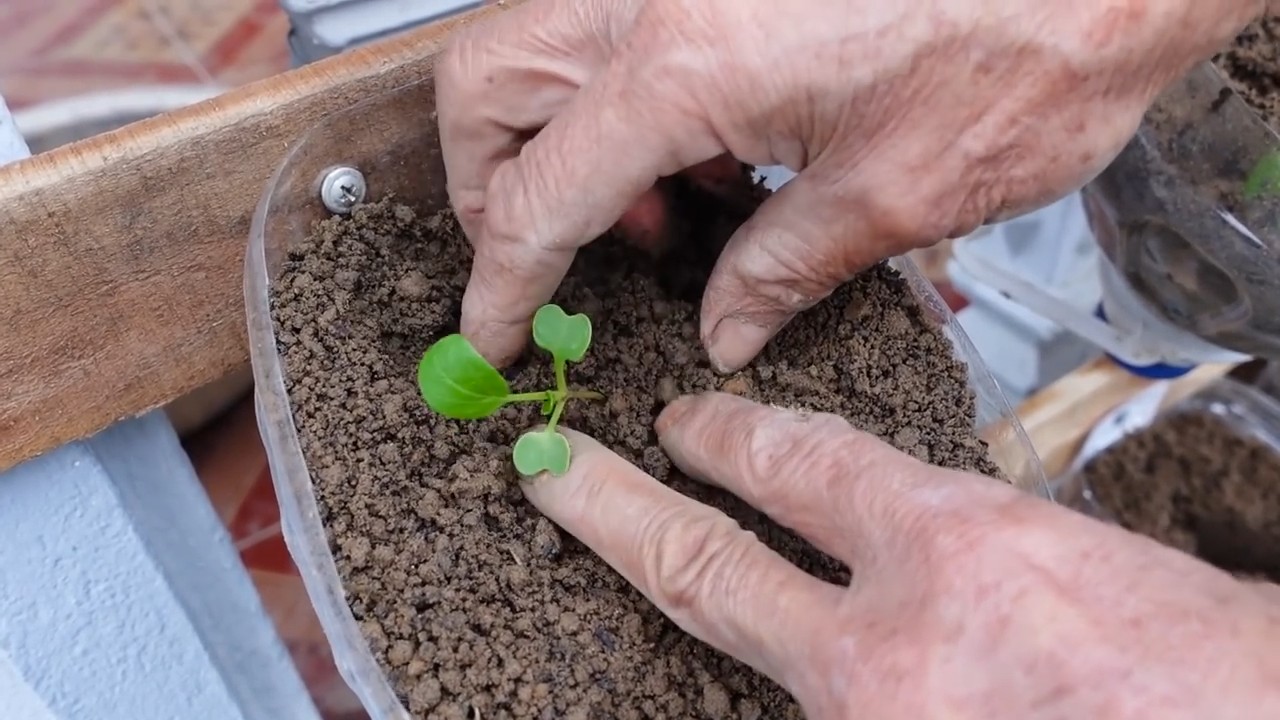
3. Sowing Seeds or Planting Seedlings
Here you have two options: either you grow your Bok Choy plants from seed, or you buy pre-grown seedlings. I personally find seedlings easier, but both work!
Sowing seeds:
- Make seed furrows: Make small seed furrows in the soil with your finger or a trowel. The furrows should be about 1 cm deep.
- Sow the seeds: Sow the seeds in the furrows. Make sure the seeds are not too close together. A distance of about 2-3 cm is ideal.
- Cover with soil: Cover the seeds with a thin layer of soil.
- Water in: Water the soil gently to moisten the seeds. It’s best to use a watering can with a sprinkler head so as not to wash the seeds away.
- Keep moist: Keep the soil moist until the seeds germinate. This can take 5-10 days depending on temperature and moisture.
Planting seedlings:
- Dig holes: Dig holes in the soil with a trowel that are large enough to accommodate the root balls of the seedlings.
- Insert seedlings: Carefully remove the seedlings from their pots and place them in the holes. Make sure that the top of the root ball is level with the soil surface.
- Fill with soil: Fill the holes with soil and press the soil down lightly.
- Water in: Water the seedlings thoroughly.
4. Caring for Your Bok Choy Garden
Now comes the most important part: the care! Bok Choy is relatively easy to care for, but you should pay attention to a few things.
- Watering: Water your Bok Choy plants regularly, especially in dry weather. The soil should always be slightly moist, but not wet. It is best to water in the morning or evening to avoid evaporation.
- Fertilizing: Fertilize your Bok Choy plants every 2-3 weeks with an organic fertilizer. This promotes growth and ensures a rich harvest. I like to use compost tea or diluted nettle tea.
- Weed control: Remove weeds regularly to prevent them from taking nutrients and water from your Bok Choy plants.
- Pest control: Unfortunately, Bok Choy is susceptible to pests such as snails, aphids, and cabbage whites. Check your plants regularly and control pests if necessary. Snail bait or setting up beer traps helps against snails. Against aphids, you can spray the plants with a jet of water or treat them with a soap solution. You can cover the plants with a net to protect them from cabbage whites.
- Mulching: Cover the soil around your Bok Choy plants with mulch to retain moisture in the soil and suppress weeds. Straw, wood chips, or grass clippings are good mulch materials.
- Sun protection (optional): If your roof is very sunny, a shade net can be helpful to protect the plants from burns. Young plants are particularly sensitive to strong sunlight.
5. Harvest Time!
After about 4-6 weeks, you can harvest your Bok Choy!
- Harvesting time: You can harvest Bok Choy as soon as the leaves have reached a reasonable size. The leaves should be firm and crisp.
- Harvesting method: Cut the leaves with a sharp knife or scissors. You can either harvest the whole plants or just the outer leaves to let the inner leaves continue to grow.
- Storage: Bok Choy can be stored in the refrigerator for about a week. Wrap the leaves in a damp cloth to keep them fresh.
Additional Tips for Your Rooftop Garden
Wind protection: Roofs are often windy. Place your containers in a sheltered spot or build a small windbreak.
Irrigation system: If you don’t have time to water regularly, you can install an automatic irrigation system.
Conclusion
So, there you have it! Transforming your rooftop into a thriving bok choy garden is not only achievable, but incredibly rewarding. We’ve walked you through the process, highlighting the ease and accessibility of this DIY project. But why is this a must-try? Beyond the obvious benefit of fresh, organic produce right at your fingertips, rooftop bok choy gardening offers a unique connection to nature, even in the heart of the city. It’s a chance to engage in sustainable practices, reduce your carbon footprint, and enjoy the satisfaction of nurturing something from seed to harvest.
Think about the possibilities! Imagine stepping onto your rooftop, selecting crisp, vibrant bok choy leaves for a stir-fry, salad, or even a refreshing juice. No more trips to the grocery store, no more worrying about pesticides or questionable origins. You control the entire process, ensuring the highest quality and freshest flavor.
But the benefits extend beyond the culinary. A rooftop garden provides insulation, helping to regulate your home’s temperature and potentially lowering energy bills. It also creates a beautiful, tranquil space, a green oasis amidst the urban landscape. The simple act of tending to your plants can be incredibly therapeutic, offering a welcome escape from the stresses of daily life.
Now, let’s talk variations. While we’ve focused on bok choy, your rooftop garden can be adapted to accommodate a variety of other leafy greens and vegetables. Consider adding some companion plants like marigolds to deter pests or herbs like cilantro and chives to complement your bok choy dishes. Experiment with different container sizes and arrangements to maximize your space and create a visually appealing design. You could even incorporate a small composting system to recycle kitchen scraps and enrich your soil.
Don’t be afraid to get creative and personalize your rooftop garden to suit your individual needs and preferences. The key is to start small, learn as you go, and most importantly, have fun!
We understand that embarking on a new gardening project can be daunting, but we assure you that rooftop bok choy gardening is surprisingly simple and accessible, even for beginners. With a little planning, preparation, and dedication, you can transform your rooftop into a flourishing source of fresh, healthy food.
We wholeheartedly encourage you to give this DIY trick a try. The rewards are well worth the effort. And once you’ve experienced the joy of harvesting your own homegrown bok choy, we’re confident that you’ll be hooked!
We’d love to hear about your experiences! Share your photos, tips, and challenges in the comments section below. Let’s create a community of rooftop gardeners, supporting and inspiring each other to grow our own food and create more sustainable urban environments. So, grab your seeds, gather your supplies, and get ready to transform your rooftop into a bok choy paradise! Happy gardening!
Frequently Asked Questions (FAQ)
What kind of soil is best for rooftop bok choy gardening?
The ideal soil for rooftop bok choy gardening is a well-draining potting mix that is rich in organic matter. Avoid using garden soil, as it can be too heavy and compact for containers. Look for a potting mix specifically formulated for vegetables or create your own by combining equal parts of compost, peat moss (or coconut coir), and perlite or vermiculite. This combination provides the necessary nutrients, drainage, and aeration for healthy bok choy growth. Adding a slow-release fertilizer at planting time can also help to ensure a steady supply of nutrients throughout the growing season. Remember to check the pH of your soil, as bok choy prefers a slightly acidic to neutral pH of around 6.0 to 7.0. You can easily test the pH using a soil testing kit available at most garden centers.
How much sunlight does bok choy need on a rooftop?
Bok choy thrives in full sun, requiring at least 6 hours of direct sunlight per day. However, it can also tolerate partial shade, especially in hotter climates. If your rooftop receives less than 6 hours of direct sunlight, consider using grow lights to supplement the natural light. Position your containers in the sunniest spot on your rooftop and monitor your plants closely. If you notice that the leaves are pale or leggy, it may indicate that they are not getting enough sunlight. In extremely hot weather, providing some afternoon shade can help to prevent the leaves from scorching.
How often should I water my rooftop bok choy?
Watering frequency depends on several factors, including the weather, the size of your containers, and the type of potting mix you are using. Generally, you should water your bok choy whenever the top inch of soil feels dry to the touch. Avoid overwatering, as this can lead to root rot. During hot, dry weather, you may need to water daily, while during cooler, wetter weather, you may only need to water every few days. When watering, water deeply and thoroughly, ensuring that the entire root ball is moistened. Avoid watering the leaves, as this can increase the risk of fungal diseases. Consider using a soaker hose or drip irrigation system to deliver water directly to the roots.
What are some common pests and diseases that affect bok choy, and how can I prevent them?
Bok choy can be susceptible to several pests and diseases, including aphids, cabbage worms, flea beetles, and fungal diseases like downy mildew and clubroot. To prevent these problems, start with healthy seedlings and use a well-draining potting mix. Regularly inspect your plants for signs of pests or diseases and take action promptly. Handpick pests or use insecticidal soap or neem oil to control infestations. To prevent fungal diseases, ensure good air circulation around your plants, avoid overhead watering, and remove any infected leaves immediately. Crop rotation can also help to prevent soilborne diseases. Consider using companion planting to deter pests. For example, planting marigolds near your bok choy can help to repel aphids.
How do I harvest bok choy from my rooftop garden?
You can harvest bok choy at any stage of growth, depending on your preference. For baby bok choy, harvest when the leaves are about 4-6 inches long. For mature bok choy, harvest when the heads are firm and compact, typically about 6-8 weeks after planting. To harvest, simply cut the entire head of bok choy at the base of the plant using a sharp knife. Alternatively, you can harvest individual leaves as needed, starting with the outer leaves. This will allow the plant to continue producing new leaves. After harvesting, wash the bok choy thoroughly and store it in the refrigerator for up to a week.
Can I grow bok choy on my rooftop during the winter?
Whether you can grow bok choy on your rooftop during the winter depends on your climate. Bok choy is a cool-season crop that can tolerate light frosts. In mild climates, you may be able to grow bok choy throughout the winter with minimal protection. However, in colder climates, you will need to provide some protection from the cold, such as a cold frame, greenhouse, or row covers. Choose a variety of bok choy that is known to be cold-hardy and plant it in a sheltered location on your rooftop. Monitor the weather closely and take action to protect your plants from extreme cold.
What are some creative ways to use bok choy from my rooftop garden?
Bok choy is a versatile vegetable that can be used in a variety of dishes. It can be stir-fried, steamed, boiled, or eaten raw in salads. It pairs well with a variety of flavors, including garlic, ginger, soy sauce, sesame oil, and chili peppers. Try adding bok choy to soups, stews, and noodle dishes. You can also use it as a filling for dumplings or spring rolls. For a simple and healthy side dish, try steaming bok choy with a drizzle of sesame oil and a sprinkle of sesame seeds. Get creative and experiment with different recipes to find your favorite ways to use your homegrown bok choy.
How do I ensure my rooftop can handle the weight of a garden?
This is a crucial question! Before embarking on any rooftop gardening project, it’s essential to assess the structural integrity of your roof. Consult with a qualified structural engineer or building professional to determine the weight-bearing capacity of your roof. They can advise you on the maximum weight per square foot that your roof can safely support. Consider the weight of the containers, soil, water, and mature plants. Distribute the weight evenly across the roof and avoid placing heavy containers near the edges. If you have any doubts about the safety of your roof, it’s best to err on the side of caution and choose lighter containers or limit the size of your garden. Safety first!


Leave a Comment