

Potato bucket harvest: Ever dreamt of digging up a mountain of potatoes from a single container, right in your backyard or even on your balcony? Imagine the satisfaction of harvesting your own fresh, homegrown potatoes with minimal effort and maximum yield! Well, stop dreaming and start doing! This DIY guide will unlock the secrets to a bountiful potato harvest using the humble bucket.
Growing potatoes in containers isn’t a new fad. In fact, container gardening has been practiced for centuries, with evidence suggesting its use in ancient civilizations. While not specifically always in buckets, the concept of controlled environments for cultivation has allowed people to grow food in limited spaces, from urban apartments to arid landscapes. Today, the potato bucket harvest method is gaining immense popularity, and for good reason!
Let’s face it, traditional in-ground potato farming can be labor-intensive and space-consuming. Many of us lack the sprawling gardens needed for a decent harvest. That’s where this DIY trick comes in. With a simple bucket, some soil, and a few seed potatoes, you can bypass the digging, weeding, and potential soil-borne diseases that often plague traditional potato crops. Plus, the ease of moving the bucket allows you to chase the sun and optimize growing conditions. I’m excited to share this easy and effective method with you, so let’s get started and get ready for a delicious and rewarding potato harvest!
DIY Potato Bucket Harvest: From Seed to Spud-tacular Feast!
Okay, potato lovers, gather ’round! I’m going to walk you through my favorite way to grow and harvest potatoes – in buckets! It’s perfect for small spaces, beginners, and anyone who wants a super easy and rewarding gardening experience. Plus, the harvest is a breeze! Forget digging around in the dirt; we’re lifting and dumping! Let’s get started!
What You’ll Need
Before we dive in, let’s make sure you have everything you need. This is crucial for a smooth and successful potato-growing adventure.
* Buckets: 5-gallon buckets are ideal. You can use plastic or even repurposed containers, but make sure they’re clean and have drainage holes. I usually aim for at least 3 buckets to get a decent harvest.
* Seed Potatoes: These aren’t seeds, but rather small potatoes specifically grown for planting. You can find them at your local garden center. Choose a variety you love to eat! I personally love Yukon Gold for their buttery flavor.
* Potting Mix: Don’t use garden soil! It’s too heavy and compacts easily. A good quality potting mix is essential for drainage and aeration.
* Compost: This is your potato’s best friend! Compost provides nutrients and helps retain moisture.
* Water: Obvious, but important!
* Sharp Knife: For cutting the seed potatoes (if needed).
* Gloves: To keep your hands clean.
* Optional: Fertilizer specifically formulated for potatoes.
Preparing Your Seed Potatoes
This step is crucial for getting your potatoes off to a good start. We want to encourage those little eyes to sprout!
1. Inspect Your Seed Potatoes: Look for healthy, firm potatoes with “eyes” (small buds) starting to sprout. If your seed potatoes are small (like golf ball size), you can plant them whole.
2. Cutting Larger Seed Potatoes: If your seed potatoes are larger than a golf ball, you’ll want to cut them into pieces. Each piece should have at least 2-3 eyes. This allows you to get more plants from a single seed potato.
3. Let the Cut Pieces Cure: After cutting, let the pieces sit out for a day or two to allow the cut surfaces to callous over. This helps prevent rot when you plant them. I usually spread them out on a tray in a cool, dry place.
Planting Your Potatoes
Now for the fun part! Getting those potatoes in the ground (or, rather, in the bucket!).
1. Drill Drainage Holes: If your buckets don’t already have them, drill several drainage holes in the bottom. This is absolutely essential to prevent waterlogging, which can rot your potatoes.
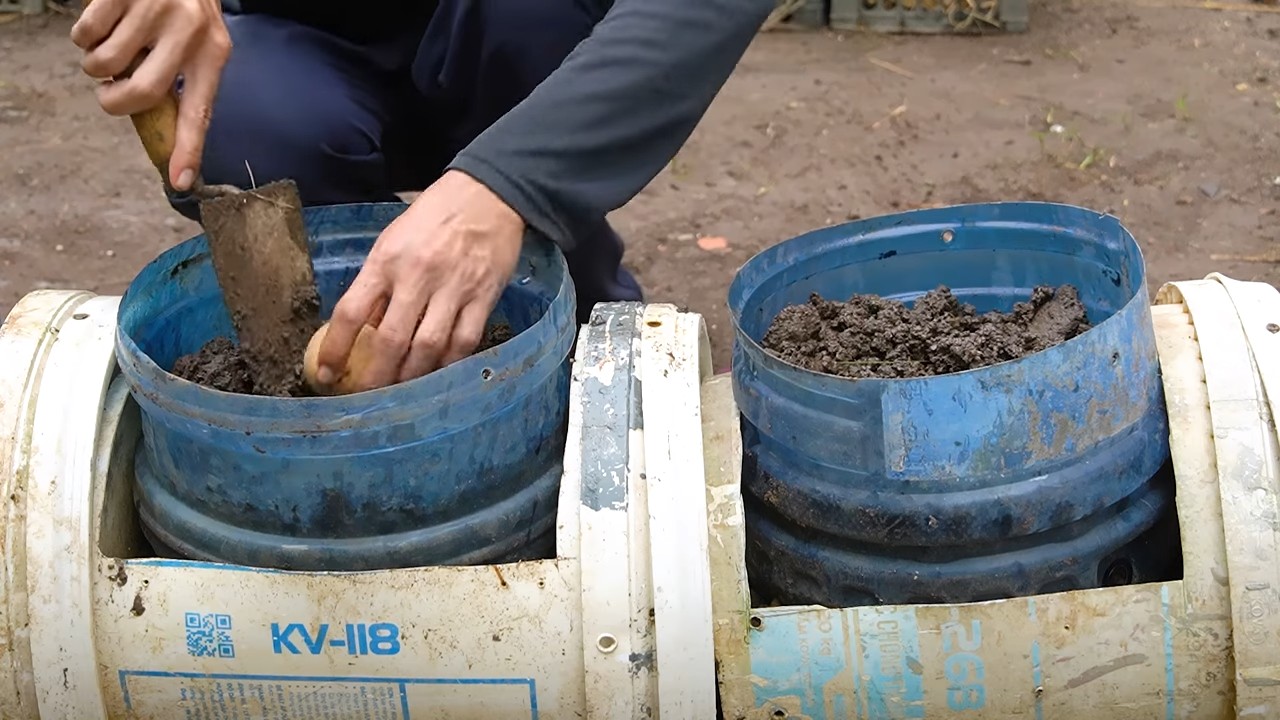
2. First Layer of Soil: Add about 4-6 inches of potting mix to the bottom of each bucket. Mix in a generous amount of compost. I usually aim for a 50/50 mix of potting mix and compost.
3. Planting the Seed Potatoes: Place the seed potato pieces (or whole small potatoes) on top of the soil, with the eyes facing up. Space them evenly in the bucket. For a 5-gallon bucket, I usually plant 2-3 pieces.
4. Cover with Soil: Cover the seed potatoes with another 4-6 inches of potting mix and compost mixture.
5. Water Thoroughly: Water the buckets well until water drains out of the bottom.
“Hilling” Your Potatoes
This is a key technique for maximizing your potato harvest. As the potato plants grow, you’ll need to add more soil to encourage more potatoes to form along the stems.
1. Wait for Sprouts: Once the potato plants have sprouted and are about 6-8 inches tall, it’s time to “hill” them.
2. Add More Soil: Add a mixture of potting mix and compost around the base of the plants, burying the stems up to the bottom set of leaves. Leave the top leaves exposed.
3. Repeat the Process: Continue to “hill” the potatoes every few weeks as they grow, until the bucket is almost full. This encourages the plants to produce more potatoes along the buried stems.
Caring for Your Potato Plants
Consistent care is essential for a bountiful harvest.
1. Watering: Potatoes need consistent moisture, especially during tuber formation. Water deeply whenever the top inch of soil feels dry. Avoid overwatering, which can lead to rot.
2. Sunlight: Potatoes need at least 6-8 hours of sunlight per day. Place your buckets in a sunny location.
3. Fertilizing (Optional): If you want to give your potatoes an extra boost, you can fertilize them every few weeks with a fertilizer specifically formulated for potatoes. Follow the instructions on the fertilizer package.
4. Pest Control: Keep an eye out for pests like potato beetles and aphids. Hand-picking them off the plants is often the easiest solution. You can also use organic pest control methods if necessary.
Harvesting Your Potatoes
This is the moment we’ve all been waiting for! The best part about growing potatoes in buckets is how easy it is to harvest them.
1. When to Harvest: You can start harvesting “new potatoes” (small, tender potatoes) a few weeks after the plants flower. For a full harvest, wait until the plants have died back and the foliage has turned yellow or brown. This usually takes about 80-100 days from planting.
2. Stop Watering: About two weeks before you plan to harvest, stop watering the plants. This helps the potatoes to cure and develop thicker skins.
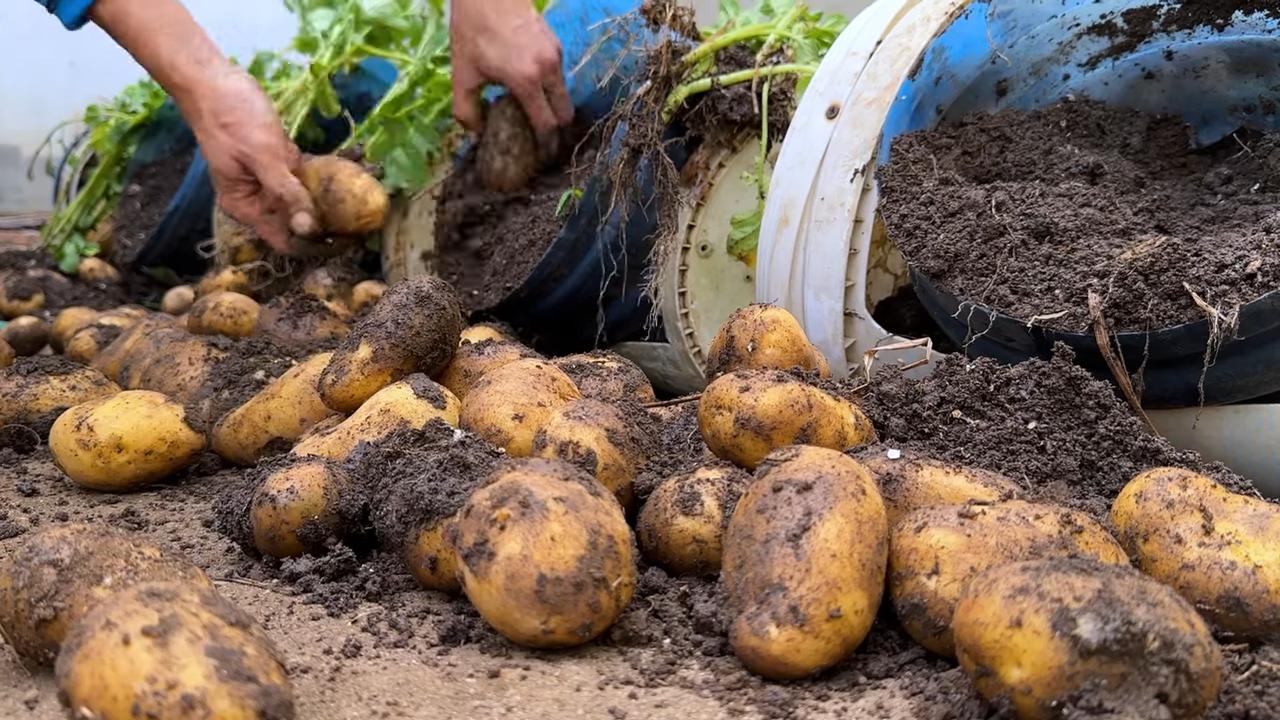
3. The Big Dump: Now for the fun part! Simply tip the bucket over onto a tarp or large container.
4. Dig Through the Soil: Gently dig through the soil to find all the potatoes.
5. Curing Your Potatoes: After harvesting, let the potatoes cure in a cool, dark, and well-ventilated place for about a week. This helps them to develop thicker skins and store longer.
Troubleshooting
Even with the best planning, things can sometimes go wrong. Here are a few common problems and how to fix them:
* Potato Blight: This fungal disease can cause brown spots on the leaves and tubers. To prevent blight, choose disease-resistant varieties and ensure good air circulation. If blight does occur, remove infected leaves immediately.
* Potato Beetles: These pests can quickly defoliate your potato plants. Hand-picking them off the plants is often the easiest solution. You can also use organic insecticides.
* Rotting Potatoes: This is usually caused by overwatering or poor drainage. Make sure your buckets have adequate drainage holes and avoid overwatering.
* Small Potatoes: This can be caused by a lack of nutrients or insufficient hilling. Make sure you’re using a good quality potting mix and compost, and hill your potatoes regularly.
Enjoy Your Homegrown Potatoes!
Congratulations! You’ve successfully grown and harvested your own potatoes in buckets. Now it’s time to enjoy the fruits (or rather, vegetables) of your labor! There are endless ways to cook and enjoy your homegrown potatoes. From classic mashed potatoes to crispy roasted potatoes, the possibilities are endless. I love simply boiling them with a little salt and butter – the flavor is incredible!
Growing potatoes in buckets is a fun, easy, and rewarding experience. I hope this guide has inspired you to give it a try. Happy gardening!
Conclusion
So, there you have it! The potato bucket harvest method is more than just a gardening trend; it’s a game-changer for anyone looking to grow their own delicious potatoes, regardless of space constraints or gardening experience. We’ve walked you through the simple steps, highlighted the benefits, and hopefully, inspired you to give it a try.
Why is this DIY trick a must-try? Because it offers a potent combination of convenience, efficiency, and yield. Imagine harvesting a bountiful crop of fresh, homegrown potatoes from a single bucket, right on your patio or balcony. No more back-breaking digging in vast gardens, no more worrying about soil conditions, and no more wasted space. The potato bucket harvest puts the power of potato production directly into your hands.
But the beauty of this method lies not only in its simplicity but also in its adaptability. Feel free to experiment with different potato varieties to discover your favorites. Russets, Yukon Golds, fingerlings – the choice is yours! You can also adjust the size of your bucket to suit your needs and available space. Want an even bigger harvest? Try using multiple buckets!
Consider adding companion plants to your potato bucket. Marigolds can help deter pests, while basil can improve the flavor of your potatoes. You can also experiment with different soil mixtures to find what works best for your local climate and potato variety. Some gardeners swear by adding compost tea to their watering routine for an extra boost of nutrients.
Don’t be afraid to get creative and personalize your potato bucket harvest experience. The most important thing is to have fun and enjoy the process of growing your own food.
We are confident that once you experience the joy of harvesting your own potatoes from a bucket, you’ll be hooked. It’s a rewarding and satisfying experience that connects you to the earth and provides you with fresh, healthy food.
So, what are you waiting for? Grab a bucket, some seed potatoes, and get started on your own potato bucket harvest adventure today! We encourage you to document your progress, share your tips and tricks, and let us know how it goes. Post pictures of your bountiful harvests on social media and tag us! We can’t wait to see what you grow. Let’s spread the word about this fantastic DIY gardening method and empower everyone to grow their own potatoes, one bucket at a time. Happy gardening!
Frequently Asked Questions (FAQ)
What kind of potatoes are best for bucket growing?
Almost any potato variety can be grown in a bucket, but some tend to perform better than others. Determinate varieties, which produce all their potatoes at the bottom of the plant, are generally a good choice. These include varieties like Yukon Gold, Red Pontiac, and Irish Cobbler. Indeterminate varieties, which produce potatoes along the stem as it grows, also work well, but you’ll need to hill them more frequently. Fingerling potatoes are also a popular choice for bucket growing due to their smaller size and prolific production. Ultimately, the best variety for you will depend on your personal preferences and local climate. Experiment with different varieties to see what grows best in your area.
How big of a bucket do I need?
A 5-gallon bucket is generally considered the minimum size for growing potatoes. However, larger buckets, such as 10-gallon or even larger containers, will provide more room for the roots to grow and can potentially result in a larger harvest. The size of the bucket will also depend on the variety of potato you are growing. Smaller varieties, like fingerlings, may do well in a 5-gallon bucket, while larger varieties may benefit from a larger container. Make sure the bucket has drainage holes to prevent waterlogging.
How often should I water my potato bucket?
Potatoes need consistent moisture, but they don’t like to be waterlogged. Water your potato bucket when the top inch of soil feels dry to the touch. The frequency of watering will depend on the weather conditions, the size of your bucket, and the type of soil you are using. In hot, dry weather, you may need to water your potatoes every day, while in cooler, wetter weather, you may only need to water them every few days. Be sure to check the soil moisture regularly and adjust your watering schedule accordingly. Overwatering can lead to root rot, so it’s important to ensure proper drainage.
What kind of soil should I use?
Potatoes need well-draining soil that is rich in organic matter. A good potting mix is essential. You can use a commercially available potting mix or create your own by combining equal parts of compost, peat moss (or coconut coir), and perlite or vermiculite. Avoid using garden soil, as it can be too heavy and may not drain well. The soil should be slightly acidic, with a pH between 6.0 and 6.5. Adding compost to the soil will provide essential nutrients and improve drainage.
How do I know when my potatoes are ready to harvest?
The timing of your potato bucket harvest depends on the variety of potato you are growing and your personal preferences. Generally, potatoes are ready to harvest when the foliage begins to turn yellow and die back. This usually occurs about 70-90 days after planting. You can also gently dig around the edges of the bucket to check the size of the potatoes. If they are the size you desire, you can harvest them. For “new potatoes,” you can harvest them earlier, when they are smaller and more tender. To harvest, simply tip the bucket over and carefully remove the potatoes from the soil.
Can I reuse the soil from my potato bucket?
It’s generally not recommended to reuse the soil from your potato bucket for growing potatoes again, as it may contain pests or diseases that can affect future crops. However, you can reuse the soil for other plants that are not susceptible to the same diseases. Before reusing the soil, it’s a good idea to amend it with fresh compost and other organic matter to replenish nutrients. You can also sterilize the soil by baking it in the oven or solarizing it in the sun.
What if I don’t have a sunny spot?
Potatoes need at least 6-8 hours of sunlight per day to thrive. If you don’t have a sunny spot, you can try using grow lights. Place the grow lights close to the plants and provide them with 12-16 hours of light per day. You can also try rotating the bucket regularly to ensure that all sides of the plant receive adequate sunlight. While potatoes can tolerate some shade, they will not produce as many potatoes if they don’t receive enough sunlight.
Can I grow potatoes in a bucket indoors?
Yes, you can grow potatoes in a bucket indoors, but you’ll need to provide them with adequate light and ventilation. Use grow lights to supplement natural light and ensure that the plants receive at least 12-16 hours of light per day. You’ll also need to provide good ventilation to prevent fungal diseases. Make sure the bucket has drainage holes to prevent waterlogging. Growing potatoes indoors can be a fun and rewarding experience, especially if you live in an area with a short growing season.
What are some common problems with growing potatoes in buckets?
Some common problems with growing potatoes in buckets include pests, diseases, and nutrient deficiencies. Pests such as aphids, potato beetles, and flea beetles can damage the foliage and tubers. Diseases such as early blight, late blight, and potato scab can also affect the plants. Nutrient deficiencies can lead to stunted growth and poor yields. To prevent these problems, use healthy seed potatoes, provide good drainage, and monitor your plants regularly for signs of pests or diseases. You can also use organic pest control methods and fertilize your plants with a balanced fertilizer.
How do I store my harvested potatoes?
Store your harvested potatoes in a cool, dark, and dry place. A root cellar is ideal, but a basement or garage can also work. Avoid storing potatoes in the refrigerator, as this can cause them to develop a sweet taste. Before storing, cure the potatoes by allowing them to dry for a few days in a well-ventilated area. This will help to harden the skins and prevent spoilage. Store the potatoes in a single layer in a well-ventilated container, such as a cardboard box or a mesh bag. Check the potatoes regularly for signs of spoilage and remove any that are rotting. Properly stored potatoes can last for several months.

Leave a Comment