

Plastic waste vegetable garden: Ever dream of transforming that mountain of plastic bottles and containers into a thriving, edible oasis? I know I have! It might sound like something out of a futuristic eco-novel, but trust me, it’s totally achievable, and incredibly rewarding. We’re not just talking about recycling; we’re talking about upcycling with a purpose, creating a beautiful and productive space while reducing our environmental footprint.
For centuries, resourceful gardeners have found innovative ways to cultivate food, often out of necessity. From the hanging gardens of Babylon to the victory gardens of World War II, the spirit of making the most of available resources has always been strong. Today, that spirit is more relevant than ever. With growing concerns about plastic pollution and the desire for fresh, locally sourced food, the idea of a plastic waste vegetable garden is gaining serious traction.
Why should you jump on the bandwagon? Well, think about it: you’re diverting waste from landfills, saving money on gardening supplies, and growing your own delicious, healthy vegetables. Plus, it’s a fantastic project for the whole family! This DIY guide will walk you through everything you need to know, from choosing the right plastics to planting your first seeds. Get ready to turn trash into treasure and cultivate a garden that’s both good for you and good for the planet!
Turning Trash into Treasure: Building a Thriving Vegetable Garden from Plastic Waste
Hey there, fellow gardening enthusiasts! I’m so excited to share this project with you – a way to not only grow your own delicious veggies but also do your part for the environment. We’re going to build a fantastic vegetable garden using recycled plastic waste! It’s surprisingly easy, budget-friendly, and incredibly rewarding. Get ready to transform those plastic bottles, containers, and even old buckets into a vibrant, productive garden.
What You’ll Need: The Gathering of Supplies
Before we dive in, let’s gather our supplies. This is where the fun begins – rummaging through your recycling bin and maybe even asking friends and neighbors for their plastic waste!
* Plastic Bottles (various sizes): Think soda bottles, water bottles, juice containers – the more, the merrier! These will become our individual planters, especially great for herbs and smaller vegetables like lettuce and spinach.
* Plastic Containers (larger sizes): Yogurt tubs, ice cream buckets, storage containers – these are perfect for larger plants like tomatoes, peppers, and eggplants. Make sure they’re food-grade plastic if possible, especially for edibles.
* Plastic Crates or Baskets: These can be used as raised beds or to hold multiple smaller containers. They provide structure and make your garden look more organized.
* Old Plastic Buckets: These are fantastic for growing potatoes or other root vegetables.
* Potting Soil: Choose a good quality potting mix that’s well-draining and nutrient-rich.
* Seeds or Seedlings: Select your favorite vegetables, herbs, and flowers. Consider your climate and the amount of sunlight your garden will receive.
* Scissors or a Utility Knife: For cutting and modifying the plastic containers. Be careful!
* Drill or Screwdriver: To create drainage holes in the bottom of the containers.
* Gloves: To protect your hands while working with soil and plastic.
* Measuring Tape or Ruler: For accurate cutting and spacing.
* Permanent Marker: To label your plants.
* Optional: Landscape Fabric: To line the bottom of larger containers or raised beds to prevent soil erosion.
* Optional: Gravel or Small Stones: To improve drainage in the bottom of the containers.
* Optional: Paint (non-toxic): To decorate your containers and make your garden more visually appealing.
Preparing the Plastic Containers: The Foundation of Our Garden
This is a crucial step, so let’s take our time and do it right. We need to transform our plastic waste into suitable homes for our plants.
1. Cleaning: Thoroughly wash all the plastic containers with soap and water to remove any dirt, debris, or residue. This is especially important if the containers previously held food. Rinse them well and let them dry completely.
2. Drainage Holes: This is absolutely essential! Plants need drainage to prevent root rot. Use a drill or screwdriver to create several drainage holes in the bottom of each container. For smaller bottles, 3-4 holes should suffice. For larger containers, aim for 5-7 holes, evenly spaced.
3. Cutting (if necessary): If you’re using large bottles, you might want to cut them in half or create openings on the sides to allow for better airflow and sunlight penetration. Use scissors or a utility knife for this, and be extremely careful! Always cut away from yourself and use a stable surface. You can also cut off the top of bottles to create wider openings for planting.
4. Optional: Painting and Decorating: This is where you can get creative! Use non-toxic paint to decorate your containers. You can paint them solid colors, add patterns, or even create fun designs. This will not only make your garden look more attractive but also help protect the plastic from UV damage. Let the paint dry completely before moving on to the next step.
5. Optional: Adding Gravel for Drainage: For larger containers, consider adding a layer of gravel or small stones to the bottom before adding the potting soil. This will further improve drainage and prevent the soil from becoming waterlogged.
Planting Your Vegetables: Bringing Life to Our Creation
Now for the most exciting part – planting our vegetables!
1. Filling the Containers: Fill each container with potting soil, leaving about an inch or two of space at the top. This will prevent the soil from spilling out when you water your plants.
2. Planting Seeds or Seedlings: Follow the instructions on your seed packets or seedling labels for proper planting depth and spacing. Generally, you’ll want to create a small hole in the soil, place the seed or seedling in the hole, and gently cover it with soil.
3. Watering: Water your plants thoroughly after planting. Make sure the water drains out of the drainage holes.
4. Labeling: Use a permanent marker to label each container with the name of the plant. This will help you keep track of what you’ve planted and avoid any confusion later on.
5. Sunlight: Place your containers in a location that receives adequate sunlight. Most vegetables need at least 6-8 hours of sunlight per day.
Creating Different Garden Structures: Maximizing Space and Aesthetics
Let’s explore some creative ways to arrange our plastic containers to create different garden structures.
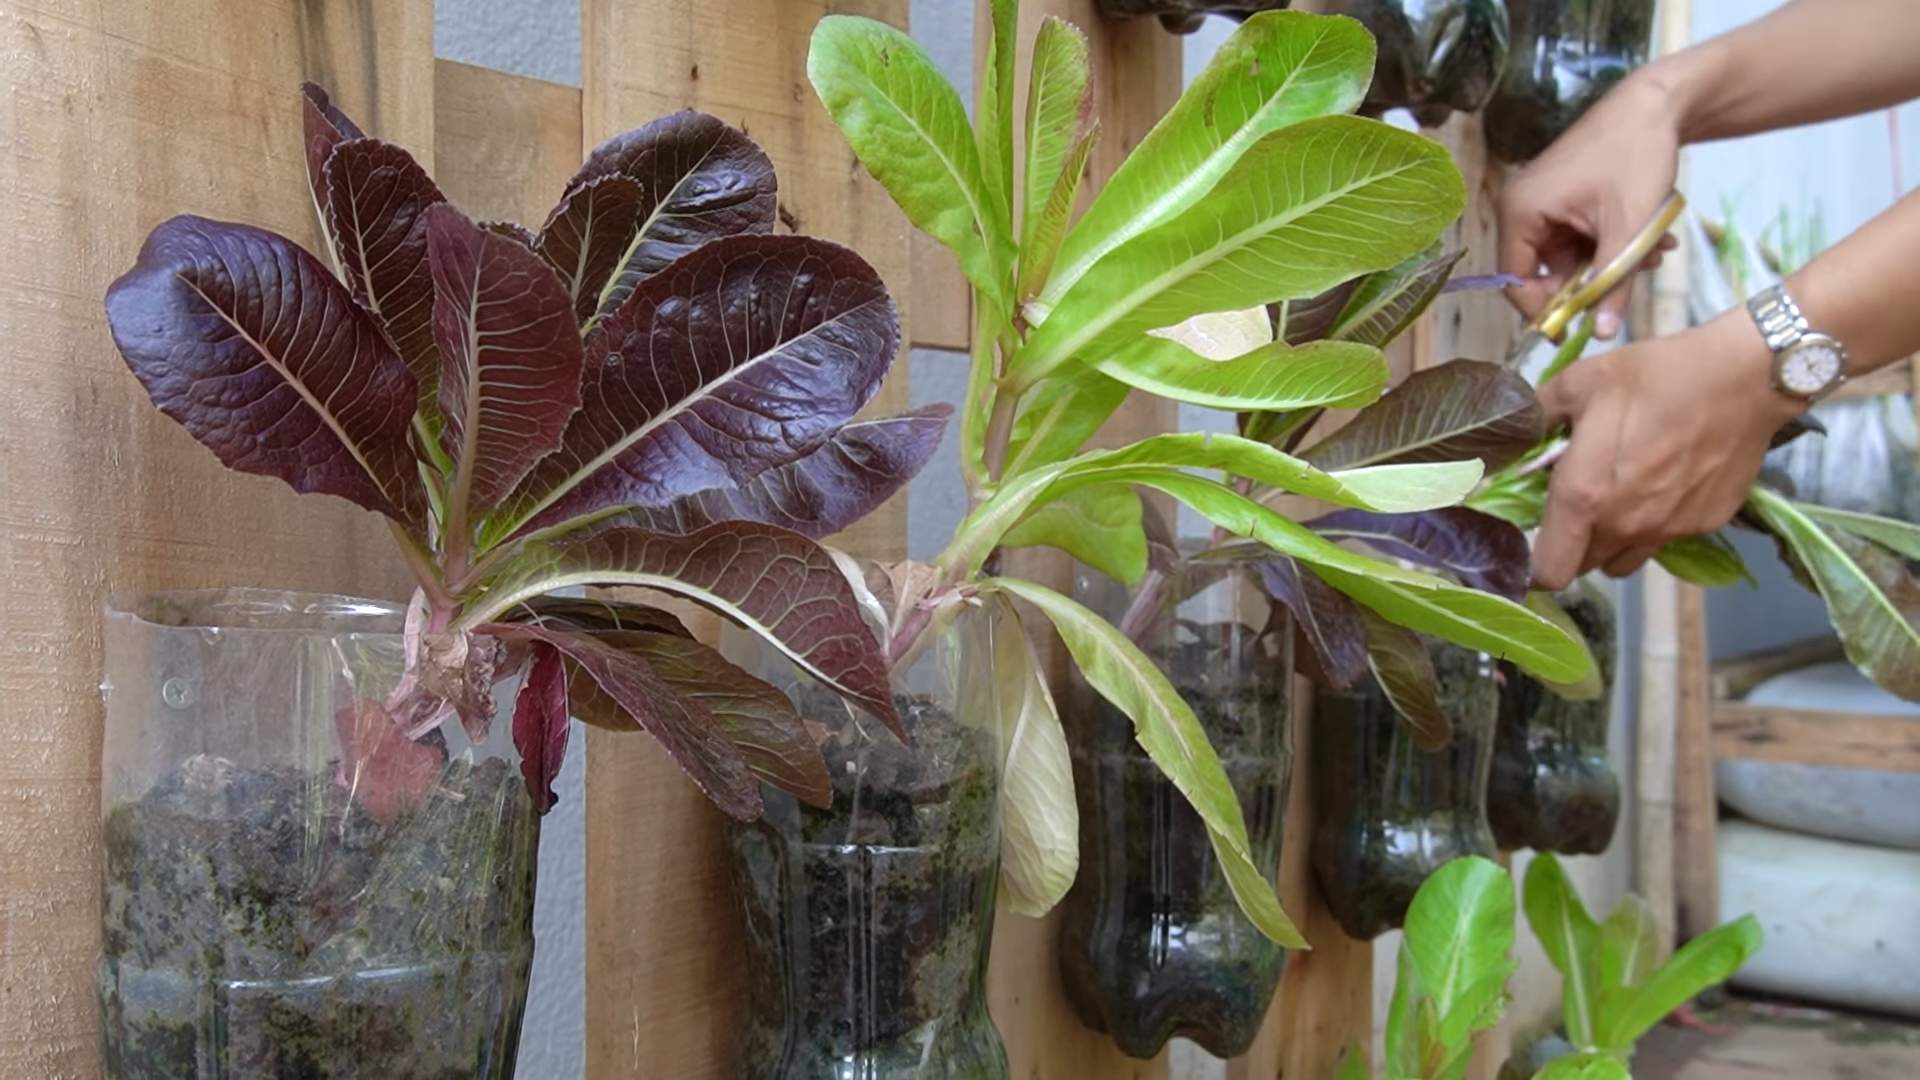
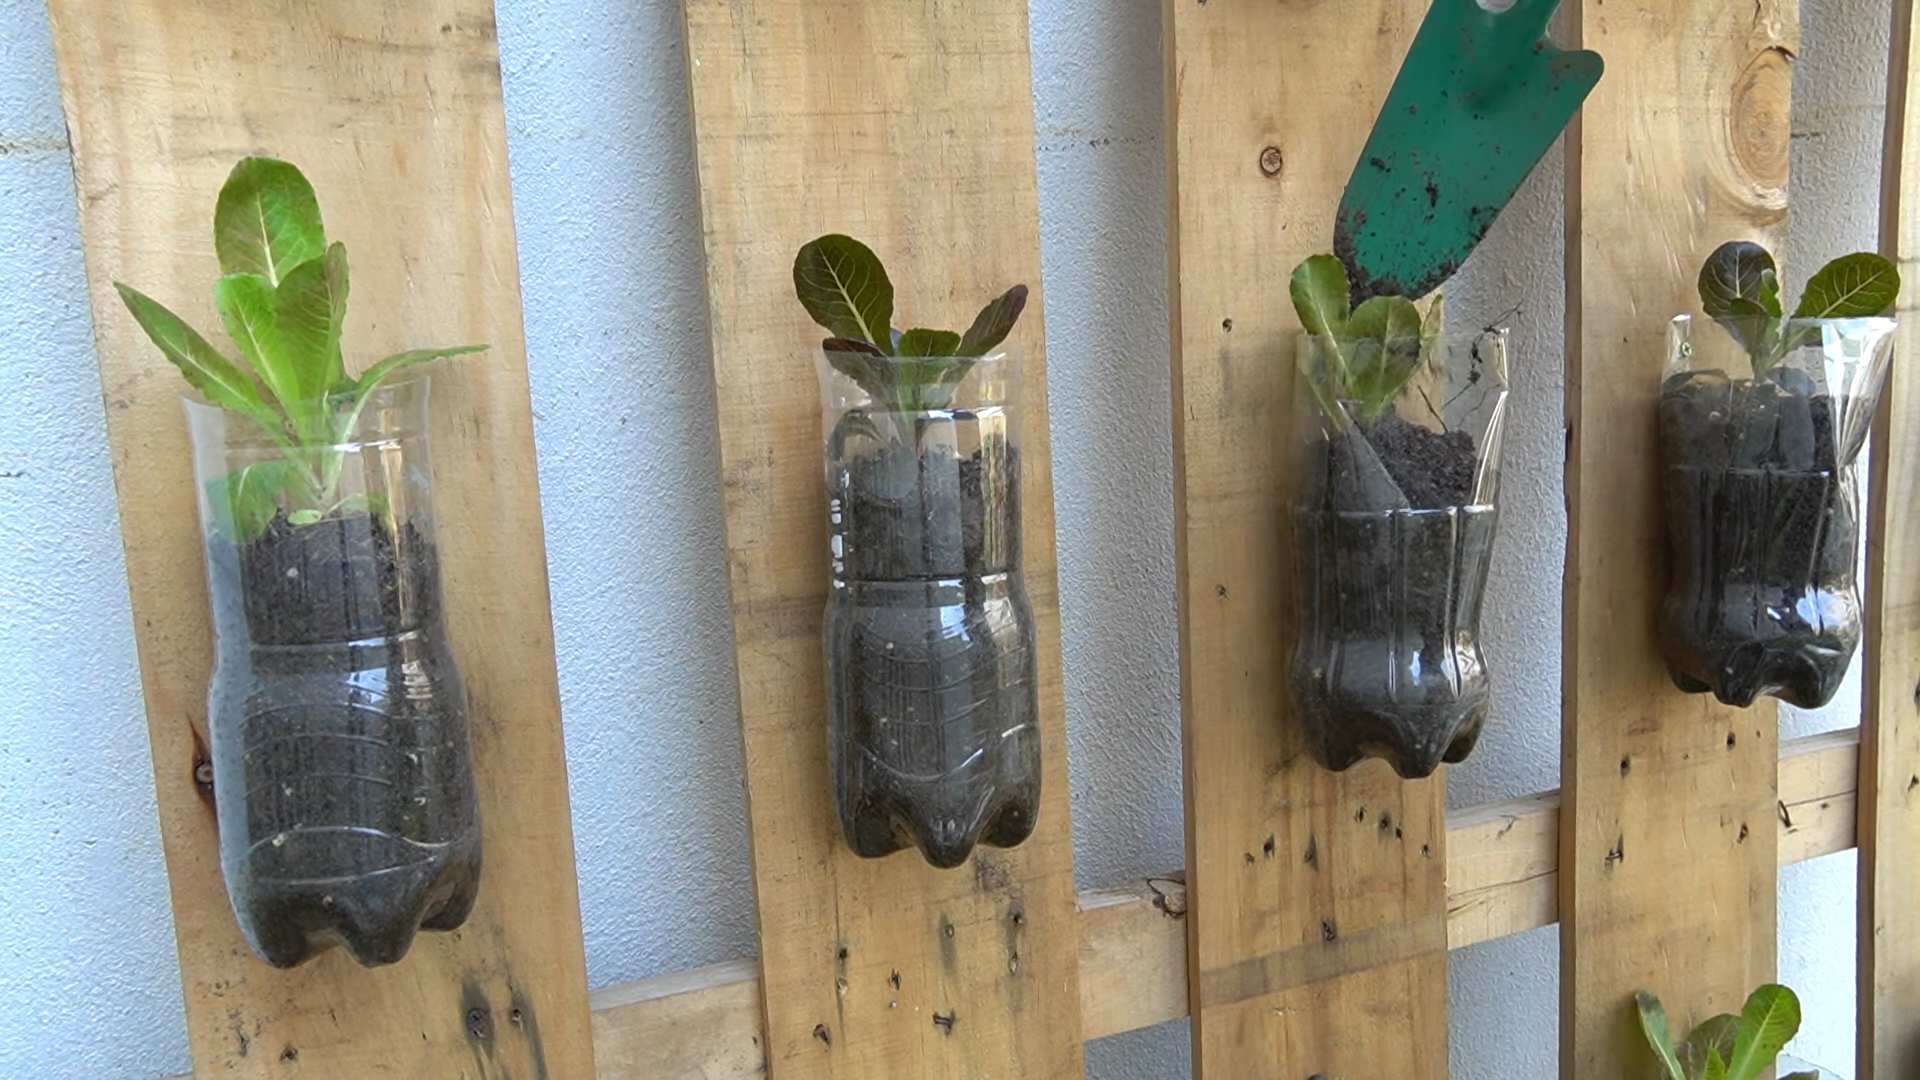
Vertical Garden with Plastic Bottles
This is a fantastic way to maximize space, especially if you have a small balcony or patio.
1. Prepare the Bottles: Cut a rectangular opening on one side of each bottle, large enough to plant your vegetables. Make sure to leave the bottle cap on to prevent soil from leaking out.
2. Create a Hanging System: You can use rope, wire, or even old clothesline to create a hanging system. Tie the bottles together, one above the other, creating a vertical chain.
3. Hang the Garden: Hang the vertical garden on a wall, fence, or balcony railing. Make sure it’s securely attached and can support the weight of the bottles and soil.
4. Plant and Water: Fill the bottles with potting soil, plant your vegetables, and water them thoroughly.
Raised Beds with Plastic Crates
This is a great way to create a more traditional garden bed using recycled plastic crates.
1. Prepare the Crates: Line the bottom of the crates with landscape fabric to prevent soil erosion.
2. Arrange the Crates: Arrange the crates in the desired shape and size for your raised bed. You can stack them on top of each other to create a higher bed.
3. Fill with Soil: Fill the crates with potting soil, leaving a few inches of space at the top.
4. Plant and Water: Plant your vegetables in the raised bed and water them thoroughly.
Hanging Baskets from Plastic Containers
This is a simple and elegant way to display your herbs and flowers.
1. Prepare the Containers: Drill three or four holes around the top edge of each container.
2. Attach Hanging Wires: Thread wires or ropes through the holes and tie them together to create a hanging basket.
3. Plant and Water: Fill the containers with potting soil, plant your herbs or flowers, and water them thoroughly.
Caring for Your Plastic Waste Vegetable Garden: Nurturing Your Plants
Now that our garden is planted, it’s important to provide proper care to ensure our plants thrive.
Hey there, fellow gardening enthusiasts! I’m so excited to share this project with you – a way to not only grow your own delicious veggies but also do your part for the environment. We’re going to build a fantastic vegetable garden using recycled plastic waste! It’s surprisingly easy, budget-friendly, and incredibly rewarding. Get ready to transform those plastic bottles, containers, and even old buckets into a vibrant, productive garden.
What You’ll Need: The Gathering of Supplies
Before we dive in, let’s gather our supplies. This is where the fun begins – rummaging through your recycling bin and maybe even asking friends and neighbors for their plastic waste!
* Plastic Bottles (various sizes): Think soda bottles, water bottles, juice containers – the more, the merrier! These will become our individual planters, especially great for herbs and smaller vegetables like lettuce and spinach.
* Plastic Containers (larger sizes): Yogurt tubs, ice cream buckets, storage containers – these are perfect for larger plants like tomatoes, peppers, and eggplants. Make sure they’re food-grade plastic if possible, especially for edibles.
* Plastic Crates or Baskets: These can be used as raised beds or to hold multiple smaller containers. They provide structure and make your garden look more organized.
* Old Plastic Buckets: These are fantastic for growing potatoes or other root vegetables.
* Potting Soil: Choose a good quality potting mix that’s well-draining and nutrient-rich.
* Seeds or Seedlings: Select your favorite vegetables, herbs, and flowers. Consider your climate and the amount of sunlight your garden will receive.
* Scissors or a Utility Knife: For cutting and modifying the plastic containers. Be careful!
* Drill or Screwdriver: To create drainage holes in the bottom of the containers.
* Gloves: To protect your hands while working with soil and plastic.
* Measuring Tape or Ruler: For accurate cutting and spacing.
* Permanent Marker: To label your plants.
* Optional: Landscape Fabric: To line the bottom of larger containers or raised beds to prevent soil erosion.
* Optional: Gravel or Small Stones: To improve drainage in the bottom of the containers.
* Optional: Paint (non-toxic): To decorate your containers and make your garden more visually appealing.
Preparing the Plastic Containers: The Foundation of Our Garden
This is a crucial step, so let’s take our time and do it right. We need to transform our plastic waste into suitable homes for our plants.
1. Cleaning: Thoroughly wash all the plastic containers with soap and water to remove any dirt, debris, or residue. This is especially important if the containers previously held food. Rinse them well and let them dry completely.
2. Drainage Holes: This is absolutely essential! Plants need drainage to prevent root rot. Use a drill or screwdriver to create several drainage holes in the bottom of each container. For smaller bottles, 3-4 holes should suffice. For larger containers, aim for 5-7 holes, evenly spaced.
3. Cutting (if necessary): If you’re using large bottles, you might want to cut them in half or create openings on the sides to allow for better airflow and sunlight penetration. Use scissors or a utility knife for this, and be extremely careful! Always cut away from yourself and use a stable surface. You can also cut off the top of bottles to create wider openings for planting.
4. Optional: Painting and Decorating: This is where you can get creative! Use non-toxic paint to decorate your containers. You can paint them solid colors, add patterns, or even create fun designs. This will not only make your garden look more attractive but also help protect the plastic from UV damage. Let the paint dry completely before moving on to the next step.
5. Optional: Adding Gravel for Drainage: For larger containers, consider adding a layer of gravel or small stones to the bottom before adding the potting soil. This will further improve drainage and prevent the soil from becoming waterlogged.
Planting Your Vegetables: Bringing Life to Our Creation
Now for the most exciting part – planting our vegetables!
1. Filling the Containers: Fill each container with potting soil, leaving about an inch or two of space at the top. This will prevent the soil from spilling out when you water your plants.
2. Planting Seeds or Seedlings: Follow the instructions on your seed packets or seedling labels for proper planting depth and spacing. Generally, you’ll want to create a small hole in the soil, place the seed or seedling in the hole, and gently cover it with soil.
3. Watering: Water your plants thoroughly after planting. Make sure the water drains out of the drainage holes.
4. Labeling: Use a permanent marker to label each container with the name of the plant. This will help you keep track of what you’ve planted and avoid any confusion later on.
5. Sunlight: Place your containers in a location that receives adequate sunlight. Most vegetables need at least 6-8 hours of sunlight per day.
Creating Different Garden Structures: Maximizing Space and Aesthetics
Let’s explore some creative ways to arrange our plastic containers to create different garden structures.
Vertical Garden with Plastic Bottles
This is a fantastic way to maximize space, especially if you have a small balcony or patio.
1. Prepare the Bottles: Cut a rectangular opening on one side of each bottle, large enough to plant your vegetables. Make sure to leave the bottle cap on to prevent soil from leaking out.
2. Create a Hanging System: You can use rope, wire, or even old clothesline to create a hanging system. Tie the bottles together, one above the other, creating a vertical chain.
3. Hang the Garden: Hang the vertical garden on a wall, fence, or balcony railing. Make sure it’s securely attached and can support the weight of the bottles and soil.
4. Plant and Water: Fill the bottles with potting soil, plant your vegetables, and water them thoroughly.
Raised Beds with Plastic Crates
This is a great way to create a more traditional garden bed using recycled plastic crates.
1. Prepare the Crates: Line the bottom of the crates with landscape fabric to prevent soil erosion.
2. Arrange the Crates: Arrange the crates in the desired shape and size for your raised bed. You can stack them on top of each other to create a higher bed.
3. Fill with Soil: Fill the crates with potting soil, leaving a few inches of space at the top.
4. Plant and Water: Plant your vegetables in the raised bed and water them thoroughly.
Hanging Baskets from Plastic Containers
This is a simple and elegant way to display your herbs and flowers.
1. Prepare the Containers: Drill three or four holes around the top edge of each container.
2. Attach Hanging Wires: Thread wires or ropes through the holes and tie them together to create a hanging basket.
3. Plant and Water: Fill the containers with potting soil, plant your herbs or flowers, and water them thoroughly.
Caring for Your Plastic Waste Vegetable Garden: Nurturing Your Plants
Now that our garden is planted, it’s important to provide proper care to ensure our plants thrive.
1. Watering: Water your plants regularly, especially during hot and dry weather. Check the soil moisture by sticking your finger into the soil. If the soil feels dry, it’s time to water. Avoid overwatering, as this can lead to root rot.
2. Fertilizing: Fertilize your plants every few weeks with a balanced fertilizer. Follow the instructions on the fertilizer label for proper application. You can also use organic fertilizers like compost tea or worm castings.
3. Weeding: Regularly remove any weeds that may grow in your containers. Weeds compete with your vegetables for nutrients and water.
4. Pest Control: Keep an eye out for pests and diseases. If you notice any problems, take action immediately. You can use organic pest control methods like insecticidal soap or neem oil.
5. Sunlight: Ensure your plants are receiving adequate sunlight. If they’re not getting enough sunlight, they may become leggy and produce fewer vegetables.
6. Pruning: Prune your plants regularly to encourage growth and productivity. Remove any dead or yellowing leaves.
7. Support: Provide support for climbing vegetables like tomatoes and cucumbers. You can use stakes, trellises, or cages.
Troubleshooting: Addressing Common Issues
Even with the best care, you might encounter some challenges along the way. Here are some common issues and how to address them:
* Yellowing Leaves: This could be a sign of overwatering, underwatering, nutrient deficiency, or pest infestation. Check the soil moisture, fertilize your plants, and inspect them for pests.
*
Conclusion
So, there you have it! Transforming plastic waste into a thriving vegetable garden isn’t just a feel-good project; it’s a practical, cost-effective, and environmentally responsible way to grow your own food. We’ve shown you how to take discarded plastic bottles, containers, and even bags, and give them a new life as planters, raised beds, and even innovative irrigation systems. This DIY approach not only reduces landfill waste but also provides you with fresh, organic produce right at your doorstep.
Why is this a must-try? Because it’s a win-win-win! You’re reducing your environmental footprint, saving money on gardening supplies, and enjoying the satisfaction of growing your own food. Plus, it’s a fantastic project for the whole family, teaching children about sustainability and the importance of reducing waste.
But don’t stop there! The possibilities are endless. Experiment with different types of plastic containers, try vertical gardening techniques using plastic bottles strung together, or create a self-watering system using repurposed plastic jugs. You can even get creative with the design and aesthetics of your plastic waste vegetable garden, painting the containers, adding decorative elements, or arranging them in unique and eye-catching patterns. Consider using different colored plastics to create a visually appealing garden. For example, clear bottles can be used for seedlings to maximize sunlight exposure, while darker plastics can be used for plants that prefer shade.
Think about incorporating companion planting techniques into your plastic container garden. Planting basil near tomatoes, for example, can help deter pests and improve the flavor of your tomatoes. Similarly, marigolds can help repel nematodes and other harmful insects.
We encourage you to embrace this DIY project and create your own unique plastic waste vegetable garden. It’s a rewarding experience that will not only benefit you but also contribute to a more sustainable future. Don’t be afraid to experiment, get creative, and most importantly, have fun!
We’re confident that you’ll be amazed at what you can achieve with a little ingenuity and a lot of plastic waste. So, gather your materials, roll up your sleeves, and get ready to transform your trash into treasure.
Now, we want to hear from you! Share your experiences, tips, and photos of your own plastic waste vegetable gardens in the comments below. Let’s inspire each other and create a community of eco-conscious gardeners who are making a difference, one plastic bottle at a time. Let us know what worked, what didn’t, and any innovative solutions you came up with. Your feedback will help others on their journey to creating a sustainable and productive garden.
Remember, every small effort counts. By embracing this DIY trick, you’re not just growing vegetables; you’re growing a greener future. So, let’s get gardening!
Frequently Asked Questions (FAQ)
1. What types of plastic are safe to use for a vegetable garden?
It’s crucial to choose the right types of plastic to avoid leaching harmful chemicals into your soil and plants. Look for plastics labeled with recycling codes 2 (HDPE), 4 (LDPE), and 5 (PP). These are generally considered food-safe and less likely to leach chemicals. Avoid plastics labeled with recycling codes 3 (PVC), 6 (PS), and 7 (Other), as they may contain harmful chemicals like BPA or phthalates. Always thoroughly clean any plastic containers before using them for planting. If you’re unsure about the safety of a particular plastic, it’s best to err on the side of caution and choose a different container. Consider lining the inside of the plastic container with a food-grade plastic liner to further minimize the risk of chemical leaching.
2. How do I prepare plastic containers for planting?
Proper preparation is key to ensuring your plants thrive in their recycled plastic homes. First, thoroughly clean the containers with soap and water to remove any dirt, debris, or residue. Next, drill drainage holes in the bottom of the containers to prevent waterlogging, which can lead to root rot. The number and size of the drainage holes will depend on the size of the container and the type of plants you’re growing. For larger containers, consider adding a layer of gravel or pebbles at the bottom to improve drainage. If you’re using dark-colored plastic containers, consider painting them a lighter color to reflect sunlight and prevent the soil from overheating.
3. What kind of soil should I use in my plastic waste vegetable garden?
The type of soil you use will depend on the specific vegetables you’re growing, but a well-draining potting mix is generally a good choice. Avoid using garden soil, as it can be too heavy and compact in containers. Look for a potting mix that contains a blend of peat moss, perlite, and vermiculite. You can also amend your potting mix with compost or other organic matter to improve its fertility and drainage. Consider adding slow-release fertilizer to provide your plants with a steady supply of nutrients. Regularly check the soil moisture and adjust your watering schedule accordingly.
4. How often should I water my plastic container garden?
Watering frequency will depend on several factors, including the type of plants, the size of the containers, the weather conditions, and the type of soil you’re using. Generally, you should water your plants when the top inch of soil feels dry to the touch. Avoid overwatering, as this can lead to root rot. Water deeply and thoroughly, allowing the water to drain out of the drainage holes. During hot, dry weather, you may need to water your plants more frequently. Consider using a moisture meter to accurately assess the soil moisture levels.
5. How much sunlight do my vegetables need in a plastic container garden?
Most vegetables need at least six hours of sunlight per day to thrive. Choose a location for your plastic container garden that receives plenty of sunlight. If you don’t have a sunny spot, you can supplement with grow lights. Be aware that plastic containers can heat up quickly in direct sunlight, so consider providing some shade during the hottest part of the day. You can use shade cloth, umbrellas, or even strategically placed plants to provide shade.
6. Can I grow any vegetable in a plastic container?
While you can grow a wide variety of vegetables in plastic containers, some are better suited than others. Compact vegetables like lettuce, spinach, herbs, peppers, and tomatoes are generally good choices. Larger vegetables like corn, pumpkins, and watermelons may require larger containers and more space. Consider the mature size of the plant when choosing a container.
7. How do I deal with pests and diseases in my plastic waste vegetable garden?
Regularly inspect your plants for signs of pests or diseases. Remove any affected leaves or plants immediately. Use organic pest control methods, such as insecticidal soap or neem oil, to control pests. Ensure good air circulation around your plants to prevent fungal diseases. Avoid overwatering, as this can create a favorable environment for diseases. Consider using companion planting techniques to deter pests and attract beneficial insects.
8. How do I fertilize my plastic container garden?
Container gardens require regular fertilization because nutrients are leached out of the soil with each watering. Use a balanced fertilizer that contains nitrogen, phosphorus, and potassium. Follow the instructions on the fertilizer label carefully. You can use liquid fertilizer, slow-release fertilizer, or compost tea to fertilize your plants. Avoid over-fertilizing, as this can burn the roots of your plants.
9. What are some creative ways to use plastic waste in my vegetable garden besides containers?
Beyond containers, plastic waste can be repurposed in numerous creative ways. Plastic bottles can be used to create self-watering planters, drip irrigation systems, or even mini-greenhouses for seedlings. Plastic bags can be used as weed barriers or to line raised beds. Plastic lids can be used as plant markers. Get creative and experiment with different ways to repurpose plastic waste in your garden.
10. How can I make my plastic waste vegetable garden more sustainable?
To make your plastic waste vegetable garden even more sustainable, consider using organic gardening practices, such as composting, mulching, and using natural pest control methods. Collect rainwater to water your plants. Source your potting mix and fertilizer from sustainable sources. And most importantly, continue to reduce, reuse, and recycle plastic waste whenever possible. By embracing sustainable practices, you can create a garden that is not only productive but also environmentally friendly.

Leave a Comment