

Plastic Bottle Cabbage Garden: Ever dreamt of harvesting your own crisp, delicious cabbage right outside your doorstep, even if you’re short on space or gardening experience? Well, dream no more! This DIY guide unlocks the secrets to creating a thriving cabbage patch using something you probably already have lying around: plastic bottles!
For centuries, cultivating cabbage has been a staple in countless cultures, from the hearty stews of Eastern Europe to the vibrant kimchi of Korea. It’s a versatile and nutritious vegetable, but traditional gardening can be intimidating. That’s where our ingenious plastic bottle cabbage garden comes in. We’re taking a time-honored tradition and giving it a modern, eco-friendly twist.
Let’s face it, not everyone has acres of land or a green thumb. Many of us live in apartments, condos, or simply have limited outdoor space. And even if you do have a garden, protecting your precious cabbage seedlings from pests and harsh weather can be a real challenge. This DIY project solves all those problems! I’m going to show you how to repurpose those discarded plastic bottles into mini-greenhouses, creating a controlled environment where your cabbage can flourish. It’s budget-friendly, sustainable, and surprisingly effective. So, grab your scissors and let’s get started on your very own plastic bottle cabbage garden – you’ll be amazed at how easy it is!
DIY Vertical Cabbage Garden from Plastic Bottles
Hey there, fellow gardening enthusiasts! Are you short on space but dreaming of fresh, homegrown cabbage? Well, I’ve got the perfect solution for you: a vertical cabbage garden made entirely from recycled plastic bottles! This project is not only eco-friendly but also a fantastic way to maximize your yield in a small area. Plus, it’s a fun and rewarding DIY project that anyone can tackle. Let’s get started!
What You’ll Need
Before we dive in, let’s gather all the necessary materials. Trust me, having everything on hand will make the process much smoother.
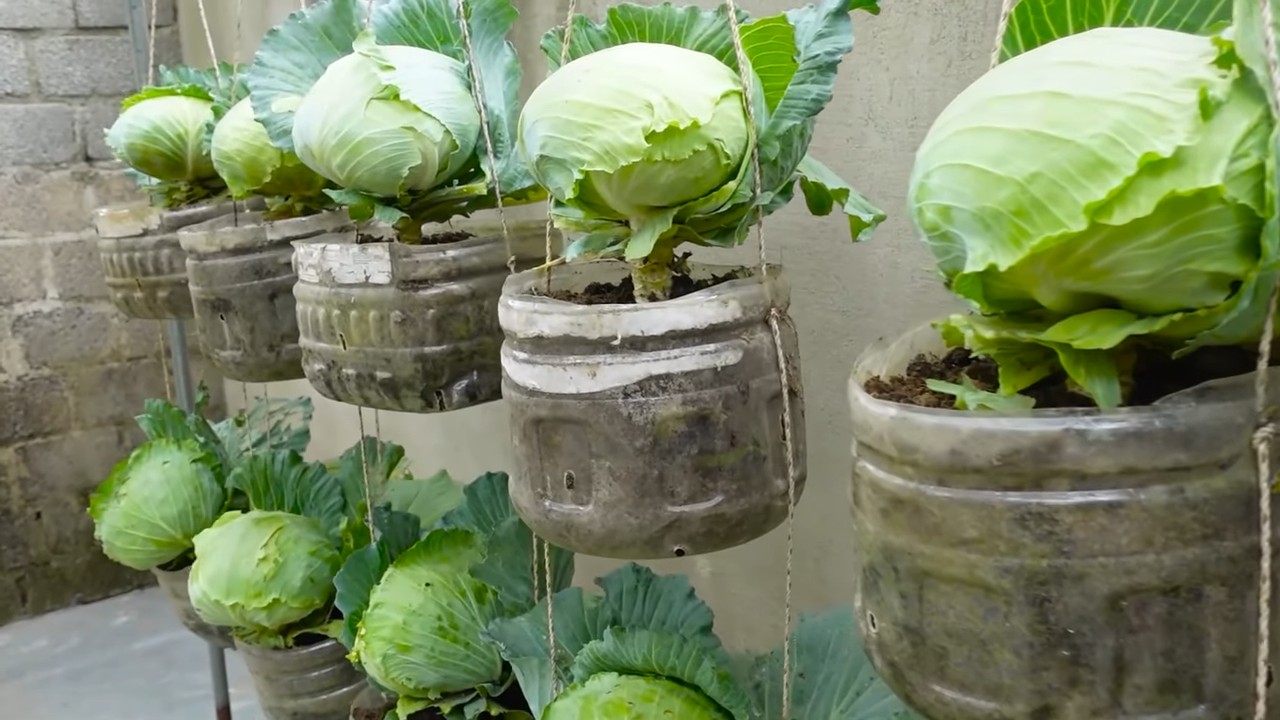
* Plastic Bottles: You’ll need a good number of plastic bottles, preferably the 2-liter size. The exact number depends on how tall you want your vertical garden to be. I recommend collecting at least 10-15 to start. Make sure they are clean and dry.
* Potting Soil: Choose a high-quality potting mix that’s well-draining and rich in nutrients. Cabbage needs a good foundation to thrive.
* Cabbage Seedlings: You can either start your cabbage from seeds or purchase seedlings from a local nursery. Seedlings will give you a head start.
* Scissors or Utility Knife: For cutting the plastic bottles. Be careful!
* Drill or Awl: To create drainage holes and hanging points.
* Rope or Strong Twine: To hang the bottles vertically.
* Measuring Tape or Ruler: To ensure consistent cuts and spacing.
* Permanent Marker: For marking cutting lines.
* Gloves: To protect your hands.
* Watering Can or Hose: For watering your cabbage plants.
* Optional: Landscape Fabric: To line the bottles and help retain moisture.
Preparing the Bottles
This is where the magic begins! We’ll transform those ordinary plastic bottles into mini cabbage condos.
1. Clean and Dry the Bottles: Thoroughly wash each bottle with soap and water to remove any residue. Let them dry completely before proceeding. This will prevent mold and mildew growth.
2. Cut the Bottles: This is a crucial step, so pay close attention.
* Using your measuring tape and marker, draw a horizontal line around each bottle, about 4-5 inches from the top. This will be your cutting line.
* Carefully cut along the marked line using your scissors or utility knife. You’ll essentially be creating a “bowl” from the bottom portion of the bottle.
* Repeat this process for all the bottles you plan to use.
3. Create Drainage Holes: Cabbage plants need well-drained soil to prevent root rot.
* Using your drill or awl, create several small drainage holes in the bottom of each bottle “bowl.” Aim for about 4-5 holes per bottle.
4. Optional: Line with Landscape Fabric: This step is optional, but I highly recommend it.
* Cut pieces of landscape fabric slightly larger than the inside of each bottle “bowl.”
* Place the fabric inside the bottle, pressing it against the sides and bottom. This will help retain moisture and prevent soil from washing out through the drainage holes.
Assembling the Vertical Garden
Now comes the fun part – putting everything together!
1. Create Hanging Points: We need to create a way to hang the bottles vertically.
* Using your drill or awl, create two small holes on opposite sides of each bottle, near the top edge. These holes should be large enough to thread your rope or twine through.
* Make sure the holes are evenly spaced to ensure the bottles hang straight.
2. Connect the Bottles: This is where you’ll create the vertical structure.
* Cut a long piece of rope or twine. The length will depend on how tall you want your garden to be. Remember to leave extra length at the top for hanging.
* Thread the rope through the holes in the first bottle. Tie a secure knot to hold the bottle in place.
* Repeat this process for each bottle, spacing them about 6-8 inches apart. This will give your cabbage plants enough room to grow.
* Make sure each bottle is securely attached to the rope before adding the next one.
3. Secure the Bottom: To prevent the bottom bottle from swinging around, you can either weigh it down with rocks or attach it to a stable base.
Planting Your Cabbage
Time to get your hands dirty and plant those cabbage seedlings!
1. Fill the Bottles with Potting Soil: Carefully fill each bottle “bowl” with your chosen potting soil. Leave about an inch of space at the top.
2. Plant the Seedlings: Gently remove the cabbage seedlings from their containers.
* Create a small hole in the center of the soil in each bottle.
* Place the seedling in the hole and gently pat the soil around it.
* Make sure the top of the root ball is level with the soil surface.
3. Water Thoroughly: Water each bottle thoroughly until water drains out of the drainage holes. This will help settle the soil and encourage root growth.
Caring for Your Vertical Cabbage Garden
Now that your garden is planted, it’s important to provide the right care to ensure a bountiful harvest.
1. Sunlight: Cabbage plants need at least 6 hours of sunlight per day. Choose a location that receives plenty of sunlight. If you don’t have a sunny spot, you can supplement with grow lights.
2. Watering: Water your cabbage plants regularly, especially during hot, dry weather. Check the soil moisture by sticking your finger into the soil. If it feels dry, it’s time to water. Avoid overwatering, as this can lead to root rot.
3. Fertilizing: Cabbage plants are heavy feeders, so they need regular fertilization. Use a balanced fertilizer according to the package instructions. You can also add compost or other organic matter to the soil to provide additional nutrients.
4. Pest Control: Keep an eye out for pests such as cabbage worms, aphids, and slugs. You can use organic pest control methods such as insecticidal soap or neem oil to control these pests. Handpicking pests is also an effective method.
5. Harvesting: Cabbage is typically ready to harvest in 60-80 days. The head should be firm and compact. To harvest, simply cut the head off the plant with a sharp knife.
Troubleshooting Tips
Even with the best planning, things can sometimes go wrong. Here are a few troubleshooting tips to help you overcome common challenges.
* Yellowing Leaves: This could be a sign of overwatering, underwatering, or nutrient deficiency. Check the soil moisture and adjust your watering schedule accordingly. Fertilize with a balanced fertilizer to provide essential nutrients.
* Slow Growth: This could be due to insufficient sunlight, poor soil, or pest infestation. Make sure your plants are getting enough sunlight and that the soil is well-draining and rich in nutrients. Check for pests and take appropriate action.
* Root Rot: This is caused by overwatering and poor drainage. Make sure your bottles have adequate drainage holes and avoid overwatering. You can also add perlite or vermiculite to the soil to improve drainage.
* Pest Problems: Regularly inspect your plants for pests and take action as soon as you notice them. Organic pest control methods are often effective, but you may need to use stronger measures if the infestation is severe.
Additional Tips and Tricks
Here are a few extra tips to help you get the most out of your vertical cabbage garden.
* Choose the Right Cabbage Variety: Some cabbage varieties are better suited for container gardening than others. Look for compact varieties that don’t get too large.
* Rotate Your Crops: To prevent soilborne diseases, rotate your crops each year. Don’t plant cabbage in the same spot year after year.
* Add Companion Plants: Companion plants can help deter pests and attract beneficial insects. Some good companion plants for cabbage include marigolds, nasturtiums, and dill.
* Mulch Around the Plants: Mulch helps retain moisture, suppress weeds, and regulate soil temperature. Use organic mulch such as straw, wood chips, or shredded leaves.
* Consider the Weight: A fully watered vertical garden can get quite heavy. Make sure your hanging structure is strong enough to support the weight.
I hope you found this guide helpful! With a little effort and creativity, you can create a thriving vertical cabbage garden that will provide you with fresh, delicious cabbage all season long. Happy gardening!
Conclusion
So, there you have it! Transforming humble plastic bottles into a thriving cabbage garden is not just a quirky DIY project; it’s a sustainable, space-saving, and surprisingly effective way to cultivate your own fresh produce. We’ve walked you through the simple steps, highlighting the benefits of this innovative approach. But why is this plastic bottle cabbage garden a must-try?
Firstly, it’s incredibly eco-friendly. By repurposing plastic bottles, you’re actively reducing plastic waste and giving these discarded materials a new lease on life. In a world grappling with plastic pollution, every little bit helps, and this project allows you to contribute in a tangible and rewarding way.
Secondly, it’s perfect for those with limited space. Whether you have a small balcony, a tiny patio, or no garden at all, this method allows you to grow your own cabbage without needing acres of land. The vertical nature of the setup maximizes space utilization, making it ideal for urban dwellers or anyone with a compact living area.
Thirdly, it’s cost-effective. The primary materials are readily available and often free – plastic bottles! This significantly reduces the financial burden associated with traditional gardening, making it an accessible option for everyone, regardless of their budget.
But the benefits don’t stop there. A plastic bottle cabbage garden offers excellent drainage, reducing the risk of root rot and other common gardening problems. It also provides a degree of protection from pests and diseases, as the enclosed environment makes it harder for unwanted critters to reach your precious cabbages.
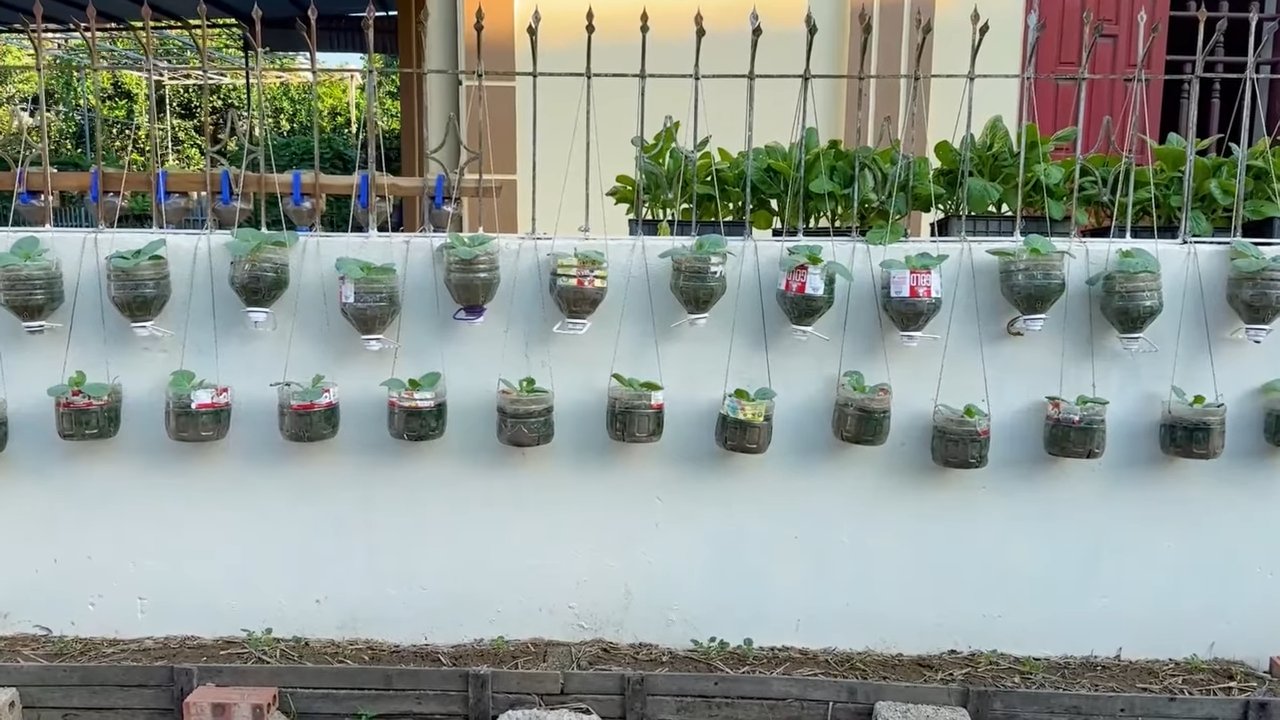
Now, let’s talk about variations. While we’ve focused on cabbage, this method can be adapted for other leafy greens like lettuce, spinach, and kale. You can also experiment with different types of plastic bottles, from smaller water bottles to larger soda bottles, depending on the size of your desired plants. Consider painting the bottles to add a splash of color to your garden or using different colored bottles to create a visually appealing display. You can even create a tiered system by stacking the bottles on top of each other, further maximizing space and adding visual interest.
Don’t be afraid to get creative with your setup. You can hang the bottles from a fence, a balcony railing, or even a specially constructed frame. The possibilities are endless, and the only limit is your imagination.
We strongly encourage you to give this DIY trick a try. It’s a fun, rewarding, and environmentally friendly way to grow your own fresh cabbage. Not only will you enjoy the satisfaction of harvesting your own produce, but you’ll also be contributing to a more sustainable future.
Once you’ve created your own plastic bottle cabbage garden, we’d love to hear about your experience. Share your photos, tips, and challenges with us in the comments section below. Let’s build a community of eco-conscious gardeners and inspire others to embrace this innovative approach to growing food. Your insights could be invaluable to someone just starting out, and together, we can make a real difference. So, grab those plastic bottles, get your hands dirty, and start growing your own delicious and sustainable cabbage today!
Frequently Asked Questions (FAQ)
What type of plastic bottles are best to use for a plastic bottle cabbage garden?
Ideally, you should use food-grade plastic bottles, such as those used for water, soda, or juice. These are generally made from PET (polyethylene terephthalate) or HDPE (high-density polyethylene), which are considered safe for growing food. Avoid using bottles that have contained harsh chemicals or cleaning products, as these could contaminate your plants. Thoroughly wash and rinse the bottles before using them to remove any residue. The size of the bottle will depend on the variety of cabbage you are growing. Smaller bottles are suitable for smaller varieties, while larger bottles are needed for larger cabbages.
How do I ensure proper drainage in my plastic bottle cabbage garden?
Proper drainage is crucial to prevent root rot and ensure healthy cabbage growth. When preparing your plastic bottles, make sure to create adequate drainage holes at the bottom. We recommend drilling or poking several holes, approximately ¼ inch in diameter, evenly spaced around the base of the bottle. You can also add a layer of gravel or small stones to the bottom of the bottle before adding the soil. This will further improve drainage and prevent the soil from becoming waterlogged. Regularly check the drainage holes to ensure they are not blocked by soil or debris.
What type of soil should I use for growing cabbage in plastic bottles?
Cabbage thrives in well-draining, nutrient-rich soil. A good option is to use a potting mix specifically formulated for vegetables. You can also create your own soil mix by combining equal parts of garden soil, compost, and perlite or vermiculite. Compost provides essential nutrients, while perlite or vermiculite improves drainage and aeration. Avoid using heavy clay soil, as it can become compacted and restrict root growth. Before planting, amend the soil with a slow-release fertilizer to provide a steady supply of nutrients throughout the growing season.
How often should I water my plastic bottle cabbage garden?
The watering frequency will depend on the weather conditions and the type of soil you are using. Generally, you should water your cabbage plants when the top inch of soil feels dry to the touch. Avoid overwatering, as this can lead to root rot. Water deeply, ensuring that the water reaches the bottom of the bottle. During hot and dry weather, you may need to water more frequently. Check the soil moisture regularly and adjust your watering schedule accordingly. Consider using a watering can with a gentle rose head to avoid disturbing the soil and damaging the plants.
How much sunlight do cabbage plants need in a plastic bottle garden?
Cabbage plants require at least 6 hours of direct sunlight per day to thrive. Choose a location for your plastic bottle cabbage garden that receives ample sunlight. If you live in a particularly hot climate, you may need to provide some afternoon shade to prevent the plants from overheating. You can use shade cloth or move the bottles to a shadier location during the hottest part of the day. Monitor your plants closely and adjust their position as needed to ensure they receive the optimal amount of sunlight.
How do I protect my cabbage plants from pests and diseases in a plastic bottle garden?
While the enclosed environment of a plastic bottle garden offers some protection from pests and diseases, it’s still important to take preventative measures. Regularly inspect your plants for signs of infestation or disease. Common cabbage pests include aphids, cabbage worms, and slugs. You can control aphids with insecticidal soap or neem oil. Cabbage worms can be handpicked or treated with Bacillus thuringiensis (Bt), a natural insecticide. Slugs can be controlled with slug bait or by creating barriers around the bottles. To prevent fungal diseases, ensure good air circulation and avoid overwatering. If you notice any signs of disease, remove the affected leaves immediately.
Can I grow different varieties of cabbage in plastic bottles?
Yes, you can grow different varieties of cabbage in plastic bottles. Consider the size of the mature cabbage head when choosing your varieties. Smaller varieties, such as bok choy or napa cabbage, are well-suited for smaller bottles, while larger varieties, such as green cabbage or red cabbage, will require larger bottles. Be sure to provide adequate spacing between the plants to allow for proper growth. You can also experiment with different colors and textures to create a visually appealing and diverse cabbage garden.
How do I harvest cabbage from my plastic bottle garden?
Cabbage is typically ready to harvest when the head is firm and compact. To harvest, use a sharp knife to cut the cabbage head from the stem, leaving a few outer leaves intact. You can harvest the entire head at once or harvest individual leaves as needed. After harvesting, you can leave the roots in the bottle to decompose and add nutrients to the soil. Alternatively, you can remove the roots and replant the bottle with another crop.
What are some other plants I can grow in plastic bottles besides cabbage?
The plastic bottle gardening method is versatile and can be used to grow a variety of other plants, including lettuce, spinach, kale, herbs, strawberries, and even some smaller varieties of tomatoes and peppers. Choose plants that have relatively shallow root systems and don’t require a lot of space. Be sure to provide adequate support for taller plants, such as tomatoes and peppers. Experiment with different plants and find what works best for your climate and growing conditions.
How do I recycle the plastic bottles after I’m done with my cabbage garden?
Once you’re finished with your plastic bottle cabbage garden, you can recycle the bottles through your local recycling program. Be sure to remove any soil or debris from the bottles before recycling them. Alternatively, you can reuse the bottles for other gardening projects or repurpose them for other household uses. Get creative and find new ways to give these plastic bottles a second life.

Leave a Comment