

Low Maintenance Rooftop Kale: Imagine stepping onto your rooftop and harvesting fresh, vibrant kale, ready to be tossed into a salad or blended into a smoothie. Sounds idyllic, right? Well, it’s more achievable than you might think! For centuries, urban dwellers have sought ways to bring nature closer, and rooftop gardening, including growing your own low maintenance rooftop kale, is a fantastic way to do just that. From the hanging gardens of Babylon to modern-day urban farms, the desire to cultivate green spaces in unexpected places is deeply ingrained in our history.
But let’s be honest, not everyone has the time or energy for a high-maintenance garden. That’s where this DIY guide comes in! I’m going to share some simple, effective tricks and hacks to help you grow thriving kale on your rooftop, even if you’re a complete beginner. We’ll cover everything from choosing the right containers and soil to pest control and watering techniques, all designed to minimize your effort and maximize your harvest. Why spend money on store-bought kale when you can have a fresh, organic supply right outside your door? Let’s get started and transform your rooftop into a kale oasis!
DIY: Low-Maintenance Rooftop Cabbage – Your Own Green Paradise!
Hey everyone! Are you tired of boring rooftops and have always wanted to grow your own vegetables, but have little time? Then I have just the thing for you: a low-maintenance rooftop cabbage garden! Sounds crazy? Maybe it is a little, but it works great and is really easy to implement. I’ll show you how to harvest fresh, crisp cabbage directly from your roof with minimal effort. Let’s get started!
What you need: The Material List
Before we begin, here is a list of all the things you will need for your rooftop cabbage garden. Don’t worry, you might already have most of them at home!
- Cabbage plants: Young plants that you can get at a garden center or online are best. Look for robust varieties that can cope well with the conditions on the roof. Kale, Lacinato kale, or Brussels sprouts are good options.
- Planters: There are no limits to your creativity here! You can use large pots, balcony boxes, old buckets, or even recycled plastic containers. It’s important that they are large enough (at least 30 cm in diameter and depth) and have drainage holes so that water can run off.
- Potting soil: Use high-quality potting soil that retains water well and is also loose and airy. Special vegetable soil is ideal, but regular potting soil enriched with some compost works well too.
- Drainage material: Expanded clay pebbles, gravel, or clay shards at the bottom of the planters ensure good drainage and prevent waterlogging.
- Watering can or hose: For watering your cabbage plants.
- Trowel or planting spade: For repotting the plants.
- Gloves: To protect your hands.
- Organic fertilizer: Slow-release fertilizer or compost to provide your cabbage plants with nutrients.
- Mulch material: Straw, wood chips, or grass clippings to keep the soil moist and suppress weeds.
- (Optional) Slug fence or copper tape: To protect against slugs.
- (Optional) Trellis: For tall-growing cabbage varieties like Lacinato kale.
Safety First: Preparing the Roof
Before you start planting, you should make sure that your roof is suitable for a rooftop garden.
- Check the structural integrity: The most important thing is that your roof can support the weight of the planters and the soil. When in doubt, you should consult a structural engineer.
- Check the waterproofing: Make sure the roof waterproofing is intact to avoid water damage.
- Consider sun exposure: Cabbage plants need a lot of sun, so choose a location that gets at least 6 hours of sun per day.
- Wind protection: Roofs can be very windy. Protect your plants from strong wind by placing them in a sheltered spot or setting up a windbreak.
- Accessibility: Make sure you can easily reach your plants to water and harvest them.
Step-by-Step Guide: How to Plant Your Rooftop Cabbage
Now let’s get down to it! Follow these steps to plant your own rooftop cabbage:
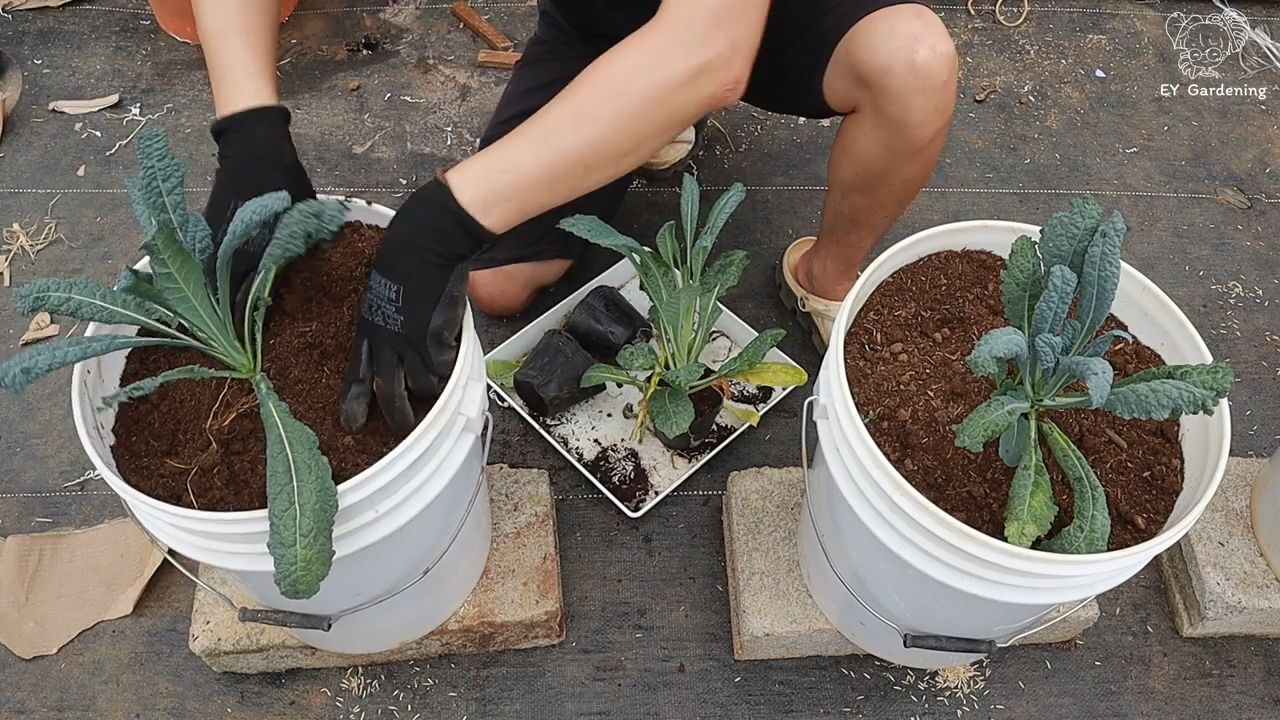
- Prepare the planters:
- Clean the planters thoroughly.
- Place a layer of drainage material (expanded clay pebbles, gravel, or clay shards) at the bottom of the containers. This ensures good drainage and prevents waterlogging.
- Fill the containers with potting soil, but leave about 5 cm of space to the rim.
- Plant the cabbage plants:
- Carefully remove the cabbage plants from their pots.
- Slightly loosen the root ball.
- Place the plants in the planters. The distance between the plants should be about 30-40 cm, depending on the cabbage variety.
- Fill the containers with soil and press it down lightly.
- Watering in:
- Water the plants thoroughly until water runs out of the drainage holes.
- Fertilizing:
- Give the plants an organic slow-release fertilizer or compost. This provides them with the necessary nutrients for healthy growth.
- Mulching:
- Cover the soil with a layer of mulch material (straw, wood chips, or grass clippings). This keeps the soil moist, suppresses weeds, and protects the plants from temperature fluctuations.
- Protective measures:
- If you have problems with slugs, you can set up a slug fence around the planters or attach copper tape to the containers.
- For tall-growing cabbage varieties like Lacinato kale, you can add a trellis for support.
The Right Care: Keeping Your Rooftop Cabbage Healthy and Productive
For your rooftop cabbage to thrive, proper care is crucial. But don’t worry, it’s not a lot of effort!
- Watering: Cabbage plants need regular water, especially on hot days. It’s best to water them in the morning or evening when the sun is not so strong. Make sure the soil is always slightly moist, but avoid waterlogging.
- Fertilizing: Fertilize your cabbage plants regularly with organic fertilizer or compost. This provides them with the necessary nutrients for healthy growth and a bountiful harvest.
- Weed control: Remove weeds regularly so they don’t take nutrients away from your cabbage plants.
- Pest control: Check your plants regularly for pests like cabbage white butterflies or aphids. If necessary, you can use biological pesticides.
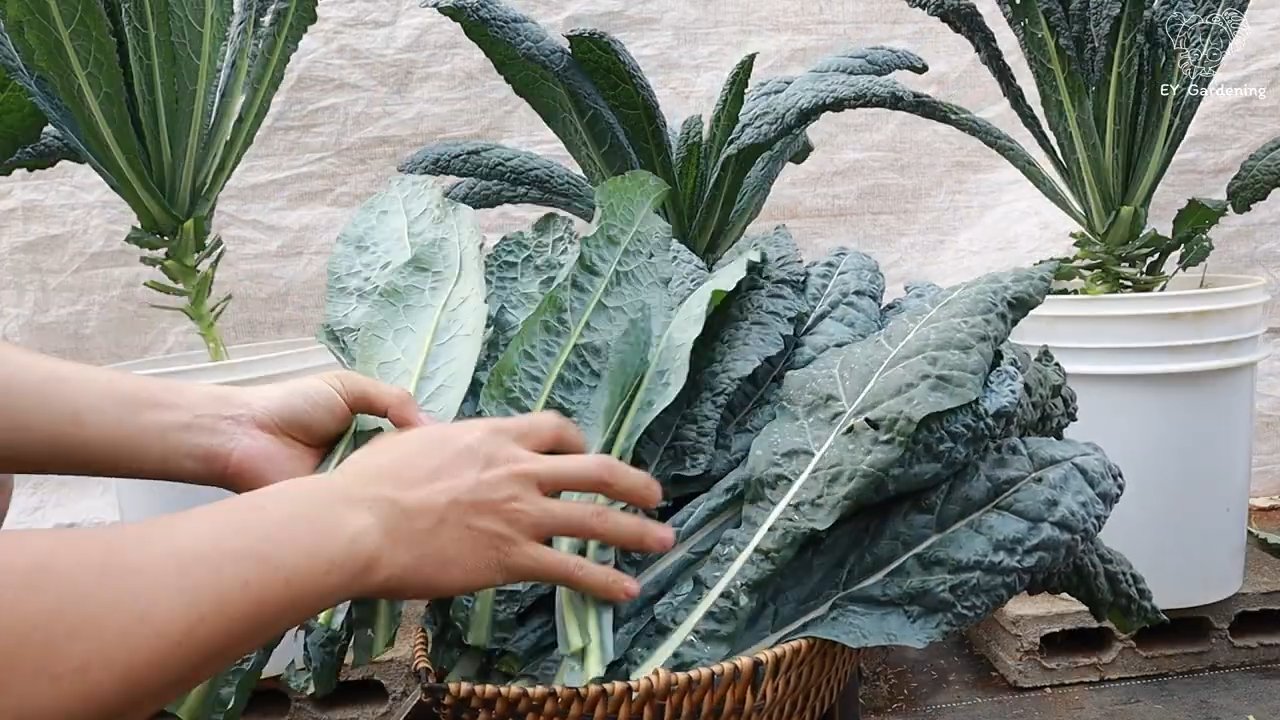
- Harvesting: Depending on the cabbage variety, you can harvest the leaves or heads as soon as they have reached the desired size. With kale, you can harvest the outer leaves gradually while the plant continues to grow. With Brussels sprouts, you harvest the sprouts from the bottom up.
Common Problems and Solutions: What to do when something goes wrong?
Even with rooftop cabbage, problems can arise. Here are some common problems and how you can solve them:
- Yellow leaves: Yellow leaves can be a sign of a nutrient deficiency. Fertilize your plants with an organic fertilizer or compost.
- Aphids: Aphids can infest your cabbage plants and weaken them. Spray the plants with a solution of water and soapy water.
- Cabbage white butterflies: The caterpillars of the cabbage white butterfly love to feed on the leaves of your cabbage plants. Pick off the caterpillars or use a biological insecticide.
- Slugs: Slugs can devour your cabbage plants overnight. Set up a slug fence or use slug pellets.
- Waterlogging: Waterlogging can lead to root rot. Make sure the planters have drainage holes and use well-draining soil.
Variety Recommendations: Which Cabbage is Right for Your Rooftop Garden?
Not every type of cabbage is equally well-suited for growing on a roof. Here are some varieties I can recommend:
Kale: Kale is very robust and also tolerates colder temperatures well. It is also very low-maintenance and can be harvested over a long period.
Conclusion
So, there you have it! Creating your own low-maintenance rooftop kale garden is not only achievable, but it’s also incredibly rewarding. We’ve walked you through the simple steps, highlighting how easy it is to cultivate this nutritional powerhouse right on your own roof. Forget complicated gardening techniques and endless hours of tending; this method is designed for busy individuals who crave fresh, homegrown produce without the fuss.
Why is this DIY trick a must-try? Because it offers a multitude of benefits. First and foremost, you gain access to a constant supply of fresh, organic kale, packed with vitamins and antioxidants. Imagine stepping onto your roof and harvesting vibrant, healthy leaves for your salads, smoothies, or stir-fries. Secondly, you’re contributing to a more sustainable lifestyle by reducing your reliance on store-bought produce, which often travels long distances and contributes to carbon emissions. Thirdly, a rooftop garden adds a touch of greenery and beauty to your urban environment, creating a tranquil oasis amidst the concrete jungle. And finally, it’s a fantastic way to connect with nature and experience the satisfaction of growing your own food.
But the beauty of this low-maintenance rooftop kale system lies in its adaptability. Feel free to experiment with different container sizes and materials. Upcycled plastic containers, repurposed wooden crates, or even fabric grow bags can all work wonders. Consider adding companion plants like marigolds or basil to deter pests and attract beneficial insects. You can also explore different varieties of kale, from the classic curly kale to the smoother, more tender Tuscan kale (also known as Lacinato kale or dinosaur kale). If you live in a particularly windy area, consider adding a windbreak to protect your plants. And if you’re concerned about drainage, you can add a layer of gravel or pebbles to the bottom of your containers.
Don’t be afraid to get creative and personalize your rooftop kale garden to suit your specific needs and preferences. The key is to start small, observe your plants closely, and adjust your approach as needed. Remember, gardening is a learning process, and even experienced gardeners encounter challenges along the way. The most important thing is to have fun and enjoy the journey.
We are confident that you’ll find this DIY project to be both enjoyable and rewarding. The satisfaction of harvesting your own fresh, organic kale is truly unparalleled. So, gather your supplies, choose a sunny spot on your roof, and get ready to embark on your rooftop gardening adventure.
We encourage you to try this low-maintenance rooftop kale method and share your experiences with us. We’d love to see photos of your gardens, hear about your successes (and challenges!), and learn any tips or tricks you’ve discovered along the way. Share your stories on social media using #RooftopKale or leave a comment below. Let’s build a community of rooftop gardeners and inspire others to embrace the joys of growing their own food. Happy gardening!
Frequently Asked Questions (FAQ)
What kind of kale is best for a rooftop garden?
While most kale varieties will thrive in a rooftop setting, some are better suited than others. Curly kale is a popular choice due to its hardiness and resistance to pests. Tuscan kale (Lacinato or dinosaur kale) is another excellent option, known for its smoother leaves and slightly sweeter flavor. Red Russian kale is also a good choice, offering a beautiful color contrast and a slightly peppery taste. Ultimately, the best kale variety for your rooftop garden will depend on your personal preferences and local climate. Experiment with different varieties to see which ones perform best in your specific environment. Consider factors like sun exposure, wind conditions, and temperature fluctuations when making your selection.
How much sunlight does rooftop kale need?
Kale thrives in full sun, requiring at least six hours of direct sunlight per day. However, it can tolerate partial shade, especially in hotter climates. If your rooftop receives less than six hours of sunlight, your kale plants may not grow as vigorously or produce as many leaves. In this case, you can supplement with grow lights or choose a location that receives more sunlight. Observe your plants closely and adjust their position as needed to ensure they are receiving adequate sunlight.
What type of soil is best for growing kale in containers?
A well-draining potting mix is essential for growing kale in containers. Avoid using garden soil, as it can become compacted and prevent proper drainage. A good potting mix should be lightweight, airy, and rich in organic matter. You can purchase pre-made potting mixes at most garden centers, or you can create your own by combining equal parts peat moss, perlite, and vermiculite. Adding compost to your potting mix will provide additional nutrients and improve drainage.
How often should I water my rooftop kale?
Water your kale plants regularly, especially during hot, dry weather. The soil should be kept consistently moist, but not waterlogged. Check the soil moisture by sticking your finger into the soil about an inch deep. If the soil feels dry, it’s time to water. Water deeply, allowing the water to drain out of the bottom of the container. Avoid watering the leaves, as this can promote fungal diseases.
How do I fertilize my rooftop kale?
Kale is a heavy feeder, so it’s important to fertilize your plants regularly. You can use a balanced liquid fertilizer or a slow-release granular fertilizer. Follow the instructions on the fertilizer package for application rates. Fertilize your kale plants every two to four weeks during the growing season. You can also amend the soil with compost or other organic matter to provide additional nutrients.
How do I protect my rooftop kale from pests?
Kale is susceptible to a variety of pests, including aphids, cabbage worms, and flea beetles. To protect your plants, you can use a variety of organic pest control methods. These include hand-picking pests off the plants, spraying with insecticidal soap or neem oil, and using row covers to prevent pests from reaching the plants. Companion planting with herbs like marigolds and basil can also help deter pests. Regularly inspect your plants for signs of pests and take action promptly to prevent infestations from becoming severe.
How do I harvest my rooftop kale?
You can begin harvesting kale leaves when they are about 6-8 inches long. Harvest the outer leaves first, leaving the inner leaves to continue growing. You can harvest kale leaves continuously throughout the growing season. To harvest, simply cut the leaves off at the base of the stem with a sharp knife or scissors. Avoid tearing the leaves, as this can damage the plant.
Can I grow kale on my rooftop during the winter?
Yes, kale is a cold-hardy vegetable that can tolerate frost and even snow. In mild climates, you can grow kale throughout the winter. In colder climates, you may need to provide some protection from the elements, such as covering the plants with a cold frame or row covers. Even if the leaves freeze, they will often thaw out and continue to grow. Winter-grown kale often has a sweeter flavor than summer-grown kale.
What if my rooftop doesn’t get enough sun?
If your rooftop doesn’t receive at least six hours of direct sunlight per day, you can still grow kale, but you may need to supplement with grow lights. Place the grow lights about 6-12 inches above the plants and keep them on for 12-14 hours per day. You can also choose a location on your rooftop that receives the most sunlight, even if it’s not ideal. Consider using reflective materials, such as white paint or aluminum foil, to bounce sunlight onto your plants.
How do I prevent my containers from blowing over in the wind?
Rooftop gardens can be exposed to strong winds, which can cause containers to blow over. To prevent this, choose heavy containers made of materials like terracotta or concrete. You can also add weight to the bottom of the containers by placing rocks or bricks inside. Consider using windbreaks, such as fences or trellises, to protect your plants from the wind. Grouping your containers together can also help to stabilize them.


Leave a Comment