

Kalamansi Container Growing Easy: Imagine stepping onto your balcony or into your small garden and plucking fresh, tangy kalamansi right from your own tree! It sounds like a dream, right? Well, it doesn’t have to be! For centuries, cultivating citrus fruits has been a cherished tradition in many cultures, bringing a touch of the exotic to homes and gardens. Now, even if you don’t have acres of land, you can experience the joy of growing your own kalamansi with these simple DIY tricks.
I know what you’re thinking: “Growing citrus seems complicated!” But trust me, with a few clever hacks, kalamansi container growing easy is totally achievable. This article is packed with practical, step-by-step instructions and insider tips to help you nurture a thriving kalamansi tree in a container, no matter your experience level. We’ll cover everything from choosing the right pot and soil to providing the perfect amount of sunlight and water.
Why is this DIY project so important? Because fresh kalamansi adds a burst of flavor to countless dishes, drinks, and desserts. Plus, there’s nothing quite like the satisfaction of harvesting your own homegrown produce. So, let’s dive in and unlock the secrets to successful kalamansi container growing!
Growing Kalamansi in Containers: A DIY Guide for Citrus Success
Hey there, fellow plant enthusiasts! Ever dreamed of having your own little citrus orchard, even if you only have a balcony or a small patio? Well, I’m here to tell you that growing kalamansi (also known as calamondin) in containers is totally achievable, and it’s a rewarding experience. These little citrus gems are packed with flavor and are surprisingly easy to care for, especially when you follow a few simple steps. So, let’s dive in and get your kalamansi container garden started!
Choosing the Right Container and Soil
Before we even think about planting, we need to get the foundation right. The container and soil are crucial for your kalamansi’s health and happiness.
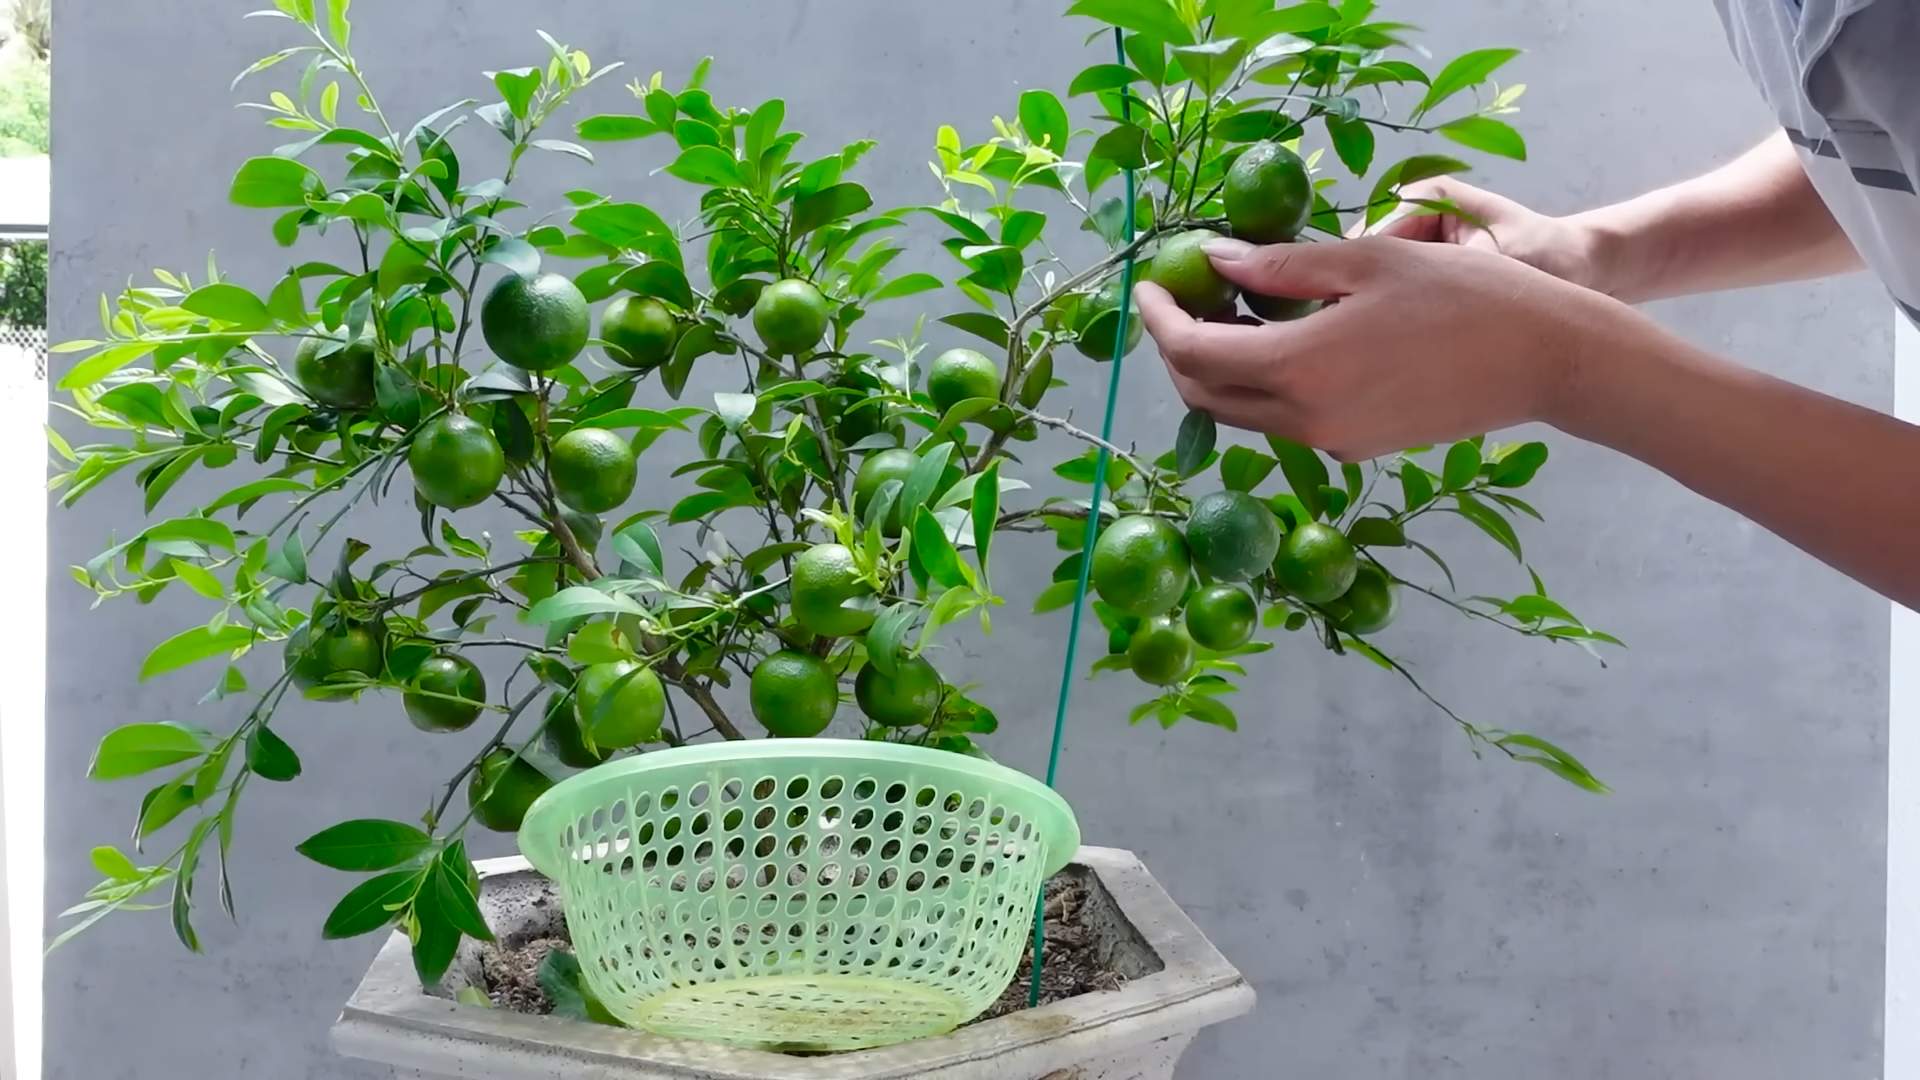
* Container Size: Opt for a pot that’s at least 12 inches in diameter and depth. A larger pot (15-18 inches) is even better, as it gives the roots more room to grow and reduces the frequency of repotting. Remember, kalamansi trees can get quite bushy!
* Drainage is Key: Make sure your container has plenty of drainage holes. Citrus trees hate sitting in soggy soil, which can lead to root rot.
* Material Matters: Terracotta pots are great because they allow the soil to breathe, but they can dry out quickly. Plastic pots retain moisture better, but be careful not to overwater. I personally prefer using a glazed ceramic pot – it looks beautiful and helps retain moisture without being too heavy.
* Soil Mix: Forget regular garden soil! Kalamansi trees need well-draining, slightly acidic soil. A mix of equal parts potting soil, perlite, and compost works wonders. You can also find specialized citrus potting mixes at most garden centers. I usually add a handful of slow-release citrus fertilizer to the mix as well.
Planting Your Kalamansi Tree
Now for the fun part – getting your kalamansi tree settled into its new home!
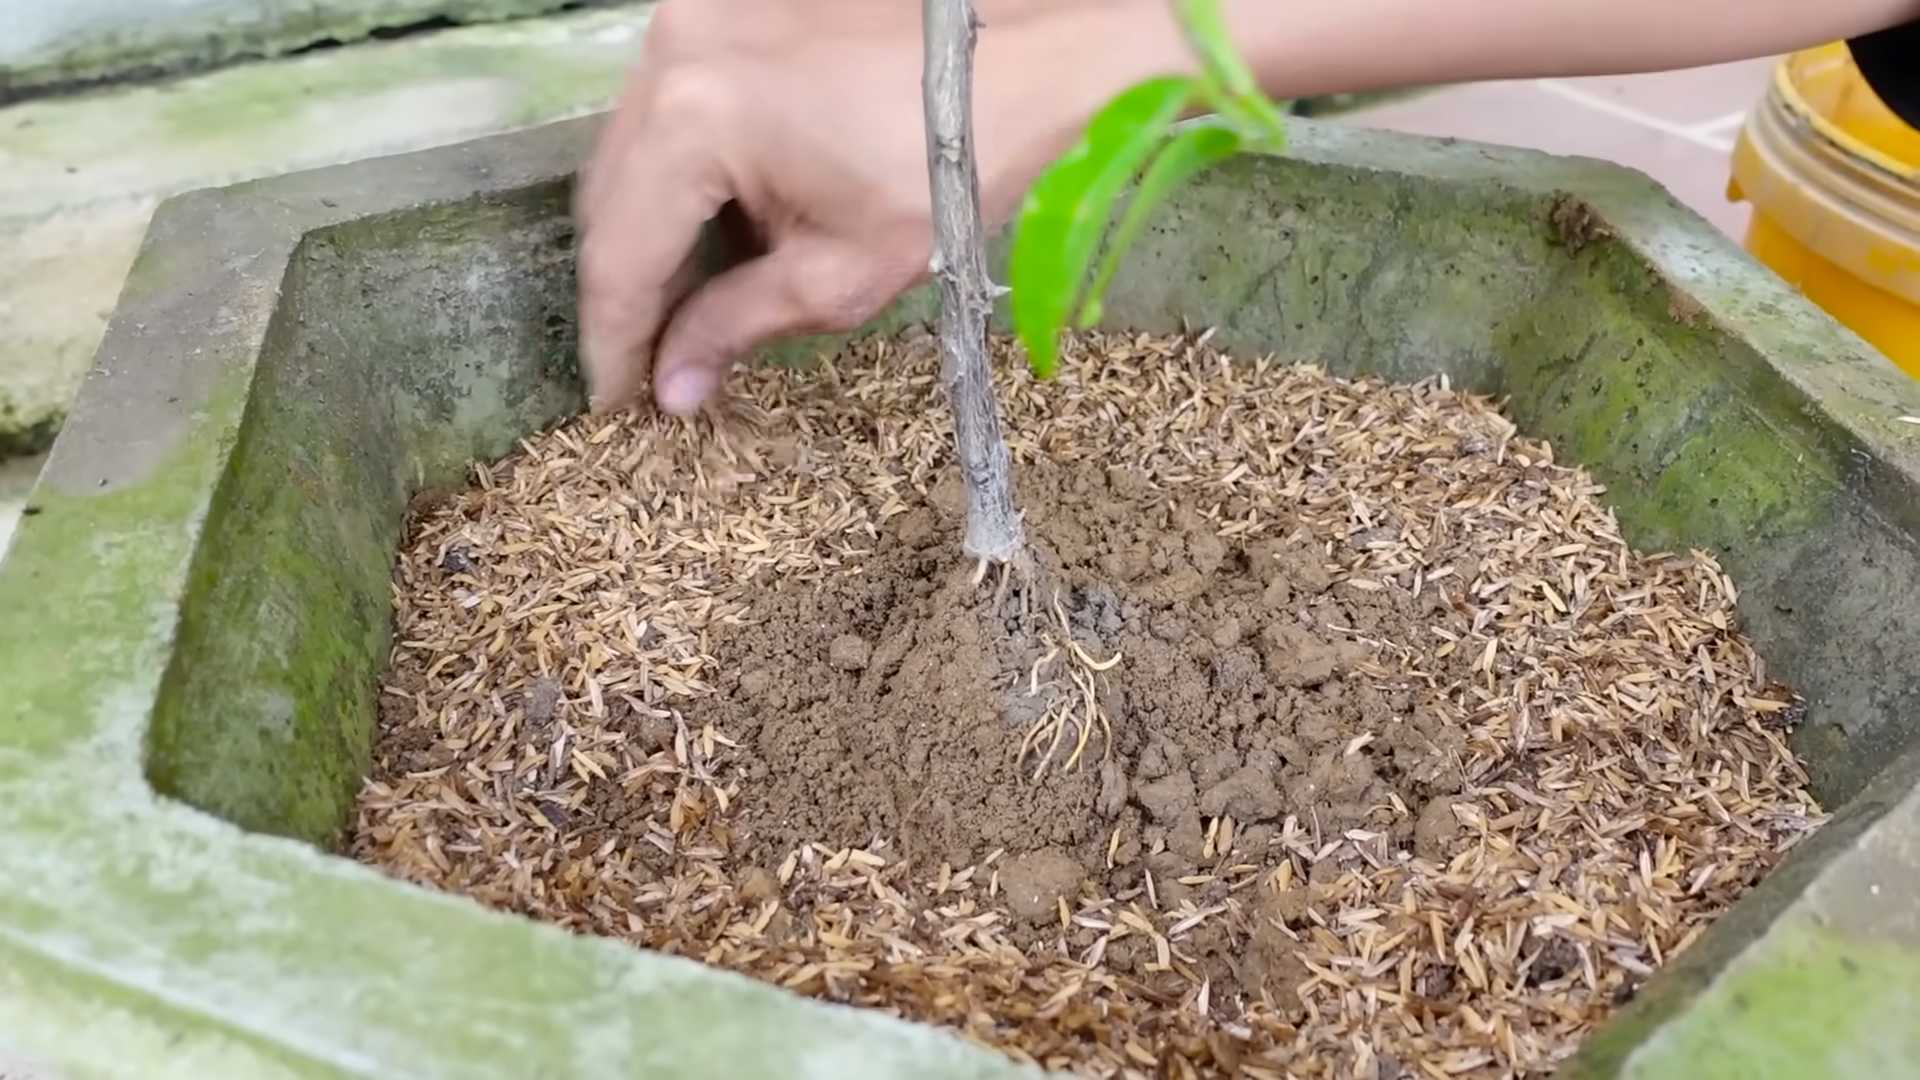
1. Prepare the Container: Place a layer of gravel or broken pottery at the bottom of the pot to improve drainage. This is an optional step, but I find it helps prevent the drainage holes from getting clogged.
2. Add Soil: Fill the pot about one-third full with your chosen potting mix.
3. Remove the Tree from its Nursery Pot: Gently loosen the root ball by squeezing the sides of the nursery pot. If the roots are tightly bound, carefully tease them apart with your fingers. Don’t be afraid to trim off any circling or overly congested roots.
4. Position the Tree: Place the kalamansi tree in the center of the pot, making sure the top of the root ball is level with the soil surface.
5. Fill with Soil: Add more potting mix around the root ball, gently pressing down to eliminate air pockets. Leave about an inch or two of space between the soil surface and the rim of the pot.
6. Water Thoroughly: Water the newly planted tree deeply until water drains out of the drainage holes. This helps settle the soil and ensures the roots are properly hydrated.
7. Mulch (Optional): Add a thin layer of organic mulch, such as wood chips or shredded bark, around the base of the tree. This helps retain moisture, suppress weeds, and regulate soil temperature. Be sure to keep the mulch a few inches away from the trunk to prevent rot.
Caring for Your Container Kalamansi
Once your kalamansi is planted, the real work begins – but don’t worry, it’s not too demanding!
* Sunlight: Kalamansi trees need at least 6-8 hours of direct sunlight per day. A south-facing balcony or patio is ideal. If you live in a particularly hot climate, provide some afternoon shade to prevent the leaves from scorching.
* Watering: Water deeply when the top inch of soil feels dry to the touch. Avoid overwatering, as this can lead to root rot. During the growing season (spring and summer), you’ll likely need to water more frequently than in the dormant season (fall and winter). I always check the soil moisture with my finger before watering.
* Fertilizing: Feed your kalamansi tree with a citrus-specific fertilizer every 4-6 weeks during the growing season. Follow the instructions on the fertilizer package carefully. I prefer using a slow-release fertilizer, as it provides a steady supply of nutrients over time.
* Pruning: Prune your kalamansi tree in late winter or early spring to remove any dead, damaged, or crossing branches. You can also prune to shape the tree and encourage bushier growth. Don’t be afraid to prune – kalamansi trees are quite resilient!
* Pest Control: Keep an eye out for common citrus pests, such as aphids, scale, and spider mites. If you spot any pests, treat them promptly with insecticidal soap or neem oil. I always try to use organic pest control methods whenever possible.
* Overwintering: If you live in a climate with cold winters, you’ll need to bring your kalamansi tree indoors before the first frost. Place it in a bright, sunny location, such as a south-facing window. Reduce watering during the winter months, as the tree will be less active. You might also want to use a humidifier to increase the humidity around the tree, as indoor air can be quite dry.
Troubleshooting Common Problems
Even with the best care, you might encounter a few challenges along the way. Here are some common problems and how to address them:
* Yellowing Leaves: This can be caused by a variety of factors, including overwatering, underwatering, nutrient deficiencies, or pest infestations. Check the soil moisture, fertilize if necessary, and inspect the tree for pests.
* Leaf Drop: Leaf drop can be caused by sudden changes in temperature, overwatering, underwatering, or stress. Try to maintain consistent growing conditions and avoid drastic changes.
* Lack of Fruit: If your kalamansi tree isn’t producing fruit, it could be due to insufficient sunlight, lack of pollination, or nutrient deficiencies. Make sure the tree is getting enough sunlight, hand-pollinate the flowers if necessary, and fertilize with a citrus-specific fertilizer.
* Root Rot: Root rot is caused by overwatering and poor drainage. If you suspect root rot, repot the tree in fresh, well-draining soil and be careful not to overwater.
Harvesting Your Kalamansi
The moment you’ve been waiting for – harvesting your own homegrown kalamansi!
* When to Harvest: Kalamansi fruits are typically ready to harvest when they turn from green to orange. The fruit should also be slightly soft to the touch.
* How to Harvest: Gently twist or clip the fruit from the tree, being careful not to damage the branches.
* Storage: Kalamansi fruits can be stored in the refrigerator for several weeks.
Using Your Kalamansi
Now that you have a bounty of kalamansi, what can you do with them? The possibilities are endless!
* Kalamansi Juice: Squeeze the juice and use it in drinks, marinades, or sauces. Kalamansi juice is more tart than lemon juice, so use it sparingly.
* Kalamansi Marmalade: Make a delicious and tangy marmalade.
* Kalamansi Pie: Bake a refreshing kalamansi pie.
* Kalamansi in Cocktails: Add a splash of kalamansi juice to your favorite cocktails.
* Kalamansi Zest: Use the zest to add a citrusy flavor to baked goods, salads, or other dishes.
Propagating Kalamansi
Want to expand your kalamansi orchard? You can propagate new trees from cuttings.
1. Take Cuttings: In late spring or early summer, take 4-6 inch cuttings from healthy, non-flowering stems.
2. Prepare the Cuttings: Remove the lower leaves from the cuttings, leaving only a few leaves at the top.
3. Dip in Rooting Hormone: Dip the cut end of each cutting in rooting hormone.
4. Plant the Cuttings: Plant the cuttings in a pot filled with well-draining potting mix.
5. Keep Moist: Cover the pot with a plastic bag or humidity dome to create a humid environment.
6. Wait for Roots: Place the pot in a warm, bright location and wait for roots to develop. This can take several weeks.
7. Transplant: Once the cuttings have developed roots, transplant them into individual pots.
Enjoying Your Kalamansi Journey
Growing kalamansi in containers is a rewarding experience that brings a touch of the tropics to your home. With a little care and attention, you can enjoy a bountiful harvest of these delicious citrus fruits. So, get started today and experience the joy of growing your own kalamansi! Happy gardening!
Conclusion
So, there you have it! Growing your own kalamansi in containers is not only achievable, but it’s also incredibly rewarding. Imagine the burst of citrusy sunshine you can add to your dishes, drinks, and even cleaning solutions, all thanks to your own homegrown fruit. This DIY trick transforms even the smallest balcony or patio into a miniature citrus grove, bringing a touch of the tropics right to your doorstep.
Why is this a must-try? Because it empowers you to control the quality of your produce, avoid the often-high prices of specialty citrus, and experience the sheer joy of nurturing a plant from seedling to fruit-bearing beauty. Plus, the fragrant blossoms will fill your space with a delightful aroma, creating a truly sensory experience.
But the fun doesn’t stop there! Feel free to experiment with different container sizes and materials. Terracotta pots offer excellent drainage, while plastic containers are lightweight and retain moisture well. You can also explore different soil mixes to find what works best for your climate and growing conditions. Consider adding companion plants like marigolds or basil to deter pests and attract beneficial insects.
For a unique twist, try grafting your kalamansi onto a more cold-hardy citrus rootstock, potentially extending its growing season in cooler climates. Or, if you’re feeling adventurous, experiment with different pruning techniques to shape your tree into a stunning ornamental feature.
The possibilities are endless! The key is to start, observe, and adapt. Don’t be afraid to make mistakes – that’s how we learn and grow (pun intended!).
We wholeheartedly encourage you to embark on this exciting journey of growing your own **kalamansi** in containers. It’s a simple, satisfying, and sustainable way to add a touch of zest to your life. Once you’ve harvested your first batch of homegrown kalamansi, we’d love to hear about your experience! Share your tips, tricks, and photos in the comments below. Let’s create a community of kalamansi container gardening enthusiasts and inspire others to embrace the joy of growing their own food. What are you waiting for? Get planting!
Frequently Asked Questions (FAQ)
Q: What size container do I need for my kalamansi tree?
A: The ideal container size depends on the age and size of your kalamansi tree. When starting with a young seedling or small grafted plant, a 10-12 inch diameter pot is a good starting point. As the tree grows, you’ll need to repot it into a larger container. Mature kalamansi trees can thrive in containers that are 20 inches or larger in diameter. Ensure the container has adequate drainage holes to prevent waterlogging, which can lead to root rot. Remember, it’s better to start with a slightly smaller pot and gradually increase the size as the tree grows, rather than planting a small tree in a very large pot, as this can lead to soil compaction and drainage issues.
Q: What type of soil is best for growing kalamansi in containers?
A: Kalamansi trees thrive in well-draining, slightly acidic soil. A good potting mix for container-grown kalamansi should consist of a blend of ingredients that provide both drainage and moisture retention. A recommended mix includes equal parts of:
* **Potting Soil:** Provides essential nutrients and structure.
* **Perlite:** Improves drainage and aeration.
* **Peat Moss or Coco Coir:** Helps retain moisture and provides a slightly acidic environment.
You can also add a small amount of compost to the mix for added nutrients. Avoid using garden soil in containers, as it tends to compact and doesn’t drain well. The ideal pH range for kalamansi is between 6.0 and 7.0. You can test the soil pH using a soil testing kit and amend it if necessary.
Q: How often should I water my container-grown kalamansi tree?
A: Watering frequency depends on several factors, including the size of the container, the climate, and the time of year. Generally, you should water your kalamansi tree when the top inch of soil feels dry to the touch. During hot, dry weather, you may need to water it daily or even twice a day. In cooler weather, you can reduce the watering frequency. When watering, water deeply until water drains out of the drainage holes. Avoid overwatering, as this can lead to root rot. Also, avoid letting the soil dry out completely, as this can stress the tree. A good rule of thumb is to check the soil moisture regularly and adjust your watering schedule accordingly.
Q: How much sunlight does a kalamansi tree need?
A: Kalamansi trees need at least 6-8 hours of direct sunlight per day to thrive. Choose a location for your container-grown kalamansi tree that receives plenty of sunlight. If you live in a hot climate, you may need to provide some afternoon shade to protect the tree from scorching. If you’re growing your kalamansi tree indoors, place it near a sunny window or supplement with grow lights. Insufficient sunlight can lead to poor fruit production and weak growth.
Q: What kind of fertilizer should I use for my kalamansi tree?
A: Kalamansi trees are heavy feeders and benefit from regular fertilization. Use a citrus-specific fertilizer that contains nitrogen, phosphorus, and potassium, as well as micronutrients like iron, zinc, and manganese. Follow the instructions on the fertilizer label for application rates and frequency. Generally, you should fertilize your kalamansi tree every 4-6 weeks during the growing season (spring and summer). Reduce or stop fertilizing during the dormant season (fall and winter). You can also use organic fertilizers like compost tea or fish emulsion.
Q: How do I protect my kalamansi tree from pests and diseases?
A: Kalamansi trees can be susceptible to various pests and diseases, including aphids, scale, spider mites, and citrus canker. Regularly inspect your tree for signs of pests or diseases. If you find any, take action immediately. You can use insecticidal soap or neem oil to control pests. For diseases, you may need to use a fungicide. Good cultural practices, such as proper watering, fertilization, and pruning, can also help prevent pests and diseases. Ensure good air circulation around the tree to reduce the risk of fungal diseases.
Q: How do I prune my kalamansi tree?
A: Pruning is essential for maintaining the health and shape of your kalamansi tree. Prune your tree in late winter or early spring, before new growth begins. Remove any dead, damaged, or diseased branches. Also, prune any crossing or rubbing branches to improve air circulation. You can also prune to shape the tree and encourage fruit production. Kalamansi trees typically fruit on new growth, so avoid pruning too heavily, as this can reduce fruit yield.
Q: Can I grow kalamansi indoors?
A: Yes, you can grow kalamansi indoors, but it requires some extra care. Ensure the tree receives at least 6-8 hours of direct sunlight per day, either from a sunny window or grow lights. Maintain adequate humidity levels by misting the tree regularly or using a humidifier. Water the tree when the top inch of soil feels dry to the touch. Fertilize the tree regularly with a citrus-specific fertilizer. Also, be aware that indoor-grown kalamansi trees may not produce as much fruit as outdoor-grown trees.
Q: How long does it take for a kalamansi tree to produce fruit?
A: Grafted kalamansi trees typically start producing fruit within 1-2 years of planting. Seed-grown trees may take 3-5 years to produce fruit. The time it takes for a tree to fruit depends on several factors, including the age of the tree, the growing conditions, and the variety. Ensure the tree receives adequate sunlight, water, and fertilizer to encourage fruit production.
Q: What do I do if my kalamansi tree is not fruiting?
A: There are several reasons why your kalamansi tree may not be fruiting. Some common causes include:
* **Insufficient Sunlight:** Kalamansi trees need at least 6-8 hours of direct sunlight per day to produce fruit.
* **Lack of Nutrients:** Kalamansi trees are heavy feeders and need regular fertilization.
* **Improper Watering:** Overwatering or underwatering can stress the tree and prevent it from fruiting.
* **Pruning:** Pruning too heavily can remove the fruiting wood.
* **Age:** Young trees may not be mature enough to produce fruit.
Review your growing practices and address any potential issues. With proper care, your kalamansi tree should eventually start producing fruit.
Leave a Comment