

Indoor Tomato Growing Tips: Imagine plucking a sun-ripened, juicy tomato right from your own indoor garden, even in the dead of winter! Sounds like a dream, right? Well, it doesn’t have to be! For centuries, humans have cultivated plants indoors, from the hanging gardens of Babylon to the orangeries of European royalty. But you don’t need to be a king or queen to enjoy fresh, homegrown tomatoes year-round.
In today’s busy world, access to fresh, healthy produce can be a challenge. Store-bought tomatoes often lack the vibrant flavor of homegrown varieties. That’s where these DIY indoor tomato growing tips come in! I’m going to share some simple, effective techniques to help you cultivate a thriving tomato garden inside your home.
Whether you’re a seasoned gardener or a complete beginner, these hacks will empower you to grow delicious tomatoes, regardless of the season or your outdoor space. Get ready to transform your windowsill into a miniature tomato farm and enjoy the unparalleled taste of homegrown goodness!
Growing Delicious Tomatoes Indoors: A DIY Guide
Okay, tomato lovers, let’s face it: sometimes Mother Nature just doesn’t cooperate. Whether you live in a chilly climate, have limited outdoor space, or just crave fresh tomatoes year-round, growing them indoors is totally achievable! I’m going to walk you through everything you need to know to cultivate your own little tomato paradise inside your home. Get ready for some seriously tasty homegrown goodness!
What You’ll Need: The Essentials
Before we dive in, let’s gather our supplies. This is crucial for a smooth and successful tomato-growing journey.
* Tomato Seeds: Choose determinate or dwarf varieties specifically bred for containers. ‘Roma,’ ‘Patio,’ ‘Tiny Tim,’ and ‘Bush Early Girl’ are excellent choices. Avoid indeterminate varieties, as they get HUGE and require extensive support.
* Seed Starting Tray or Small Pots: These will be your nursery for the baby tomato plants.
* Seed Starting Mix: This is a light, sterile mix that’s perfect for delicate seedlings. Don’t use garden soil!
* Grow Lights: This is non-negotiable. Tomatoes need a LOT of light, and a sunny windowsill just won’t cut it. I recommend LED grow lights for energy efficiency and optimal growth.
* Larger Pots (5-10 Gallon): Once your seedlings are big enough, they’ll need a spacious home.
* Potting Mix: A good quality potting mix is essential for healthy tomato growth. Again, avoid garden soil.
* Fertilizer: Tomato plants are heavy feeders. A balanced fertilizer specifically formulated for tomatoes is ideal.
* Watering Can or Spray Bottle: For gentle watering.
* Small Fan: To provide air circulation and prevent fungal diseases.
* Optional: Tomato cages or stakes for support (even dwarf varieties can get a bit floppy).
* Optional: Heat mat to speed up germination.
Section 1: Starting Your Tomato Seeds
This is where the magic begins! We’re going to nurture those tiny seeds into strong, healthy seedlings.
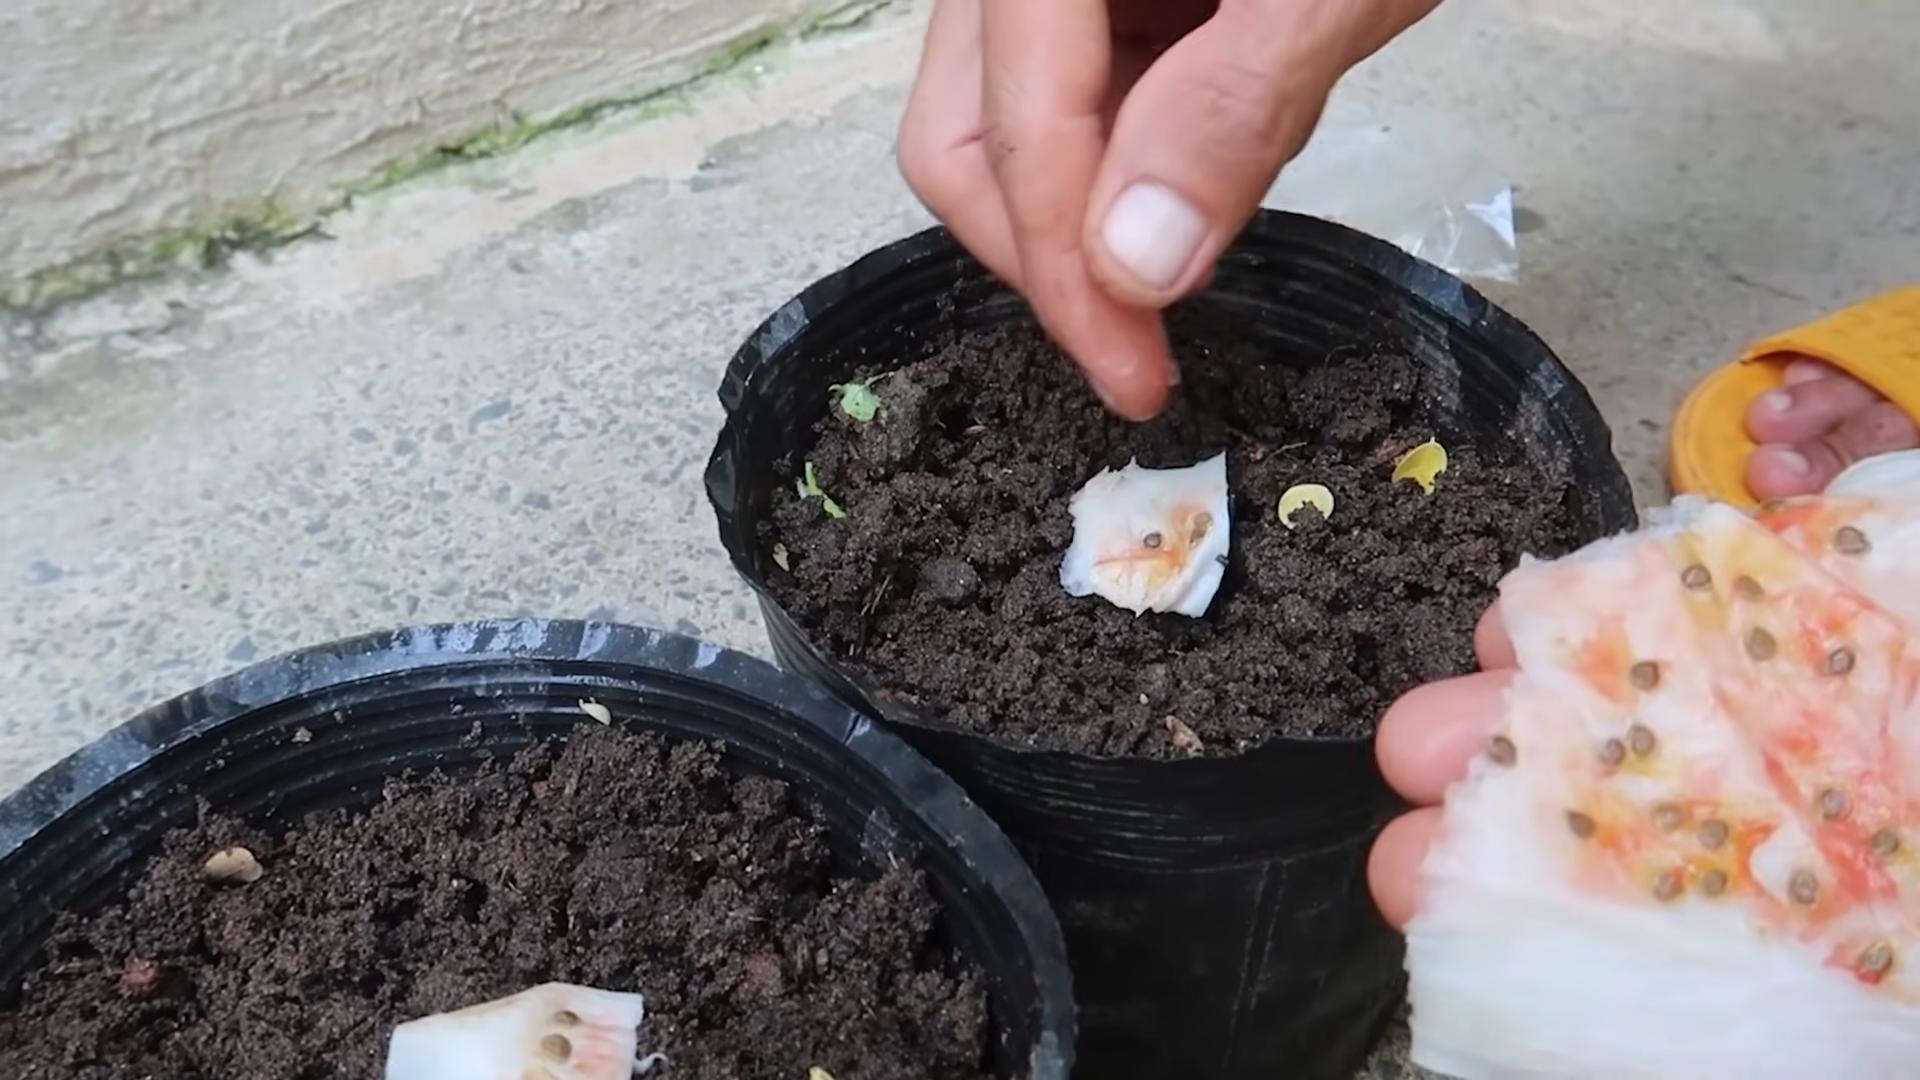
1. Prepare Your Seed Starting Tray or Pots: Fill your seed starting tray or small pots with seed starting mix. Moisten the mix thoroughly, but don’t soak it. You want it damp, not dripping.
2. Sow the Seeds: Make a small indentation (about 1/4 inch deep) in the center of each cell or pot. Place 2-3 tomato seeds in each indentation. This increases your chances of at least one seed germinating.
3. Cover the Seeds: Gently cover the seeds with a thin layer of seed starting mix.
4. Water Gently: Use a spray bottle to lightly mist the surface of the soil. Avoid overwatering, which can lead to rot.
5. Provide Warmth: Tomato seeds germinate best in warm conditions (around 70-75°F). You can use a heat mat to speed up the process.
6. Cover with a Dome or Plastic Wrap: This helps to retain moisture and create a humid environment.
7. Place Under Grow Lights: Position your seed starting tray or pots under your grow lights. Keep the lights on for 14-16 hours per day.
8. Monitor and Water: Check the soil moisture daily. Keep the soil consistently moist, but not soggy. Remove the dome or plastic wrap once the seedlings emerge.
9. Thin the Seedlings: Once the seedlings have developed their first true leaves (the second set of leaves that appear after the initial seed leaves), thin them out by snipping off the weaker seedlings at the soil line. Leave only the strongest seedling in each cell or pot.
Section 2: Transplanting Your Seedlings
Now that your seedlings are thriving, it’s time to give them more space to grow.
1. Harden Off the Seedlings: Before transplanting, you need to “harden off” your seedlings. This means gradually exposing them to outdoor conditions to acclimate them to the change in environment. Start by placing them outdoors in a sheltered location for an hour or two each day, gradually increasing the amount of time they spend outside over the course of a week.
2. Prepare Your Larger Pots: Fill your 5-10 gallon pots with potting mix.
3. Dig a Hole: Dig a hole in the center of each pot that is large enough to accommodate the root ball of the seedling.
4. Gently Remove the Seedling: Carefully remove the seedling from its seed starting tray or pot. Be gentle to avoid damaging the roots.
5. Plant the Seedling: Place the seedling in the hole and gently backfill with potting mix. Make sure the top of the root ball is level with the soil surface.
6. Water Thoroughly: Water the newly transplanted seedling thoroughly.
7. Provide Support (Optional): If you’re using tomato cages or stakes, install them now.
Section 3: Caring for Your Indoor Tomato Plants
This is where the ongoing maintenance comes in. Consistent care is key to a bountiful harvest.
1. Light: Tomatoes need at least 14-16 hours of light per day. Keep your grow lights on a timer to ensure consistent light exposure. Position the lights close enough to the plants (check the manufacturer’s instructions) to provide adequate light intensity.
2. Watering: Water your tomato plants regularly, keeping the soil consistently moist but not soggy. Water deeply when the top inch of soil feels dry to the touch. Avoid watering the foliage, as this can promote fungal diseases.
3. Fertilizing: Tomato plants are heavy feeders and need regular fertilization. Use a balanced fertilizer specifically formulated for tomatoes, following the instructions on the label. Fertilize every 2-3 weeks.
4. Air Circulation: Good air circulation is essential to prevent fungal diseases. Use a small fan to gently circulate the air around your plants.
5. Pollination: Indoor tomatoes need help with pollination since there are no bees or wind to do the job. You can hand-pollinate your plants by gently shaking the flowers or using a small paintbrush to transfer pollen from one flower to another. I like to use an electric toothbrush (without the brush head!) and gently touch the back of each flower to vibrate the pollen loose.
6. Pruning: Prune your tomato plants regularly to remove suckers (the small shoots that grow between the main stem and the branches). This will help to improve air circulation and encourage fruit production. For determinate varieties, minimal pruning is needed.
7. Pest and Disease Control: Keep an eye out for pests and diseases. Common pests include aphids, whiteflies, and spider mites. Common diseases include powdery mildew and blossom end rot. Treat any problems promptly with appropriate organic pest control methods or fungicides. For aphids, a strong blast of water can often do the trick.
8. Temperature: Maintain a consistent temperature between 65-80°F. Avoid exposing your plants to extreme temperature fluctuations.
Section 4: Harvesting Your Tomatoes
The moment you’ve been waiting for!
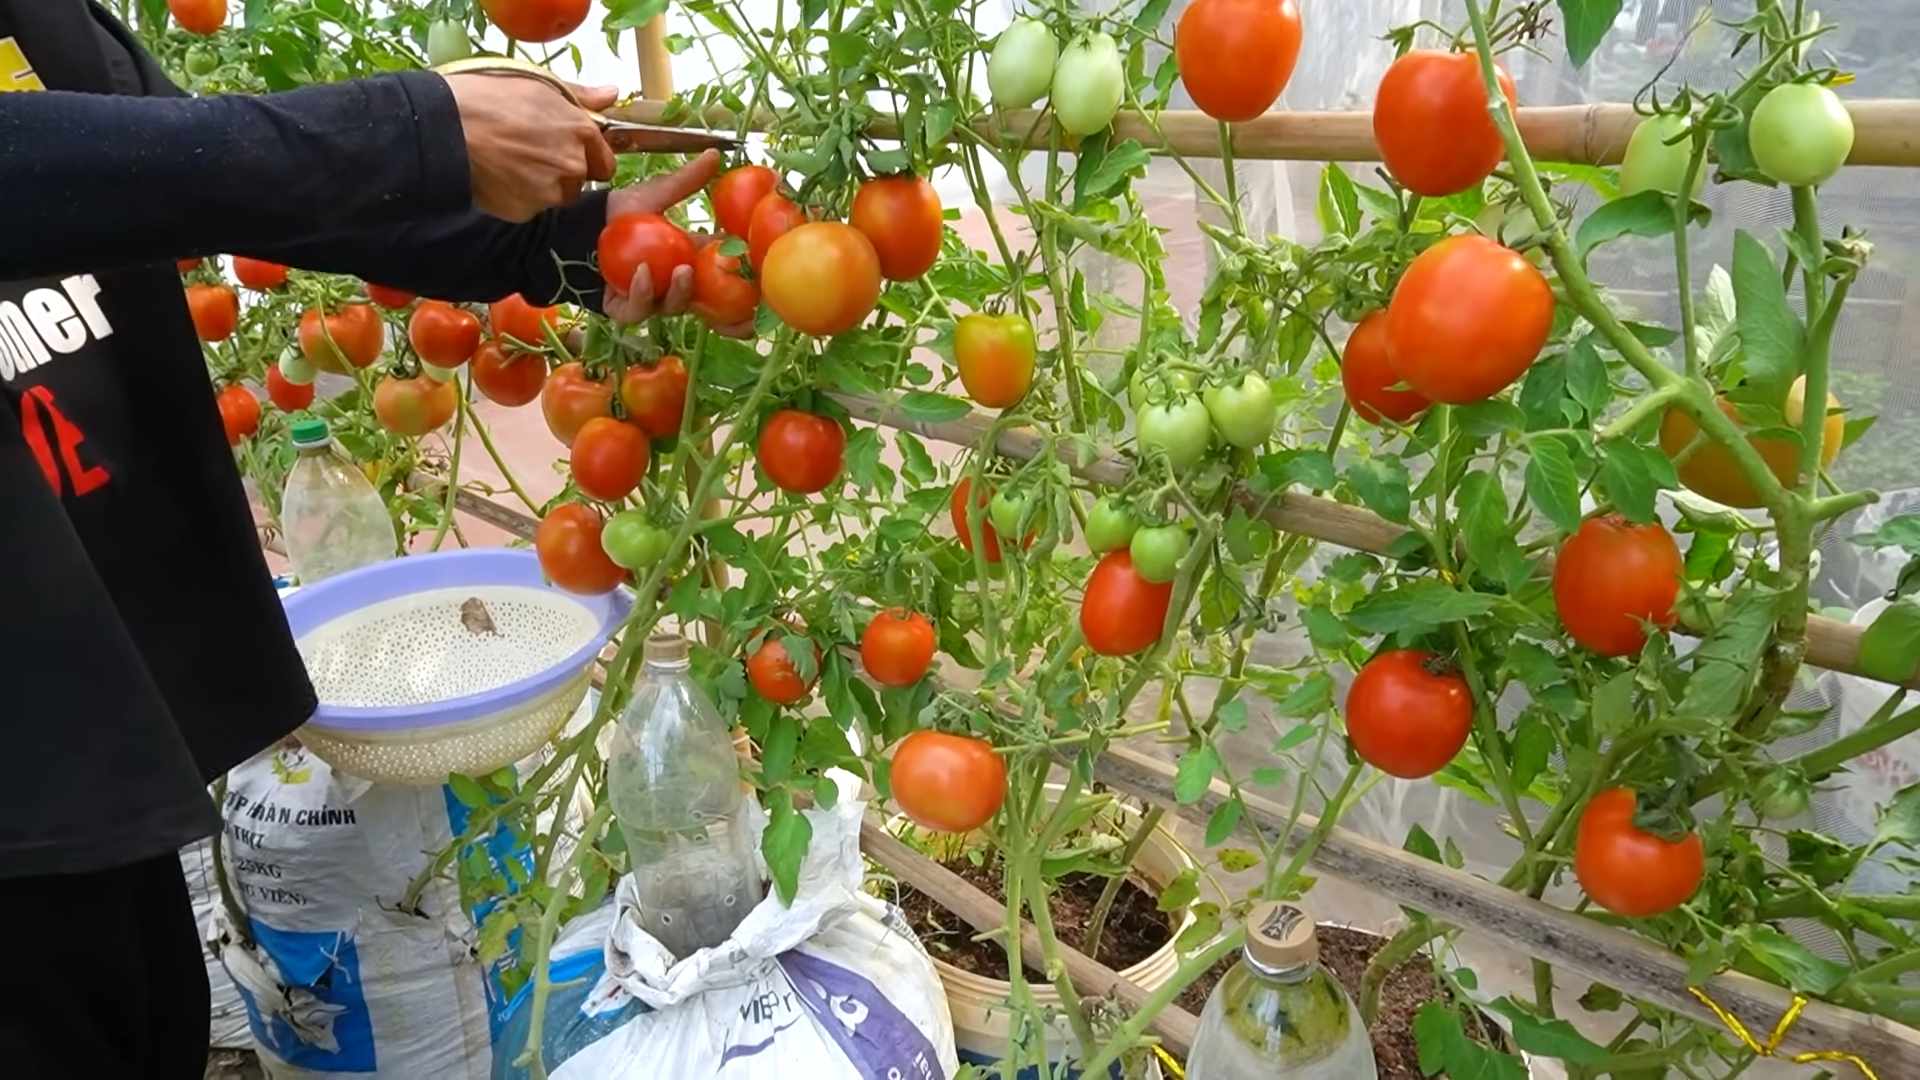
1. Harvest When Ripe: Tomatoes are ready to harvest when they are fully colored and slightly soft to the touch.
2. Gently Twist or Cut: Gently twist the tomato from the vine or use a pair of scissors to cut the stem just above the fruit.
3. Enjoy Your Harvest: Savor the taste of your homegrown tomatoes! Use them in salads, sauces, sandwiches, or enjoy them fresh off the vine.
Troubleshooting Common Problems
Even with the best care, you might encounter a few challenges along the way. Here are some common problems and how to address them:
* Yellowing Leaves: This could be a sign of overwatering, underwatering, nutrient deficiency, or pest infestation. Check the soil moisture, fertilize your plants, and inspect them for pests.
* Blossom End Rot: This is caused by a calcium deficiency. Ensure your potting mix contains adequate calcium and water your plants consistently. You can also add calcium to the soil.
* Leggy Seedlings: This is usually caused by insufficient light. Make sure your grow lights are close enough to the seedlings and provide adequate light intensity.
* No Fruit Production: This could be due to insufficient light, poor pollination, or temperature fluctuations. Ensure your plants are getting enough light, hand-pollinate them regularly, and maintain a consistent temperature.
Choosing the Right Tomato Variety
As I mentioned earlier, selecting the right tomato variety is crucial for indoor growing. Here’s a bit more detail:
* Determinate Varieties: These are bush-type tomatoes that grow to a certain size and then stop. They produce all their fruit at once, making them ideal for canning or making sauce. They are generally more compact and better suited for containers.
* Dwarf Varieties: These are even smaller than determinate varieties, making them perfect for small spaces. They produce smaller tomatoes, but they
Conclusion
So, there you have it! Transforming your living space into a miniature tomato farm is not only achievable but incredibly rewarding. We’ve explored the essential steps to successfully growing tomatoes indoors, from selecting the right varieties and providing adequate light to mastering pollination and pest control. The beauty of this DIY project lies in its accessibility and the sheer joy of nurturing life from seed to succulent fruit, right in your own home.
Why is this a must-try? Because fresh, vine-ripened tomatoes, bursting with flavor, are no longer limited to summer months or expensive grocery store purchases. Imagine the satisfaction of plucking a perfectly ripe tomato from your indoor garden in the dead of winter, adding it to a salad, or using it to create a vibrant sauce. It’s a taste of sunshine, a connection to nature, and a testament to your green thumb, all rolled into one delicious package.
But the journey doesn’t end here! Feel free to experiment with different tomato varieties. Cherry tomatoes are particularly well-suited for indoor growing due to their compact size and prolific yields. Roma tomatoes are another excellent choice, offering a meaty texture perfect for sauces and canning. Consider trying heirloom varieties for unique flavors and colors.
Beyond variety selection, explore different growing mediums. While we’ve focused on traditional potting soil, hydroponics offers an alternative approach for those seeking a soilless solution. You can also experiment with different types of grow lights to find the optimal spectrum for your specific tomato variety.
Don’t be afraid to get creative with your support systems. While tomato cages are a standard option, you can also use stakes, trellises, or even hanging baskets to support your plants as they grow. The key is to provide adequate support to prevent the stems from breaking under the weight of the fruit.
And remember, **indoor tomato growing** is a learning process. You may encounter challenges along the way, but don’t be discouraged. Each season brings new opportunities to refine your techniques and improve your yields.
We wholeheartedly encourage you to embark on this exciting adventure. Start small, be patient, and most importantly, have fun! We’re confident that you’ll be amazed by the results.
Once you’ve harvested your first batch of homegrown tomatoes, we’d love to hear about your experience! Share your tips, tricks, and triumphs in the comments below. Let’s build a community of indoor tomato growers and learn from each other’s successes and challenges. Post pictures of your thriving plants, share your favorite recipes using your homegrown tomatoes, and let us know what you’ve learned along the way. Together, we can cultivate a world of fresh, flavorful tomatoes, one indoor garden at a time.
Frequently Asked Questions (FAQ)
Q: What are the best tomato varieties for indoor growing?
A: While many tomato varieties can be grown indoors, some are better suited than others due to their size, growth habits, and disease resistance. Determinate varieties, which grow to a specific size and produce all their fruit at once, are generally preferred for indoor growing as they tend to be more compact. Cherry tomatoes, such as ‘Sweet 100’ or ‘Sungold’, are excellent choices due to their small size and prolific yields. Roma tomatoes are also a good option for those who prefer a larger, meatier tomato. Indeterminate varieties, which continue to grow and produce fruit throughout the season, can also be grown indoors, but they require more space and support. Popular indeterminate varieties for indoor growing include ‘Early Girl’ and ‘Brandywine’, although the latter may be more challenging. Consider dwarf or micro-dwarf varieties for very small spaces; these are specifically bred for container growing.
Q: How much light do indoor tomato plants need?
A: Adequate light is crucial for successful indoor tomato growing. Tomato plants need at least 6-8 hours of direct sunlight per day. If you don’t have a south-facing window that provides sufficient sunlight, you’ll need to supplement with grow lights. LED grow lights are a popular choice due to their energy efficiency and long lifespan. Fluorescent grow lights can also be used, but they are less energy-efficient and need to be replaced more frequently. The type of grow light you choose will depend on your budget and the size of your growing area. Ensure the light is positioned close enough to the plants (usually 6-12 inches) without burning them. Observe your plants for signs of insufficient light, such as leggy growth or pale leaves, and adjust the light accordingly.
Q: How do I pollinate my indoor tomato plants?
A: Tomatoes are self-pollinating, but they often need a little help to pollinate indoors, where there are no bees or wind to assist. The easiest way to pollinate your tomato plants is to gently shake the plants a few times a week. You can also use a small paintbrush or cotton swab to transfer pollen from one flower to another. Another method is to use a vibrating toothbrush or electric pollinator to vibrate the flowers, which helps to release the pollen. Pollination is most effective when the humidity is low and the temperature is warm. You’ll know pollination has been successful when the base of the flower starts to swell and form a small tomato.
Q: What kind of soil should I use for indoor tomato plants?
A: Use a high-quality potting mix that is well-draining and contains plenty of organic matter. Avoid using garden soil, as it can be too heavy and may contain pests or diseases. A good potting mix will provide the necessary nutrients and drainage for your tomato plants to thrive. You can also amend your potting mix with compost or other organic materials to improve its fertility. Consider using a potting mix specifically formulated for vegetables or tomatoes.
Q: How often should I water my indoor tomato plants?
A: Water your tomato plants regularly, keeping the soil consistently moist but not waterlogged. The frequency of watering will depend on the size of your pot, the type of potting mix you’re using, and the temperature and humidity of your environment. Check the soil moisture level regularly by sticking your finger into the soil. If the top inch of soil feels dry, it’s time to water. Water deeply, allowing the water to drain out of the bottom of the pot. Avoid overwatering, as this can lead to root rot.
Q: How do I fertilize my indoor tomato plants?
A: Tomato plants are heavy feeders and require regular fertilization to produce abundant fruit. Use a balanced fertilizer that is specifically formulated for tomatoes or vegetables. Start fertilizing your plants a few weeks after transplanting them into their final pots. Follow the instructions on the fertilizer label for application rates and frequency. You can also use organic fertilizers, such as compost tea or fish emulsion. Avoid over-fertilizing, as this can lead to nutrient imbalances and other problems.
Q: How do I deal with pests and diseases on my indoor tomato plants?
A: Indoor tomato plants are less susceptible to pests and diseases than outdoor plants, but they can still be affected. Common pests include aphids, whiteflies, and spider mites. These pests can be controlled with insecticidal soap or neem oil. Diseases such as powdery mildew and blossom end rot can also affect indoor tomato plants. Powdery mildew can be treated with a fungicide, while blossom end rot is caused by a calcium deficiency and can be prevented by adding calcium to the soil. Regularly inspect your plants for signs of pests or diseases and take action promptly to prevent them from spreading. Good air circulation and proper watering practices can also help to prevent pest and disease problems.
Q: How do I prevent blossom end rot in my indoor tomatoes?
A: Blossom end rot, a common problem in tomatoes, is caused by a calcium deficiency at the blossom end of the fruit. While calcium may be present in the soil, the plant may not be able to absorb it properly due to inconsistent watering or high levels of nitrogen or potassium. To prevent blossom end rot, ensure consistent watering, avoiding both overwatering and underwatering. Amend your soil with calcium-rich materials like bone meal or crushed eggshells before planting. You can also use a calcium supplement specifically designed for tomatoes, following the instructions on the label. Maintaining a soil pH between 6.0 and 6.8 also helps with calcium absorption.
Q: My tomato plant is growing tall but not producing fruit. What should I do?
A: Several factors can contribute to a tomato plant growing tall without producing fruit. Insufficient light is a common cause, as the plant prioritizes vertical growth in search of more light. Ensure your plant receives at least 6-8 hours of direct sunlight or supplement with grow lights. Another factor could be excessive nitrogen fertilization, which promotes leafy growth at the expense of fruit production. Use a balanced fertilizer with a lower nitrogen content. Inadequate pollination can also prevent fruit set. Gently shake the plant or use a small brush to pollinate the flowers. Finally, temperature extremes can also inhibit fruit production. Maintain a consistent temperature between 65°F and 85°F.

Leave a Comment