

Indoor Mushroom Farming Beginners, listen up! Have you ever dreamt of harvesting fresh, gourmet mushrooms right from your own home? Imagine adding a burst of earthy flavor to your meals, knowing you cultivated them yourself. It’s not just a culinary adventure; it’s a deeply satisfying connection to nature, even within the confines of your apartment or house.
Mushroom cultivation has a rich history, dating back centuries in Eastern cultures, where it was revered for its medicinal and culinary properties. Today, we’re bringing this ancient practice into the modern home, making it accessible to everyone. Forget the complicated setups and expensive equipment you might imagine. This DIY guide is designed specifically for indoor mushroom farming beginners like you, breaking down the process into simple, manageable steps.
Why should you embark on this journey? Well, beyond the delicious rewards, growing your own mushrooms is incredibly sustainable. You’re reducing your carbon footprint by sourcing food locally (literally!), and you’re gaining control over the quality and freshness of your produce. Plus, it’s a fantastic way to learn new skills and impress your friends and family with your newfound green thumb (or should we say, mushroom thumb?). Let’s dive in and unlock the secrets to successful indoor mushroom farming!
DIY Indoor Mushroom Farming: A Beginner’s Guide
Hey there, fellow fungi fanatics! Ever dreamt of harvesting your own delicious mushrooms right in your kitchen? Well, dream no more! I’m going to walk you through a simple and rewarding DIY project: growing mushrooms indoors. It’s easier than you think, and the satisfaction of eating something you cultivated yourself is truly amazing.
What You’ll Need: The Essential Supplies
Before we dive in, let’s gather our supplies. Don’t worry, you probably have some of these lying around already!
* Mushroom Spawn: This is the “seed” of your mushrooms. Oyster mushrooms are a great choice for beginners because they’re relatively easy to grow and tolerate a wider range of conditions. You can find spawn online or at your local garden center. Look for grain spawn or sawdust spawn.
* Growing Substrate: This is what your mushrooms will grow on. Straw, coffee grounds, and hardwood sawdust are popular options. For this guide, we’ll focus on using straw, as it’s readily available and easy to prepare.
* Large Plastic Bags or Buckets: These will be our growing containers. Make sure they’re clean and food-grade. Clear bags allow you to monitor the mycelium growth.
* Spray Bottle: For misting the mushrooms to maintain humidity.
* Bleach: For sterilizing the straw.
* Large Pot or Container: For pasteurizing the straw.
* Thermometer: To monitor the temperature of the straw during pasteurization.
* Gloves: To keep everything clean and prevent contamination.
* Optional: Micropore tape for covering ventilation holes.
Phase 1: Preparing the Substrate (Straw)
The key to successful mushroom growing is a clean and properly prepared substrate. Straw is a fantastic option, but it needs to be pasteurized to kill off any competing organisms that could hinder mushroom growth.
1. Chop the Straw: Using scissors or a knife, chop the straw into smaller pieces, about 2-3 inches long. This will make it easier to pack into the bags and for the mycelium to colonize.
2. Pasteurize the Straw: This is the most crucial step! Pasteurization kills off unwanted bacteria and fungi, giving your mushroom spawn a head start.
* Soak the Straw: Fill your large pot or container with water and add a splash of bleach (about 1 tablespoon per gallon of water). This helps to further sanitize the straw. Soak the chopped straw in the bleach water for at least 30 minutes.
* Heat the Straw: Drain the bleach water and rinse the straw thoroughly with clean water. Now, fill the pot with fresh water and add the rinsed straw. Heat the water to around 160-180°F (71-82°C). Use your thermometer to monitor the temperature.
* Maintain the Temperature: Keep the straw at this temperature for about 60-90 minutes. This will effectively pasteurize it without completely sterilizing it, which can actually be detrimental to mushroom growth.
* Cool and Drain: After pasteurization, carefully drain the hot water and let the straw cool down to room temperature. This can take several hours. You want the straw to be damp, but not soaking wet. Squeeze out any excess water. It should feel like a wrung-out sponge.
Phase 2: Inoculating the Substrate
Now comes the fun part – introducing the mushroom spawn to the prepared straw!
1. Clean Your Work Area: Before you start, wipe down your work surface with a disinfectant to minimize contamination.
2. Prepare Your Bags or Buckets: If you’re using plastic bags, make several small holes (about ¼ inch in diameter) all around the bag for ventilation. Space them a few inches apart. If you’re using buckets, drill similar holes. You can cover these holes with micropore tape to prevent fruit flies from getting in.
3. Layer the Straw and Spawn: Put on your gloves. Begin by placing a layer of pasteurized straw at the bottom of your bag or bucket. Then, sprinkle a layer of mushroom spawn over the straw. Repeat this process, layering straw and spawn, until the bag or bucket is full. Aim for about 1 part spawn to 10 parts straw by weight. The more spawn you use, the faster the colonization will be.
4. Pack it Down: Gently pack the straw and spawn mixture down to create a firm, even surface. This helps the mycelium spread evenly.
5. Seal the Bag (if using bags): Fold the top of the bag over and secure it with tape or a rubber band.
Phase 3: Incubation
This is where the magic happens! The mycelium (the vegetative part of the mushroom) will start to colonize the straw.
1. Find a Suitable Location: Place your inoculated bags or buckets in a dark, warm, and humid location. A basement, closet, or spare room works well. The ideal temperature is around 65-75°F (18-24°C).
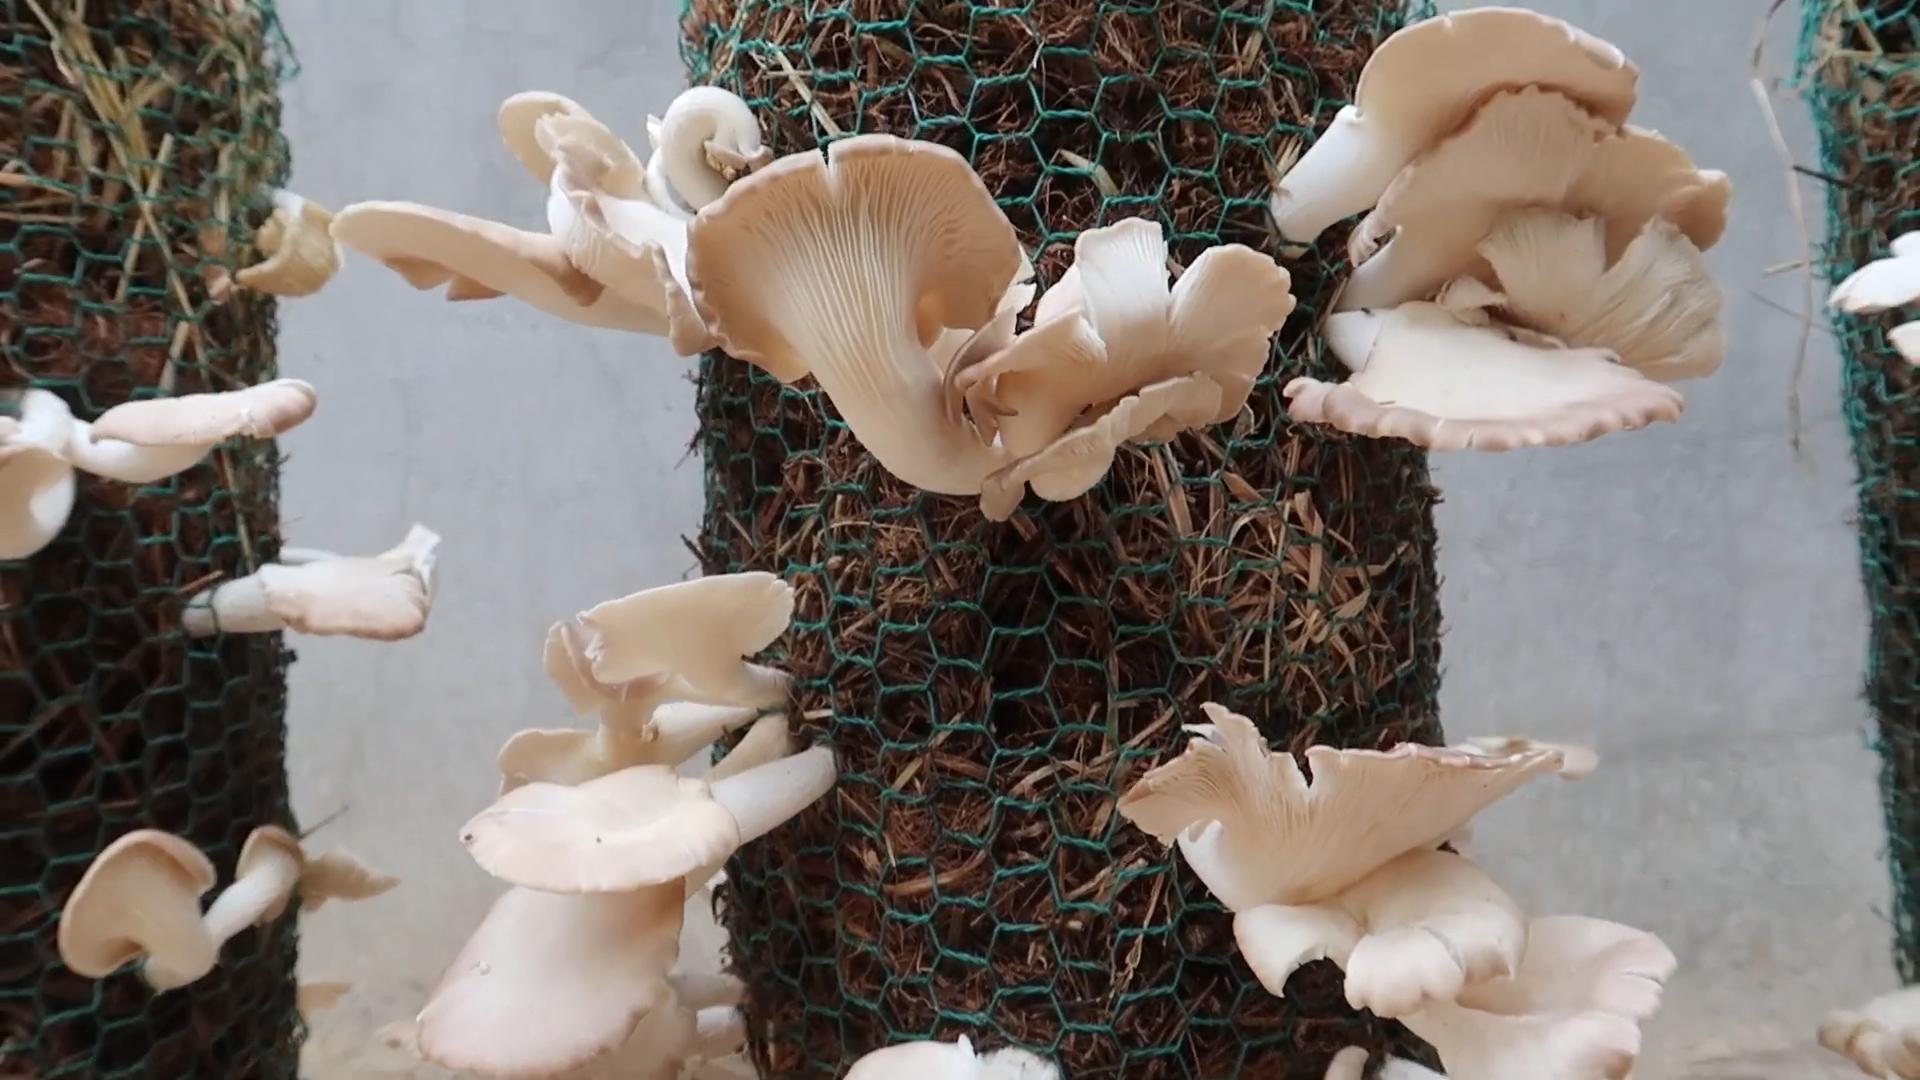
2. Monitor Colonization: Over the next few weeks, you’ll see white, fuzzy growth (the mycelium) spreading throughout the straw. This is a good sign! It means the spawn is taking hold.
3. Maintain Humidity: Keep the humidity high by misting the bags or buckets with water every few days. You don’t want the straw to dry out.
4. Be Patient: Colonization can take anywhere from 2-4 weeks, depending on the temperature, humidity, and the amount of spawn you used. The straw should be almost completely covered in white mycelium before moving on to the next phase.
Phase 4: Fruiting
Time to encourage those mushrooms to pop out!
1. Introduce Light: Once the straw is fully colonized, move the bags or buckets to a location with indirect light. Direct sunlight can dry out the mushrooms. A north-facing window is ideal.
2. Increase Humidity: Mushrooms need high humidity to fruit properly. Mist the bags or buckets several times a day with water. You can also create a humidity tent by placing a clear plastic bag over the container, making sure to leave some ventilation.
3. Lower the Temperature (Slightly): A slight drop in temperature can trigger fruiting. Aim for a temperature around 55-65°F (13-18°C).
4. Look for Pins: After a few days, you should start to see small mushroom “pins” forming on the surface of the straw. These are the baby mushrooms!
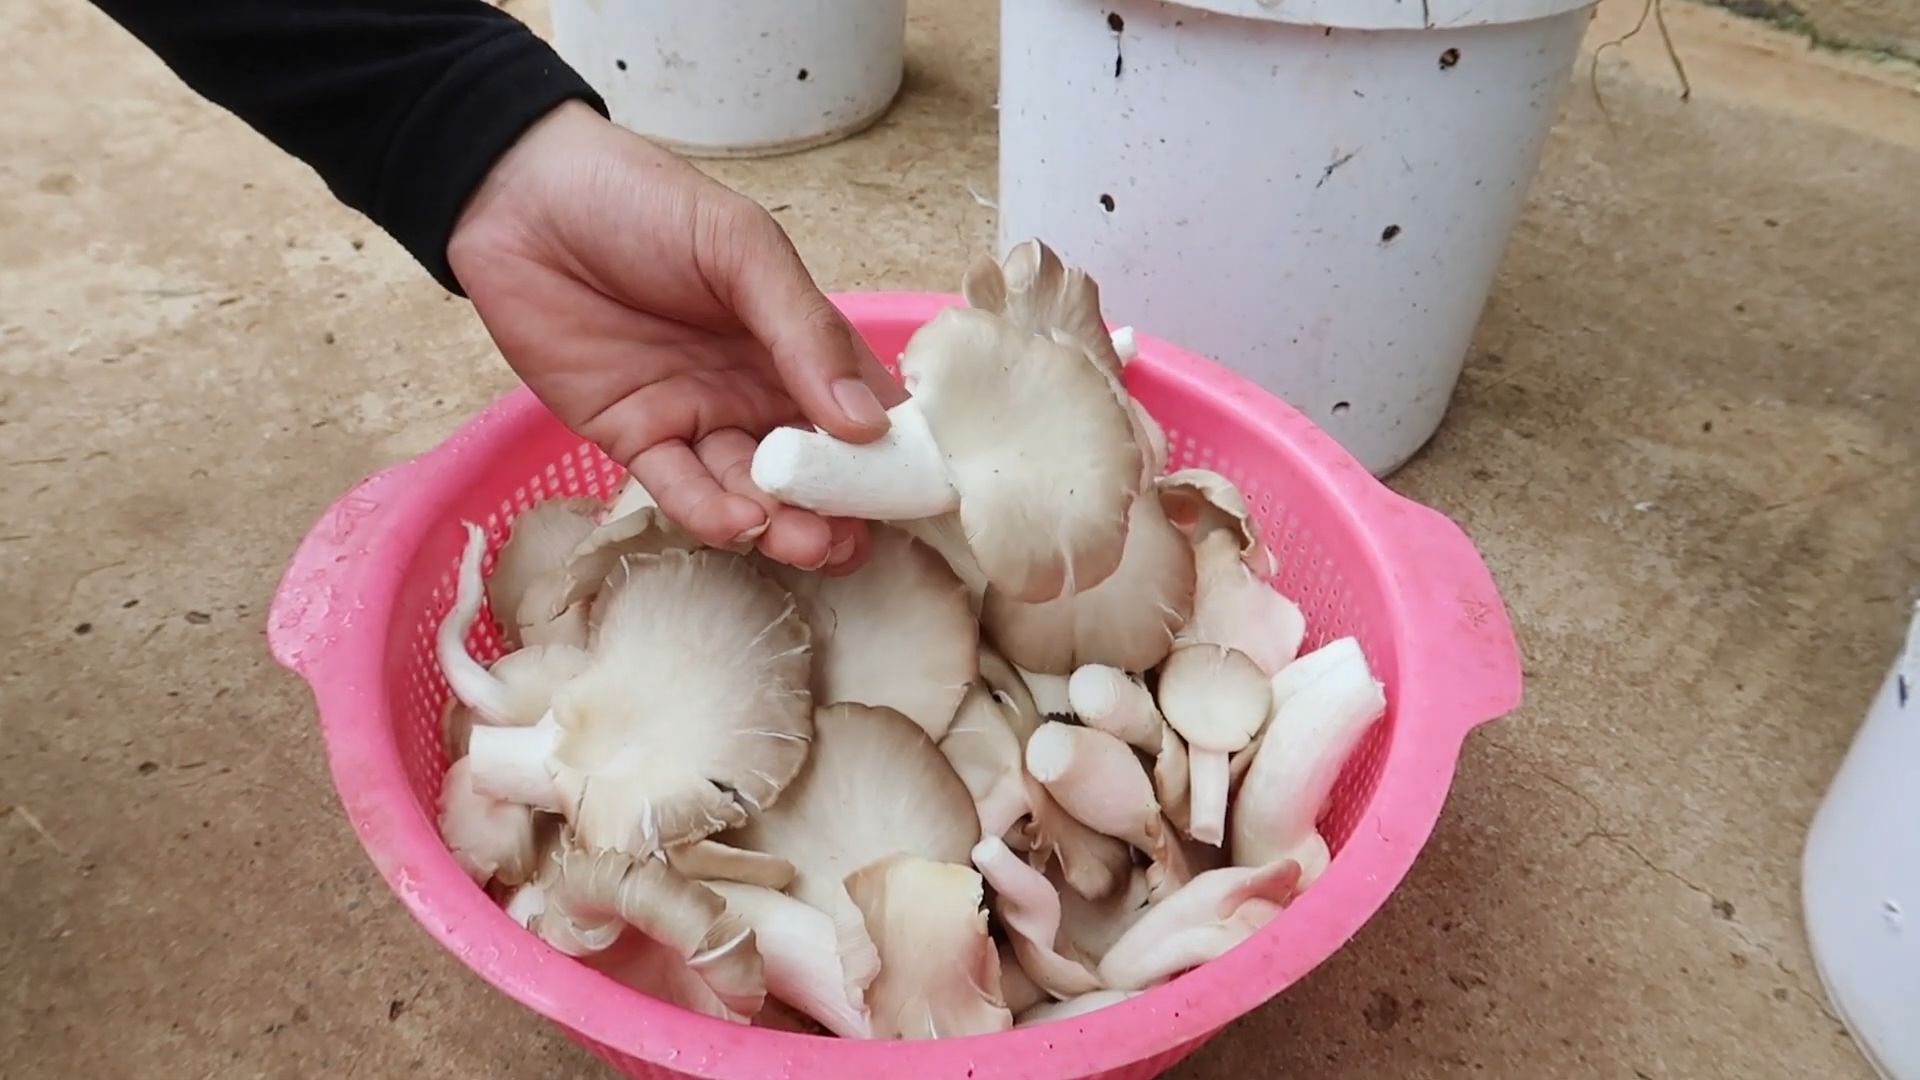
5. Harvest Your Mushrooms: The mushrooms will grow rapidly over the next few days. Harvest them when the caps are fully developed but before they start to release spores (you’ll see a powdery substance on the surface). To harvest, gently twist and pull the mushrooms from the straw.
Phase 5: Subsequent Flushes
Congratulations! You’ve harvested your first flush of mushrooms. But the fun doesn’t have to end there. You can often get several more flushes from the same substrate.
1. Soak the Substrate: After harvesting, soak the substrate in cold water for 12-24 hours. This rehydrates the straw and encourages another flush of mushrooms.
2. Drain and Repeat: Drain the water and return the bags or buckets to their fruiting location. Repeat the misting and humidity control as before.
3. Expect Diminishing Returns: Each subsequent flush will likely produce fewer mushrooms than the previous one. After 2-3 flushes, the substrate will be exhausted, and it’s time to start a new batch.
Troubleshooting Tips
* Green Mold: This is a common problem. It indicates contamination. Remove the affected area immediately and try to improve ventilation. If the mold is widespread, it’s best to discard the entire batch.
* Slow Colonization: This could be due to low temperature, low humidity, or poor spawn quality. Make sure the temperature and humidity are within the ideal range, and consider using a higher quality spawn for your next batch.
* No Fruiting: This could be due to lack of light, low humidity, or insufficient temperature drop. Make sure the mushrooms are getting enough indirect light, maintain high humidity, and try lowering the temperature slightly.
* Fruit Flies: These pesky insects can be attracted to the mushrooms. Use micropore tape to cover the ventilation holes and keep your growing area clean.
Enjoy Your Homegrown Mushrooms!
Growing your own mushrooms is a rewarding and delicious experience. With a little patience and attention to detail, you can enjoy fresh, homegrown mushrooms all year round. Experiment with different substrates and mushroom varieties to find what works best for you. Happy growing!
Conclusion
So, there you have it! Embarking on your own indoor mushroom farming beginners journey is not only achievable but incredibly rewarding. We’ve demystified the process, showing you that with a little patience, some readily available materials, and a dash of enthusiasm, you can cultivate delicious and nutritious mushrooms right in the comfort of your home.
Why is this DIY trick a must-try? Because it empowers you to take control of your food source, reduces your reliance on commercially grown options (often shipped long distances), and connects you to the fascinating world of fungi. Imagine the satisfaction of harvesting your own oyster mushrooms for a stir-fry, or adding homegrown shiitakes to a hearty soup. The flavor is unparalleled, the freshness unmatched, and the sense of accomplishment is truly fulfilling.
But the beauty of indoor mushroom farming lies in its adaptability. Feel free to experiment with different substrates. While we’ve focused on straw and coffee grounds, you can also explore using hardwood sawdust, cardboard, or even old cotton clothing (sterilized, of course!). Consider trying different mushroom varieties as well. Once you’ve mastered the basics with oyster mushrooms, branch out to shiitakes, lion’s mane, or even wine caps. Each variety offers a unique flavor profile and growing experience.
Another variation to consider is the growing environment itself. While a dark, humid space is ideal, you can also use a humidity tent or a modified greenhouse to create the perfect conditions. Monitor the temperature and humidity levels closely, and adjust your setup as needed. Remember, consistency is key to successful mushroom cultivation.
Don’t be afraid to get creative with your setup. Upcycle old containers, repurpose discarded materials, and let your imagination run wild. The possibilities are endless!
We wholeheartedly encourage you to give this DIY indoor mushroom farming trick a try. It’s a fun, educational, and ultimately delicious experience. And most importantly, don’t be discouraged if your first attempt isn’t perfect. Mushroom farming is a learning process, and every failure is an opportunity to learn and improve.
Once you’ve harvested your first batch of homegrown mushrooms, we’d love to hear about your experience! Share your photos, tips, and challenges in the comments below. Let’s build a community of indoor mushroom enthusiasts and learn from each other. Together, we can unlock the secrets of the fungal kingdom and enjoy the bounty of our own homegrown mushrooms. Happy growing!
Frequently Asked Questions (FAQ)
What are the best mushroom varieties for beginners?
Oyster mushrooms are generally considered the easiest and most forgiving variety for beginners. They are fast-growing, relatively tolerant of environmental fluctuations, and produce a generous yield. Shiitake mushrooms are another good option, although they require a slightly longer incubation period. Avoid more challenging varieties like morels or truffles until you have more experience.
What kind of substrate should I use?
For beginners, pasteurized straw or coffee grounds are excellent choices. Straw is readily available, inexpensive, and provides a good source of nutrients for many mushroom varieties. Coffee grounds are also a sustainable option, as they are often discarded by coffee shops and households. Make sure to pasteurize the substrate properly to eliminate competing molds and bacteria. Hardwood sawdust is another popular option, especially for shiitake mushrooms, but it requires more specialized equipment for sterilization.
How do I pasteurize the substrate?
Pasteurization is crucial for eliminating harmful microorganisms that can compete with the mushroom mycelium. For straw, you can soak it in hot water (around 160-180°F) for at least one hour. For coffee grounds, you can microwave them in a microwave-safe container for a few minutes, or steam them in a pot on the stove. The goal is to heat the substrate sufficiently to kill off unwanted organisms without completely sterilizing it, as some beneficial microbes can actually aid in mushroom growth.
How do I maintain the proper humidity levels?
Mushrooms require high humidity levels to thrive. You can maintain humidity by misting the growing area regularly with water, using a humidity tent, or placing a tray of water near the mushrooms. A hygrometer can help you monitor the humidity levels and adjust your watering schedule accordingly. Aim for a humidity level of around 80-90%.
How much light do mushrooms need?
Mushrooms don’t need a lot of light, but they do need some light to fruit properly. Indirect sunlight or artificial light is sufficient. Avoid direct sunlight, as it can dry out the mushrooms. A dark, humid environment is ideal for the incubation phase, but once the mushrooms start to fruit, they need a bit of light to develop their color and shape.
How long does it take for mushrooms to grow?
The time it takes for mushrooms to grow depends on the variety and the growing conditions. Oyster mushrooms can typically be harvested within a few weeks of inoculation, while shiitake mushrooms may take several months. Patience is key! Monitor the growing area regularly and adjust the conditions as needed.
What if my substrate gets contaminated with mold?
Contamination is a common problem in mushroom farming. If you see mold growing on your substrate, it’s important to remove it immediately to prevent it from spreading. In some cases, you may be able to salvage the substrate by removing the contaminated area and spraying the remaining substrate with a diluted bleach solution. However, if the contamination is widespread, it’s best to discard the entire substrate and start over. Proper pasteurization and sanitation are essential for preventing contamination.
Can I grow mushrooms outdoors?
Yes, you can grow mushrooms outdoors, but it’s more challenging than growing them indoors. Outdoor mushroom farming is subject to the whims of the weather, and it’s more difficult to control the temperature and humidity levels. However, with proper planning and preparation, you can successfully grow mushrooms outdoors. Consider using a shaded area or a greenhouse to protect the mushrooms from direct sunlight and extreme temperatures.
What are the benefits of eating homegrown mushrooms?
Homegrown mushrooms are fresher, more flavorful, and more nutritious than commercially grown mushrooms. They are also free from pesticides and other harmful chemicals. Growing your own mushrooms is a sustainable way to produce food and reduce your carbon footprint. Plus, it’s a fun and rewarding hobby!
Where can I find mushroom spawn?
Mushroom spawn can be purchased online from reputable suppliers. Make sure to choose a supplier that specializes in mushroom cultivation and offers high-quality spawn. You can also find mushroom spawn at some garden centers and nurseries. When purchasing spawn, consider the variety of mushroom you want to grow and the type of substrate you will be using.
Is indoor mushroom farming expensive?
No, indoor mushroom farming can be quite affordable, especially if you use readily available materials like straw and coffee grounds. The initial investment may include the cost of mushroom spawn and a few basic supplies, but the ongoing costs are minimal. You can even save money by collecting your own coffee grounds and using recycled containers for growing.
What if I don’t have a dark, humid space?
If you don’t have a naturally dark and humid space, you can create one using a humidity tent or a modified greenhouse. A humidity tent can be made from a plastic bag or a clear plastic container. Simply place the substrate inside the tent and mist it regularly with water to maintain humidity. A modified greenhouse can be built from a wooden frame and covered with plastic sheeting. You can also use a humidifier to increase the humidity levels in the growing area.
How do I know when the mushrooms are ready to harvest?
Mushrooms are typically ready to harvest when the caps have fully opened and the gills are visible. The exact timing will vary depending on the variety of mushroom. Harvest the mushrooms by gently twisting them off the substrate. Avoid pulling them, as this can damage the mycelium.
Can I reuse the substrate after harvesting mushrooms?
Yes, you can often get multiple flushes of mushrooms from the same substrate. After harvesting the first flush, soak the substrate in water for a few hours to rehydrate it. Then, return it to the growing area and wait for the next flush to appear. The yield of each subsequent flush may be smaller than the first, but you can often get several harvests from a single substrate. Eventually, the substrate will become depleted of nutrients and will need to be replaced. The spent substrate can be composted and used as a soil amendment in your garden.
Leave a Comment