

Hydroponic Celery Growing Guide: Unlock the secrets to cultivating crisp, delicious celery right in your own home, even without a traditional garden! Have you ever dreamed of snipping fresh celery stalks for your salads, soups, or even just a healthy snack, knowing exactly where they came from and how they were grown? Well, dream no more! This DIY guide is your passport to a thriving hydroponic celery patch, bringing the farm-to-table experience directly to your kitchen counter.
While celery might seem like a modern grocery store staple, its history stretches back centuries. Ancient civilizations, including the Greeks and Romans, valued celery for its medicinal properties. Now, we’re taking this age-old vegetable into the future with hydroponics, a method of growing plants without soil.
Why should you embrace this hydroponic celery growing guide? Because it offers a fantastic solution for anyone with limited space, challenging soil conditions, or simply a desire for a more sustainable and controlled gardening experience. Imagine bypassing the grocery store lines and enjoying the freshest, most flavorful celery you’ve ever tasted, all thanks to your own green thumb (and a little bit of water!). Plus, you’ll be amazed at how easy and rewarding it is to nurture these plants from tiny seedlings to crunchy, vibrant stalks. Let’s dive in and discover the joy of hydroponic celery growing!

DIY Hydroponic Celery: A Beginner’s Guide to Growing Crispy Stalks Indoors
Hey there, fellow plant enthusiasts! Ever dreamt of having fresh, crunchy celery right at your fingertips, no matter the season? Well, I’m here to tell you it’s totally achievable with a simple hydroponic setup! Growing celery hydroponically might sound intimidating, but trust me, it’s a fun and rewarding project, even for beginners. I’m going to walk you through every step, from gathering your supplies to harvesting your delicious, homegrown celery. Let’s get started!
What You’ll Need: Your Hydroponic Celery Shopping List
Before we dive into the nitty-gritty, let’s make sure you have everything you need. Here’s a comprehensive list:
* Celery Seeds or a Celery Base: You can start from seeds (which takes longer) or use the base of a celery bunch you bought from the store. I personally prefer starting with a base – it’s quicker and easier!
* Hydroponic System: You have a few options here.
* Deep Water Culture (DWC): This is what I recommend for beginners. It’s simple and inexpensive. You’ll need a container (like a plastic tub), a net pot, an air pump, an air stone, and hydroponic nutrients.
* Kratky Method: This is a passive hydroponic system, meaning it doesn’t require an air pump. It’s even simpler than DWC, but might not be ideal for long-term celery growth. You’ll need a container, a net pot, and hydroponic nutrients.
* Nutrient Film Technique (NFT): This is a more advanced system that involves a constant flow of nutrient solution over the roots. I wouldn’t recommend this for your first hydroponic project.
* Hydroponic Nutrients: Specifically, a balanced nutrient solution formulated for leafy greens. Look for something that contains nitrogen, phosphorus, and potassium, as well as micronutrients.
* Growing Medium: This is what will support your celery plant’s roots.
* Rockwool: A popular choice for hydroponics. It’s inert and provides good support.
* Coco Coir: Another great option. It’s made from coconut husks and retains moisture well.
* Clay Pebbles (LECA): These provide excellent drainage and aeration.
* pH Meter or pH Test Kit: Crucial for monitoring the pH of your nutrient solution. Celery prefers a pH between 6.0 and 6.5.
* Grow Lights (Optional but Recommended): If you don’t have a sunny spot, grow lights will ensure your celery gets enough light. LED grow lights are energy-efficient and work well.
* Timer (If Using Grow Lights): To automate the light cycle.
* Measuring Cups and Spoons: For accurately measuring your nutrient solution.
* Water: Use filtered or dechlorinated water. Tap water can contain chemicals that are harmful to plants.
* Spray Bottle: For misting your celery seedlings or base.
Step-by-Step Guide: Growing Celery from a Base (My Preferred Method!)
Okay, let’s get our hands dirty (well, not really, since it’s hydroponics!). This method is super satisfying because you’re essentially regrowing celery from scraps.
1. Prepare the Celery Base: After you’ve used the stalks of your celery, don’t toss the base! Cut off the bottom 2 inches of the celery bunch, keeping the root end intact. Make sure there are no signs of rot or decay.
2. Place the Base in Water: Put the celery base in a shallow dish or glass filled with about an inch of water. Place it in a sunny windowsill or under grow lights.
3. Observe and Refresh the Water: Change the water every day or two to prevent bacteria growth. You should start to see new growth emerging from the center of the base within a few days.
4. Prepare Your Hydroponic System (DWC):
* Choose your container. A dark-colored container is best to prevent algae growth.
* Drill a hole in the lid of the container that’s slightly smaller than the diameter of your net pot. This will hold the net pot securely.
* Fill the container with water, leaving about an inch of space at the top.
* Add your hydroponic nutrients according to the manufacturer’s instructions. Be careful not to over-fertilize!
* Use your pH meter or test kit to check the pH of the nutrient solution. Adjust it to between 6.0 and 6.5 using pH up or pH down solutions (available at hydroponic stores).
* Place the air stone in the bottom of the container and connect it to the air pump. Turn on the air pump to oxygenate the nutrient solution.
5. Prepare the Net Pot:
* Rinse your growing medium (rockwool, coco coir, or clay pebbles) to remove any dust or debris.
* If using rockwool, soak it in pH-adjusted water (pH 5.5-6.0) for a few hours before using it. This will help to stabilize the pH around the roots.
* Fill the net pot with your chosen growing medium.
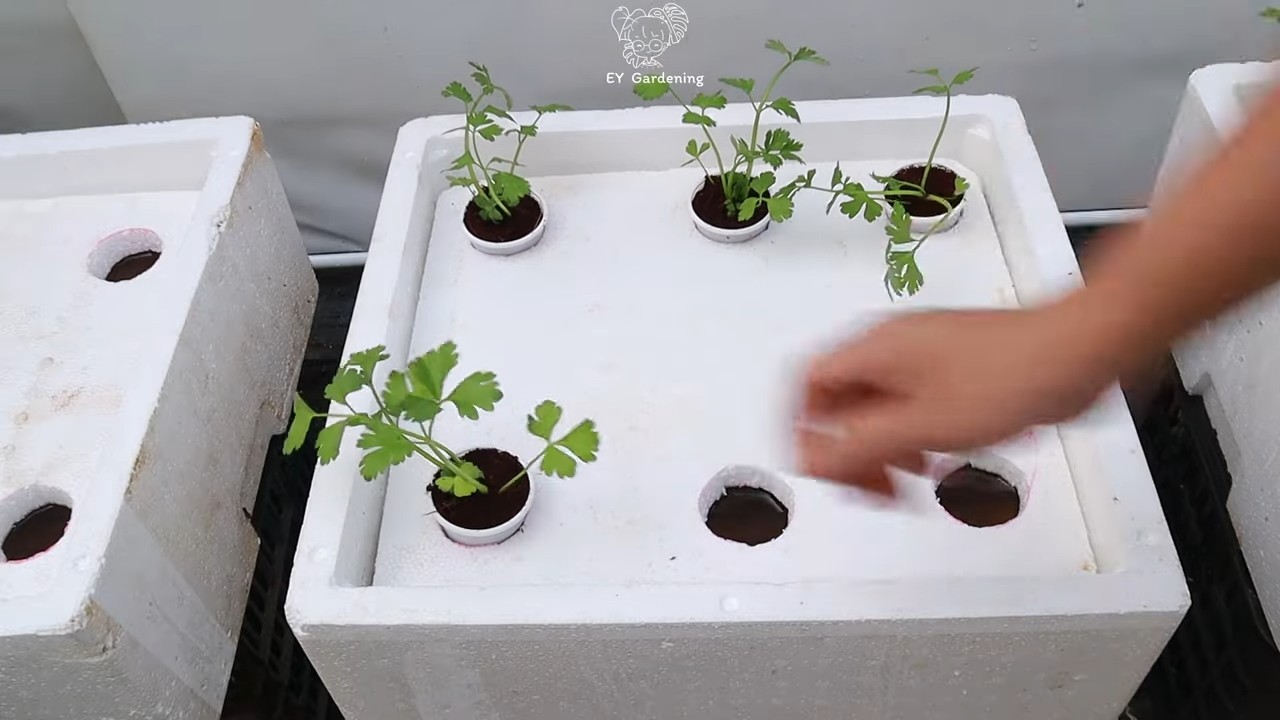
6. Transplant the Celery Base: Once the celery base has developed a good amount of new growth (about 2-3 inches), it’s time to transplant it to your hydroponic system.
* Carefully remove the celery base from the water.
* Gently place the celery base in the net pot, making sure the roots are surrounded by the growing medium. The bottom of the celery base should be just touching the nutrient solution.
* Place the net pot in the hole in the lid of the container.
7. Provide Light: If you’re using grow lights, position them about 6-12 inches above the celery plant. Set the timer to provide 14-16 hours of light per day. If you’re using natural sunlight, place the system in a sunny location that receives at least 6 hours of direct sunlight per day.
8. Monitor and Maintain:
* Check the water level in the container regularly and add more nutrient solution as needed.
* Monitor the pH of the nutrient solution and adjust it as necessary.
* Change the nutrient solution every 1-2 weeks to prevent nutrient buildup and algae growth.
* Inspect your celery plant regularly for signs of pests or diseases. Treat any problems promptly.
9. Harvest Your Celery: Your celery should be ready to harvest in about 80-100 days. You can harvest individual stalks as needed, or harvest the entire plant at once. To harvest, simply cut the stalks at the base of the plant.
Starting from Celery Seeds: A Longer, But Equally Rewarding Path
If you’re feeling patient and want to experience the entire growing process, starting from seeds is a great option. It takes a bit longer, but it’s incredibly satisfying to watch your celery grow from tiny seeds into mature plants.
1. Start Seeds Indoors: Celery seeds are tiny and need a warm, moist environment to germinate. I recommend starting them indoors about 8-10 weeks before you plan to transplant them to your hydroponic system.
2. Sow the Seeds: Fill a seed starting tray or small pots with a seed starting mix. Moisten the mix thoroughly. Sprinkle the celery seeds evenly over the surface of the mix. Celery seeds need light to germinate, so don’t cover them with soil.
3. Provide Light and Moisture: Cover the seed starting tray with a clear plastic dome or plastic wrap to create a humid environment. Place the tray under grow lights or in a sunny windowsill. Keep the soil moist but not soggy.
4. Germination: Celery seeds can take up to 2-3 weeks to germinate. Be patient! Once the seedlings emerge, remove the plastic dome or plastic wrap.
5. Thin the Seedlings: Once the seedlings have developed their first true leaves (the leaves that look like miniature celery leaves), thin them out so that only the strongest seedlings remain.
6. Harden Off the Seedlings: Before transplanting the seedlings to your hydroponic system, you need to harden them off. This means gradually exposing them to outdoor conditions to help them adjust to the change in environment. Start by placing the seedlings outdoors in a sheltered location for a few hours each day, gradually increasing the amount of time they spend outdoors over the course of a week.
7. Transplant to Hydroponic System: Follow steps 4-9 from the “Growing Celery from a Base” section to transplant your seedlings to your hydroponic system and care for them until harvest.
Troubleshooting: Common Celery Growing Challenges and How to Overcome Them
Even with the
Conclusion
So, there you have it! A comprehensive guide to growing your own celery hydroponically. We’ve walked through everything from selecting the right celery variety and preparing your nutrient solution to troubleshooting common issues and harvesting your crisp, flavorful stalks. But why should you bother with all this? Why not just buy celery at the grocery store?
The answer is simple: control, freshness, and flavor. When you grow your own celery hydroponically, you have complete control over the growing environment. You know exactly what nutrients your plants are receiving, ensuring they are healthy and free from harmful pesticides. This translates to a superior flavor profile – a crisp, clean taste that store-bought celery simply can’t match. Plus, the satisfaction of harvesting your own food is an experience that’s hard to beat.
Beyond the basic method outlined above, there are plenty of ways to experiment and customize your hydroponic celery growing. Consider trying different nutrient solutions to see how they affect the taste and texture of your celery. You might also want to experiment with different lighting setups to optimize growth rates. For example, some growers have found success using a combination of red and blue LED lights to promote both vegetative growth and stalk development.
Another interesting variation is to try growing different varieties of celery. While ‘Utah’ type celery is a popular choice, there are other options available, such as ‘Golden Self-Blanching’ celery, which has a milder flavor and doesn’t require blanching to reduce bitterness. Exploring different varieties can add a unique twist to your hydroponic celery garden.
Furthermore, think about the scale of your operation. Start small with a single container or a small hydroponic system, and then expand as you gain experience and confidence. You can even integrate your hydroponic celery growing into a larger indoor garden, alongside other leafy greens and herbs. The possibilities are endless!
But the most important thing is to just get started. Don’t be intimidated by the technical aspects of hydroponics. With a little research and experimentation, you’ll be surprised at how easy and rewarding it can be. And remember, even experienced hydroponic growers encounter challenges along the way. The key is to learn from your mistakes and keep experimenting until you find what works best for you.
We firmly believe that this DIY trick of growing celery hydroponically is a must-try for any gardening enthusiast or anyone looking to enjoy fresh, flavorful celery year-round. It’s a sustainable, efficient, and rewarding way to produce your own food, and it’s a great way to connect with nature, even if you live in an urban environment.
So, what are you waiting for? Gather your supplies, set up your hydroponic system, and start growing your own celery today! We’re confident that you’ll be amazed by the results. And don’t forget to share your experiences with us! We’d love to hear about your successes, your challenges, and any tips or tricks you’ve discovered along the way. Share your photos and stories on social media using [Your Hashtag Here] and let’s build a community of hydroponic celery growers! We are eager to see your hydroponic celery growing journey.
Frequently Asked Questions (FAQ)
What is the best type of celery to grow hydroponically?
The ‘Utah’ type celery varieties are generally considered the best for hydroponic growing. They are known for their crisp texture, robust flavor, and relatively fast growth rate. Some popular ‘Utah’ type varieties include ‘Utah Improved’ and ‘Giant Pascal’. However, don’t be afraid to experiment with other varieties, such as ‘Golden Self-Blanching’, to see what works best for you. The key is to choose a variety that is well-suited to indoor growing conditions and that you enjoy the taste of.
What kind of hydroponic system is best for celery?
Celery can be grown successfully in a variety of hydroponic systems, including deep water culture (DWC), nutrient film technique (NFT), and ebb and flow (flood and drain). DWC is a simple and inexpensive option that is well-suited for beginners. NFT is a more advanced system that provides a constant flow of nutrient solution to the roots, promoting faster growth. Ebb and flow systems are also effective, but they require more maintenance. Ultimately, the best system for you will depend on your budget, space constraints, and level of experience.
What is the ideal pH level for hydroponic celery?
The ideal pH level for hydroponic celery is between 6.0 and 6.5. This range allows the plants to effectively absorb the nutrients they need from the nutrient solution. It’s important to monitor the pH level regularly and adjust it as needed using pH up or pH down solutions. You can purchase a pH meter or test kit at most garden supply stores. Maintaining the correct pH level is crucial for healthy celery growth.
How often should I change the nutrient solution?
The frequency of nutrient solution changes depends on the size of your system and the growth rate of your celery plants. As a general rule, you should change the nutrient solution every 1-2 weeks. This helps to prevent the buildup of salts and other impurities that can inhibit plant growth. When changing the nutrient solution, be sure to thoroughly clean the reservoir and all other components of the system.
What are some common problems when growing celery hydroponically?
Some common problems when growing celery hydroponically include nutrient deficiencies, pest infestations, and fungal diseases. Nutrient deficiencies can be identified by yellowing or browning of the leaves. Pest infestations can be controlled with insecticidal soap or neem oil. Fungal diseases can be prevented by ensuring good air circulation and avoiding overwatering. Regularly inspect your plants for any signs of problems and take action promptly to prevent them from spreading.
How long does it take to grow celery hydroponically?
Celery typically takes 3-4 months to mature when grown hydroponically. However, the exact time will depend on the variety of celery, the growing conditions, and the size of the plants you are starting with. Be patient and provide your plants with the proper care, and you will be rewarded with a bountiful harvest of fresh, flavorful celery.
Can I grow celery from seed hydroponically?
Yes, you can grow celery from seed hydroponically. However, it is generally easier to start with seedlings or transplants. Celery seeds can be slow to germinate and require specific conditions to sprout successfully. If you choose to start from seed, be sure to use a high-quality seed starting mix and provide adequate moisture and warmth. Once the seedlings have developed a few true leaves, they can be transplanted into your hydroponic system.
What nutrients does celery need to grow hydroponically?
Celery requires a balanced nutrient solution that contains all the essential macronutrients and micronutrients. Macronutrients include nitrogen (N), phosphorus (P), and potassium (K), which are essential for plant growth and development. Micronutrients include iron (Fe), manganese (Mn), zinc (Zn), copper (Cu), boron (B), and molybdenum (Mo), which are needed in smaller amounts but are still crucial for plant health. You can purchase pre-mixed hydroponic nutrient solutions that are specifically formulated for leafy greens like celery.
How do I harvest celery grown hydroponically?
You can harvest celery grown hydroponically by cutting the stalks at the base of the plant. Harvest the outer stalks first, leaving the inner stalks to continue growing. This will allow you to harvest celery over a longer period of time. Be sure to use a sharp knife or scissors to avoid damaging the plant.
Is hydroponic celery growing sustainable?
Yes, hydroponic celery growing can be a very sustainable method of food production. Hydroponic systems use significantly less water than traditional soil-based agriculture. They also eliminate the need for pesticides and herbicides, which can harm the environment. Additionally, hydroponic systems can be set up in urban areas, reducing the need for transportation and associated carbon emissions. By growing your own celery hydroponically, you can contribute to a more sustainable food system.


Leave a Comment