

Harvest Ginger at Home: Imagine the satisfaction of adding freshly dug, fragrant ginger to your favorite recipes, knowing you nurtured it from rhizome to root right in your own backyard! This isn’t just a dream; it’s an achievable reality with a few simple tricks and a little patience. For centuries, ginger has been prized not only for its culinary prowess but also for its medicinal properties, playing a vital role in traditional medicine across Asia and beyond. From soothing upset stomachs to adding a zesty kick to stir-fries, ginger’s versatility is unmatched.
But why rely on store-bought ginger when you can cultivate your own, bursting with flavor and freshness? Many people struggle with knowing when and how to properly harvest ginger at home, often resulting in disappointing yields or damaged plants. That’s where this DIY guide comes in! I’m going to share my tried-and-true methods for successfully harvesting ginger, ensuring you get the most out of your homegrown spice. Whether you’re a seasoned gardener or just starting out, these tips will empower you to enjoy the rewarding experience of growing and harvesting your own ginger. Get ready to dig in – literally!
Harvesting Ginger: Your DIY Guide for a Bountiful Harvest from Your Own Garden (or Pot!)
Hello dear garden friends! Are you also tired of expensive ginger from the supermarket? Today I’m going to show you how you can easily harvest your own ginger at home. Whether in the garden or in a pot, with this guide you will soon have a rich harvest and enjoy fresh, aromatic ginger!
What you need for the ginger harvest:
- A garden trowel or a small spade (depending on where your ginger is growing)
- Gardening gloves (optional, but recommended to keep your hands clean)
- A bucket or a bowl to collect the harvested ginger
- A brush or cloth to remove the soil from the ginger
- A sharp knife or garden shears (for dividing the rhizomes)
- A sunny spot to dry the ginger
- Patience and anticipation!
When is the right time to harvest ginger?
This is one of the most important questions! Ginger needs a certain amount of time to mature and develop its full aroma.
- The best time to harvest is in the fall or winter, about 8-10 months after planting. I personally usually harvest my ginger in November, before the first frost.
- Pay attention to the leaves: When the leaves turn yellow and die back, it’s a sign that the ginger is ripe.
- You can also harvest earlier: If you only need a small piece of ginger for immediate use, you can also cut off a piece of the rhizome earlier. However, make sure that the rest of the plant can continue to grow.
Step-by-Step Guide to Harvesting Ginger
So, now let’s get down to it! Here is a detailed guide on how to successfully harvest your ginger:
1. Preparation is everything!
- Water the ginger thoroughly the day before harvesting. This makes digging easier and is gentler on the rhizomes.
- Get your tools ready: Trowel, bucket, brush, knife – everything should be within reach.
- Put on your garden gloves (if you use them).
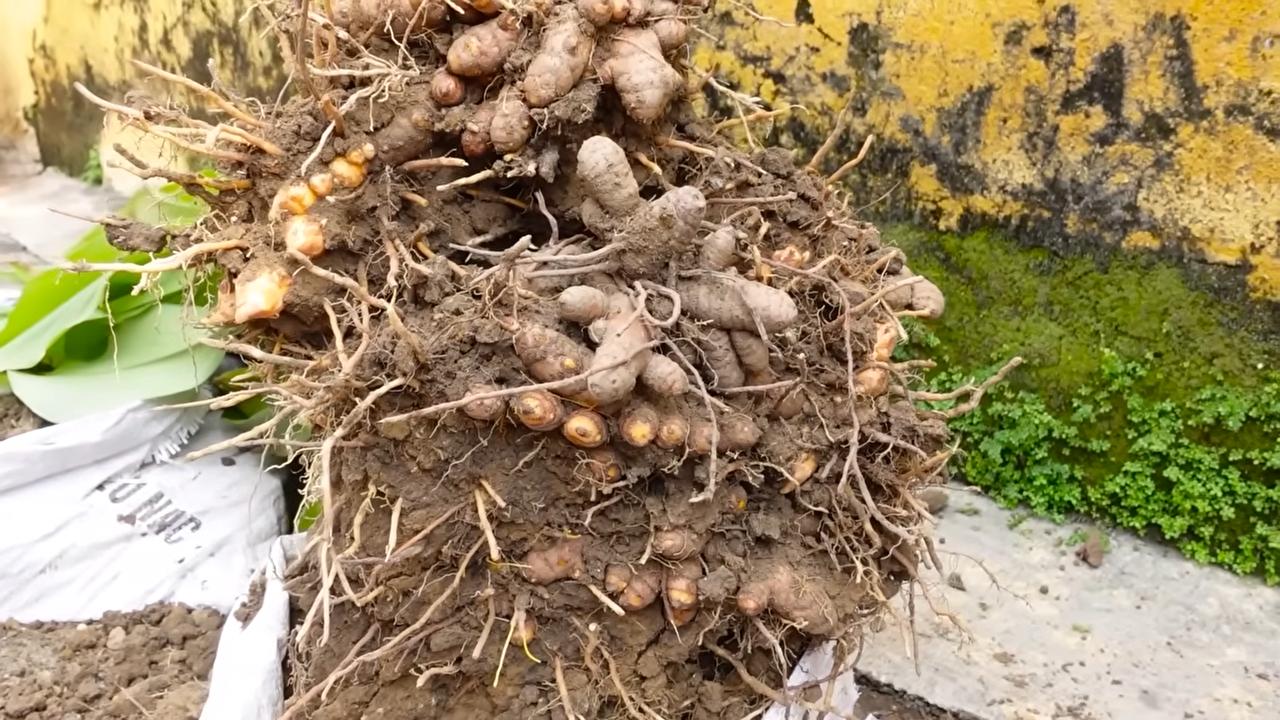
2. Digging up the ginger (or taking it out of the pot)
- In the garden: Carefully dig around the ginger plant with the trowel. Be careful not to damage the rhizomes. Then gently lift the plant out of the soil.
- In a pot: Carefully tip the pot over and loosen the soil around the ginger plant. Then gently pull the plant out.
3. Removing soil and inspecting the ginger
- Remove the excess soil from the rhizomes. You can use a brush or a cloth for this. Be careful not to injure the delicate tubers.
- Inspect the ginger: Are the rhizomes plump and firm? Do they have a nice color? These are good signs!
4. Dividing the ginger (optional)
- If you want, you can divide the ginger now. This is particularly useful if you have a large harvest or want to use the ginger for propagation.
- Use a sharp knife or garden shears to divide the rhizomes. Make sure that each piece has at least one “eye” (a bud) from which a new plant can grow.
- Let the cut surfaces dry for a few hours before planting or storing the pieces.
5. Cleaning and drying the ginger
- Clean the harvested ginger thoroughly with water. Remove all soil and dirt residues.
- Place the ginger in a sunny, well-ventilated place to dry. This can be on a tray, a rack, or simply on a clean cloth.
- Turn the ginger regularly so that it dries evenly.
- The drying process can take a few days. The ginger is dry when it feels firm and the skin is slightly wrinkled.
Storing Ginger: How to Keep It Fresh for a Long Time
After harvesting and drying, the question naturally arises: How do I best store the ginger so that it stays fresh for a long time? Here are a few tips:
- In the refrigerator: Wrap the ginger in a damp paper towel and place it in a plastic bag. It will keep in the refrigerator for several weeks.
- Freezing: You can also freeze the ginger. Peel it beforehand and cut it into slices or grate it. Then freeze it in a freezer bag or container. It will keep for several months this way.
- Pickling: Pickled ginger is a delicious and durable option. There are many different recipes, for example in vinegar or sugar.
- Drying: Dried ginger keeps for a very long time. You can dry it whole or grind it into a powder.
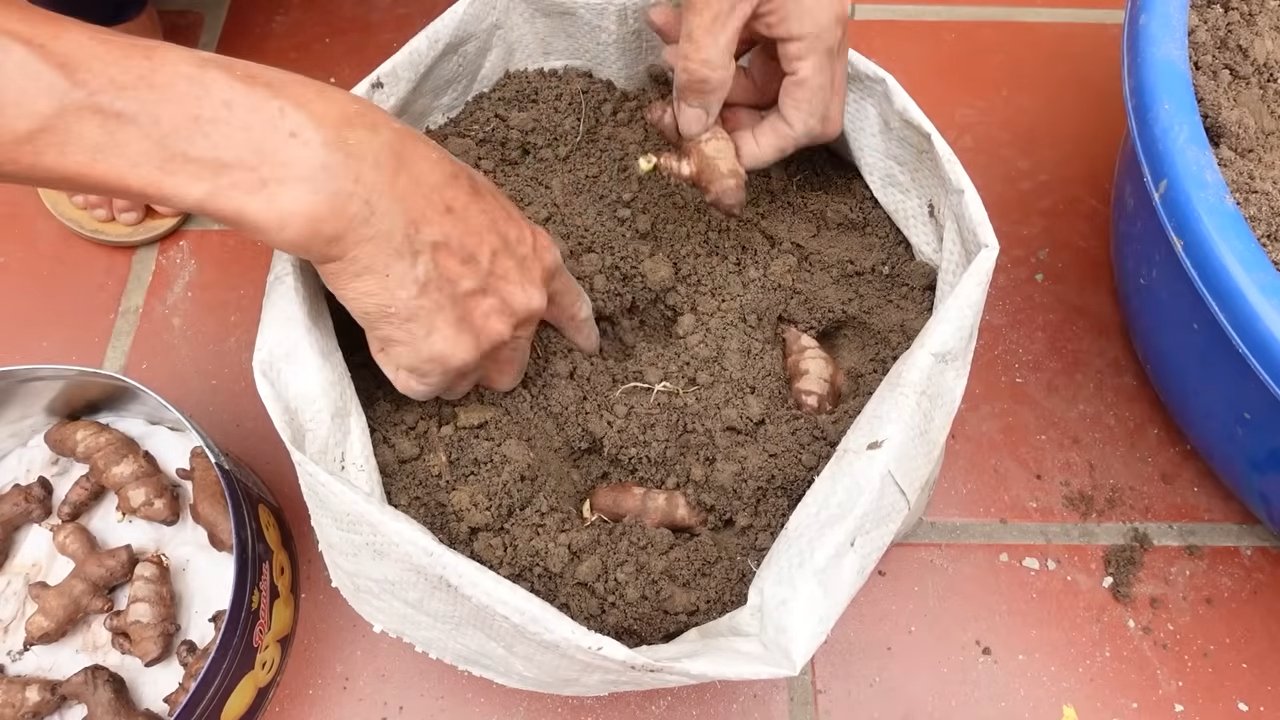
Propagating Ginger: How to Get Even More Ginger Plants
If you are thrilled with your own ginger, you may also want to propagate it. That’s very simple!
- Use the divided rhizomes with the “eyes” (buds).
- Plant the rhizomes in pots with good soil.
- Water the soil regularly and place the pots in a warm, bright place.
- The first shoots should appear after a few weeks.
- Once the plants are large enough, you can transplant them into the garden or continue to grow them in larger pots.
Common Mistakes in Ginger Harvesting and How to Avoid Them
Mistakes can also be made when harvesting ginger. Here are a few common mistakes and how to avoid them:
- Harvesting too early: If you harvest the ginger too early, it is not yet ripe and has not developed its full aroma. Wait until the leaves turn yellow and die back.
- Damaging the rhizomes: Be careful when digging to avoid damaging the rhizomes. Use a trowel or spade and dig carefully around the plant.
- Improper storage: If you store the ginger incorrectly, it can quickly mold or dry out. Ensure good ventilation and cool, dry storage.
- Too little water: Ginger needs regular water, especially during the growing season. Make sure the soil is always moist, but not wet.
- Too much sun: Ginger likes sun, but not scorching midday sun. Place the plant in a partially shaded spot.
Additional Tips for a Successful Ginger Harvest
Here are a few more tips that will help you achieve a successful ginger harvest:
- Use high-quality soil: Ginger needs loose, humus-rich soil. You can use special vegetable soil or mix your own soil with compost and sand.
- Fertilize the ginger regularly: During the growing season, you should fertilize the ginger regularly. Use an organic fertilizer or a special vegetable fertilizer.
- Watch out for pests and diseases: Ginger is relatively resistant to pests and diseases, but it can still happen that it gets infested. Watch for signs of infestation and treat the plant with a suitable agent if necessary.
- Be patient: Ginger needs time to grow and mature. Be patient and give the plant the time it needs.
I hope this guide has helped you and you are now well prepared for your own ginger harvest.
Conclusion
So, there you have it! Harvesting ginger at home is not only surprisingly simple but also incredibly rewarding. Imagine the satisfaction of using freshly dug, vibrant ginger in your cooking, knowing exactly where it came from and how it was grown. Forget the pale, often fibrous ginger from the supermarket; homegrown ginger boasts an unparalleled intensity of flavor and aroma that will elevate your culinary creations to a whole new level.
This DIY trick is a must-try for several compelling reasons. First and foremost, it puts you in control. You dictate the growing conditions, ensuring your ginger is free from harmful pesticides and herbicides. Secondly, it’s a sustainable practice. By growing your own, you reduce your reliance on commercially produced ginger, which often travels long distances, contributing to carbon emissions. Finally, it’s a cost-effective solution. While the initial investment in a ginger rhizome might seem like a small expense, the yield you’ll get from it will far outweigh the cost of buying ginger repeatedly from the store.
But the benefits don’t stop there. Growing ginger can be a therapeutic and educational experience. It’s a chance to connect with nature, learn about plant life cycles, and develop a deeper appreciation for the food we consume. Plus, it’s a fantastic conversation starter! Imagine sharing your homegrown ginger with friends and family, regaling them with tales of your gardening adventures.
Looking for variations? Consider experimenting with different varieties of ginger. While common ginger (Zingiber officinale) is the most widely available, you might also explore growing galangal (Alpinia galanga) or turmeric (Curcuma longa), both of which are closely related to ginger and offer unique flavor profiles. You can also adjust the growing conditions to influence the flavor of your ginger. For example, growing ginger in partial shade will result in a milder flavor, while growing it in more sunlight will produce a spicier ginger.
Another exciting variation is to use your homegrown ginger to make your own ginger products. Think homemade ginger ale, crystallized ginger, ginger tea, or even ginger-infused oil. The possibilities are endless!
We wholeheartedly encourage you to try this DIY trick and experience the joy of harvesting ginger at home. It’s a simple, sustainable, and incredibly rewarding project that will transform your kitchen and your cooking. Don’t be intimidated by the process; even if you’re a novice gardener, you can successfully grow ginger with a little patience and care.
Once you’ve harvested your first batch of homegrown ginger, we’d love to hear about your experience! Share your photos, tips, and recipes with us in the comments section below. Let’s create a community of ginger-growing enthusiasts and inspire others to embrace this wonderful DIY project. Happy gardening!
Frequently Asked Questions (FAQ)
Q: What is the best time of year to plant ginger?
A: The best time to plant ginger is in the early spring, after the last frost. Ginger thrives in warm, humid conditions, so waiting until the soil has warmed up will give your ginger the best chance of success. If you live in a colder climate, you can start your ginger indoors in pots a few weeks before the last frost and then transplant it outdoors once the weather warms up.
Q: How much sunlight does ginger need?
A: Ginger prefers partial shade. While it needs some sunlight to grow, too much direct sunlight can scorch the leaves. A location that receives morning sun and afternoon shade is ideal. If you’re growing ginger indoors, place it near a window that receives bright, indirect light.
Q: What kind of soil is best for growing ginger?
A: Ginger needs well-draining soil that is rich in organic matter. A mixture of potting soil, compost, and perlite is a good option. Avoid heavy clay soils, as they can retain too much water and lead to root rot. Before planting, amend the soil with plenty of compost to improve drainage and fertility.
Q: How often should I water my ginger plant?
A: Ginger needs consistent moisture, but it doesn’t like to be waterlogged. Water your ginger plant regularly, especially during hot, dry weather. Check the soil moisture regularly and water when the top inch of soil feels dry to the touch. Avoid overwatering, as this can lead to root rot.
Q: How long does it take to harvest ginger?
A: You can start harvesting ginger about 8-10 months after planting. The leaves will start to turn yellow and brown when the ginger is ready to harvest. You can harvest the entire plant at once, or you can harvest individual rhizomes as needed. To harvest, gently dig around the plant and lift the rhizomes out of the soil.
Q: How do I store harvested ginger?
A: Freshly harvested ginger can be stored in the refrigerator for several weeks. Wrap the ginger in a paper towel and place it in a plastic bag. You can also freeze ginger for longer storage. To freeze ginger, peel it and slice it into small pieces. Place the ginger pieces in a freezer bag and freeze for up to six months.
Q: Can I grow ginger in a container?
A: Yes, ginger grows very well in containers. Choose a pot that is at least 12 inches deep and wide to give the ginger rhizomes plenty of room to grow. Use a well-draining potting mix and water regularly. Container-grown ginger may need to be fertilized more frequently than ginger grown in the ground.
Q: What are some common problems when growing ginger?
A: Some common problems when growing ginger include root rot, pests, and nutrient deficiencies. Root rot can be prevented by planting ginger in well-draining soil and avoiding overwatering. Pests, such as aphids and spider mites, can be controlled with insecticidal soap. Nutrient deficiencies can be addressed by fertilizing the ginger plant regularly with a balanced fertilizer.
Q: Can I regrow ginger from store-bought ginger?
A: Yes, you can often regrow ginger from store-bought ginger, but it’s not always guaranteed. Look for ginger rhizomes that are plump and have visible “eyes” (small buds). Soak the ginger in water overnight before planting it in a pot of soil. Keep the soil moist and warm, and be patient. It may take several weeks for the ginger to sprout. Note that commercially grown ginger may be treated to prevent sprouting, so success is not always assured.
Q: Is homegrown ginger spicier than store-bought ginger?
A: Homegrown ginger often has a more intense and vibrant flavor than store-bought ginger. The spiciness can vary depending on the variety of ginger, the growing conditions, and the time of harvest. Generally, ginger that is grown in more sunlight and harvested later in the season will be spicier.

Leave a Comment