

Hanging lettuce no water? Sounds impossible, right? I thought so too, until I stumbled upon this incredibly simple, yet revolutionary, way to grow fresh, crisp lettuce without the daily watering routine. Imagine having a constant supply of salad greens right outside your door, practically begging to be harvested, and all it takes is a little ingenuity and some repurposed materials!
The concept of vertical gardening, while seemingly modern, actually has roots stretching back centuries. Think of the Hanging Gardens of Babylon, one of the Seven Wonders of the Ancient World! While we might not be building elaborate tiered structures, we *are* tapping into that same spirit of maximizing space and bringing nature closer to home. For centuries, people have been finding creative ways to cultivate plants in limited spaces, and this no-water hanging lettuce method is just the latest evolution.
Let’s face it, life gets busy. We all want fresh, healthy food, but sometimes the daily commitment of watering and tending a garden feels overwhelming. This DIY trick is a game-changer for anyone who wants to enjoy homegrown lettuce without the hassle. It’s perfect for apartment dwellers with limited space, busy families who struggle to find time for gardening, or anyone who simply wants a low-maintenance way to enjoy fresh greens. Plus, it’s a fantastic way to recycle old plastic bottles and reduce your environmental footprint. So, if you’re ready to ditch the store-bought lettuce and embrace a simpler, more sustainable way of gardening, keep reading! I’m going to show you exactly how to create your own hanging lettuce no water garden, step-by-step.

DIY Hanging Garden for Lettuce: Fresh Lettuce Without Watering!
Hello, dear garden friends! Are you also tired of your lettuce always being nibbled on by snails or just not wanting to grow properly in the garden bed? Then I have the perfect solution for you today: a hanging garden for lettuce that not only looks great but is also totally easy to care for – and the best part: we hardly need to water it at all! Sounds crazy? But it’s not! Let’s get started!
What we need:
- Several plastic bottles (preferably 1.5 or 2 liters)
- A sharp knife or scissors
- A drill or a nail and hammer
- Sturdy string or wire
- Soil (a mixture of garden soil and compost is best)
- Lettuce seedlings (different varieties for a colorful mix!)
- Optional: Coconut fiber or moss (to line the bottles)
- Optional: Spray bottle with water
Why a Hanging Garden for Lettuce?
- Protection from pests: Snails and other hungry garden dwellers have a hard time getting to the lettuce.
- Space-saving: Ideal for balconies, terraces, or small gardens.
- Less watering: The special construction helps retain moisture longer.
- Decorative: A real eye-catcher!
- Easy harvesting: The lettuce hangs at a comfortable height.
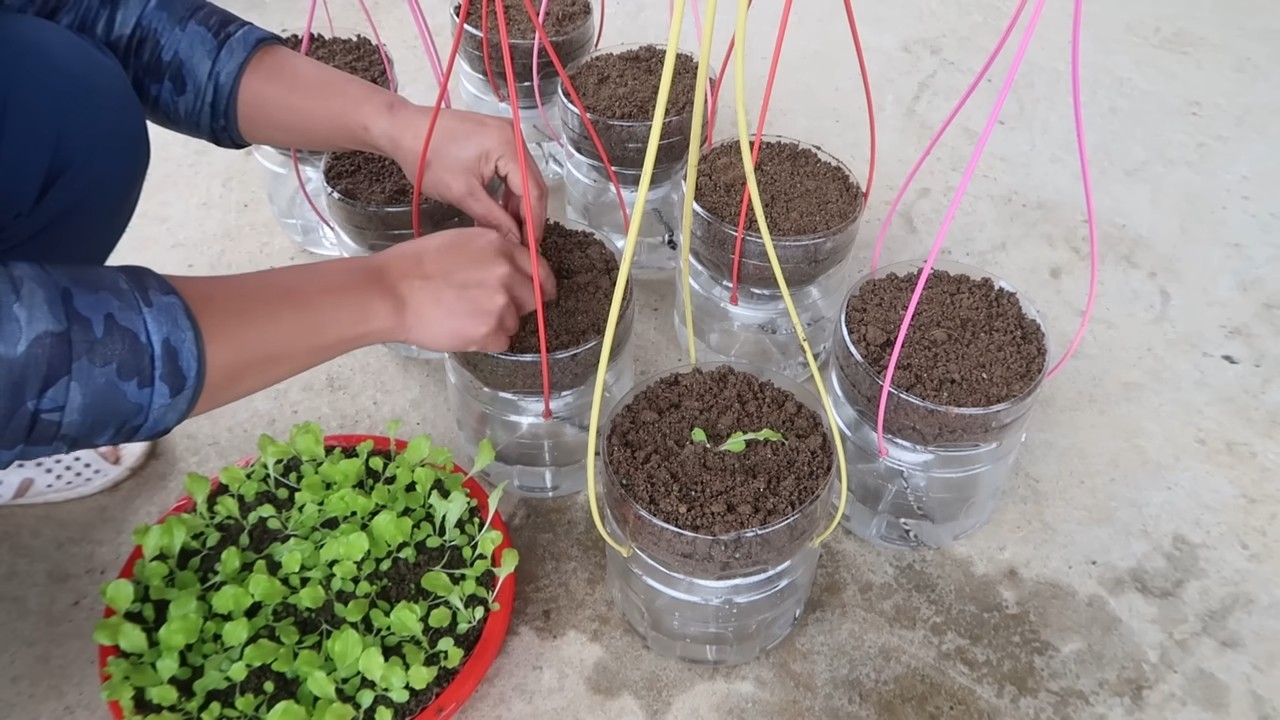
The Preparation: Working on the Bottles
- Clean the bottles: First, we need to thoroughly clean the plastic bottles. Remove all labels and rinse them with warm water and dish soap. Let them dry well.
- Cutting the bottles: Now comes the exciting part! We cut the bottles so that we get two halves that we can later fit into each other.
- Mark the line: Take a bottle and mark a line with a pen about 10-15 cm below the bottle neck. This line serves as a guide for the cut.
- Cutting: Now carefully cut along the marked line with the sharp knife or scissors. Make sure the cut is clean and straight. Repeat this step for all bottles.
- Drill holes: So that the water can drain and the plants can breathe, we need to drill holes in the bottles.
- Drainage holes: Take the bottom halves of the bottles (the ones with the bottle base) and drill or nail 3-4 small holes in the bottom. These holes ensure that excess water can drain and waterlogging is avoided.
- Hanging holes: Now we drill holes for hanging. Take the top halves of the bottles (the ones with the bottle neck) and drill or nail two holes opposite each other just below the cut edge. These holes are for threading the string or wire through to hang the bottles.
- Optional: Lining the bottles: To retain moisture even better and protect the soil from drying out, you can line the bottles with coconut fiber or moss. Cut the coconut fiber or moss into suitable pieces and line the inside of the bottom bottle halves with them.
The Assembly: Filling and Planting the Bottles
- Fit the bottles together: Take a bottom bottle half and insert the top bottle half (with the bottle neck facing down) into it. Make sure the top half fits well and does not slip out.
- Fill with soil: Fill the top bottle half with soil. It’s best to use a mixture of garden soil and compost, as this is particularly rich in nutrients. Leave about 2-3 cm of space to the rim.
- Plant the lettuce seedlings: Now we can plant the lettuce seedlings. Make small holes in the soil with your fingers and carefully place the seedlings in them. Press the soil down lightly and then water the seedlings with a little water.
- Hanging: Thread the string or wire through the hanging holes in the top bottle half. Tie the string or wire tightly so that the bottle hangs securely. Repeat this step for all bottles.
- Placement: Find a sunny or semi-shady spot for your hanging garden. Make sure the bottles are easily accessible so you can harvest the lettuce easily.
The Care: Less Watering, More Harvesting!
- Watering: The special thing about this hanging garden is that we hardly need to water it. The water we used when planting is usually sufficient for the first few days. After that, you can lightly moisten the lettuce every few days with a spray bottle. Make sure the soil does not dry out, but is also not too wet. The coconut fiber or moss helps to retain moisture.
- Fertilizing: To provide the lettuce with sufficient nutrients, you can fertilize it every few weeks with an organic liquid fertilizer. Follow the dosage instructions of the manufacturer.
- Harvesting: The lettuce is ready for harvest when the leaves have reached a sufficient size. You can either pick individual leaves or harvest the whole head. If you only harvest individual leaves, the lettuce will continue to grow and you will have something from it for longer.
- Protection from extreme weather conditions: In case of heavy rain or hail, you should move the hanging garden to a sheltered place so that the lettuce is not damaged.
Additional Tips and Tricks:
- Different lettuce varieties: Try different lettuce varieties to create a colorful and varied hanging garden.
- Herbs: You can also plant herbs like parsley, chives, or basil in the hanging garden.
- Labeling: Label the bottles so you know which lettuce variety is in which bottle.
- Recycling: Use old plastic bottles to conserve resources and protect the environment.
- Creativity: Design your hanging garden according to your own ideas. Paint the bottles, decorate them with patterns, or adorn them with ribbons.
Frequently Asked Questions (FAQ):
- How often do I have to water the lettuce? Usually, it is enough to lightly moisten the lettuce every few days with a spray bottle. Make sure the soil does not dry out, but is also not too wet.
- Which soil is best suited? A mixture of garden soil and compost is ideal, as it is particularly rich in nutrients.
- Can I also plant other plants in the hanging garden? Yes, you can also plant herbs like parsley, chives, or basil in the hanging garden.
- How do I protect the lettuce from pests? The hanging garden already offers good protection from pests. If necessary, you can also use biological pesticides.
- How long does the lettuce last in the hanging garden? That depends on the lettuce variety and the growing conditions. Usually, you can harvest the lettuce for several weeks.
I hope this guide helps you to create your own hanging garden for lettuce. It’s a really great project that is not only fun but also brings fresh lettuce to the table!
Conclusion
So, there you have it! Hanging lettuce without water might sound unconventional, but it’s a game-changer for extending the life of your leafy greens. We’ve explored the science behind why this method works so well, and hopefully, you’re convinced to give it a try.
Why is this a must-try? Because it tackles the two biggest enemies of fresh lettuce: excess moisture and ethylene gas buildup. By gently drying the lettuce and allowing for proper air circulation, you’re actively preventing premature wilting, browning, and that dreaded slimy texture. Think about the money you’ll save by not throwing away spoiled lettuce every week! Plus, it’s incredibly simple and requires minimal effort.
But don’t just take our word for it. Experiment and find what works best for you.
Here are a few suggestions and variations to consider:
* Lettuce Types: While this method works wonders for most lettuce varieties, some, like romaine, might benefit from a slightly damp paper towel placed at the base of the hanging bunch to maintain a bit of moisture.
* Storage Location: The crisper drawer in your refrigerator is generally the best place, but avoid placing the hanging lettuce near fruits like apples or bananas, which release high amounts of ethylene gas.
* Hanging Method: Get creative with your hanging setup! Use clothespins, binder clips, or even repurpose old hangers. The key is to ensure the lettuce is suspended and not touching the sides of the container.
* Pre-Washed Lettuce: Even pre-washed lettuce can benefit from this method. Gently pat it dry with paper towels before hanging to remove any excess moisture introduced during the washing process.
* Herb Extension: This method isn’t just for lettuce! Try it with other leafy herbs like parsley, cilantro, and dill. You might be surprised at how much longer they stay fresh.
We are confident that this DIY trick will revolutionize how you store lettuce. It’s a simple, effective, and eco-friendly way to reduce food waste and enjoy fresh, crisp lettuce for longer.
Now, it’s your turn! We encourage you to try this method and see the difference for yourself. Don’t be afraid to experiment with different variations and find what works best for your kitchen and your lettuce.
Most importantly, share your experience! Let us know in the comments below how this method worked for you, what variations you tried, and any tips you discovered along the way. Your feedback will help others discover the magic of hanging lettuce and enjoy fresher salads for longer. Let’s all work together to reduce food waste and enjoy the simple pleasure of perfectly crisp lettuce!
Frequently Asked Questions (FAQ)
Why does hanging lettuce without water actually work?
The secret lies in controlling moisture and airflow. Lettuce spoils quickly when it’s sitting in excess moisture, which encourages bacterial growth and causes it to wilt and become slimy. Hanging the lettuce allows air to circulate around the leaves, gently drying them and preventing moisture buildup. This also helps to slow down the natural decomposition process. Furthermore, hanging the lettuce away from other produce that emits ethylene gas (a ripening agent) further extends its shelf life.
What types of lettuce work best with this method?
This method works well for most types of lettuce, including romaine, butter lettuce, green leaf, red leaf, and even iceberg lettuce. However, some delicate varieties, like arugula or spinach, might benefit from a slightly different approach. For these, consider wrapping them loosely in a paper towel before hanging to provide a bit of extra moisture retention.
How long will lettuce last when stored this way?
While results may vary depending on the initial freshness of the lettuce and the conditions in your refrigerator, you can generally expect lettuce stored using this method to last significantly longer than lettuce stored in a plastic bag or container. Many users report that their lettuce stays fresh for a week or even two weeks longer than usual.
What if my lettuce is already a little wilted? Can this method revive it?
While this method is primarily for preventing spoilage, it can sometimes help to revive slightly wilted lettuce. Before hanging, try soaking the lettuce in a bowl of ice water for about 15-30 minutes. This can help to rehydrate the leaves and restore some of their crispness. Then, gently dry the lettuce before hanging it.
Is it necessary to wash the lettuce before hanging it?
It depends on whether the lettuce is pre-washed or not. If you purchased pre-washed lettuce, it’s generally safe to hang it without washing it again. However, if you’re using lettuce from your garden or a farmer’s market, it’s important to wash it thoroughly to remove any dirt or debris. Make sure to dry the lettuce completely before hanging it to prevent moisture buildup.
What’s the best way to dry the lettuce before hanging it?
The most effective way to dry lettuce is to use a salad spinner. This will remove excess water quickly and efficiently. If you don’t have a salad spinner, you can gently pat the lettuce dry with paper towels. Be careful not to bruise or damage the leaves.
Can I use a plastic bag instead of hanging the lettuce?
While you can store lettuce in a plastic bag, it’s not the ideal method. Plastic bags tend to trap moisture, which can lead to spoilage. If you do use a plastic bag, make sure to poke a few holes in it to allow for air circulation. However, hanging the lettuce is still the preferred method for optimal freshness.
What if I don’t have enough space in my refrigerator to hang the lettuce?
If space is limited, you can try using a smaller container or hanging the lettuce in a less conspicuous area of your refrigerator. You can also try cutting the lettuce into smaller pieces and hanging them in smaller bunches.
Does this method work for other leafy greens besides lettuce?
Yes! This method can also be used to store other leafy greens, such as spinach, kale, and chard. However, some greens may require slightly different handling. For example, kale and chard are more robust than lettuce and can tolerate being hung without any additional moisture retention.
What are some signs that my lettuce is starting to spoil, even when stored using this method?
Even with proper storage, lettuce will eventually start to spoil. Some signs of spoilage include wilting, browning, sliminess, and an unpleasant odor. If you notice any of these signs, it’s best to discard the lettuce.
Can I freeze lettuce that I’ve stored using this method?
Freezing lettuce is generally not recommended, as it can change the texture and make it mushy. However, you can freeze cooked lettuce for use in soups or stews.
How often should I check on the lettuce while it’s hanging?
It’s a good idea to check on the lettuce every few days to make sure it’s still fresh. Remove any wilted or damaged leaves to prevent them from affecting the rest of the bunch.
Is there a specific temperature setting that’s best for storing lettuce?
The ideal temperature for storing lettuce is between 32°F and 40°F (0°C and 4°C). Make sure your refrigerator is set to this temperature range to maximize the shelf life of your lettuce.
What if I don’t have a refrigerator? Can I still use this method?
While a refrigerator is ideal for storing lettuce, you can still use this method to extend its shelf life at room temperature. Hang the lettuce in a cool, dark, and well-ventilated area. However, keep in mind that the lettuce will not last as long as it would in a refrigerator.
Can I reuse the hanging materials (clips, hangers, etc.)?
Yes, you can reuse the hanging materials as long as they are clean and dry. Wash them with soap and water after each use to prevent the spread of bacteria.


Leave a Comment