

Hanging bottle garden celery: Sounds intriguing, right? Imagine fresh, crisp celery stalks dangling gracefully from repurposed plastic bottles, adding a touch of green magic to your balcony or kitchen window. Forget those wilting supermarket celery bunches! This isn’t just about growing your own food; it’s about embracing a sustainable, space-saving, and utterly charming way to bring the garden indoors.
The concept of vertical gardening, while seemingly modern, has roots stretching back centuries. Think of the Hanging Gardens of Babylon, one of the Seven Wonders of the Ancient World! While we might not be building architectural marvels, we are tapping into that same innate human desire to cultivate beauty and sustenance in unexpected places. Celery, with its refreshing crunch and versatility in cooking, makes a fantastic candidate for this DIY project.
Why should you try this hanging bottle garden celery trick? Well, for starters, it’s incredibly budget-friendly. We’re talking about upcycling plastic bottles that might otherwise end up in a landfill. Secondly, it’s perfect for those with limited space – apartment dwellers, balcony gardeners, or anyone simply looking to maximize their growing potential. And finally, let’s be honest, it’s just plain cool! Imagine the conversations you’ll spark when friends see your unique, thriving celery garden. I’m excited to share this easy-to-follow guide, so you can enjoy fresh, homegrown celery all year round!
DIY Hanging Bottle Garden for Celery: Your Own Little Vegetable Paradise!
Hello, dear garden friends! Do you also sometimes feel that your balcony or garden just doesn’t have enough space for all your green dreams? Don’t worry, I have a great solution for you: a hanging bottle garden for celery! It’s not only space-saving but also a real eye-catcher. And the best part? It’s super easy to make yourself! Let’s get started together and create our own little vegetable paradise.
What you need for your hanging bottle garden:
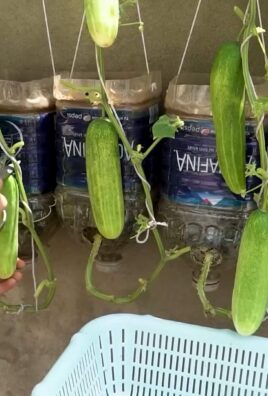
- Empty plastic bottles: Large PET bottles (e.g., from water or juice) are best. The number depends on how many celery plants you want to grow. I recommend starting with 3-5 bottles.
- Celery stalk base: You can use the base from a store-bought celery. Make sure it is still intact and has no rotten spots.
- Soil: Regular potting soil or vegetable soil is perfectly suitable.
- Scissors or utility knife: For cutting the bottles. Please be careful!
- Drill or a nail and hammer: To make holes for hanging.
- Strong rope or wire: For hanging the bottles.
- Water: For watering, of course!
- Optional: Decorative stones or gravel for the bottom of the bottles.
Phase 1: Preparing the Bottles
- Cleaning the bottles: First, we need to thoroughly clean the empty plastic bottles. Remove all labels and rinse them with warm water and dish soap. Make sure no soap residue remains. Then let the bottles dry well.
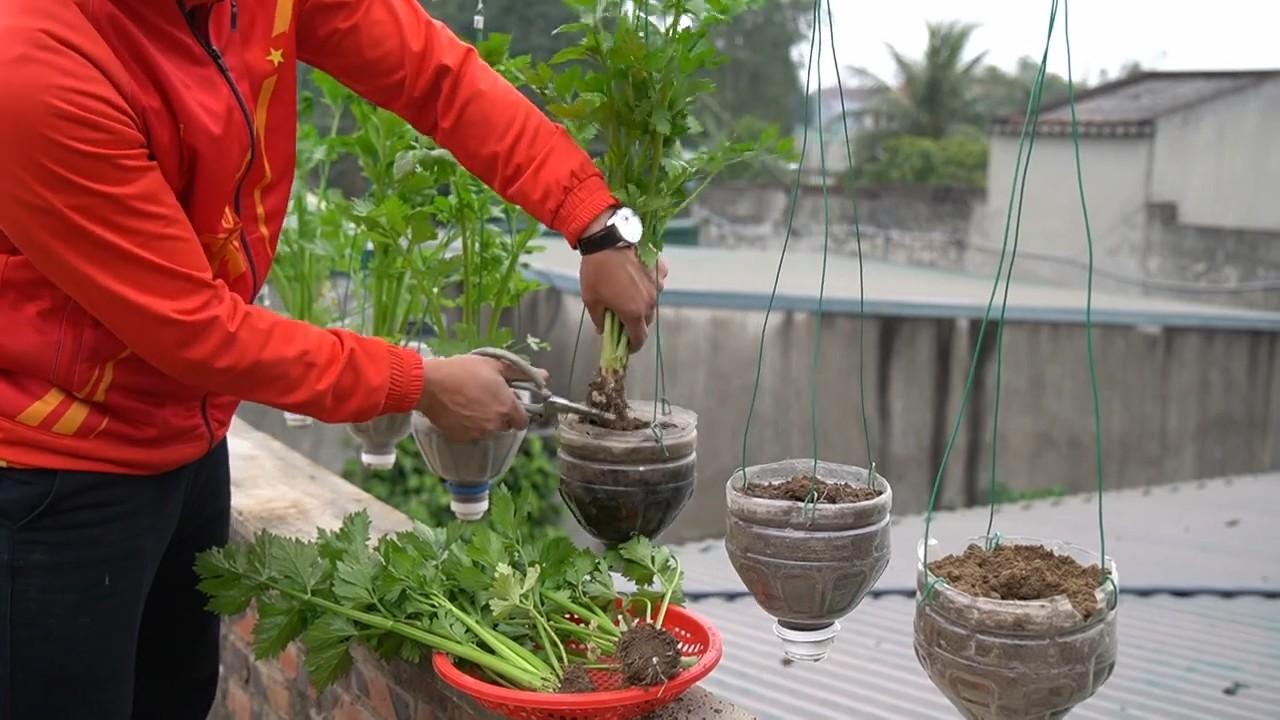
- Cutting the bottles: Now comes the slightly trickier part. With scissors or a utility knife, we cut the bottles so they can serve as planters. I recommend cutting the bottles at about the upper third. You can either discard the cut-off tops or use them later as small mini-greenhouses to protect the celery seedlings from wind and weather.Important Note: Please be very careful when cutting the bottles to avoid injury. It’s best to place the bottle on a stable surface and cut slowly and controllably.
- Drilling holes for hanging: Now we drill holes in the sides of the bottles, through which we will later thread the rope or wire to hang the bottles. I recommend drilling two holes opposite each other, about 2-3 cm below the top edge of the bottle.Tip: If you don’t have a drill, you can also use a nail and a hammer to make the holes. But be careful that the holes don’t get too big, so the rope or wire doesn’t slip through later.
- Optional: Preparing drainage: To prevent waterlogging, you can create a small drainage layer at the bottom of the bottles. Simply put a few decorative stones or gravel into the bottles. This helps to drain excess water and protect the celery roots from rot.
Phase 2: Preparing the Celery Stalk Base
- Selecting the base: As already mentioned, you should choose a fresh and intact celery stalk base. Make sure it has no rotten spots or damage.
- Preparing the base: Cut the base about 5-7 cm above the roots. Remove the outer, wilted, or damaged leaves.
- Placing in water: Place the prepared base in a glass of water. Make sure the roots are completely covered with water. Place the glass in a bright spot, but not in direct sun.
- Waiting for roots: Now it’s time to be patient! New roots should form within a few days. Change the water every 1-2 days to prevent the formation of bacteria.Tip: You can also add a few drops of liquid fertilizer to the water to promote root growth.
Phase 3: Planting and Hanging
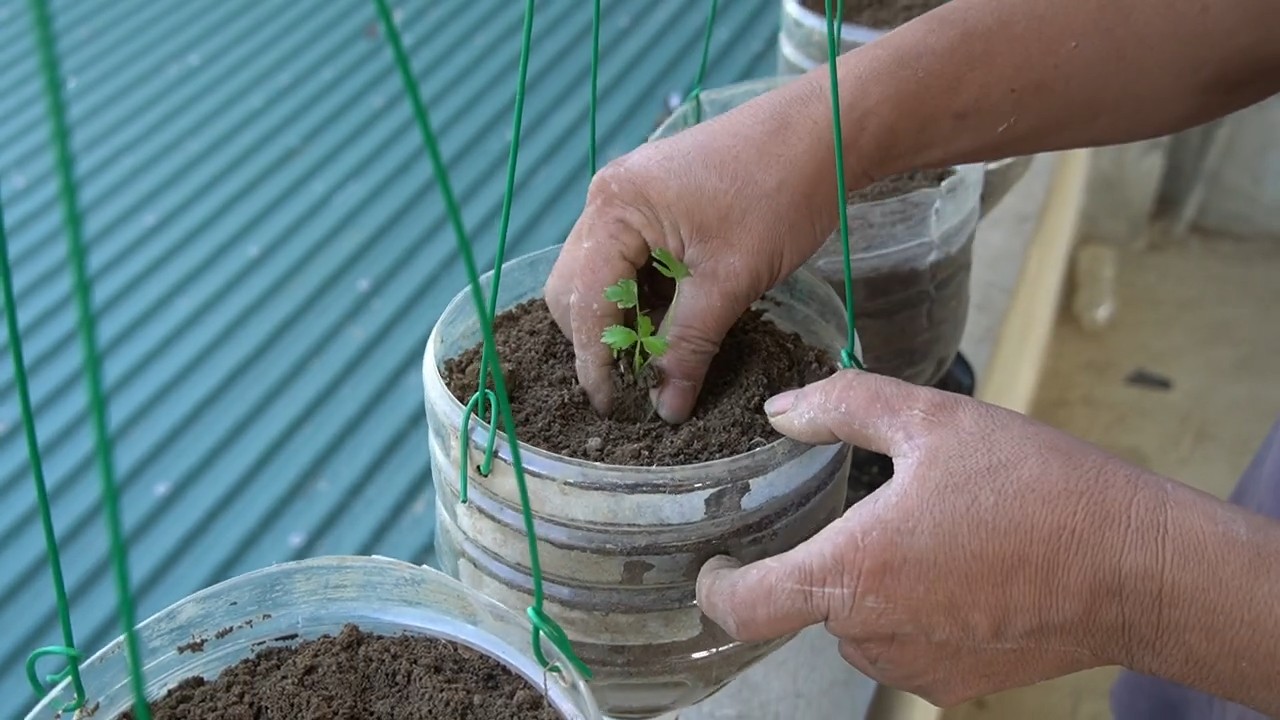
- Filling the bottles with soil: Fill the prepared bottles with soil. Leave about 2-3 cm of space to the top edge.
- Planting the celery base: Once the celery base has formed sufficient roots, you can plant it in the soil-filled bottle. Dig a small hole in the soil and carefully place the base inside. Make sure the roots are well covered with soil.
- Watering: Water the celery plant thoroughly after planting. Make sure the soil is well-moistened, but avoid waterlogging.
- Hanging the bottles: Now comes the most fun part: hanging the bottles! Thread the rope or wire through the drilled holes on the sides of the bottles. Make sure the rope or wire is strong enough to support the weight of the bottle and the soil.
- Installing the hanging garden: Find a suitable place for your hanging bottle garden. A sunny or semi-shady spot that is protected from strong wind is best. You can either hang the bottles individually or attach several bottles to a common rope or wire.Tip: You can also hang the bottles at different heights to create an interesting visual effect.
Phase 4: Caring for Your Hanging Bottle Garden
- Watering: Water your celery regularly, especially during the summer months. Make sure the soil is always slightly moist, but avoid waterlogging.
- Fertilizing: Fertilize your celery every 2-3 weeks with a liquid fertilizer for vegetables. This ensures healthy growth and a bountiful harvest.
- Pest protection: Regularly check your celery plants for pests like aphids or slugs. If necessary, you can use biological pesticides.
- Harvesting: Once the celery has grown sufficiently, you can harvest it. Simply cut off the outer stalks. The plant will continue to grow and produce new stalks.
- Overwintering: Celery is not winter-hardy. If you want to overwinter it, you should bring it indoors before the first frost and place it in a bright and cool location.
Additional Tips and Tricks:
- Use different bottle sizes: This creates a varied look.
- Paint the bottles: You can also paint the bottles with waterproof paint to make them even more individual.
- Combine different herbs and vegetables: In your hanging garden, you can grow not only celery but also other herbs and vegetables like parsley, chives, or lettuce.
- Ensure proper ventilation: Make sure the plants are sufficiently ventilated to prevent mold.
I hope this guide helps you to create your own hanging bottle garden for celery. It’s a great project that is not only fun but also allows for fresh vegetables in the smallest of spaces. Good luck and have fun gardening!
Conclusion
So, there you have it! Transforming discarded plastic bottles into a thriving vertical garden for your celery is not just a clever upcycling project; it’s a game-changer for anyone looking to maximize space, minimize waste, and enjoy the freshest celery possible. This DIY hanging bottle garden celery method offers a multitude of benefits, from its eco-friendly nature to its space-saving design, making it a must-try for urban gardeners, apartment dwellers, and anyone passionate about sustainable living.
But why is this particular method so compelling? Beyond the obvious environmental advantages, consider the convenience. No more trekking to the grocery store for celery that’s already past its prime. Imagine stepping onto your balcony or into your kitchen and snipping off exactly the amount of crisp, flavorful celery you need, right when you need it. The freshness is unparalleled, and the satisfaction of growing your own food, even in a small space, is incredibly rewarding.
Furthermore, the hanging bottle garden design offers excellent drainage and aeration for your celery plants, promoting healthy root development and preventing common issues like root rot. The vertical arrangement also maximizes sunlight exposure, ensuring your celery receives the energy it needs to thrive. And let’s not forget the aesthetic appeal! A wall adorned with lush green celery plants adds a touch of natural beauty to any space, transforming a drab area into a vibrant and inviting oasis.
Ready to take your celery growing to the next level?
Don’t be afraid to experiment with variations on this DIY project. Try using different types of plastic bottles, such as larger juice containers or even repurposed milk jugs, to accommodate larger celery varieties or to create a more visually diverse garden. You can also add other herbs and vegetables to your hanging garden, creating a miniature ecosystem of fresh, homegrown produce. Consider planting companion plants like parsley or chives alongside your celery to deter pests and enhance flavor.
For those looking to add a touch of personalization, consider painting the bottles with vibrant colors or decorating them with unique designs. This is a great way to express your creativity and add a personal touch to your garden. You can also use different types of rope or twine to hang the bottles, creating a variety of textures and visual interest.
We encourage you to embrace this DIY hanging bottle garden celery project and experience the joy of growing your own fresh produce in a sustainable and space-saving way. It’s a simple, rewarding, and environmentally conscious activity that will bring a touch of nature into your home.
So, grab those empty plastic bottles, gather your supplies, and get ready to embark on a gardening adventure! We’re confident that you’ll be amazed by the results.
And most importantly, we want to hear about your experience! Share your photos, tips, and stories with us in the comments below. Let’s create a community of DIY gardeners who are passionate about sustainable living and fresh, homegrown food. What challenges did you face? What successes did you celebrate? What unique variations did you try? Your feedback will help us refine this method and inspire others to embrace the joy of DIY gardening. Let’s grow together!
Frequently Asked Questions (FAQ)
What type of celery is best suited for a hanging bottle garden?
While most celery varieties can be grown in a hanging bottle garden, smaller, more compact varieties tend to thrive best. Look for varieties labeled as “dwarf” or “compact” at your local garden center. These varieties are less likely to become top-heavy and are better suited for the limited space of a bottle garden. However, even standard celery can be grown successfully with proper support and regular pruning.
How often should I water my hanging bottle garden celery?
The watering frequency will depend on several factors, including the climate, the type of soil you’re using, and the size of the bottles. As a general rule, check the soil moisture daily and water when the top inch feels dry to the touch. Avoid overwatering, as this can lead to root rot. Ensure that the bottles have adequate drainage holes to prevent water from pooling at the bottom. During hot, dry weather, you may need to water more frequently, while during cooler, wetter weather, you can reduce the watering frequency.
What type of soil should I use for my hanging bottle garden celery?
A well-draining potting mix is essential for growing healthy celery in a hanging bottle garden. Avoid using garden soil, as it can be too heavy and compact, leading to poor drainage and root problems. Look for a potting mix that contains a blend of peat moss, perlite, and vermiculite. You can also add compost to the potting mix to provide additional nutrients. Ensure the pH level of the soil is slightly acidic to neutral, around 6.0 to 7.0, for optimal celery growth.
How much sunlight does my hanging bottle garden celery need?
Celery requires at least six hours of sunlight per day to thrive. Choose a location for your hanging bottle garden that receives ample sunlight, such as a south-facing balcony or window. If you don’t have access to enough natural sunlight, you can supplement with grow lights. Position the grow lights close to the plants and provide them with 12-14 hours of light per day. Rotate the bottles regularly to ensure that all sides of the plants receive adequate sunlight.
How do I fertilize my hanging bottle garden celery?
Celery is a heavy feeder and requires regular fertilization to produce healthy growth. Use a balanced liquid fertilizer, such as a 10-10-10 formula, diluted to half strength. Fertilize your celery plants every two to three weeks during the growing season. You can also add compost tea to the soil to provide additional nutrients and beneficial microbes. Avoid over-fertilizing, as this can lead to leggy growth and nutrient burn.
How do I protect my hanging bottle garden celery from pests and diseases?
Regularly inspect your celery plants for signs of pests and diseases. Common pests that affect celery include aphids, spider mites, and celery leaf miners. You can control these pests by spraying the plants with insecticidal soap or neem oil. Diseases that can affect celery include early blight, late blight, and celery mosaic virus. Prevent these diseases by providing good air circulation, avoiding overhead watering, and removing any infected leaves.
Can I grow celery from seed in a hanging bottle garden?
Yes, you can grow celery from seed in a hanging bottle garden, but it requires patience and careful attention. Celery seeds are very small and can be slow to germinate. Start the seeds indoors 8-10 weeks before the last expected frost. Sow the seeds thinly on the surface of a seed-starting mix and keep them moist. Once the seedlings have developed a few true leaves, transplant them into the hanging bottle garden.
How do I harvest celery from my hanging bottle garden?
You can harvest celery from your hanging bottle garden as soon as the stalks are large enough to use. Simply cut off the outer stalks near the base of the plant, leaving the inner stalks to continue growing. You can also harvest the entire plant at once if desired. Celery is best harvested in the morning when the stalks are crisp and cool.
What are some creative variations I can try with my hanging bottle garden celery?
Get creative with your hanging bottle garden! Try painting the bottles with different colors or decorating them with unique designs. You can also use different types of rope or twine to hang the bottles, creating a variety of textures and visual interest. Consider adding other herbs and vegetables to your hanging garden, such as parsley, chives, or lettuce. You can even create a themed garden, such as a salad garden or a cocktail garden. The possibilities are endless!
Leave a Comment