

Growing Water Spinach Containers: Ever dreamt of harvesting fresh, vibrant greens right from your own backyard, even if you only have a small balcony or patio? I know I have! Forget those wilted, overpriced bunches at the grocery store. This guide is your ticket to a thriving water spinach (also known as Ong Choy) crop, all within the cozy confines of a container.
Water spinach, a staple in Asian cuisine, has a rich history, gracing tables for centuries with its delicious, slightly nutty flavor and impressive nutritional profile. But you don’t need a sprawling farm to enjoy this leafy green. In fact, growing water spinach containers is surprisingly easy and rewarding.
Why should you try this DIY project? Well, imagine the satisfaction of snipping off fresh greens for your stir-fries, salads, or soups, knowing exactly where they came from and how they were grown. Plus, it’s a fantastic way to reduce your carbon footprint and connect with nature, even in an urban setting. This article will provide you with all the tips and tricks you need to succeed, from choosing the right container to harvesting your bountiful crop. Let’s get started and transform your space into a mini water spinach oasis!
Growing Water Spinach in Containers: A Beginner’s Guide
Hey there, fellow gardening enthusiasts! I’m so excited to share my experience with growing water spinach (also known as Ong Choy or Kang Kong) in containers. It’s surprisingly easy, even if you don’t have a huge garden. Water spinach is a delicious and nutritious leafy green that thrives in warm, humid conditions, making it perfect for container gardening. Let’s dive in!
Choosing the Right Container and Soil
First things first, we need to get our setup ready. The right container and soil are crucial for success.
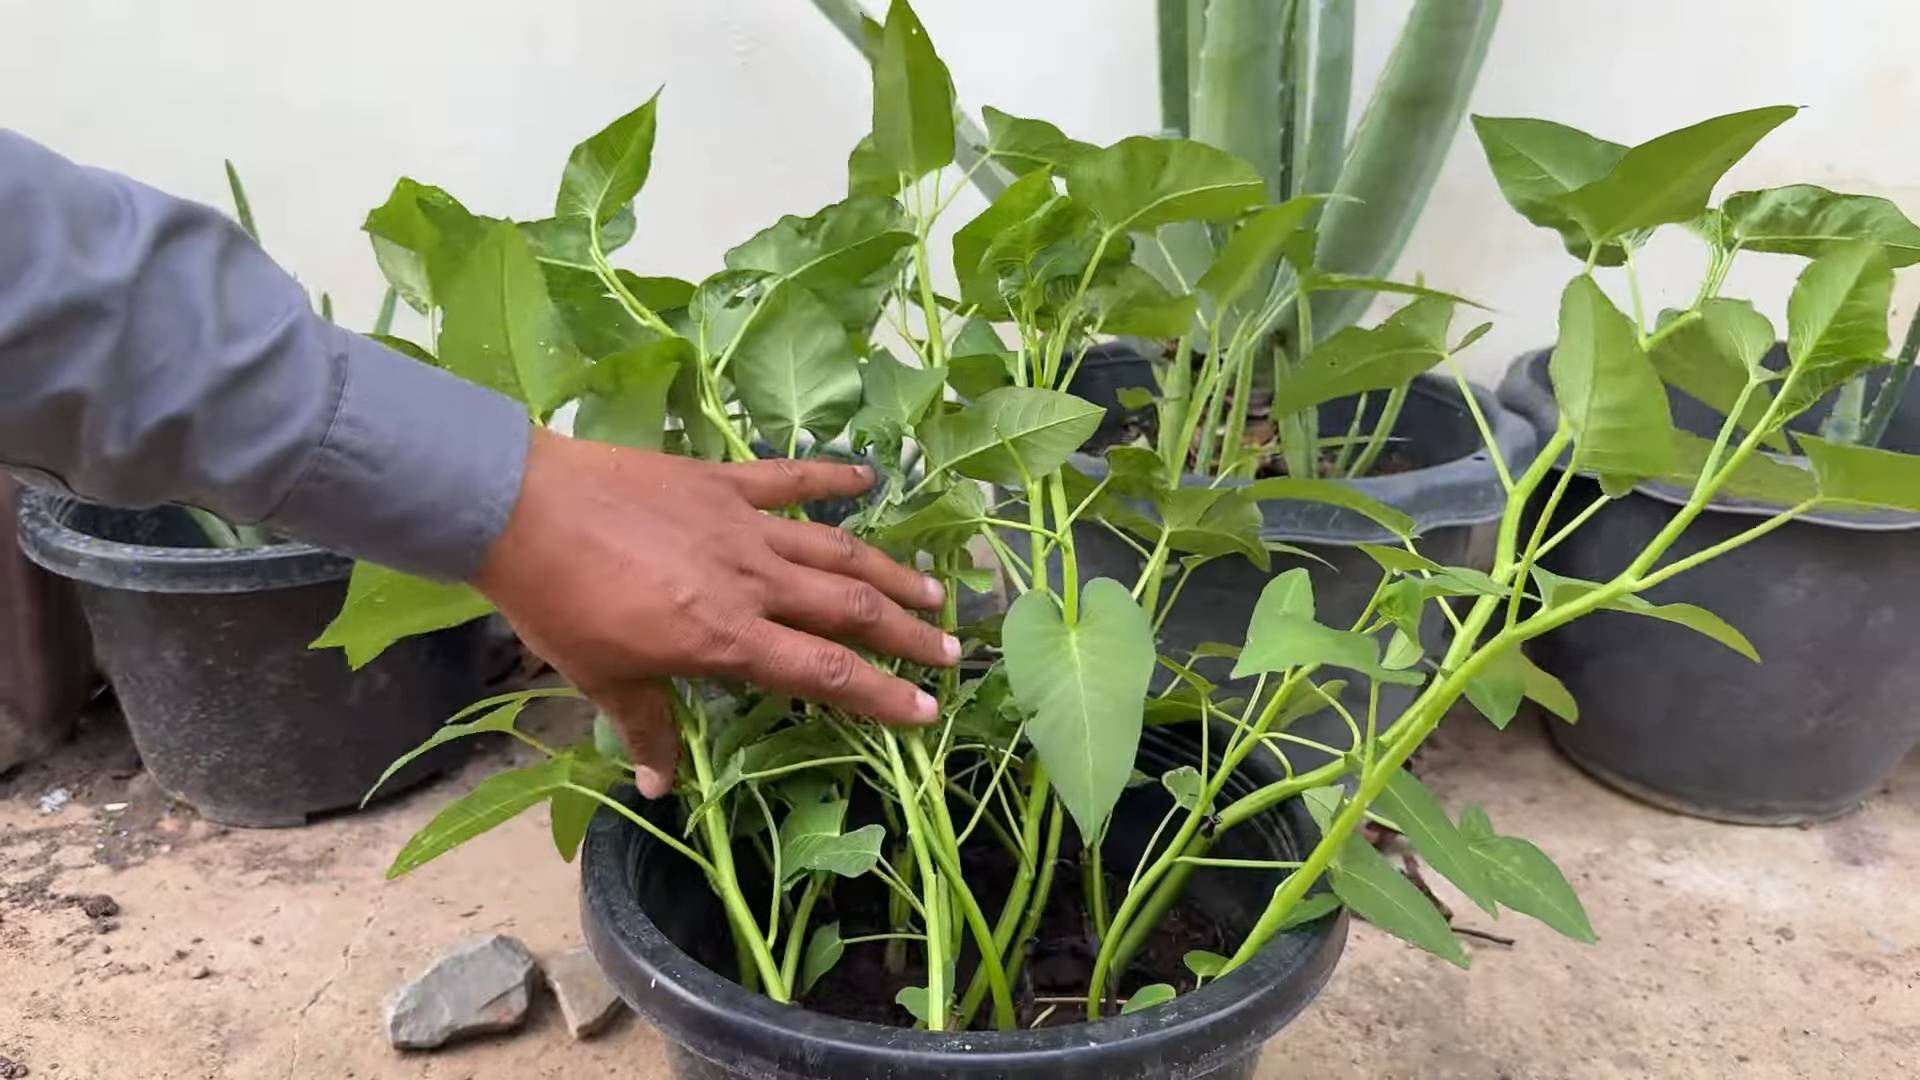
* Container Size: Water spinach loves water (obviously!), and it has a pretty extensive root system. I recommend using a container that’s at least 12 inches deep and 12 inches in diameter. A larger container (like a 5-gallon bucket or a large planter) will give your plants more room to grow and hold more water, which means less frequent watering for you!
* Drainage: While water spinach loves moisture, it doesn’t like sitting in stagnant water. Make sure your container has drainage holes at the bottom. If it doesn’t, you can easily drill some.
* Soil Mix: The best soil for water spinach is a rich, well-draining potting mix that retains moisture. I like to use a mix of:
* Potting soil (about 60%)
* Compost (about 30%) – This adds nutrients and helps retain moisture.
* Perlite or Vermiculite (about 10%) – This improves drainage and aeration.
Planting Water Spinach
Now for the fun part – planting! You can start water spinach from seeds or cuttings. I’ve had success with both, but I find starting from seeds a bit more rewarding.
* From Seeds:
1. Soaking the Seeds: Before planting, soak the water spinach seeds in warm water for 12-24 hours. This helps soften the seed coat and encourages germination. I usually put them in a small bowl on my kitchen counter.
2. Sowing the Seeds: Fill your container with the soil mix, leaving about an inch of space at the top. Sprinkle the seeds evenly over the surface of the soil. You can sow them quite densely, as you can always thin them out later.
3. Covering the Seeds: Gently cover the seeds with a thin layer (about ¼ inch) of soil.
4. Watering: Water the soil thoroughly but gently, making sure not to dislodge the seeds. I use a watering can with a rose head to avoid disturbing the soil.
5. Creating a Humid Environment: To help with germination, you can cover the container with a clear plastic bag or plastic wrap. This will create a humid environment that the seeds love. Make sure to poke a few holes in the plastic for ventilation.
6. Placement: Place the container in a warm, sunny location. Water spinach needs at least 6 hours of sunlight per day.
7. Germination: Keep the soil consistently moist. The seeds should germinate in about 7-14 days. Once the seedlings emerge, remove the plastic bag or wrap.
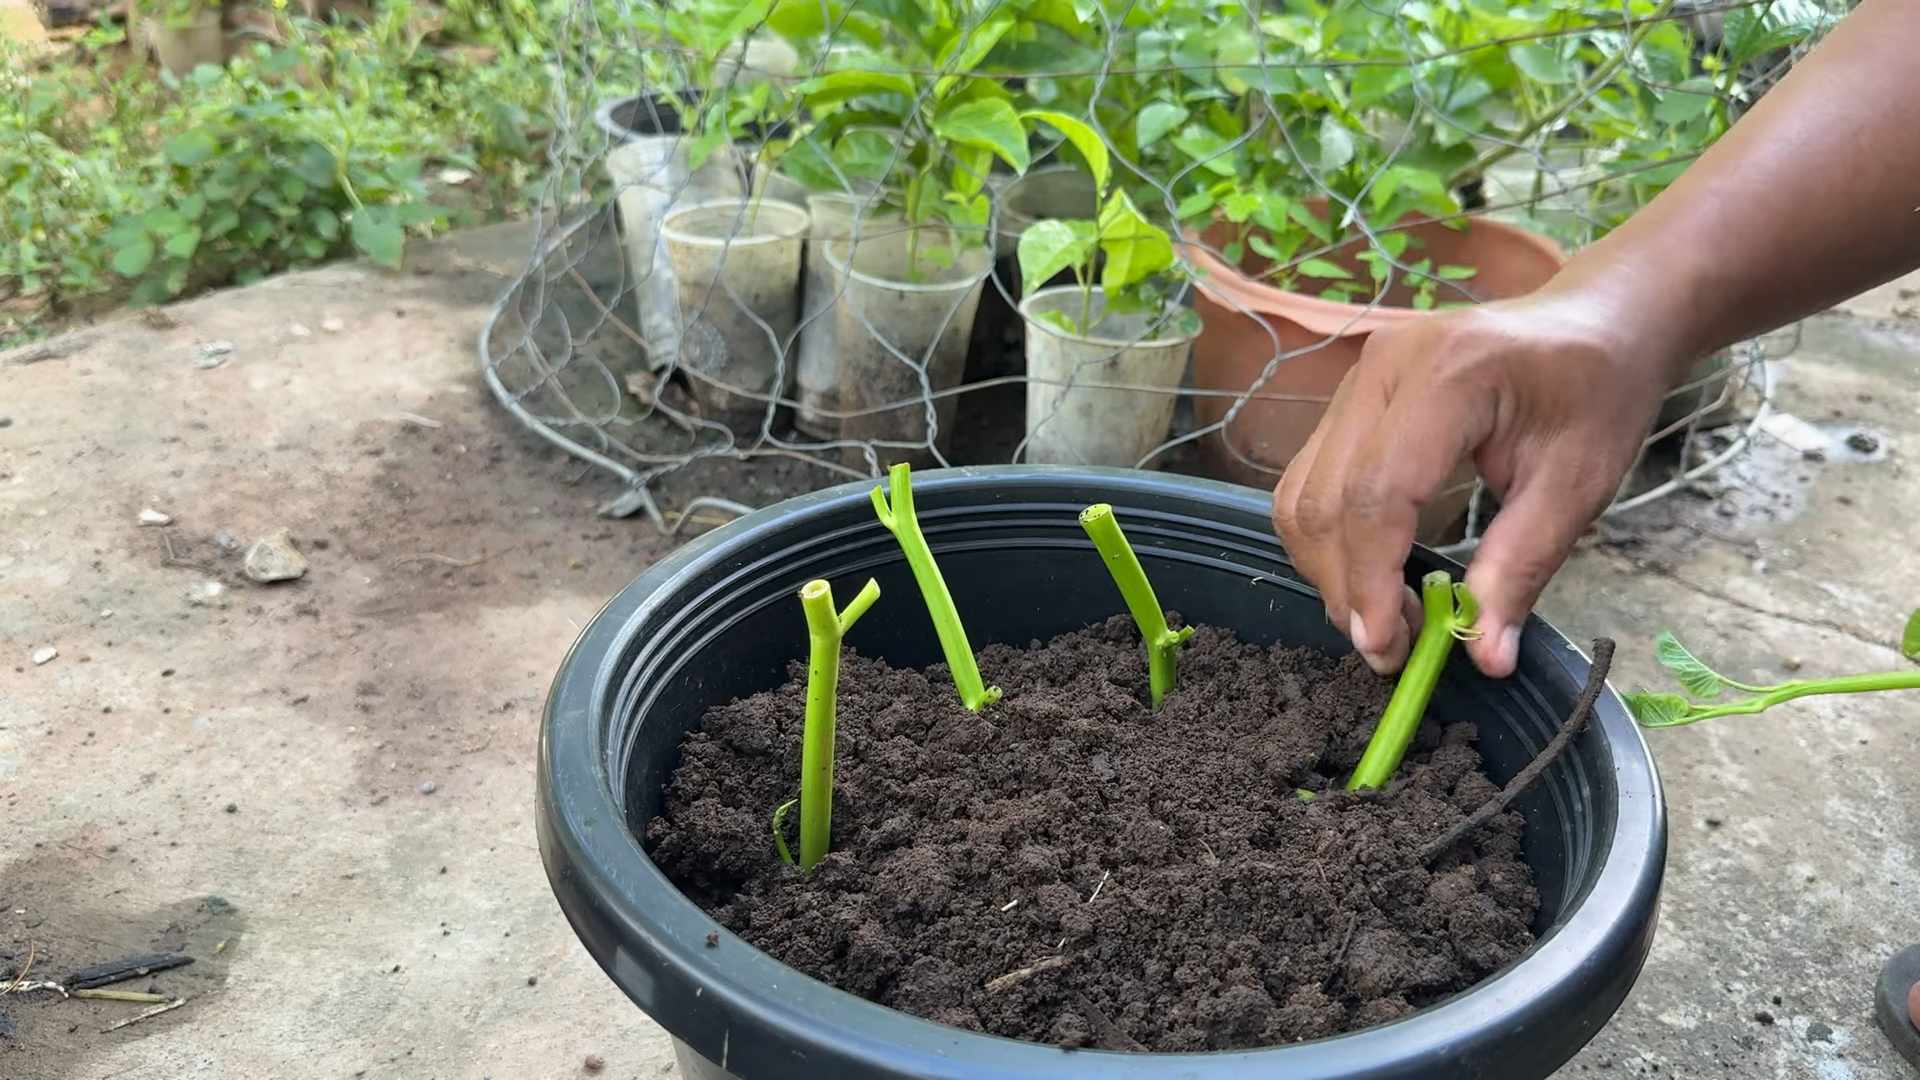
* From Cuttings:
1. Selecting Cuttings: Take cuttings from healthy, mature water spinach plants. Choose stems that are about 6-8 inches long and have several nodes (the points where leaves grow).
2. Preparing Cuttings: Remove the leaves from the bottom 2-3 inches of the stem.
3. Rooting the Cuttings: You can root the cuttings in water or directly in the soil.
* In Water: Place the cuttings in a glass or jar of water, making sure the bottom nodes are submerged. Change the water every 1-2 days. Roots should start to appear in about a week. Once the roots are about an inch long, you can transplant the cuttings into your container.
* Directly in Soil: Dip the cut end of the stem in rooting hormone (optional, but it helps). Plant the cuttings directly into the soil, burying the bottom 2-3 inches. Water thoroughly.
4. Placement and Care: Place the container in a warm, sunny location and keep the soil consistently moist.
Caring for Your Water Spinach
Once your water spinach plants are established, it’s time to focus on providing them with the care they need to thrive.
* Watering: Water spinach loves water, so keep the soil consistently moist. I usually water my plants every day, especially during hot weather. You can even place the container in a shallow tray of water to keep the soil extra moist. Just make sure the water doesn’t become stagnant.
* Fertilizing: Water spinach is a heavy feeder, so it needs regular fertilization. I like to use a balanced liquid fertilizer (like a 20-20-20) diluted to half strength. Fertilize every 2-3 weeks. You can also add compost tea to the soil for an extra boost of nutrients.
* Sunlight: Water spinach needs at least 6 hours of sunlight per day. If you don’t have a sunny spot, you can supplement with grow lights.
* Pest Control: Water spinach is relatively pest-resistant, but it can sometimes be affected by aphids or spider mites. If you notice any pests, you can spray the plants with insecticidal soap or neem oil. I prefer to use organic methods whenever possible.
* Pruning: Regular pruning encourages bushier growth and prevents the plants from becoming leggy. Simply pinch off the tips of the stems to encourage side shoots.
Harvesting Water Spinach
The best part of growing your own water spinach is, of course, the harvest! You can start harvesting when the plants are about 6-8 inches tall.
* Harvesting Technique: Use scissors or a sharp knife to cut the stems about 2-3 inches above the soil line. This will allow the plants to regrow and produce more leaves.
* Harvesting Frequency: You can harvest water spinach every 2-3 weeks. The more you harvest, the more the plants will produce!
* Storage: Freshly harvested water spinach is best used immediately. However, you can store it in the refrigerator for a few days. Wrap the leaves in a damp paper towel and place them in a plastic bag.
Troubleshooting
Even with the best care, you might encounter a few challenges along the way. Here are some common problems and how to fix them:
* Yellowing Leaves: This could be a sign of overwatering, underwatering, or nutrient deficiency. Check the soil moisture and adjust your watering accordingly. If the soil is dry, water more frequently. If the soil is soggy, allow it to dry out slightly before watering again. You can also try fertilizing with a balanced fertilizer.
* Slow Growth: This could be due to lack of sunlight, poor soil, or insufficient fertilization. Make sure your plants are getting enough sunlight and that the soil is rich in nutrients. Fertilize regularly.
* Pests: As mentioned earlier, aphids and spider mites can sometimes be a problem. Spray the plants with insecticidal soap or neem oil.
* Bolting: Bolting is when the plant starts to flower prematurely. This can happen if the weather is too hot or if the plant is stressed. To prevent bolting, keep the soil consistently moist and provide shade during the hottest part of the day. If the plant does bolt, you can still harvest the leaves, but they may be a bit bitter.
Enjoying Your Homegrown Water Spinach
Now that you’ve harvested your water spinach, it’s time to enjoy the fruits (or rather, leaves!) of your labor. Water spinach is a versatile vegetable that can be used in a variety of dishes.
* Stir-fries: Water spinach is a popular ingredient in stir-fries. It cooks quickly and has a slightly sweet, nutty flavor.
* Soups: Add water spinach to soups for a boost of nutrients and flavor.
* Salads: Young, tender water spinach leaves can be used in salads.
* Steaming: Steam water spinach and serve it as a side dish.
* Garlic Water Spinach: My favorite way to prepare water spinach is simply stir-fried with garlic and a little bit of soy sauce. It’s quick, easy, and delicious!
Growing water spinach in containers is a rewarding experience. It’s a great way to add fresh, healthy greens to your diet, even if you don’t have a lot of space. With a little bit of care and attention, you can enjoy a bountiful harvest of water spinach all season long. Happy gardening!
Conclusion
So, there you have it! Growing water spinach in containers is not just a viable option; it’s a downright rewarding experience. We’ve walked through the simple steps, highlighted the key considerations, and hopefully, dispelled any doubts you might have had about cultivating this delicious and nutritious leafy green in the comfort of your own home.
Why is this DIY trick a must-try? Because it empowers you to enjoy fresh, organic water spinach, regardless of your garden size or location. Imagine stepping outside your door and harvesting crisp, vibrant greens for your stir-fries, soups, or salads. No more relying on questionable supermarket produce or paying premium prices for specialty Asian vegetables. You’re in control of the entire process, from seed to table.
Beyond the convenience and cost savings, growing your own water spinach offers a unique connection to nature. It’s a therapeutic activity that allows you to nurture life and witness the miracle of growth firsthand. Plus, it’s a fantastic way to reduce your carbon footprint by minimizing transportation and packaging waste.
But the beauty of this DIY project lies in its adaptability. Feel free to experiment with different container sizes and materials. While we recommended larger containers for optimal growth, you can certainly start with smaller ones and transplant your water spinach as it matures. Consider using recycled materials like old buckets, tubs, or even repurposed plastic containers to add an eco-friendly touch to your gardening endeavor.
For those seeking variations, explore different growing mediums. While a standard potting mix works well, you can also incorporate compost, coco coir, or even a hydroponic setup for enhanced nutrient delivery and faster growth. Just remember to adjust your watering and fertilization accordingly.
Another exciting variation is to experiment with different water spinach varieties. While the common variety is readily available, you might be able to find other cultivars with slightly different leaf shapes, textures, or flavors. Don’t be afraid to branch out and discover your personal favorite.
We wholeheartedly encourage you to give this DIY trick a try. It’s a simple, affordable, and incredibly satisfying way to enjoy fresh, homegrown water spinach. And once you’ve experienced the joy of harvesting your own greens, we’re confident you’ll be hooked.
But don’t just take our word for it. We want to hear about your experiences! Share your photos, tips, and challenges in the comments section below. Let’s create a community of water spinach enthusiasts and learn from each other’s successes and failures. Together, we can unlock the full potential of this amazing plant and enjoy a bounty of fresh, homegrown goodness. So, grab your containers, seeds, and get ready to embark on your water spinach growing adventure! Let’s see those beautiful, thriving plants!
Frequently Asked Questions (FAQs)
What is the best time of year to start growing water spinach in containers?
Water spinach thrives in warm weather, so the best time to start growing it is during the late spring or early summer, after the last frost has passed. The ideal temperature range for water spinach is between 75°F and 85°F (24°C and 29°C). If you live in a region with a short growing season, you can start your seeds indoors a few weeks before the last frost to give them a head start. Alternatively, if you live in a tropical or subtropical climate, you can grow water spinach year-round.
How much sunlight does water spinach need when grown in containers?
Water spinach requires at least six hours of direct sunlight per day to thrive. Choose a location for your containers that receives ample sunlight throughout the day. If you don’t have a sunny spot, you can supplement with grow lights. Insufficient sunlight can lead to leggy growth and reduced yields.
What type of container is best for growing water spinach?
Larger containers are generally better for growing water spinach, as they provide more room for the roots to spread and access nutrients. A container that is at least 12 inches deep and 12 inches in diameter is recommended. You can use plastic pots, ceramic pots, or even repurposed containers like buckets or tubs. Make sure the container has drainage holes to prevent waterlogging.
What kind of soil should I use for growing water spinach in containers?
Water spinach prefers a rich, well-draining soil that is high in organic matter. A good potting mix is a suitable option. You can also amend the soil with compost, aged manure, or other organic materials to improve its fertility and drainage. Avoid using heavy clay soils, as they can become waterlogged and inhibit root growth.
How often should I water my water spinach plants in containers?
Water spinach is a water-loving plant, so it needs to be watered frequently, especially during hot weather. Aim to keep the soil consistently moist but not waterlogged. Water deeply whenever the top inch of soil feels dry to the touch. You may need to water your plants daily or even twice a day during the hottest periods.
How often should I fertilize my water spinach plants in containers?
Water spinach is a heavy feeder, so it benefits from regular fertilization. Use a balanced fertilizer that is rich in nitrogen, phosphorus, and potassium. You can use a liquid fertilizer or a slow-release granular fertilizer. Follow the instructions on the fertilizer package for application rates. Fertilize your plants every two to three weeks during the growing season.
How do I harvest water spinach from containers?
You can start harvesting water spinach about four to six weeks after planting. To harvest, simply cut the stems about two inches above the soil line. The plants will regrow from the cut stems, allowing you to harvest multiple times. Harvest regularly to encourage new growth and prevent the plants from becoming too leggy.
Are there any common pests or diseases that affect water spinach grown in containers?
Water spinach is generally resistant to pests and diseases, but it can be susceptible to aphids, spider mites, and whiteflies. These pests can be controlled with insecticidal soap or neem oil. Overwatering can lead to fungal diseases, so make sure your containers have good drainage and avoid overwatering.
Can I grow water spinach indoors in containers?
Yes, you can grow water spinach indoors in containers, but you will need to provide adequate light. Place your containers near a sunny window or use grow lights to supplement the natural light. You will also need to maintain a warm temperature and high humidity.
Is water spinach safe to eat?
Yes, water spinach is generally safe to eat, but it’s important to wash it thoroughly before consuming it. Water spinach can sometimes accumulate heavy metals from the soil, so it’s best to grow it in clean soil and avoid growing it near sources of pollution. If you are concerned about heavy metal contamination, you can have your soil tested.


Leave a Comment