

Growing Thyme Indoors can seem daunting, but trust me, it’s easier than you think! Have you ever dreamt of snipping fresh, fragrant thyme right from your kitchen windowsill, adding that perfect touch to your culinary creations? Imagine the aroma filling your home, a constant reminder of the vibrant flavors you can create. This isn’t just about having a plant; it’s about bringing a piece of the Mediterranean into your everyday life.
Thyme, with its rich history dating back to ancient Egypt and Greece, where it was used for medicinal purposes and even embalming, has always been valued for its versatility. Today, we appreciate it for its culinary prowess and its ability to thrive even in small spaces. But why bother growing it indoors? Well, for starters, having fresh herbs readily available elevates your cooking game instantly. No more last-minute trips to the grocery store or settling for dried, lackluster flavors. Plus, growing thyme indoors allows you to enjoy this delightful herb year-round, regardless of the weather outside.
This DIY guide will equip you with simple, effective tricks and hacks to successfully cultivate thyme indoors, even if you don’t have a green thumb. I’ll walk you through everything from choosing the right pot and soil to providing the perfect amount of sunlight and water. Get ready to unlock the secrets to a thriving indoor thyme garden and enjoy the fresh, flavorful rewards!
Grow Crunchy Radishes at Home: A DIY Guide
Hey there, fellow gardening enthusiasts! I’m so excited to share my secrets for growing the crunchiest, most delicious radishes you’ve ever tasted. Forget those bland, pithy radishes from the grocery store – we’re going to create radish perfection right in your own backyard (or even on your balcony!). This guide is packed with tips and tricks I’ve learned over the years, so get ready to roll up your sleeves and get your hands dirty!
Choosing the Right Radish Variety
First things first, let’s talk about radish varieties. Not all radishes are created equal! Some are better suited for certain climates, and some are just plain crunchier than others. Here are a few of my favorites:
* **Cherry Belle:** A classic, round, bright red radish that’s quick to mature and has a mild flavor. Perfect for beginners!
* **French Breakfast:** Oblong, red with a white tip, and known for its crisp texture and slightly peppery taste. These are my go-to for salads.
* **Easter Egg:** A mix of red, pink, purple, and white radishes. They’re not only delicious but also add a pop of color to your garden.
* **White Icicle:** Long, white radishes with a mild, sweet flavor. They take a bit longer to mature than other varieties, but they’re worth the wait.
* **Black Spanish:** A winter radish with black skin and white flesh. It has a strong, pungent flavor and stores well.
I recommend trying a few different varieties to see which ones you like best and which ones thrive in your local climate.
Preparing the Soil
Radishes are pretty easygoing, but they do have a few preferences when it comes to soil. They need well-drained soil that’s rich in organic matter. Here’s how I prepare my radish beds:
* **Choose a sunny spot:** Radishes need at least 6 hours of sunlight per day.
* **Loosen the soil:** Use a garden fork or tiller to loosen the soil to a depth of at least 6 inches. This will help the radish roots grow easily.
* **Amend the soil:** Mix in plenty of compost or well-rotted manure. This will add nutrients to the soil and improve drainage. I usually add about 2-3 inches of compost.
* **Remove rocks and debris:** Radishes don’t like to grow around rocks, so make sure to remove any that you find.
* **Level the soil:** Use a rake to level the soil surface. This will make it easier to sow the seeds evenly.
Sowing the Seeds
Now for the fun part – planting the seeds! Radishes are cool-season crops, so I usually plant them in early spring or late summer.
1. **Create shallow furrows:** Use your finger or a garden tool to create furrows about 1/2 inch deep and 1 inch apart.
2. **Sow the seeds:** Sprinkle the radish seeds evenly in the furrows. Don’t overcrowd them! I aim for about 1/2 inch between seeds.
3. **Cover the seeds:** Gently cover the seeds with soil.
4. **Water gently:** Use a watering can or hose with a gentle spray to water the soil. Keep the soil moist but not soggy.
Important Tip: Radishes germinate quickly, usually within 3-7 days. To ensure a continuous harvest, I sow a new batch of seeds every 1-2 weeks. This is called succession planting.
Caring for Your Radishes
Radishes are relatively low-maintenance, but they do need a little bit of care to thrive.
1. **Water regularly:** Keep the soil consistently moist, especially during hot weather. Radishes need about 1 inch of water per week.
2. **Thin the seedlings:** Once the seedlings are about 1 inch tall, thin them to about 1-2 inches apart. This will give the radishes enough room to grow. I know it feels bad to pull them out, but it’s necessary! You can even eat the thinnings in salads.
3. **Weed regularly:** Keep the radish bed free of weeds. Weeds compete with radishes for nutrients and water. I like to hand-pull weeds when they’re small.
4. **Fertilize (optional):** If your soil is poor, you can fertilize your radishes with a balanced fertilizer. Follow the instructions on the fertilizer package. I usually don’t fertilize unless I see signs of nutrient deficiency, like yellowing leaves.
5. **Protect from pests:** Radishes can be susceptible to pests like flea beetles and root maggots. I use row covers to protect my radishes from these pests. You can also use insecticidal soap if necessary.
Harvesting Your Radishes
The best part! Radishes are ready to harvest in as little as 3-4 weeks, depending on the variety.
1. **Check for size:** Gently pull back the soil around the radish to check its size. Radishes are usually ready to harvest when they’re about 1 inch in diameter.
2. **Pull them up:** Grasp the radish leaves near the base and gently pull the radish out of the ground.
3. **Wash and store:** Wash the radishes thoroughly and store them in the refrigerator in a plastic bag or container. They’ll keep for about a week.
Pro Tip: Don’t let your radishes get too big, or they’ll become pithy and bitter. Harvest them when they’re young and tender.
Troubleshooting Common Radish Problems
Even with the best care, you might encounter a few problems when growing radishes. Here are some common issues and how to fix them:
* **Radishes are too small:** This could be due to overcrowding, poor soil, or lack of water. Thin the seedlings, amend the soil with compost, and water regularly.
* **Radishes are pithy and bitter:** This is usually caused by letting the radishes get too big or by growing them in hot weather. Harvest them when they’re young and tender, and plant them in early spring or late summer.
* **Radishes are cracked:** This is often caused by inconsistent watering. Water regularly and deeply, especially during hot weather.
* **Radishes are infested with pests:** Use row covers to protect your radishes from pests. You can also use insecticidal soap if necessary.
* **Radishes don’t form bulbs:** This can be caused by soil that is too compacted or lacking in nutrients. Make sure to loosen the soil well and amend it with compost before planting. Also, ensure they are getting enough sunlight.
Radish Recipes and Serving Suggestions
Now that you’ve grown your own delicious radishes, it’s time to enjoy them! Here are a few of my favorite ways to eat radishes:
* **Raw:** Radishes are delicious raw, sliced or quartered, and served with a sprinkle of salt. I love them in salads, on sandwiches, or as a crunchy snack.
* **Roasted:** Roasting radishes mellows out their flavor and makes them surprisingly sweet. Toss them with olive oil, salt, and pepper, and roast them at 400°F for 20-25 minutes.
* **Pickled:** Pickled radishes are a tangy and refreshing treat. You can find many recipes online.
* **In salads:** Radishes add a peppery crunch to any salad. I especially love them in salads with vinaigrette dressing.
* **With butter and salt:** This is a classic French way to eat radishes. Spread butter on a slice of bread, top with sliced radishes, and sprinkle with salt.
* **Radish greens:** Don’t throw away the radish greens! They’re edible and delicious. You can add them to salads, sauté them with garlic, or use them in soups.
Growing Radishes in Containers
Don’t have a garden? No problem! You can easily grow radishes in containers.
* **Choose a container:** Select a container that is at least 6 inches deep and has drainage holes.
* **Use potting mix:** Fill the container with a high-quality potting mix.
* **Sow the seeds:** Sow the seeds as described above.
* **Water regularly:** Water the container regularly, keeping the soil moist but not soggy.
* **Place in a sunny spot:** Place the container in a sunny spot that gets at least 6 hours of sunlight per day.
Growing radishes in containers is a great way to enjoy fresh, crunchy radishes even if you don’t have a lot of space.
Extra Tips for Super Crunchy Radishes
Okay, here are a few extra tips I’ve picked up over the years that will really take your radish game to the next level:
* Keep the soil cool: Radishes prefer cool soil. In hot weather, try mulching around the plants to keep the soil temperature down.
* Water deeply: Deep watering encourages strong root growth, which leads to crunchier radishes.
* Harvest early in the
Conclusion
So, there you have it! Growing thyme indoors isn’t just a whimsical dream for those with a green thumb; it’s an achievable reality for anyone, regardless of their gardening experience. We’ve walked through the simple steps, from selecting the right variety and providing optimal lighting to ensuring proper watering and drainage. The beauty of this DIY project lies in its accessibility and the incredible reward it offers: a constant supply of fresh, aromatic thyme right at your fingertips.
Why is this a must-try? Because store-bought dried thyme simply can’t compare to the vibrant flavor and fragrance of freshly harvested thyme. Imagine adding a sprig or two to your favorite roasted chicken, sprinkling it over a creamy pasta dish, or infusing it into a soothing herbal tea. The possibilities are endless, and the taste is undeniably superior. Plus, you’ll be reducing your reliance on store-bought herbs, saving money, and minimizing your environmental impact. It’s a win-win-win!
But the benefits extend beyond just culinary delights. Growing thyme indoors can also be a therapeutic and rewarding hobby. Nurturing a living plant, watching it thrive under your care, and harvesting its fragrant leaves can be incredibly satisfying. It’s a small connection to nature that can bring a sense of calm and well-being to your indoor space.
Looking for variations? Consider experimenting with different varieties of thyme. Lemon thyme adds a citrusy zing to your dishes, while creeping thyme can be used as a fragrant ground cover in small containers. You can also try growing thyme from seeds or cuttings, each offering a unique learning experience. And don’t be afraid to get creative with your container choices! Upcycled teacups, mason jars, or even old boots can make charming and unique planters. Just ensure they have adequate drainage.
We’ve covered the essentials for successful indoor thyme cultivation, but the real magic happens when you put these tips into practice. So, grab a pot, some soil, and a thyme plant (or seeds!), and embark on this rewarding gardening adventure. We are confident that you will find that growing thyme indoors is easier than you think.
Now, we want to hear from you! Have you tried growing thyme indoors before? What challenges did you face, and what tips would you share with fellow gardeners? Share your experiences, photos, and questions in the comments below. Let’s create a community of indoor thyme enthusiasts and learn from each other’s successes and failures. Happy gardening!
Frequently Asked Questions (FAQ)
What is the best variety of thyme to grow indoors?
The best thyme varieties for indoor growing are generally those that stay relatively compact and are known for their flavor and resilience. Common thyme (Thymus vulgaris) is a great all-around choice, offering a classic thyme flavor that’s perfect for cooking. Lemon thyme (Thymus citriodorus) is another excellent option, adding a bright, citrusy note to your dishes. Creeping thyme (Thymus serpyllum) can also be grown indoors, although it’s more often used as a ground cover. It’s less flavorful than common or lemon thyme but can still be used in cooking and adds a lovely visual element to your indoor garden. Ultimately, the best variety depends on your personal preferences and what you plan to use the thyme for.
How much sunlight does indoor thyme need?
Thyme thrives in bright, sunny conditions. Ideally, your indoor thyme plant should receive at least six to eight hours of direct sunlight per day. A south-facing window is usually the best option, but east- or west-facing windows can also work if they provide sufficient light. If you don’t have access to enough natural light, you can supplement with a grow light. Position the grow light a few inches above the plant and keep it on for 12-14 hours per day. Insufficient light can lead to leggy growth and a weaker flavor.
What kind of soil is best for growing thyme indoors?
Thyme prefers well-draining soil that is slightly alkaline. A good potting mix for thyme should be light and airy, allowing for good root aeration. You can create your own mix by combining equal parts of potting soil, perlite, and coarse sand. The perlite and sand will improve drainage and prevent the soil from becoming waterlogged. Avoid using heavy, clay-based soils, as these can retain too much moisture and lead to root rot.
How often should I water my indoor thyme plant?
Watering frequency depends on several factors, including the size of the pot, the type of soil, and the ambient temperature. As a general rule, water your thyme plant when the top inch of soil feels dry to the touch. Avoid overwatering, as thyme is susceptible to root rot. When you do water, water thoroughly until excess water drains out of the bottom of the pot. Allow the soil to dry out slightly between waterings. During the winter months, when growth slows down, you may need to water less frequently.
How do I harvest thyme from my indoor plant?
Harvesting thyme is easy and encourages bushier growth. Use clean scissors or pruning shears to snip off stems as needed. Avoid cutting more than one-third of the plant at a time, as this can stress the plant. The best time to harvest thyme is in the morning, after the dew has dried but before the sun gets too hot. This is when the essential oils are most concentrated, resulting in the best flavor. You can use the fresh thyme immediately or dry it for later use.
How do I dry thyme from my indoor plant?
There are several ways to dry thyme. One simple method is to tie the stems together in small bundles and hang them upside down in a cool, dry, and well-ventilated place. Another option is to spread the thyme sprigs on a baking sheet and dry them in a low oven (around 170°F or 77°C) for a few hours, until they are brittle. You can also use a dehydrator to dry thyme. Once the thyme is completely dry, crumble the leaves and store them in an airtight container in a cool, dark place.
Why is my indoor thyme plant turning yellow?
Yellowing leaves can be a sign of several problems, including overwatering, underwatering, nutrient deficiencies, or pests. Check the soil moisture to determine if you are watering too much or too little. If the soil is consistently soggy, reduce your watering frequency. If the soil is bone dry, water more often. Yellowing leaves can also indicate a nutrient deficiency, particularly nitrogen. Try fertilizing your thyme plant with a balanced liquid fertilizer diluted to half strength. Finally, inspect the plant for pests, such as aphids or spider mites, and treat accordingly.
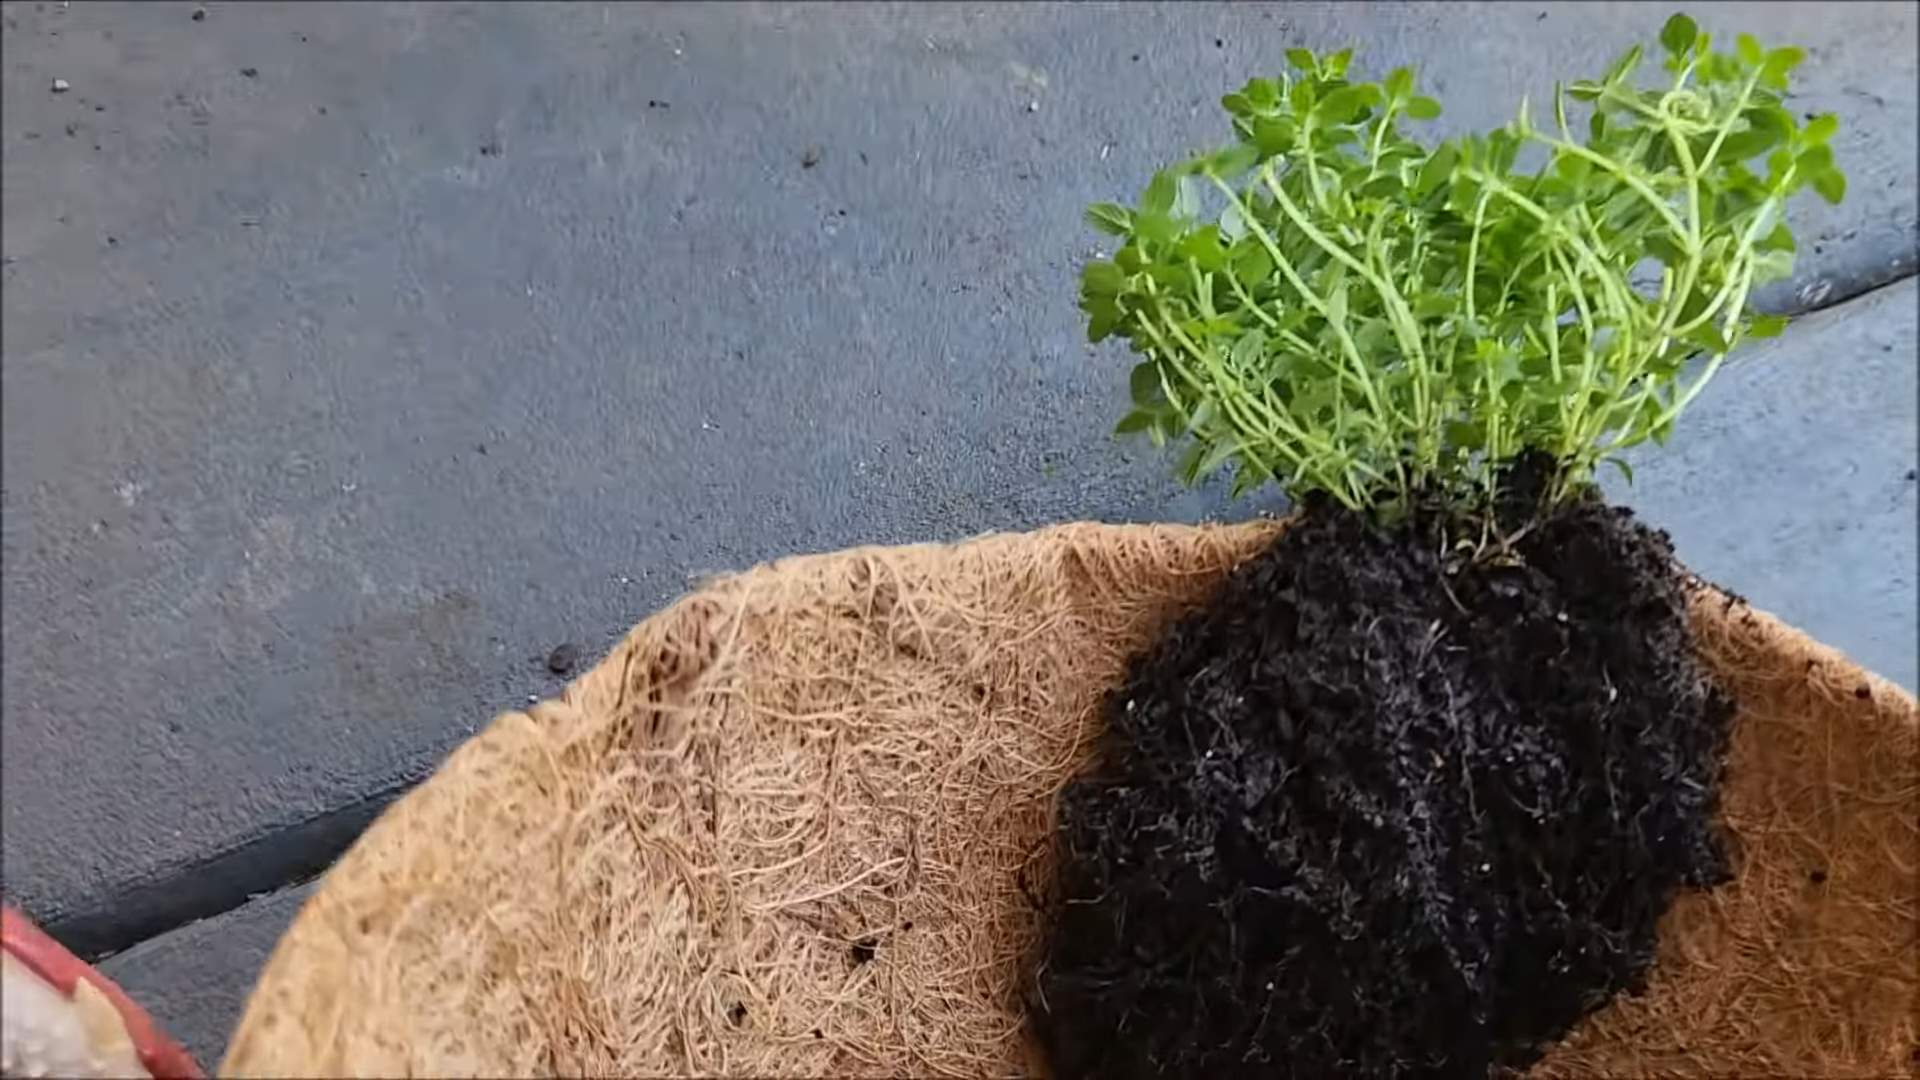
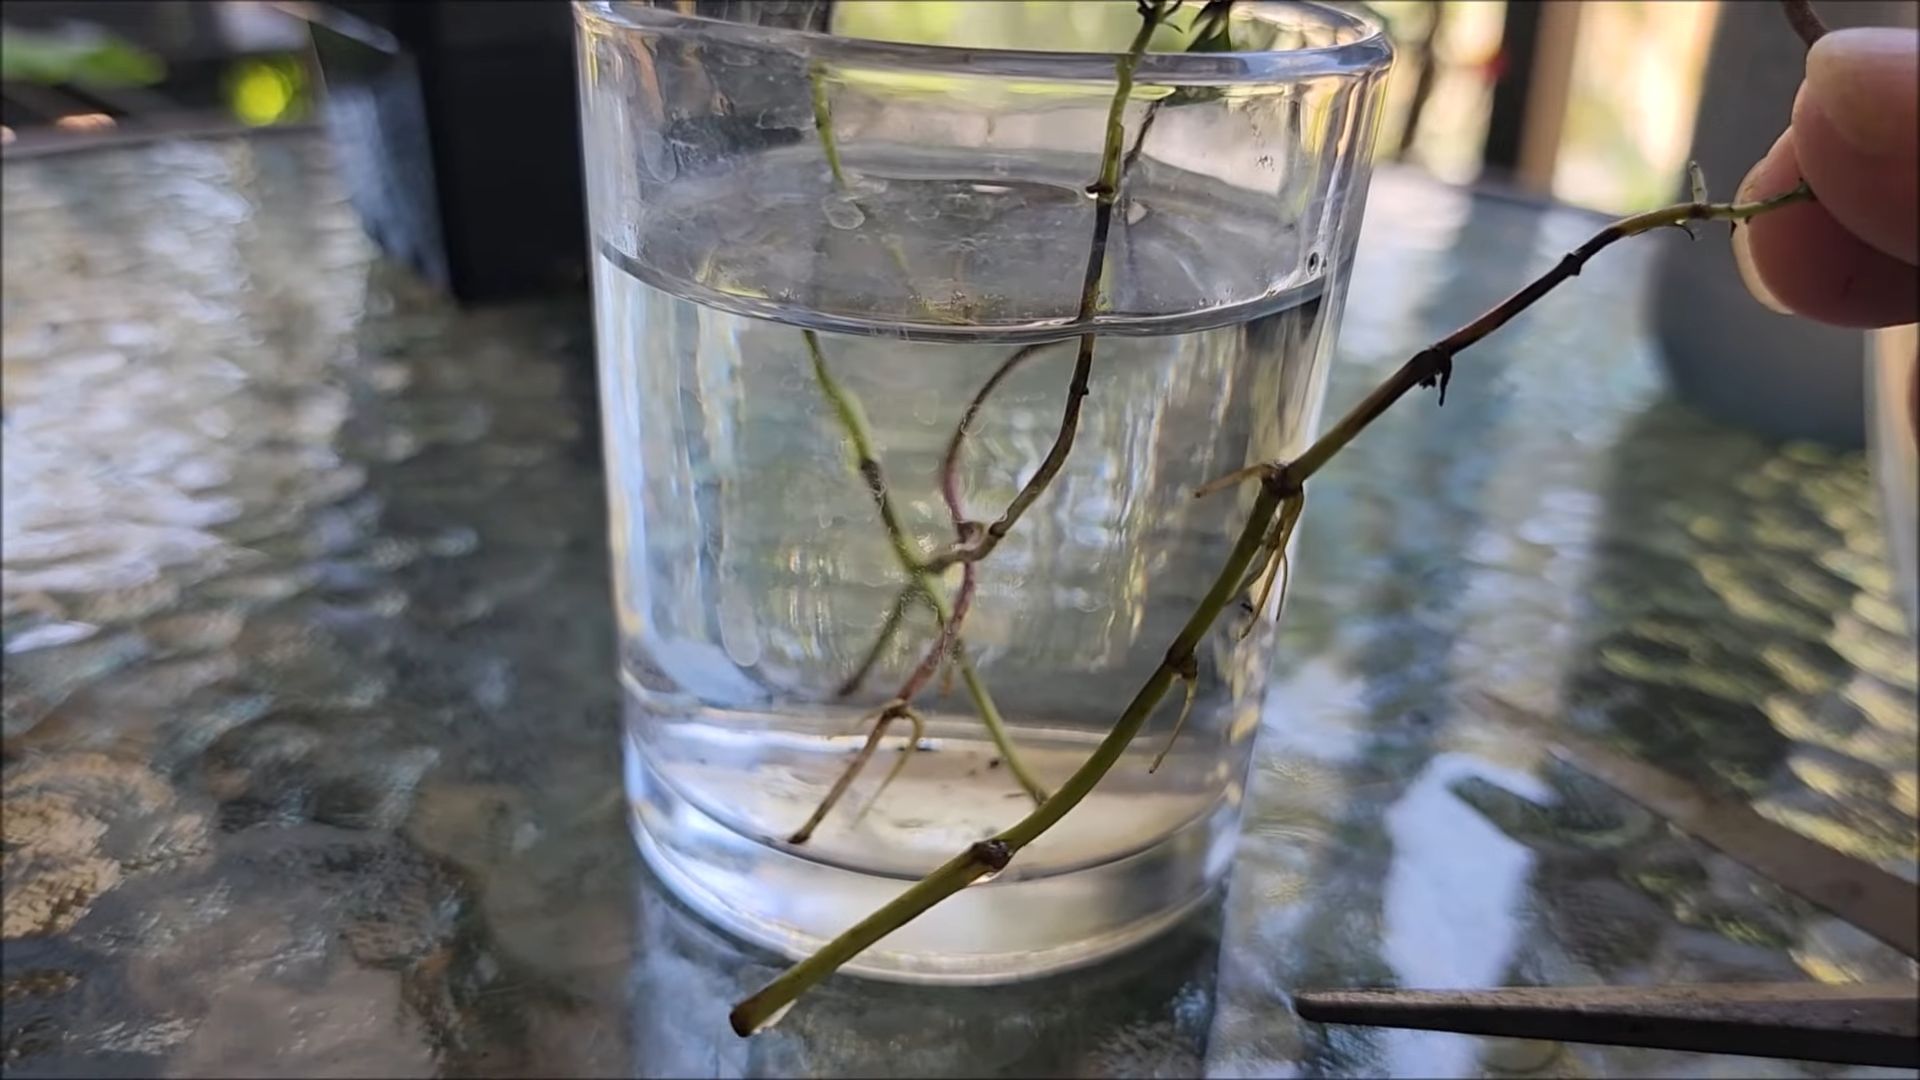
How do I propagate thyme from cuttings?
Propagating thyme from cuttings is a great way to expand your indoor thyme garden. Take cuttings from healthy, non-flowering stems, about 4-6 inches long. Remove the leaves from the bottom inch of the cutting and dip the cut end in rooting hormone. Plant the cutting in a small pot filled with well-draining potting mix. Water gently and cover the pot with a plastic bag or humidity dome to create a humid environment. Place the pot in a warm, bright location, but out of direct sunlight. Roots should develop in a few weeks. Once the cutting has rooted, you can transplant it into a larger pot.
My thyme plant is flowering. Should I cut off the flowers?
Flowering is a natural part of the thyme plant’s life cycle. While the flowers are edible and can add a delicate flavor to your dishes, allowing the plant to flower can sometimes reduce the flavor of the leaves. If you want to maximize the flavor of the leaves, you can pinch off the flower buds before they open. However, leaving the flowers on the plant will attract pollinators and add a touch of beauty to your indoor garden. The choice is ultimately up to you.
Can I grow thyme indoors year-round?
Yes, you can absolutely grow thyme indoors year-round! With proper care and attention, your indoor thyme plant can thrive throughout the year, providing you with a continuous supply of fresh herbs. Just be sure to provide adequate light, water, and nutrients, and protect the plant from extreme temperatures.

Leave a Comment