

Growing sugarcane in recycled containers might sound like a tropical dream reserved for sprawling plantations, but I’m here to tell you it’s totally achievable, even if you’re working with a small balcony or patio! Forget the image of vast fields; we’re bringing the sweet taste of sugarcane to your home, one recycled container at a time.
Sugarcane has a rich history, deeply intertwined with cultures across the globe. From its origins in Southeast Asia to its spread throughout the Caribbean and beyond, sugarcane has been a vital crop for centuries. It’s not just about sugar; it’s about tradition, resourcefulness, and connecting with the earth.
But why should *you* bother growing sugarcane in a container? Well, for starters, imagine the satisfaction of sipping on a freshly squeezed sugarcane juice, knowing you grew it yourself! Beyond the delicious reward, it’s a fantastic way to reduce waste by repurposing old containers, learn about plant life cycles, and add a unique, tropical touch to your garden. Plus, in a world increasingly focused on sustainability, growing sugarcane in recycled containers is a small but meaningful step towards a greener lifestyle. This DIY project is perfect for anyone looking to add a touch of the exotic to their home garden while embracing eco-friendly practices. Let’s get started!
Growing Sugarcane in Recycled Containers: A Sweet DIY Project
Hey there, fellow gardening enthusiasts! Ever dreamt of having your own homegrown sugarcane? It’s not as difficult as you might think, and it’s incredibly rewarding. Plus, what better way to be eco-friendly than by using recycled containers? I’m going to walk you through the entire process, from prepping your sugarcane stalks to harvesting your sweet reward. Let’s get started!
What You’ll Need
Before we dive in, let’s gather our supplies. This is crucial for a smooth and successful sugarcane-growing experience.
* Sugarcane Stalks: The most important ingredient! You can usually find these at local nurseries, farmers’ markets, or even some grocery stores that cater to specific ethnic cuisines. Look for healthy stalks with visible nodes (the little bumps where roots will sprout).
* Recycled Containers: Think big! Sugarcane needs room to grow. Old buckets, large plastic bins, even repurposed trash cans (cleaned thoroughly, of course!) will work. Aim for containers that are at least 18-24 inches deep and wide.
* Potting Mix: A well-draining potting mix is essential. You can buy a pre-made mix or create your own by combining equal parts garden soil, compost, and perlite or vermiculite.
* Sharp Knife or Pruning Shears: For cutting the sugarcane stalks. Make sure they’re clean and sharp to prevent disease.
* Watering Can or Hose: For, well, watering!
* Optional: Rooting Hormone: This can help speed up the rooting process, but it’s not strictly necessary.
* Optional: Fertilizer: A balanced fertilizer (like 10-10-10) can give your sugarcane a boost.
Preparing Your Sugarcane Stalks
This is a crucial step, so pay close attention! We need to encourage those nodes to sprout roots.
1. Cutting the Stalks: Using your sharp knife or pruning shears, cut the sugarcane stalks into sections, each containing at least two or three nodes. I usually aim for sections that are about 6-8 inches long.
2. Identifying the Nodes: Take a close look at each section. You’ll see small bumps or rings around the stalk – these are the nodes. These are where the roots and new shoots will emerge.
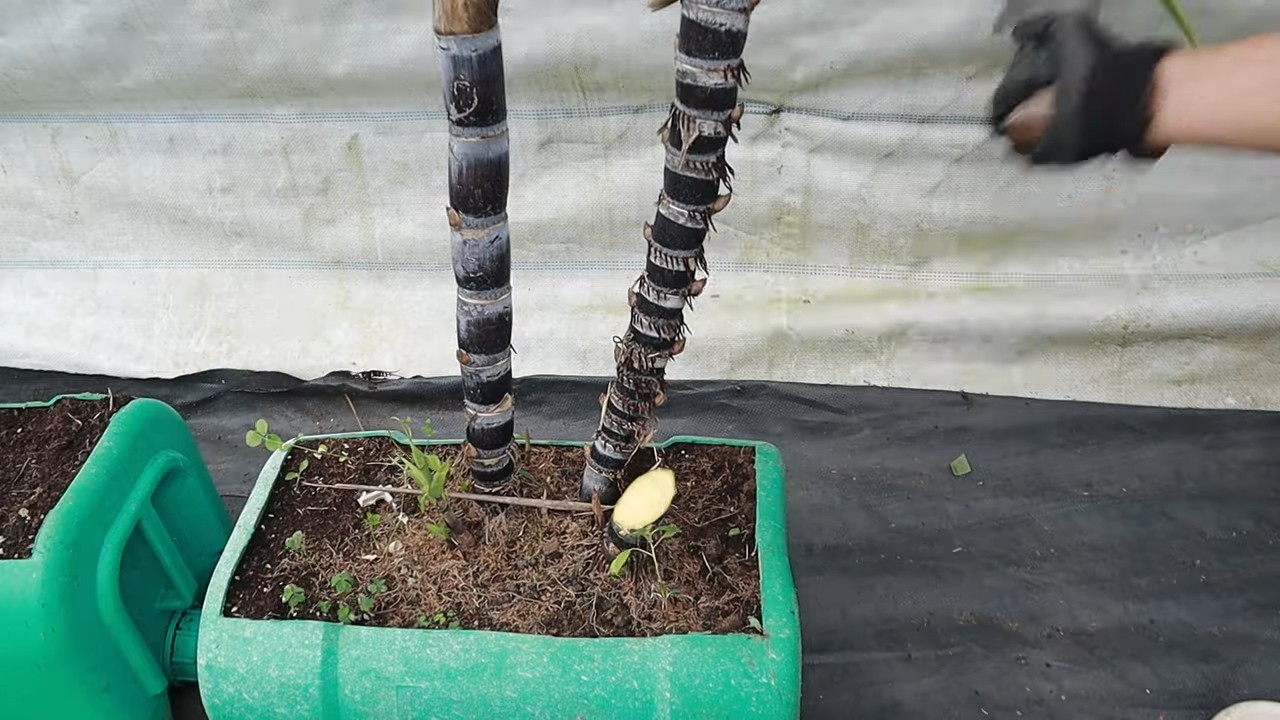
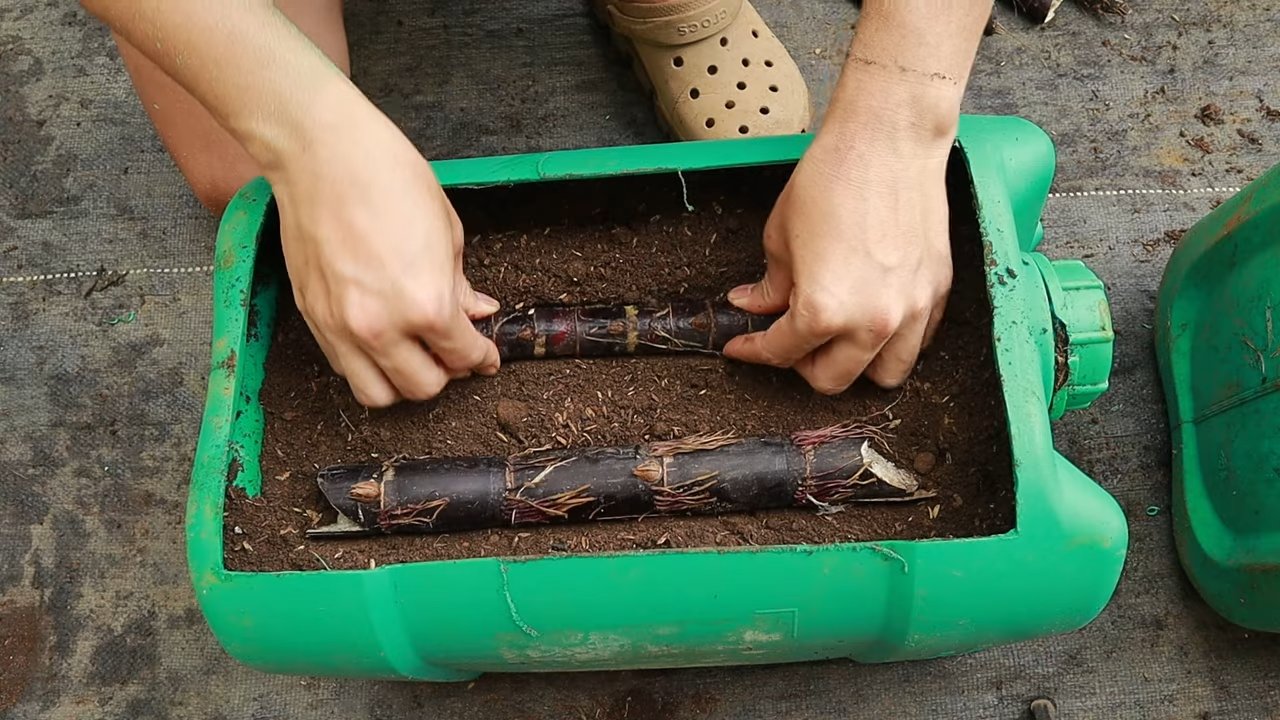
3. Laying the Stalks Horizontally: This is key! Instead of planting the stalks vertically, we’re going to lay them horizontally in the container. This encourages more nodes to sprout.
4. Applying Rooting Hormone (Optional): If you’re using rooting hormone, dip the cut ends of each stalk section into the powder or liquid. This will help stimulate root growth.
Planting Your Sugarcane
Now for the fun part – getting those stalks into their new homes!
1. Preparing the Containers: Make sure your recycled containers are clean and have drainage holes at the bottom. This is super important to prevent waterlogging, which can rot the roots.
2. Filling the Containers: Fill each container with your potting mix, leaving about 2-3 inches of space at the top.
3. Laying the Stalks: Gently lay the sugarcane stalk sections horizontally on top of the potting mix. Space them a few inches apart.
4. Covering the Stalks: Cover the stalks with another 1-2 inches of potting mix. Gently pat the soil down.
5. Watering Thoroughly: Water the containers thoroughly until the water drains out of the bottom. This helps settle the soil and encourages root growth.
Caring for Your Sugarcane
Sugarcane is relatively easy to care for, but it does have a few specific needs.
1. Sunlight: Sugarcane loves sunshine! Place your containers in a location that receives at least 6-8 hours of direct sunlight per day. The more sun, the better!
2. Watering: Keep the soil consistently moist, but not waterlogged. Water deeply whenever the top inch of soil feels dry to the touch. During hot weather, you may need to water more frequently.
3. Fertilizing: Feed your sugarcane with a balanced fertilizer (like 10-10-10) every 4-6 weeks during the growing season (spring and summer). Follow the instructions on the fertilizer package.
4. Weeding: Keep the containers free of weeds, which can compete with your sugarcane for nutrients and water.
5. Support (Optional): As your sugarcane grows taller, it may need some support to prevent it from falling over. You can use stakes or trellises to provide support.
6. Pest Control: Keep an eye out for pests like aphids or spider mites. If you spot any, treat them with an insecticidal soap or neem oil.
Harvesting Your Sugarcane
This is the moment you’ve been waiting for! Harvesting sugarcane is a rewarding experience.
1. Timing: Sugarcane typically takes 9-12 months to mature. You’ll know it’s ready to harvest when the stalks are thick and the leaves start to turn yellow or brown.
2. Cutting the Stalks: Using a sharp knife or pruning shears, cut the sugarcane stalks close to the base of the plant.
3. Removing the Leaves: Remove the leaves from the stalks.
4. Processing the Sugarcane: Now you can enjoy your homegrown sugarcane! You can chew on the stalks to extract the sweet juice, or you can process it further to make sugar or syrup. There are many online tutorials that can guide you through the process of extracting the juice and boiling it down to make syrup or sugar. Be careful, it is a hot and sticky process!
5. Regrowth: Sugarcane is a perennial plant, meaning it can grow back year after year. After harvesting, leave a few inches of the stalk in the container, and it will likely sprout new shoots in the spring.
Troubleshooting
Even with the best care, you might encounter a few challenges along the way. Here are some common problems and how to address them:
* Yellowing Leaves: This could be a sign of overwatering, underwatering, or nutrient deficiency. Check the soil moisture and adjust your watering accordingly. If the soil is consistently moist, you may be overwatering. If the soil is dry, you need to water more frequently. You may also need to fertilize your sugarcane.
* Slow Growth: This could be due to insufficient sunlight, poor soil, or lack of fertilizer. Make sure your sugarcane is getting enough sunlight and that the soil is well-draining and nutrient-rich. Fertilize regularly.
* Pests: Keep an eye out for pests like aphids or spider mites. Treat them with an insecticidal soap or neem oil.
* Root Rot: This is caused by overwatering and poor drainage. Make sure your containers have drainage holes and that you’re not overwatering. If you suspect root rot, you may need to repot your sugarcane in fresh soil.
Tips for Success
Here are a few extra tips to help you succeed in growing sugarcane in recycled containers:
* Choose the Right Variety: Some sugarcane varieties are better suited for container growing than others. Ask your local nursery for recommendations.
* Start with Healthy Stalks: The healthier the stalks you start with, the better your chances of success.
* Be Patient: Sugarcane takes time to grow. Don’t get discouraged if you don’t see results immediately.
* Experiment: Don’t be afraid to experiment with different potting mixes, fertilizers, and watering schedules to find what works best for you.
* Enjoy the Process: Growing sugarcane is a rewarding experience. Enjoy the process and don’t be afraid to get your hands dirty!
Growing sugarcane in recycled containers is a fun and eco-friendly way to enjoy this sweet treat. With a little patience and care, you can have your own homegrown sugarcane in no time. Happy gardening!
Conclusion
So, there you have it! Growing sugarcane in recycled containers isn’t just a quirky gardening project; it’s a sustainable, rewarding, and surprisingly accessible way to bring a touch of the tropics to your own backyard, balcony, or even sunny windowsill. We’ve walked you through the process, from selecting the right sugarcane stalks to nurturing them in their upcycled homes.
Why is this DIY trick a must-try? Because it’s more than just growing a plant. It’s about embracing sustainability by giving new life to discarded containers, reducing waste, and contributing to a greener planet. It’s about connecting with nature, observing the fascinating growth cycle of sugarcane, and experiencing the satisfaction of harvesting your own sweet stalks. And let’s be honest, it’s also about the sheer novelty and bragging rights of growing sugarcane in a container! Imagine the conversations you’ll spark when you offer friends a taste of homegrown sugarcane juice.
But the benefits extend beyond the environmental and the social. Growing sugarcane in containers allows you to control the growing environment, protecting your plants from harsh weather conditions and pests. It’s a fantastic option for those with limited space, as you can easily move your containers to optimize sunlight exposure. Plus, the visual appeal of lush green sugarcane stalks adds a touch of exotic beauty to any space.
Don’t be afraid to experiment with variations! Try different types of sugarcane to discover your favorite flavor profile. Consider adding companion plants to your containers, such as herbs or flowers, to attract beneficial insects and enhance the overall ecosystem. You can even explore different types of recycled containers, from old tires to plastic buckets, as long as they provide adequate drainage and space for root growth.
Remember, the key to success lies in providing your sugarcane with plenty of sunlight, consistent moisture, and well-draining soil. Be patient, observe your plants closely, and adjust your care routine as needed. And most importantly, have fun!
We wholeheartedly encourage you to give this DIY sugarcane growing project a try. It’s a simple, affordable, and incredibly rewarding way to connect with nature, embrace sustainability, and enjoy the sweet taste of homegrown goodness. Once you’ve embarked on your sugarcane growing adventure, we’d love to hear about your experiences! Share your photos, tips, and challenges in the comments below. Let’s create a community of sugarcane enthusiasts and inspire others to embrace the joy of growing their own food, one recycled container at a time. Let’s all become masters of **growing sugarcane**!
Frequently Asked Questions (FAQ)
1. What type of sugarcane is best for growing in containers?
While many sugarcane varieties can be grown in containers, some are better suited than others due to their size and growth habits. Look for varieties that are known to be more compact or dwarf, such as ‘Purple Sugar Cane’ or ‘Lakouka’. These varieties tend to be less aggressive growers and are more manageable in a confined space. However, even larger varieties can be successfully grown in containers with proper care and pruning. Consider your local climate and the availability of sugarcane stalks when making your selection. Local nurseries or agricultural extension offices can provide valuable insights into the best varieties for your region.
2. What size container do I need for growing sugarcane?
The size of the container is crucial for the successful growth of sugarcane. A minimum of 15-20 gallons is recommended for each stalk. Larger containers are always better, as they provide more room for root development and allow the plant to access more nutrients and water. Choose a container that is wide and deep, with adequate drainage holes to prevent waterlogging. Recycled containers like large plastic bins, buckets, or even repurposed tires can be used, as long as they are clean and free of harmful chemicals. Remember to consider the weight of the container when filled with soil and water, and choose a location that can support the weight.
3. What type of soil is best for growing sugarcane in containers?
Sugarcane thrives in well-draining, fertile soil that is rich in organic matter. A good potting mix for sugarcane should consist of a combination of topsoil, compost, and perlite or vermiculite. The topsoil provides essential nutrients, the compost improves soil structure and water retention, and the perlite or vermiculite enhances drainage. Avoid using heavy clay soils, as they can become waterlogged and suffocate the roots. You can also amend your potting mix with slow-release fertilizer to provide a steady supply of nutrients throughout the growing season. Regularly check the soil pH and adjust as needed to maintain a slightly acidic to neutral pH (6.0-7.0).
4. How much sunlight does sugarcane need?
Sugarcane is a sun-loving plant and requires at least 6-8 hours of direct sunlight per day to thrive. Choose a location for your container that receives ample sunlight throughout the day. If you live in a region with intense summer heat, you may need to provide some afternoon shade to prevent the leaves from scorching. If you are growing sugarcane indoors, supplement with grow lights to ensure adequate light exposure. Rotate the container regularly to ensure that all sides of the plant receive equal sunlight.
5. How often should I water sugarcane in containers?
Sugarcane requires consistent moisture, especially during the growing season. Water your plants deeply whenever the top inch of soil feels dry to the touch. Avoid overwatering, as this can lead to root rot. The frequency of watering will depend on the climate, the size of the container, and the type of soil. In hot, dry weather, you may need to water daily. In cooler, wetter weather, you may only need to water every few days. Check the soil moisture regularly and adjust your watering schedule accordingly.
6. How do I fertilize sugarcane in containers?
Sugarcane is a heavy feeder and requires regular fertilization to support its rapid growth. Use a balanced fertilizer with a ratio of 10-10-10 or 14-14-14. Apply the fertilizer according to the manufacturer’s instructions, typically every 4-6 weeks during the growing season. You can also supplement with organic fertilizers, such as compost tea or fish emulsion. Avoid over-fertilizing, as this can burn the roots. Monitor the plant’s growth and adjust the fertilizer application as needed.
7. How do I harvest sugarcane from containers?
Sugarcane is typically ready for harvest in 9-12 months, depending on the variety and growing conditions. The stalks will be thick and mature, and the leaves may start to turn yellow or brown. To harvest, use a sharp knife or machete to cut the stalks at the base, close to the soil line. Remove the leaves and any remaining roots. The harvested stalks can be used to make sugarcane juice, syrup, or other products.
8. Can I grow sugarcane indoors?
Yes, you can grow sugarcane indoors, but it requires a lot of sunlight. Place the container near a sunny window that receives at least 6-8 hours of direct sunlight per day. Supplement with grow lights if necessary. Ensure that the container has adequate drainage and that the soil is well-draining. Monitor the plant’s growth and adjust the care routine as needed. Indoor-grown sugarcane may not grow as large or produce as much juice as outdoor-grown sugarcane, but it can still be a rewarding experience.
9. What are some common pests and diseases that affect sugarcane?
Sugarcane can be susceptible to various pests and diseases, including aphids, mealybugs, sugarcane borers, and fungal infections. Inspect your plants regularly for signs of infestation or disease. Treat any problems promptly with appropriate insecticides or fungicides. You can also use organic pest control methods, such as neem oil or insecticidal soap. Ensure that your plants have good air circulation and are not overcrowded to prevent fungal diseases.
10. How do I propagate sugarcane from cuttings?
Sugarcane can be easily propagated from cuttings. Select healthy, mature stalks and cut them into sections that are 6-8 inches long. Each cutting should have at least one node (the point where leaves emerge). Plant the cuttings horizontally in a well-draining potting mix, with the nodes facing upwards. Keep the soil moist but not waterlogged. The cuttings should root within a few weeks. Once the roots have developed, you can transplant the seedlings into larger containers.
Leave a Comment