

Growing Sponge Gourd in a Container might sound like a challenge, especially if you’re short on space, but trust me, it’s totally doable and incredibly rewarding! Imagine harvesting your own fresh, homegrown sponge gourds right from your balcony or patio. Forget those bland, store-bought veggies – we’re talking about vibrant, flavorful gourds bursting with goodness.
For centuries, sponge gourds have been a staple in Asian cuisine and traditional medicine. From stir-fries to soups, their versatility is unmatched. But beyond their culinary uses, these fascinating plants offer a unique opportunity to connect with nature, even in the heart of the city. I’ve always been fascinated by how something so useful can be grown in a small space.
Why should you try this DIY trick? Well, for starters, it’s a fantastic way to enjoy fresh, organic produce without a sprawling garden. Plus, growing sponge gourd in a container allows you to control the growing environment, protecting your plants from pests and diseases. And let’s be honest, there’s something incredibly satisfying about nurturing a plant from seed to harvest. So, if you’re ready to embark on a fun and fulfilling gardening adventure, keep reading! I’m going to share all my secrets for successfully growing sponge gourds in containers, even if you’re a complete beginner.
Growing Sponge Gourd in Containers: A Complete DIY Guide
Hey there, fellow gardening enthusiasts! I’m so excited to share my experience with growing sponge gourds in containers. It’s a surprisingly rewarding project, even if you don’t have a sprawling garden. I’ve learned a lot along the way, and I’m confident that with this guide, you’ll be harvesting your own homegrown sponges in no time!
Choosing the Right Container and Location
Before we even think about seeds, let’s talk about the foundation of our sponge gourd empire: the container and its location. This is crucial for success!
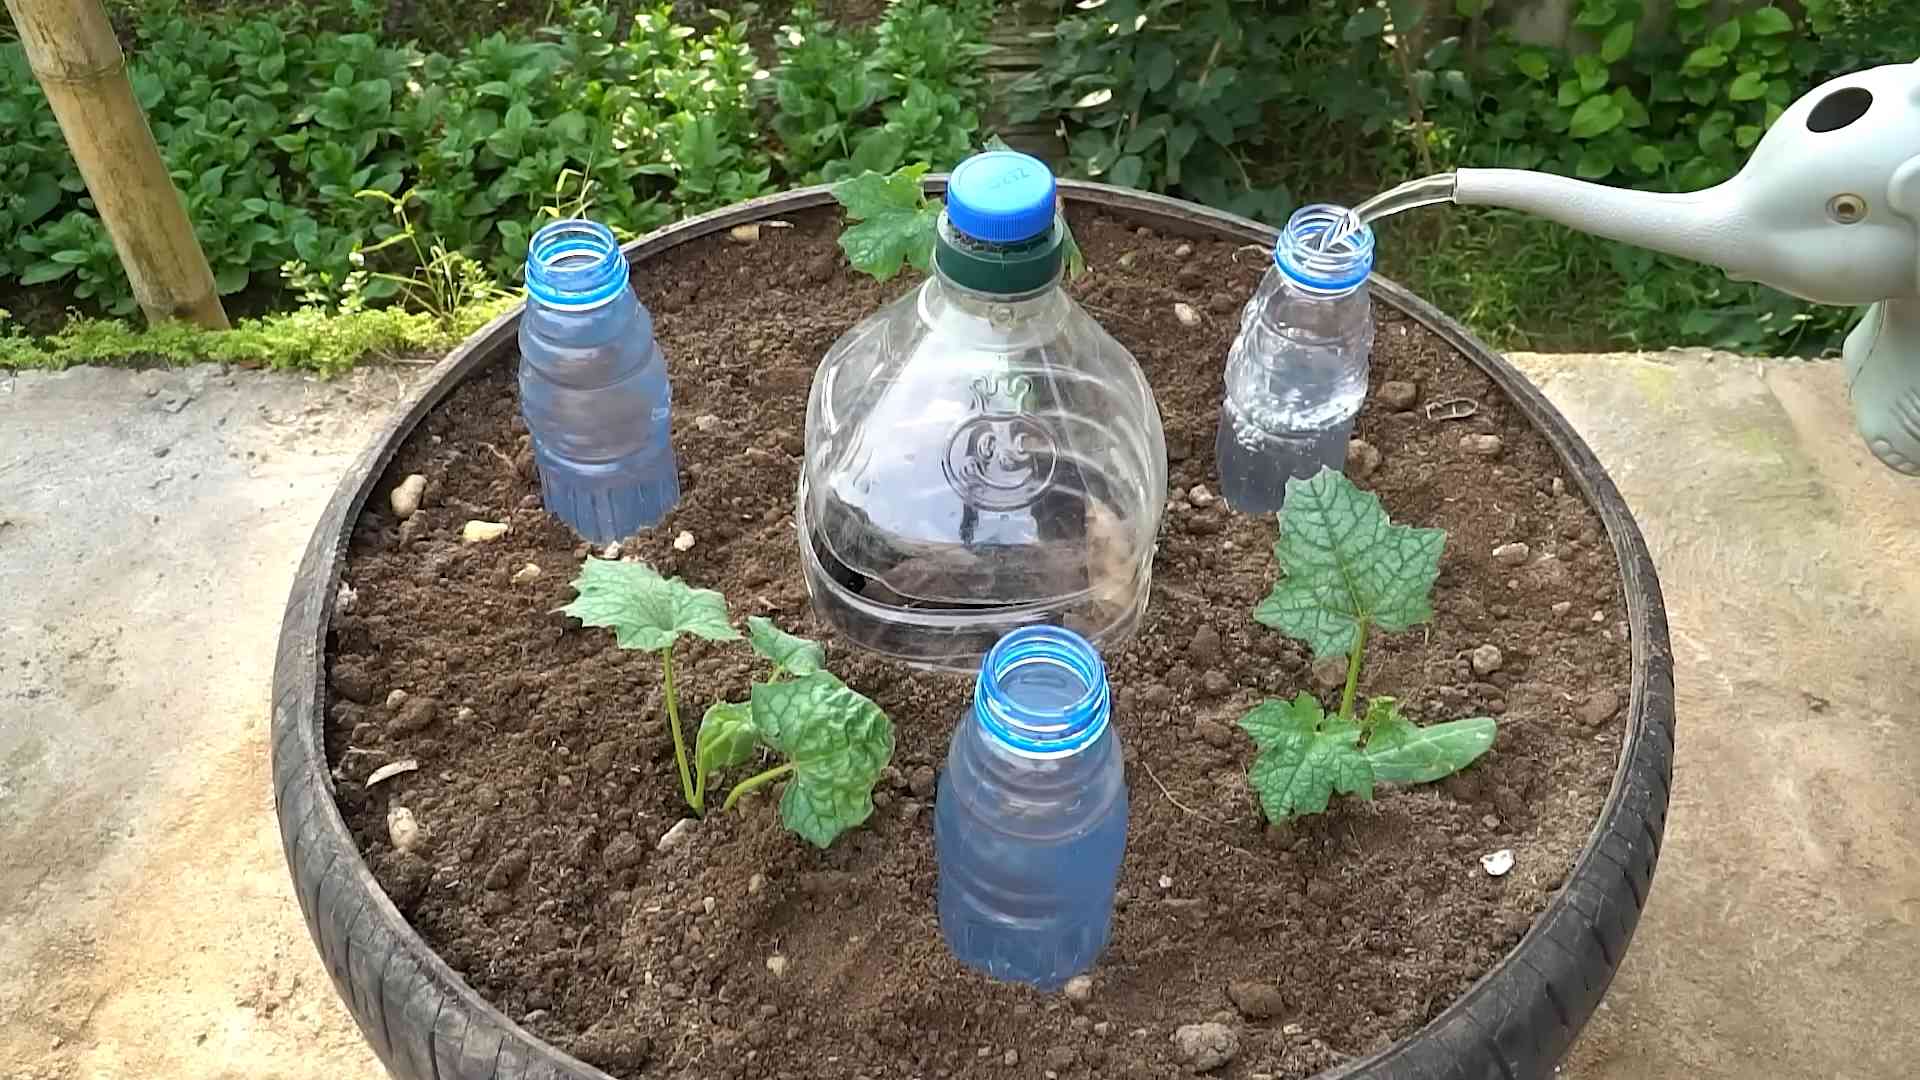
* Container Size: Sponge gourds are vigorous climbers with extensive root systems. Don’t underestimate the size you’ll need! I recommend a container that’s at least 20 gallons in size. Think large trash cans, half wine barrels, or even those big plastic storage tubs (just make sure to drill drainage holes!). The bigger, the better, honestly. A smaller container will severely stunt the plant’s growth and reduce your harvest.
* Drainage: This is non-negotiable. Sponge gourds hate sitting in soggy soil. Make sure your chosen container has plenty of drainage holes. If you’re using a plastic tub, drill at least 6-8 holes that are about ½ inch in diameter.
* Material: The material of the container doesn’t matter too much, but keep in mind that dark-colored containers will absorb more heat, which can be beneficial in cooler climates but detrimental in hotter ones. Terracotta pots are beautiful but can dry out quickly, so you’ll need to water more frequently. Plastic is lightweight and retains moisture well, making it a good option for beginners.
* Location, Location, Location: Sponge gourds are sun worshippers! They need at least 6-8 hours of direct sunlight per day to thrive. Choose a location that gets plenty of sun, preferably in the morning and early afternoon. Also, consider the wind. Sponge gourd vines can get quite heavy, so a sheltered location will prevent them from being damaged by strong winds.
* Support System: This is where things get interesting! Sponge gourds are climbers, so you’ll need to provide them with a sturdy trellis or support system. A fence, pergola, or even a DIY trellis made from bamboo poles or chicken wire will work. Make sure the support is strong enough to handle the weight of the mature vines and gourds. I’ve seen people use everything from old ladders to repurposed swing sets! Get creative!
Preparing the Soil
Now that we have our container and location sorted, let’s talk about the soil. Sponge gourds are heavy feeders, so they need a rich, well-draining soil mix.
* The Perfect Mix: I like to use a mix of equal parts compost, potting soil, and perlite. The compost provides nutrients, the potting soil provides structure, and the perlite improves drainage. You can also add a handful of slow-release fertilizer to the mix.
* Compost is Key: Don’t skimp on the compost! It’s the lifeblood of your sponge gourd plant. Use well-rotted compost from your own compost pile or purchase it from a garden center.
* Avoid Garden Soil: Resist the temptation to use garden soil in your containers. It’s often too heavy and doesn’t drain well, which can lead to root rot.
* pH Level: Sponge gourds prefer a slightly acidic to neutral soil pH (around 6.0-7.0). You can test your soil pH with a soil testing kit. If your soil is too alkaline, you can amend it with sulfur.
Planting the Seeds
Alright, let’s get our hands dirty! It’s time to plant those seeds.
* Starting Seeds Indoors (Optional): You can start sponge gourd seeds indoors about 4-6 weeks before the last expected frost. This will give them a head start and allow you to harvest earlier. Sow the seeds in small pots or seed trays filled with seed-starting mix. Keep the soil moist and warm (around 70-80°F).
* Direct Sowing: If you live in a warm climate with a long growing season, you can direct sow the seeds directly into the container after the last frost.
* Soaking the Seeds: Before planting, soak the seeds in warm water for 24 hours. This will help to soften the seed coat and improve germination.
* Planting Depth: Plant the seeds about 1 inch deep.
* Spacing: If you’re planting multiple seeds in the same container, space them about 6 inches apart.
* Watering: Water the soil gently after planting. Keep the soil moist but not soggy.
* Germination: Sponge gourd seeds typically germinate in 7-14 days.
Caring for Your Sponge Gourd Plant
Now that your seeds have sprouted, it’s time to nurture your little sponge gourd plants.
* Watering: Sponge gourds need consistent watering, especially during hot, dry weather. Water deeply whenever the top inch of soil feels dry to the touch. Avoid overhead watering, as this can lead to fungal diseases.
* Fertilizing: Sponge gourds are heavy feeders, so you’ll need to fertilize them regularly. Use a balanced fertilizer (e.g., 10-10-10) every 2-3 weeks. You can also supplement with compost tea or fish emulsion.
* Pruning: Pruning can help to improve air circulation and encourage fruit production. Remove any yellowing or diseased leaves. You can also pinch off the tips of the vines to encourage branching.
* Pollination: Sponge gourds are monoecious, meaning they have separate male and female flowers on the same plant. The female flowers have a small gourd-like structure at the base. You may need to hand-pollinate the flowers if you’re not seeing any fruit set. To hand-pollinate, use a small paintbrush to transfer pollen from the male flowers to the female flowers. Do this in the morning, when the flowers are open.
* Pest and Disease Control: Keep an eye out for pests such as aphids, squash bugs, and vine borers. You can control these pests with insecticidal soap or neem oil. Fungal diseases can be a problem in humid climates. Prevent fungal diseases by providing good air circulation and avoiding overhead watering. If you see signs of fungal disease, treat with a fungicide.
Harvesting Your Sponge Gourds
The moment we’ve all been waiting for! It’s time to harvest your homegrown sponges.
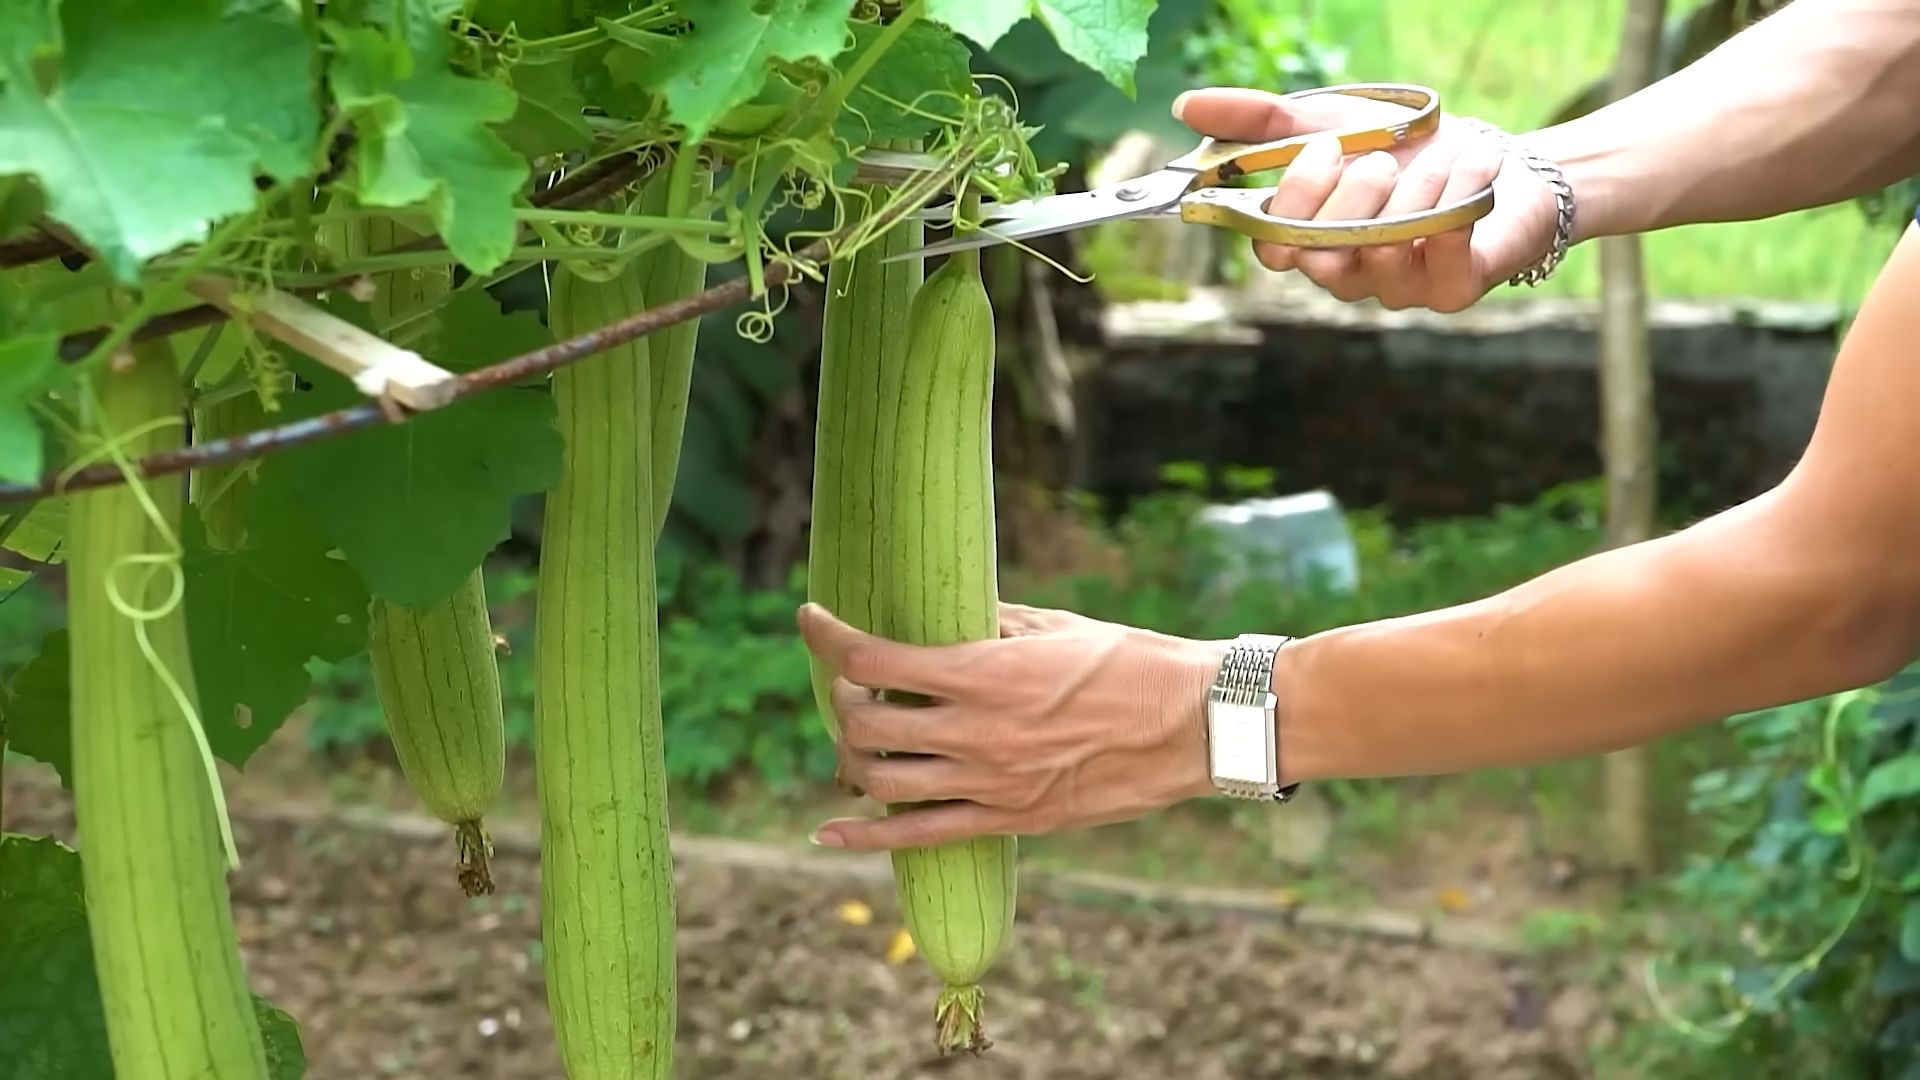
* Timing is Key: The best time to harvest sponge gourds is when they are young and tender, about 6-8 inches long. At this stage, they are still edible and can be used in stir-fries, soups, and other dishes.
* For Sponges: If you want to use your sponge gourds as sponges, you’ll need to let them mature on the vine until they are fully ripe and the skin turns brown and hard. This can take several months.
* Harvesting for Sponges: Once the gourds are ripe, cut them from the vine with a sharp knife or pruning shears.
* Processing for Sponges: To process the gourds into sponges, soak them in water for several days to soften the skin. Then, peel off the skin and remove the seeds and pulp. Rinse the sponge thoroughly and let it dry completely.
* Enjoy Your Harvest! Now you can enjoy your homegrown sponges in the bath, kitchen, or anywhere else you need a natural and sustainable cleaning tool!
Troubleshooting
Even with the best planning, things can sometimes go wrong. Here are a few common problems you might encounter and how to fix them:
* Yellowing Leaves: This could be a sign of overwatering, underwatering, nutrient deficiency, or pest infestation. Check the soil moisture, fertilize if necessary, and inspect the plant for pests.
* Lack of Fruit Set: This could be due to poor pollination, lack of sunlight, or nutrient deficiency. Hand-pollinate the flowers, ensure the plant is getting enough sunlight, and fertilize regularly.
* Pest Infestation: Treat pests with insecticidal soap or neem oil.
* Fungal Diseases: Provide good air circulation, avoid overhead watering, and treat with a fungicide if necessary.
Extra Tips and Tricks
* Succession Planting: Plant new seeds every few weeks to extend your harvest season.
* Companion Planting: Plant companion plants such as marigolds, basil, and nasturtiums to attract pollinators and repel pests.
* Saving Seeds: Save seeds from your best-performing plants to grow next year.
* Experiment! Don’t be afraid to experiment with different varieties of sponge gourds and different growing techniques.
Growing sponge gourds in containers is a fun and rewarding project that anyone can do. With a little bit of planning and effort, you can be harvesting your own homegrown sponges in no time!
Conclusion
So, there you have it! Growing sponge gourd in containers is not only possible, but it’s also incredibly rewarding. We’ve walked through the entire process, from selecting the right container and soil to providing the necessary support and care. This DIY trick opens up a world of possibilities, especially for those with limited garden space. Imagine harvesting your own fresh, organic sponge gourds right from your balcony or patio!
Why is this a must-try? Because it empowers you to control the growing environment, minimizes pest issues, and allows you to enjoy the satisfaction of nurturing a plant from seed to harvest. Plus, homegrown sponge gourds taste infinitely better than anything you can buy at the store. The flavor is fresher, the texture is more tender, and you know exactly what went into growing them.
But don’t stop there! Feel free to experiment with different varieties of sponge gourd. Some are longer and thinner, while others are shorter and rounder. You can also try companion planting to enhance growth and deter pests. Marigolds, for example, are known to repel nematodes and other harmful insects. Basil can also be a great companion plant, attracting beneficial insects and improving the overall health of your sponge gourd.
Consider adding a trellis or support structure that is more decorative. A beautiful archway covered in lush green vines and vibrant yellow flowers can transform your outdoor space into a stunning oasis. You can also explore different container materials. While plastic pots are lightweight and affordable, terracotta pots offer better drainage and breathability. Just be sure to choose a container that is large enough to accommodate the plant’s root system.
Another variation to consider is vertical gardening. If you have a wall or fence, you can train your sponge gourd to grow upwards, maximizing space and creating a visually appealing display. This is a great option for those with very limited horizontal space.
Ultimately, the key to success is consistent care and attention. Regularly check the soil moisture, fertilize as needed, and prune any dead or yellowing leaves. With a little bit of effort, you’ll be rewarded with a bountiful harvest of delicious sponge gourds.
We wholeheartedly encourage you to give this DIY trick a try. It’s a fun, educational, and rewarding experience that will connect you with nature and provide you with fresh, healthy produce. And most importantly, don’t forget to share your experience with us! We’d love to hear about your successes, challenges, and any tips or tricks you discover along the way. Post pictures of your container gardens, share your favorite sponge gourd recipes, and let’s create a community of passionate gardeners who are dedicated to growing their own food, one container at a time. Let’s make growing sponge gourd in containers a new trend!
Frequently Asked Questions (FAQ)
Q: What is the best size container for growing sponge gourd?
A: The ideal container size for growing sponge gourd is at least 20 gallons. Sponge gourds have extensive root systems and require ample space to grow and thrive. A larger container will also provide better water retention and prevent the plant from becoming root-bound. If you’re using a smaller container, you may need to water more frequently and fertilize more often. However, a 20-gallon container is generally considered the minimum for optimal growth and yield.
Q: What type of soil should I use for growing sponge gourd in containers?
A: A well-draining, nutrient-rich potting mix is essential for growing sponge gourd in containers. Avoid using garden soil, as it can become compacted and doesn’t provide adequate drainage. A good potting mix should contain a blend of peat moss, perlite, and vermiculite. You can also amend the potting mix with compost or aged manure to provide additional nutrients. The soil pH should be slightly acidic to neutral, around 6.0 to 7.0.
Q: How often should I water my sponge gourd plants in containers?
A: Sponge gourd plants require consistent moisture, especially during hot weather. Water deeply whenever the top inch of soil feels dry to the touch. Avoid overwatering, as this can lead to root rot. The frequency of watering will depend on the weather conditions, the size of the container, and the type of potting mix you’re using. Generally, you’ll need to water more frequently during the summer months and less frequently during cooler periods. Check the soil moisture regularly and adjust your watering schedule accordingly.
Q: How much sunlight do sponge gourd plants need?
A: Sponge gourd plants require at least 6-8 hours of direct sunlight per day to thrive. Choose a location that receives plenty of sunlight throughout the day. If you’re growing sponge gourd indoors, you may need to supplement with artificial lighting. Insufficient sunlight can lead to stunted growth, reduced flowering, and lower yields.
Q: What type of fertilizer should I use for sponge gourd plants?
A: Sponge gourd plants are heavy feeders and require regular fertilization. Use a balanced fertilizer with an NPK ratio of 10-10-10 or 14-14-14. Apply the fertilizer according to the manufacturer’s instructions. You can also supplement with organic fertilizers, such as compost tea or fish emulsion. Fertilize every 2-3 weeks during the growing season to promote healthy growth and abundant fruit production.
Q: How do I provide support for my sponge gourd vines?
A: Sponge gourd vines are vigorous climbers and require sturdy support. Use a trellis, fence, or other structure to provide support for the vines. The support should be at least 6-8 feet tall to accommodate the plant’s growth. You can also train the vines to grow along a wall or pergola. Secure the vines to the support structure using plant ties or twine.
Q: How long does it take for sponge gourds to mature?
A: Sponge gourds typically take 90-120 days to mature from seed to harvest. The exact time will depend on the variety, growing conditions, and climate. You can harvest sponge gourds when they are young and tender, or you can allow them to mature fully for use as sponges.
Q: How do I harvest sponge gourds?
A: Harvest sponge gourds when they are young and tender, about 6-8 inches long. Use a sharp knife or pruning shears to cut the gourd from the vine. If you’re harvesting for sponges, allow the gourds to mature fully on the vine until they turn brown and dry. Then, soak the gourds in water to loosen the skin and seeds. Peel off the skin and remove the seeds. Rinse the sponge thoroughly and allow it to dry completely.
Q: What are some common pests and diseases that affect sponge gourd plants?
A: Common pests that affect sponge gourd plants include aphids, squash bugs, and vine borers. Diseases that can affect sponge gourd plants include powdery mildew and downy mildew. Monitor your plants regularly for signs of pests or diseases. Use organic pest control methods, such as insecticidal soap or neem oil, to control pests. Prevent diseases by providing good air circulation and avoiding overwatering.
Q: Can I grow sponge gourd indoors?
A: Yes, you can grow sponge gourd indoors, but it requires a large container, plenty of sunlight, and adequate support. You’ll also need to pollinate the flowers manually, as there may not be enough pollinators indoors. Indoor growing can be more challenging than outdoor growing, but it is possible with the right conditions and care.

Leave a Comment