

Growing Romanesco Cauliflower might sound intimidating, but trust me, with a few clever tricks and a little DIY spirit, you can cultivate this fractal beauty right in your own backyard! Forget those bland, store-bought veggies; imagine the satisfaction of harvesting your own vibrant, geometrically stunning Romanesco.
For centuries, gardeners have been captivated by the unique spiral patterns of Romanesco, a vegetable that seems more like a work of art than something you eat. Originating in Italy, this intriguing member of the Brassica family has been prized not only for its striking appearance but also for its delicate, nutty flavor. But let’s be honest, getting it to thrive can be a bit of a challenge. That’s where these DIY hacks come in!
Why do you need these tips for growing Romanesco Cauliflower? Well, this particular vegetable can be a bit finicky. From pest control to soil preparation, there are a few key things you need to get right to ensure a bountiful harvest. I’m here to share my tried-and-true methods, simple DIY solutions, and insider secrets that will help you overcome common challenges and enjoy the rewarding experience of growing your own Romanesco. Let’s ditch the gardening guesswork and get our hands dirty!
Growing Romanesco Cauliflower: A DIY Guide for a Bountiful Harvest
Okay, let’s dive into the fascinating world of growing Romanesco cauliflower! This isn’t your average garden vegetable. With its fractal, spiraling florets, it’s a showstopper. But don’t let its unique appearance intimidate you. With a little know-how, you can absolutely grow this beauty in your own backyard. I’m going to walk you through everything you need to know, from seed starting to harvest.
Choosing the Right Variety and Starting Seeds
First things first, let’s talk about variety. While “Romanesco” is often used generically, there are slight variations. Look for seeds labeled “Romanesco Italia” or simply “Romanesco Cauliflower.” These are generally reliable and produce the classic, spiraled heads we’re after.
Here’s a breakdown of how to get your Romanesco journey started:
* Timing is Key: Romanesco is a cool-season crop, meaning it thrives in cooler temperatures. For a fall harvest, start your seeds indoors about 4-6 weeks before the first expected frost. For a spring harvest, start seeds indoors 6-8 weeks before the last expected frost. I usually start mine in late summer for a fall harvest because I find the pests are less aggressive then.
* Seed Starting Supplies: You’ll need seed starting trays or small pots, a good quality seed starting mix (not garden soil!), a spray bottle, and a heat mat (optional, but helpful). A grow light is also beneficial, especially if you don’t have a sunny windowsill.
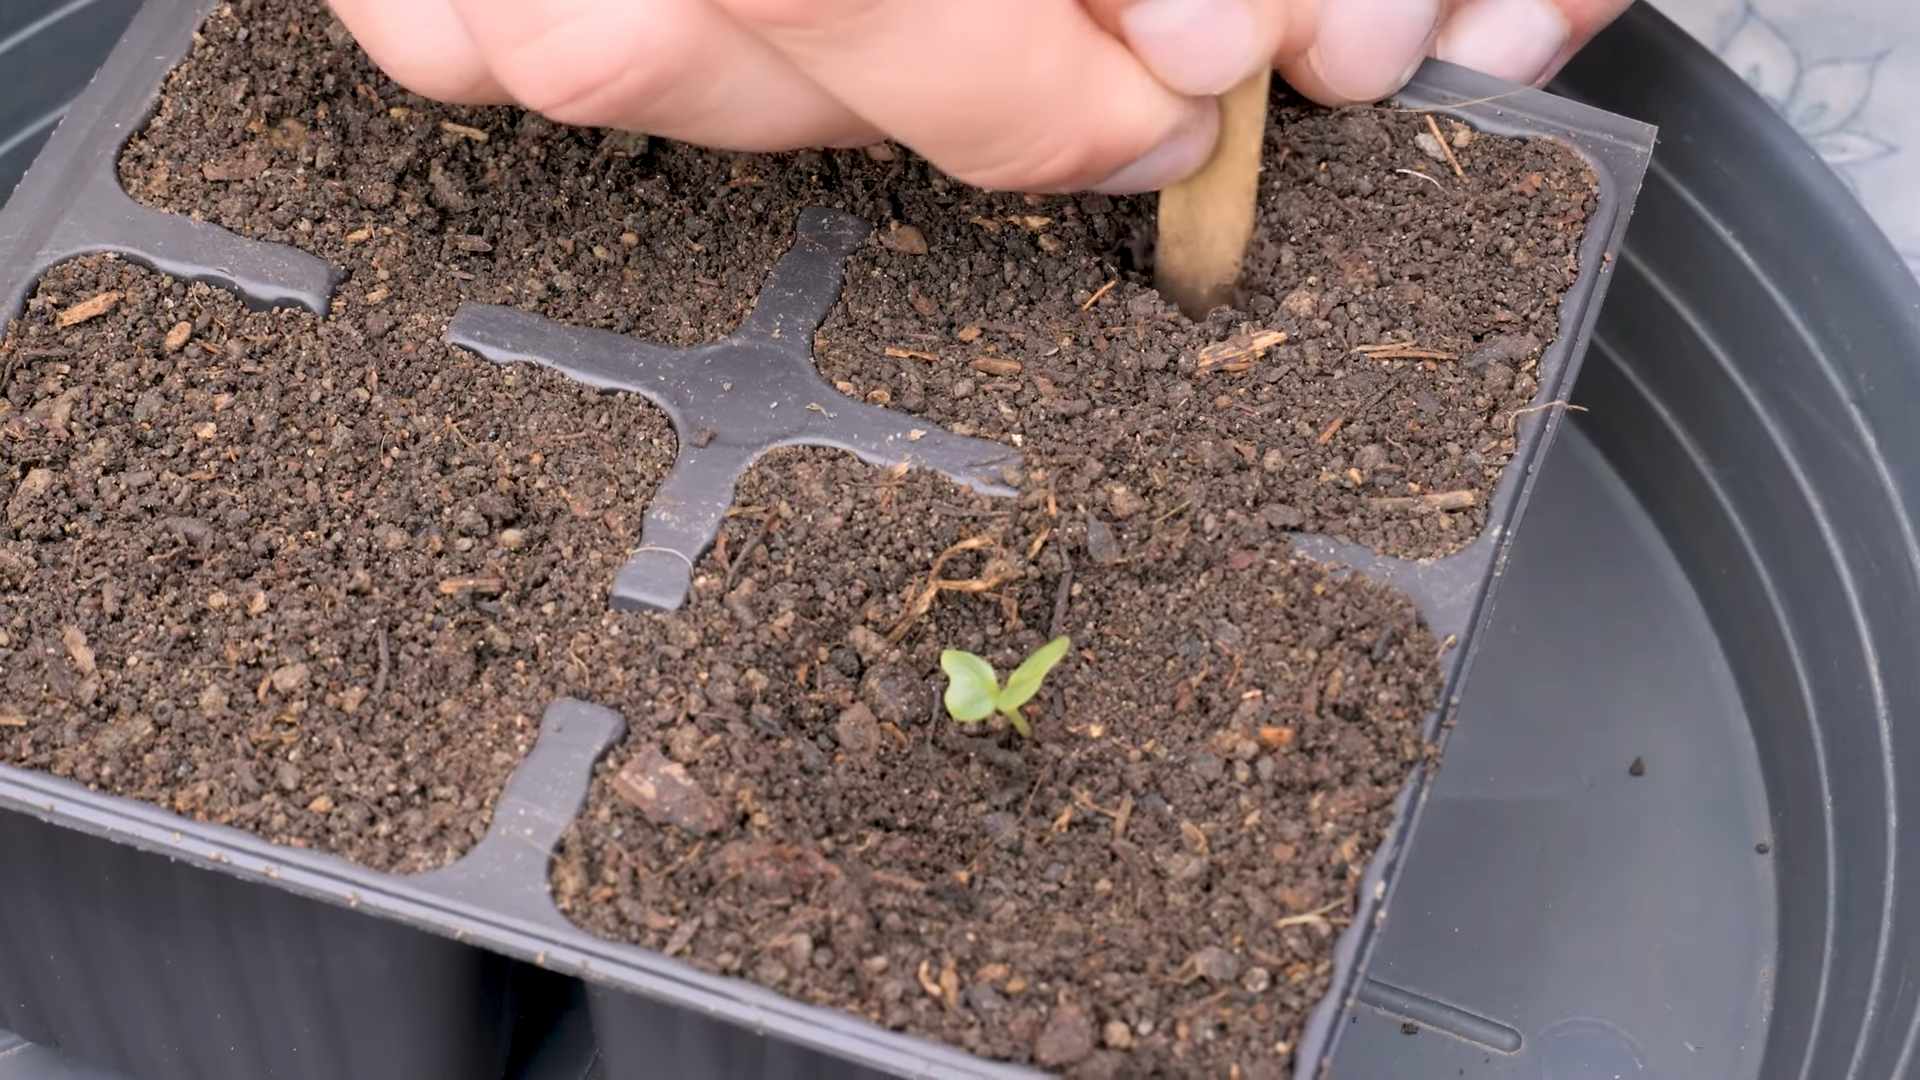
* Sowing the Seeds: Fill your seed starting trays or pots with the seed starting mix. Moisten the mix thoroughly with the spray bottle. Make a small indentation (about 1/4 inch deep) in the center of each cell or pot. Place one or two Romanesco seeds in each indentation and gently cover them with the seed starting mix.
* Creating the Ideal Environment: Cover the trays or pots with a humidity dome or plastic wrap to retain moisture. Place them on a heat mat (if using) and under a grow light or in a sunny windowsill. The ideal temperature for germination is around 70-75°F (21-24°C).
* Germination and Early Care: Keep the seed starting mix consistently moist, but not soggy. Check daily and mist with the spray bottle as needed. Once the seedlings emerge (usually within 5-10 days), remove the humidity dome or plastic wrap. If you planted two seeds per cell, thin them out, leaving the strongest seedling.
* Hardening Off: Before transplanting your seedlings outdoors, you need to “harden them off.” This process gradually acclimates them to the outdoor environment. Start by placing the seedlings outdoors in a sheltered location for a few hours each day, gradually increasing the amount of time they spend outside over the course of a week or two. Protect them from direct sunlight and strong winds during this process.
Preparing the Garden Bed and Transplanting
Now that your seedlings are thriving, it’s time to prepare their permanent home in the garden. Romanesco needs nutrient-rich soil and plenty of sunlight.
* Choosing the Right Location: Select a location that receives at least 6 hours of direct sunlight per day. Romanesco needs plenty of sunshine to develop those beautiful heads.
* Soil Preparation: Romanesco prefers well-drained soil that is rich in organic matter. Amend your soil with compost or well-rotted manure before planting. This will provide the nutrients your plants need to thrive. I usually add a generous amount of compost and some bone meal for extra phosphorus.
* Soil pH: Aim for a soil pH between 6.0 and 7.0. You can test your soil pH with a soil testing kit. If your soil is too acidic, you can add lime to raise the pH.
* Transplanting: Once your seedlings are hardened off and the danger of frost has passed (or is approaching for a fall crop), it’s time to transplant them into the garden. Space the plants about 18-24 inches apart. Dig a hole that is slightly larger than the root ball of the seedling. Gently remove the seedling from its container and place it in the hole. Backfill with soil and gently firm around the base of the plant. Water thoroughly.
Caring for Your Romanesco Plants
Consistent care is crucial for a successful Romanesco harvest. Here’s what you need to do:
* Watering: Romanesco needs consistent moisture, especially during head formation. Water deeply and regularly, especially during dry spells. Aim to keep the soil consistently moist, but not waterlogged. I like to use a soaker hose to deliver water directly to the roots.
* Fertilizing: Feed your Romanesco plants regularly with a balanced fertilizer. I usually use a liquid fertilizer diluted to half strength every two weeks. You can also side-dress with compost or well-rotted manure.
* Weeding: Keep the area around your Romanesco plants free of weeds. Weeds compete with your plants for nutrients and water. Mulching can help suppress weeds and retain moisture in the soil.
* Pest Control: Romanesco is susceptible to several pests, including cabbage worms, aphids, and flea beetles. Inspect your plants regularly for signs of pests.
* Cabbage Worms: These green caterpillars can quickly devour the leaves of your Romanesco plants. Handpicking them off is an effective method, especially for small infestations. You can also use Bacillus thuringiensis (Bt), a biological insecticide that is safe for humans and pets.
* Aphids: These small, sap-sucking insects can weaken your plants. Spray them off with a strong stream of water or use insecticidal soap.
* Flea Beetles: These tiny beetles can create small holes in the leaves of your Romanesco plants. Cover your plants with row covers to prevent flea beetles from reaching them. You can also use diatomaceous earth, a natural insecticide.
* Disease Prevention: Romanesco can also be susceptible to diseases, such as black rot and clubroot.
* Black Rot: This bacterial disease can cause dark lesions on the leaves and heads of your Romanesco plants. Prevent black rot by planting disease-resistant varieties, practicing crop rotation, and avoiding overhead watering.
* Clubroot: This fungal disease can cause swollen and distorted roots. Prevent clubroot by planting in well-drained soil, liming your soil to raise the pH, and practicing crop rotation.
Harvesting Your Romanesco Cauliflower
The moment you’ve been waiting for! Harvesting your Romanesco is the most rewarding part of the process.
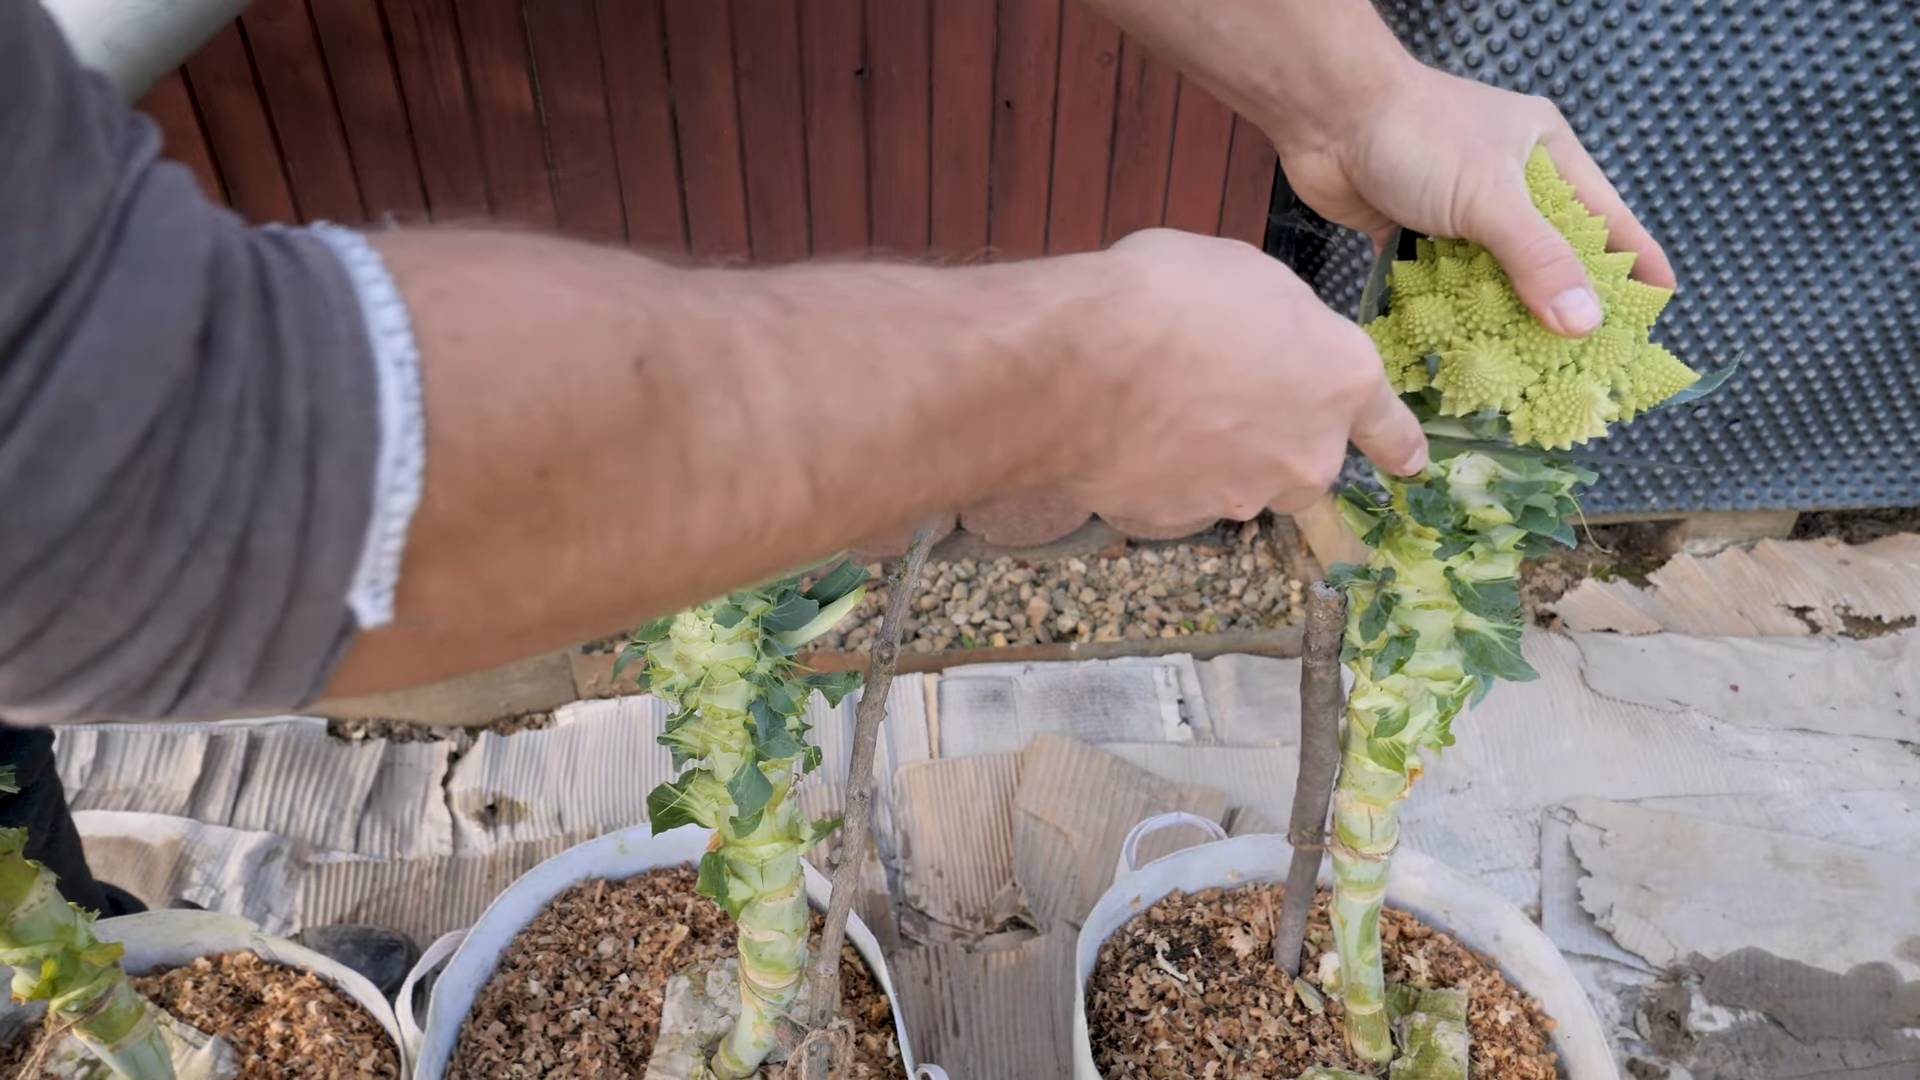
* Timing: Romanesco is typically ready to harvest about 75-85 days after transplanting. The head should be firm and compact, with tightly spiraled florets. The size of the head will vary depending on the variety and growing conditions. I usually harvest when the head is about 6-8 inches in diameter.
* Harvesting Technique: Use a sharp knife to cut the head from the plant, leaving a few inches of stem attached.
* Post-Harvest Care: Store your Romanesco cauliflower in the refrigerator. It will keep for abo
Okay, let’s dive into the fascinating world of growing Romanesco cauliflower! This isn’t your average garden vegetable. With its fractal, spiraling florets, it’s a showstopper. But don’t let its unique appearance intimidate you. With a little know-how, you can absolutely grow this beauty in your own backyard. I’m going to walk you through everything you need to know, from seed starting to harvest.
Choosing the Right Variety and Starting Seeds
First things first, let’s talk about variety. While “Romanesco” is often used generically, there are slight variations. Look for seeds labeled “Romanesco Italia” or simply “Romanesco Cauliflower.” These are generally reliable and produce the classic, spiraled heads we’re after.
Here’s a breakdown of how to get your Romanesco journey started:
* Timing is Key: Romanesco is a cool-season crop, meaning it thrives in cooler temperatures. For a fall harvest, start your seeds indoors about 4-6 weeks before the first expected frost. For a spring harvest, start seeds indoors 6-8 weeks before the last expected frost. I usually start mine in late summer for a fall harvest because I find the pests are less aggressive then.
* Seed Starting Supplies: You’ll need seed starting trays or small pots, a good quality seed starting mix (not garden soil!), a spray bottle, and a heat mat (optional, but helpful). A grow light is also beneficial, especially if you don’t have a sunny windowsill.
* Sowing the Seeds: Fill your seed starting trays or pots with the seed starting mix. Moisten the mix thoroughly with the spray bottle. Make a small indentation (about 1/4 inch deep) in the center of each cell or pot. Place one or two Romanesco seeds in each indentation and gently cover them with the seed starting mix.
* Creating the Ideal Environment: Cover the trays or pots with a humidity dome or plastic wrap to retain moisture. Place them on a heat mat (if using) and under a grow light or in a sunny windowsill. The ideal temperature for germination is around 70-75°F (21-24°C).
* Germination and Early Care: Keep the seed starting mix consistently moist, but not soggy. Check daily and mist with the spray bottle as needed. Once the seedlings emerge (usually within 5-10 days), remove the humidity dome or plastic wrap. If you planted two seeds per cell, thin them out, leaving the strongest seedling.
* Hardening Off: Before transplanting your seedlings outdoors, you need to “harden them off.” This process gradually acclimates them to the outdoor environment. Start by placing the seedlings outdoors in a sheltered location for a few hours each day, gradually increasing the amount of time they spend outside over the course of a week or two. Protect them from direct sunlight and strong winds during this process.
Preparing the Garden Bed and Transplanting
Now that your seedlings are thriving, it’s time to prepare their permanent home in the garden. Romanesco needs nutrient-rich soil and plenty of sunlight.
* Choosing the Right Location: Select a location that receives at least 6 hours of direct sunlight per day. Romanesco needs plenty of sunshine to develop those beautiful heads.
* Soil Preparation: Romanesco prefers well-drained soil that is rich in organic matter. Amend your soil with compost or well-rotted manure before planting. This will provide the nutrients your plants need to thrive. I usually add a generous amount of compost and some bone meal for extra phosphorus.
* Soil pH: Aim for a soil pH between 6.0 and 7.0. You can test your soil pH with a soil testing kit. If your soil is too acidic, you can add lime to raise the pH.
* Transplanting: Once your seedlings are hardened off and the danger of frost has passed (or is approaching for a fall crop), it’s time to transplant them into the garden. Space the plants about 18-24 inches apart. Dig a hole that is slightly larger than the root ball of the seedling. Gently remove the seedling from its container and place it in the hole. Backfill with soil and gently firm around the base of the plant. Water thoroughly.
Caring for Your Romanesco Plants
Consistent care is crucial for a successful Romanesco harvest. Here’s what you need to do:
* Watering: Romanesco needs consistent moisture, especially during head formation. Water deeply and regularly, especially during dry spells. Aim to keep the soil consistently moist, but not waterlogged. I like to use a soaker hose to deliver water directly to the roots.
* Fertilizing: Feed your Romanesco plants regularly with a balanced fertilizer. I usually use a liquid fertilizer diluted to half strength every two weeks. You can also side-dress with compost or well-rotted manure.
* Weeding: Keep the area around your Romanesco plants free of weeds. Weeds compete with your plants for nutrients and water. Mulching can help suppress weeds and retain moisture in the soil.
* Pest Control: Romanesco is susceptible to several pests, including cabbage worms, aphids, and flea beetles. Inspect your plants regularly for signs of pests.
* Cabbage Worms: These green caterpillars can quickly devour the leaves of your Romanesco plants. Handpicking them off is an effective method, especially for small infestations. You can also use Bacillus thuringiensis (Bt), a biological insecticide that is safe for humans and pets.
* Aphids: These small, sap-sucking insects can weaken your plants. Spray them off with a strong stream of water or use insecticidal soap.
* Flea Beetles: These tiny beetles can create small holes in the leaves of your Romanesco plants. Cover your plants with row covers to prevent flea beetles from reaching them. You can also use diatomaceous earth, a natural insecticide.
* Disease Prevention: Romanesco can also be susceptible to diseases, such as black rot and clubroot.
* Black Rot: This bacterial disease can cause dark lesions on the leaves and heads of your Romanesco plants. Prevent black rot by planting disease-resistant varieties, practicing crop rotation, and avoiding overhead watering.
* Clubroot: This fungal disease can cause swollen and distorted roots. Prevent clubroot by planting in well-drained soil, liming your soil to raise the pH, and practicing crop rotation.
Harvesting Your Romanesco Cauliflower
The moment you’ve been waiting for! Harvesting your Romanesco is the most rewarding part of the process.
* Timing: Romanesco is typically ready to harvest about 75-85 days after transplanting. The head should be firm and compact, with tightly spiraled florets. The size of the head will vary depending on the variety and growing conditions. I usually harvest when the head is about 6-8 inches in diameter.
* Harvesting Technique: Use a sharp knife to cut the head from the plant, leaving a few inches of stem attached.
* Post-Harvest Care: Store your Romanesco cauliflower in the refrigerator. It will keep for about a week.
Troubleshooting Common Problems
Even with the best care, you might encounter some challenges along the way. Here are some common problems and how to address them:
* Buttoning: This occurs when the head forms prematurely and remains small. It’s often caused by stress, such as lack of water or nutrients. Ensure your plants are getting adequate water and fertilizer.
* Loose Heads: This occurs when the florets are not tightly packed together. It can be caused by high temperatures or inconsistent watering. Try to provide shade during the hottest part of the day and water consistently.
* Bolting: This occurs when the plant prematurely flowers. It’s usually caused by stress, such as extreme temperature fluctuations. Choose bolt-resistant varieties and provide consistent growing conditions.
Step-by-Step Instructions: A Quick Recap
Let’s break down the entire process into numbered steps for easy reference:
1. **Start Seeds Indoors:** 4-6 weeks before the first frost (fall harvest) or 6-8 weeks before the last frost (spring harvest).
2. **Prepare Seed Starting Mix:** Use a good quality seed starting mix and moisten it thoroughly.
3. **Sow Seeds:** Plant seeds about 1/4 inch deep in seed starting trays or pots.
4. **Provide Warmth and Moisture:** Cover with a humidity dome and place on a heat mat (optional). Keep the mix consistently moist.
5. **Germination:** Remove the humidity dome once seedlings emerge.
6. **Thin Seedlings:** If you planted two seeds per cell, thin to one strong seedling.
7. **Harden Off:** Gradually acclimate seedlings to outdoor conditions over 1-2 weeks.
8. **Prepare Garden Bed:** Choose a sunny location and amend the soil with compost.
9. **Transplant Seedlings:** Space plants 18-24 inches
Conclusion
So, there you have it! Growing Romanesco cauliflower isn’t just about adding another vegetable to your garden; it’s about cultivating a piece of edible art. It’s about experiencing the satisfaction of nurturing a plant from seed to stunning, fractal-filled fruition. While it might seem a bit more demanding than your average broccoli or cabbage, the unique beauty and delicate, nutty flavor of homegrown Romanesco make it absolutely worth the effort.
Think of the possibilities! Imagine serving a vibrant Romanesco cauliflower gratin at your next dinner party, the intricate florets catching the light and sparking conversation. Or perhaps you’ll roast it with garlic and herbs, letting its natural sweetness shine through. You could even pickle it for a tangy, crunchy treat that will brighten up any charcuterie board. The culinary applications are as diverse and fascinating as the vegetable itself.
And don’t be afraid to experiment! Try different companion planting strategies to deter pests. Consider succession planting to extend your harvest season. Explore various soil amendments to optimize nutrient availability. Perhaps you’ll even discover a new and improved method for growing Romanesco cauliflower in your specific climate and soil conditions.
Growing Romanesco cauliflower is a journey of discovery, a hands-on learning experience that connects you to the natural world in a profound way. It’s a chance to challenge yourself, to expand your gardening skills, and to reap the rewards of your hard work in the form of a truly exceptional vegetable.
We urge you to give it a try. Don’t be intimidated by its reputation. With a little planning, patience, and attention to detail, you can successfully grow your own Romanesco cauliflower and enjoy its unique beauty and flavor. And most importantly, we want to hear about your experience! Share your tips, tricks, and triumphs in the comments below. Let’s build a community of Romanesco enthusiasts and learn from each other’s successes and challenges. Together, we can unlock the secrets to growing this remarkable vegetable and bring its fractal magic to gardens everywhere. So, grab your seeds, prepare your soil, and get ready to embark on a Romanesco adventure!
Frequently Asked Questions (FAQ)
Q: Is Romanesco cauliflower really that much harder to grow than regular cauliflower?
A: While Romanesco cauliflower shares many of the same growing requirements as other cauliflower varieties, it can be slightly more challenging. It’s particularly sensitive to temperature fluctuations and nutrient deficiencies. Maintaining consistent soil moisture and providing adequate fertilization are crucial for successful Romanesco cultivation. However, with careful planning and attention to detail, even beginner gardeners can successfully grow Romanesco. The key is to be proactive in addressing potential issues and to monitor your plants closely.
Q: What are the most common problems when growing Romanesco cauliflower, and how can I prevent them?
A: Several common problems can plague Romanesco cauliflower crops. These include:
* Buttoning: This occurs when the plant forms small, premature heads instead of a large, well-developed one. It’s often caused by stress, such as transplant shock, nutrient deficiencies (especially boron), or temperature extremes. To prevent buttoning, ensure your seedlings are healthy and well-established before transplanting. Amend your soil with compost and a balanced fertilizer, and protect your plants from extreme weather conditions. Soil testing can help determine if a boron deficiency exists.
* Pest Infestations: Cabbage worms, aphids, and flea beetles are common pests that can damage Romanesco cauliflower. Regularly inspect your plants for signs of infestation and take appropriate action. Organic pest control methods, such as introducing beneficial insects or using insecticidal soap, are often effective. Row covers can also provide a physical barrier against pests.
* Clubroot: This soilborne disease can cause stunted growth and swollen roots. To prevent clubroot, practice crop rotation, ensure good soil drainage, and maintain a soil pH of 6.5-7.0. If clubroot is present in your soil, consider using resistant varieties or treating the soil with lime.
* Tip Burn: This condition causes browning and necrosis of the leaf tips. It’s often caused by calcium deficiency or inconsistent watering. Ensure your soil is rich in calcium and maintain consistent soil moisture. Foliar applications of calcium can also help alleviate tip burn.
Q: What kind of soil is best for growing Romanesco cauliflower?
A: Romanesco cauliflower thrives in well-drained, fertile soil that is rich in organic matter. The ideal soil pH is between 6.5 and 7.0. Before planting, amend your soil with compost, well-rotted manure, or other organic materials to improve drainage, fertility, and water retention. A soil test can help you determine the specific nutrient needs of your soil and guide your fertilization strategy.
Q: How much sun does Romanesco cauliflower need?
A: Romanesco cauliflower requires at least 6 hours of direct sunlight per day. Choose a planting location that receives ample sunlight throughout the growing season. Insufficient sunlight can lead to stunted growth and poor head development.
Q: When is the best time to harvest Romanesco cauliflower?
A: Romanesco cauliflower is typically ready to harvest 75-85 days after transplanting. The head should be firm, compact, and have a vibrant green color. The individual florets should be tightly packed together. Harvest the head when it reaches the desired size, typically 6-8 inches in diameter. Use a sharp knife to cut the head from the plant, leaving a few leaves attached.
Q: Can I grow Romanesco cauliflower in containers?
A: Yes, you can grow Romanesco cauliflower in containers, but you’ll need to choose a large container (at least 15 gallons) to accommodate the plant’s root system. Use a high-quality potting mix that is well-draining and rich in organic matter. Water regularly and fertilize every 2-3 weeks with a balanced fertilizer. Container-grown Romanesco cauliflower may require more frequent watering and fertilization than plants grown in the ground.
Q: Are there any companion plants that are particularly beneficial for Romanesco cauliflower?
A: Yes, several companion plants can benefit Romanesco cauliflower. These include:
* Marigolds: These flowers repel many common pests, such as nematodes and aphids.
* Nasturtiums: These edible flowers attract beneficial insects, such as ladybugs and hoverflies, which prey on aphids.
* Dill: This herb attracts beneficial insects and can also help deter cabbage moths.
* Rosemary: This herb repels cabbage moths and other pests.
* Garlic and Onions: These alliums can help deter pests and diseases.
Q: Can I save seeds from my Romanesco cauliflower?
A: Saving seeds from Romanesco cauliflower is possible, but it requires a bit more effort than saving seeds from some other vegetables. Romanesco cauliflower is a biennial plant, meaning it takes two years to complete its life cycle and produce seeds. You’ll need to overwinter the plant and allow it to flower and produce seeds in the second year. Be aware that Romanesco cauliflower can cross-pollinate with other members of the Brassica family, so if you’re saving seeds, you’ll need to isolate your plants to prevent cross-pollination.
Q: What are some creative ways to use Romanesco cauliflower in cooking?
A: Beyond the usual roasting and steaming, Romanesco cauliflower is incredibly versatile. Try these ideas:
* Romanesco Cauliflower Rice: Pulse raw Romanesco florets in a food processor until they resemble rice. Sauté with your favorite vegetables and seasonings for a healthy and delicious side dish.
* Romanesco Cauliflower Pizza Crust: Combine riced Romanesco with cheese, eggs, and seasonings to create a gluten-free pizza crust.
* Romanesco Cauliflower Soup: Blend cooked Romanesco with broth, cream, and spices for a creamy and comforting soup.
* Romanesco Cauliflower Fritters: Grate raw Romanesco and combine it with flour, eggs, and seasonings. Fry until golden brown for a crispy and flavorful appetizer.
* Romanesco Cauliflower Salad: Blanch Romanesco florets and toss them with a vinaigrette dressing, nuts, and dried fruit for a refreshing and colorful salad.

Leave a Comment