

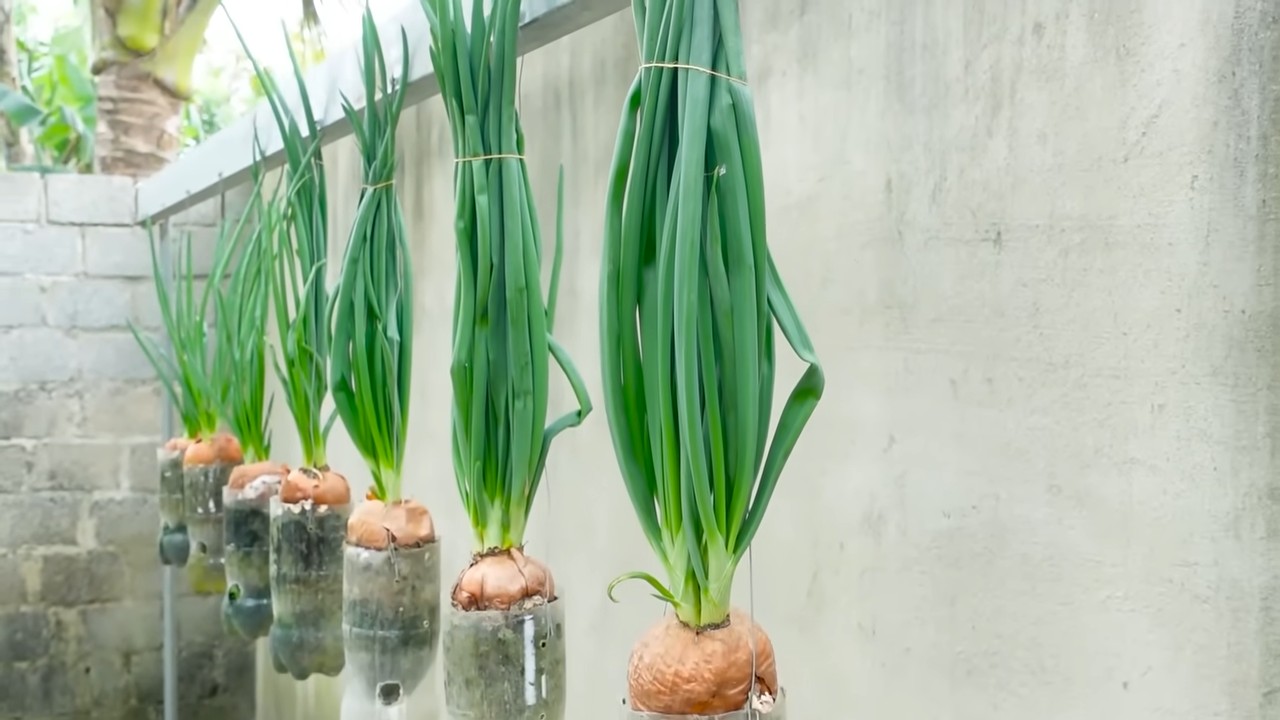
Growing Onions in Plastic Bottles: Sounds a little crazy, right? But trust me, this ingenious DIY trick is about to revolutionize your home gardening game! Forget sprawling garden beds and back-breaking weeding. We’re talking about maximizing your yield in the smallest of spaces, all while recycling those pesky plastic bottles that seem to multiply overnight.
For centuries, humans have cultivated onions, from the fertile crescent to bustling city gardens. Their pungent flavor has seasoned countless dishes, and their medicinal properties have been lauded for generations. But let’s face it, traditional onion farming can be a bit of a chore. That’s where this clever hack comes in!
Imagine fresh, flavorful onions readily available right outside your kitchen door, even if you live in an apartment. No more trips to the grocery store for that one missing ingredient! This method of growing onions in plastic bottles is perfect for urban dwellers, beginner gardeners, or anyone looking to add a touch of green to their lives. It’s sustainable, space-saving, and surprisingly effective. I’m excited to show you how easy it is to transform those discarded bottles into mini onion farms. Let’s get started and unlock the secrets to a bountiful harvest, one bottle at a time!
Growing Onions in Plastic Bottles: A DIY Garden Project for Everyone
Hello, garden friends! Have you ever wondered if there’s an easy and space-saving way to grow onions, even if you don’t have a large garden? I have the answer: onions in plastic bottles! It’s a super simple DIY project that’s not only fun but also stocks up your kitchen supplies. Let’s get started together!
What You Need: The Materials List
Before we begin, make sure you have everything on hand. This will save time and frustration!
- Plastic bottles: 1.5-liter or 2-liter bottles work best. The bigger, the better, but make sure they are stable.
- Soil: High-quality potting soil is ideal. It should be loose and nutrient-rich.
- Onions: Either small onion sets or onions that have already started to sprout. The latter are perfect for saving them from being thrown away!
- Knife or scissors: For cutting the plastic bottles.
- Drill or nail: For drainage.
- Watering can: For watering.
- Optional: Compost or organic fertilizer for an extra nutrient boost.
- Optional: Small stones or gravel for drainage.
The Preparation: Cutting Bottles and Creating Drainage
This step is important to ensure your onions can grow well later.
- Clean the bottles: First, you should clean the plastic bottles thoroughly. Remove all labels and residue. A little dish soap will help.
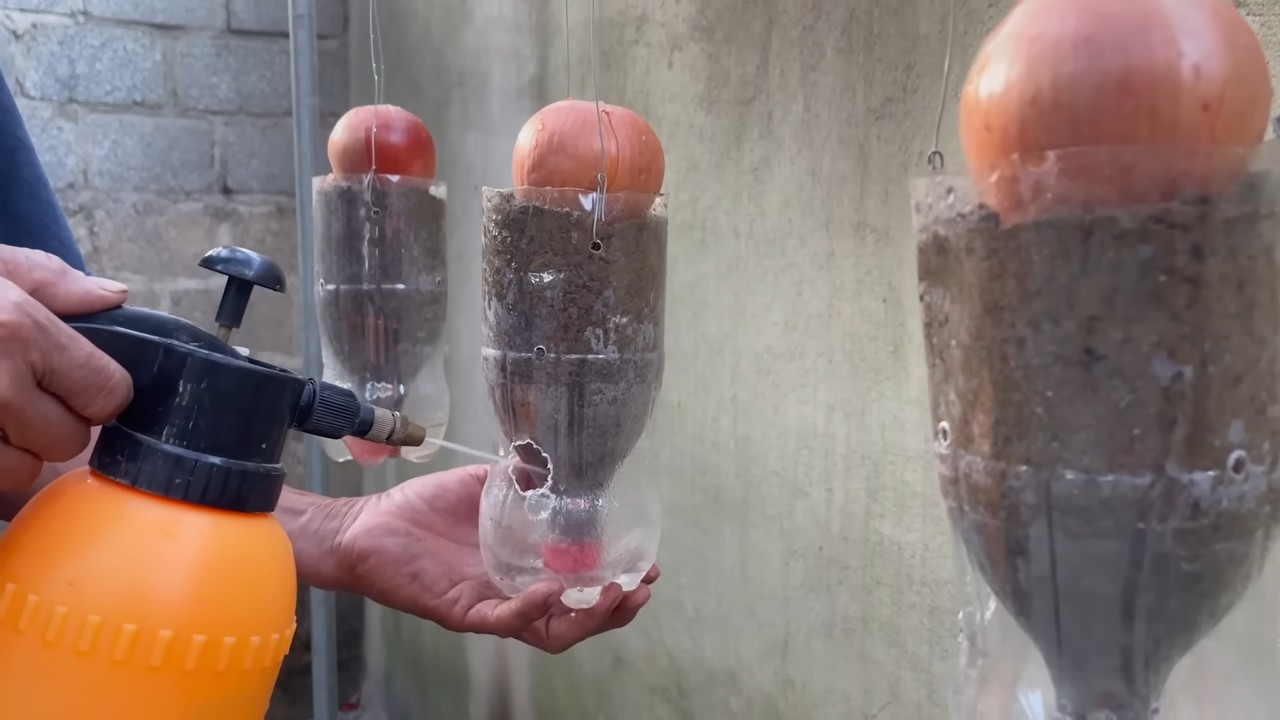
- Cut the bottles: Now for the exciting part! Cut the bottles about 10-15 cm from the bottom. You can either throw away the top part or use it later as a small funnel for watering.
- Drill drainage holes: To allow water to drain well and prevent your onions from sitting in water, drill several holes in the bottom of the bottle with a drill or nail. Make sure the holes are not too big, so the soil doesn’t fall out.
- Add a drainage layer (optional): For even better drainage, you can place a layer of small stones or gravel at the bottom of the bottle before adding the soil.
Planting: Getting the Onions into the Soil
Now let’s get down to it!
- Fill with soil: Fill the plastic bottles with soil. Leave about 2-3 cm of space to the rim.
- Plant the onions: Gently press the onions into the soil. Make sure the tip of the onions is still peeking out of the soil. The distance between the onions should be about 5-7 cm, so they have enough space to grow.
- Watering: Water the onions thoroughly after planting. The soil should be well-moistened, but not standing in water.
The Care: Watering, Fertilizing, and Observing
To ensure your onions thrive, proper care is crucial.
- Watering: Water the onions regularly, but not too much. The soil should always be slightly moist. Avoid waterlogging, as this can lead to rot.
- Fertilizing (optional): If you wish, you can regularly fertilize your onions with compost or organic fertilizer. This promotes growth and the harvest. Be sure to follow the fertilizer’s dosage instructions.
- Location: Place the plastic bottles in a sunny location. Onions love the sun! A south-facing window or a sunny balcony is ideal.
- Observing: Observe your onions regularly. Watch for pests or diseases. If you notice anything unusual, you should act quickly.
- Rotating: Rotate the bottles regularly so that all sides of the onions get even sun.
The Harvest: When the Onions are Ripe
The moment you’ve been waiting for!
- Harvest time: The onions are ready to harvest when the foliage turns yellow and flops over. This is a sign that the onions have put their energy into the bulb.
- Harvesting: Gently pull the onions out of the soil. If they don’t come out easily, you can loosen the soil a bit.
- Drying: Let the harvested onions dry for a few days in a dry and airy place. This extends their shelf life.
- Storing: Store the dried onions in a cool and dark place. They will keep for several months.
Additional Tips and Tricks: For Even More Success
Here are a few more tips to help you get the most out of your onion garden in plastic bottles:
Share: Share your experiences and successes with other garden friends. This way you can learn from each other and inspire one another.
Different varieties: Try different onion varieties. There are red, yellow, and white onions. Each variety has its own taste and characteristics.
Cold frame: If you want to start growing early in the year, you can place the plastic bottles in a small cold frame. This protects the onions from frost and allows for an earlier harvest.
Pests: Watch out for pests like onion flies or thrips. In case of an infestation, you can use natural pesticides.
Sustainability: Use recycled plastic bottles to do your part for sustainability.
Labeling: Label the plastic bottles with the planting date and onion variety. This helps you keep track.
Vertical gardens: Attach the plastic bottles to a wall or fence to create a vertical garden. This saves space and looks great.
Combination with other plants: Plant other plants like carrots or lettuce next to the onions. These plants benefit from each other and protect each other from pests.
Regular repotting: If the onions get too big for the plastic bottles, you can repot them into larger containers.
Improve soil quality: Add compost or organic fertilizer to the soil to improve its quality and promote onion growth.
Mulching: Cover the soil around the onions with mulch to retain moisture and prevent weed growth.
Growing from seed: You can also grow onions from seed. This takes longer but is a cost-effective way to grow many onions.
Use the onion greens: Cut the onion greens regularly to promote the growth of the bulbs. The greens can be used in the kitchen.
Experiment: Try different growing methods and fertilizers to find out what works best for your onions.
Document: Keep a garden journal where you record your experiences and observations. This will help you improve your growing methods over time.
Conclusion
So, there you have it! Growing onions in plastic bottles isn’t just a quirky gardening experiment; it’s a genuinely effective and space-saving method that can bring fresh, flavorful onions right to your windowsill or balcony. We’ve explored the step-by-step process, from preparing your bottles and soil to planting and nurturing your onion sets. But why is this DIY trick a must-try?
Firstly, it’s incredibly accessible. Most of us have plastic bottles readily available, turning what would otherwise be waste into a valuable resource. This makes it an eco-friendly choice, reducing your environmental footprint while simultaneously providing you with delicious onions. Secondly, it’s perfect for those with limited space. Whether you live in an apartment with a small balcony or simply want to maximize your garden’s yield, growing onions vertically in bottles allows you to cultivate a significant number of plants in a compact area.
Beyond the practical benefits, there’s also the sheer joy of watching your onions grow from tiny sets to mature bulbs. It’s a rewarding experience that connects you to the natural world, even in the heart of the city. Plus, the visual appeal of rows of green onion tops sprouting from colorful plastic bottles adds a unique and charming touch to your home.
Now, let’s talk about variations. While we’ve focused on using onion sets, you can also experiment with growing onions from seed. This will require a bit more patience, as it takes longer for the onions to mature, but it can be a cost-effective way to grow a larger quantity. Another variation is to try different types of onions. Red onions, yellow onions, and even shallots can all be successfully grown in plastic bottles. Just be sure to adjust your watering and fertilization schedule accordingly, as different varieties may have slightly different needs.
Consider adding companion plants to your bottle garden. Herbs like basil, thyme, and rosemary can thrive alongside your onions, attracting beneficial insects and adding even more flavor to your culinary creations. You can even plant flowers like marigolds to deter pests and add a splash of color.
Don’t be afraid to get creative with your bottle design. Paint them, decorate them with stencils, or even create a vertical garden wall using multiple bottles. The possibilities are endless!
Ultimately, the success of this method hinges on consistent care and attention. Regular watering, proper fertilization, and protection from pests are all crucial for healthy onion growth. But with a little effort, you’ll be rewarded with a bountiful harvest of fresh, flavorful onions that you can use in all your favorite dishes.
So, what are you waiting for? Gather your plastic bottles, prepare your soil, and get ready to embark on this exciting gardening adventure. We encourage you to try this DIY trick and experience the satisfaction of growing your own onions. And most importantly, don’t forget to share your experiences with us! Post photos of your bottle gardens, share your tips and tricks, and let us know how this method has worked for you. We can’t wait to see your creations and learn from your experiences. Happy growing! Remember, mastering the art of growing onions in plastic bottles is easier than you think, and the rewards are well worth the effort.
FAQ
What kind of plastic bottles are best for growing onions?
The ideal plastic bottles are those that are sturdy and can hold a good amount of soil. Two-liter soda bottles or larger water bottles work well. Make sure to thoroughly clean the bottles before using them to remove any residue. Avoid using bottles that have contained harmful chemicals. Clear or translucent bottles are preferable as they allow you to monitor the soil moisture levels.
How do I prepare the plastic bottles for planting?
First, thoroughly clean the bottles with soap and water. Then, cut off the top portion of the bottle, leaving enough space for the onion to grow. Drill or poke drainage holes in the bottom of the bottle to prevent waterlogging. You can also create a self-watering system by inverting the cut-off top portion of the bottle and placing it inside the bottom portion, with the bottle cap on. This will create a reservoir for water.
What type of soil should I use for growing onions in plastic bottles?
Use a well-draining potting mix that is rich in organic matter. A mixture of compost, peat moss, and perlite is a good option. Avoid using garden soil, as it can be too heavy and may not drain well in a container. You can also add slow-release fertilizer to the soil to provide nutrients to the onions.
How often should I water my onions grown in plastic bottles?
Water your onions regularly, keeping the soil consistently moist but not waterlogged. Check the soil moisture levels by sticking your finger into the soil. If the top inch feels dry, it’s time to water. Water more frequently during hot, dry weather. Avoid getting the foliage wet, as this can promote fungal diseases.
How much sunlight do onions need when grown in plastic bottles?
Onions need at least 6-8 hours of sunlight per day to thrive. Place your plastic bottle gardens in a sunny location, such as a south-facing window or balcony. If you don’t have enough natural sunlight, you can supplement with grow lights.
How do I fertilize my onions grown in plastic bottles?
Fertilize your onions every 2-3 weeks with a balanced liquid fertilizer. Follow the instructions on the fertilizer label. You can also add compost tea to the soil to provide additional nutrients. Avoid over-fertilizing, as this can burn the roots.
How do I protect my onions from pests and diseases?
Inspect your onions regularly for pests and diseases. Common pests include aphids, onion maggots, and thrips. You can control these pests with insecticidal soap or neem oil. Common diseases include onion rot and downy mildew. Prevent these diseases by providing good air circulation and avoiding overwatering.
When are the onions ready to harvest?
Onions are typically ready to harvest when the tops start to turn yellow and fall over. You can also check the size of the bulbs. If they are large enough for your liking, you can harvest them. To harvest, gently pull the onions from the soil.
Can I grow different types of onions in plastic bottles?
Yes, you can grow different types of onions in plastic bottles, including red onions, yellow onions, white onions, and shallots. Just be sure to choose varieties that are suitable for container gardening.
Can I reuse the plastic bottles for growing onions again?
Yes, you can reuse the plastic bottles for growing onions again. However, it’s important to thoroughly clean the bottles before reusing them to remove any soil or debris. You may also want to disinfect the bottles with a bleach solution to kill any pathogens.
What are some common problems when growing onions in plastic bottles and how can I fix them?
Some common problems include yellowing leaves (often due to nutrient deficiency), stunted growth (lack of sunlight or water), and pest infestations. Address nutrient deficiencies with fertilizer, ensure adequate sunlight and water, and treat pests with appropriate organic solutions.
Can I grow onions indoors in plastic bottles year-round?
Yes, with sufficient light (natural or artificial), you can grow onions indoors year-round. Ensure proper ventilation and temperature control for optimal growth.
How do I prevent my plastic bottle onion garden from tipping over?
Use larger, more stable bottles or place the bottles inside a crate or container to provide additional support. You can also weigh down the bottom of the bottles with rocks or gravel.
What are some companion plants that I can grow with onions in plastic bottles?
Good companion plants for onions include carrots, chamomile, marigolds, and rosemary. These plants can help deter pests and improve the overall health of your onion plants.
How do I store my harvested onions?
After harvesting, cure the onions by laying them out in a dry, well-ventilated area for a week or two. Once the necks are dry and the outer skins are papery, you can store them in a cool, dry place for several months.
Leave a Comment