

Growing mushrooms in plastic bottles might sound like something out of a sci-fi movie, but trust me, it’s a surprisingly simple and rewarding DIY project that anyone can tackle! Forget those expensive gourmet mushrooms at the grocery store – imagine harvesting your own delicious, earthy fungi right from your kitchen counter.
Mushroom cultivation, in general, has a rich history, dating back centuries in various cultures. From ancient Chinese medicinal practices to European culinary traditions, mushrooms have always held a special place. Now, we’re taking that ancient knowledge and adapting it for the modern home gardener, using readily available materials like plastic bottles.
Why should you try this? Well, for starters, it’s incredibly space-saving, perfect for apartment dwellers or anyone with limited garden space. Plus, it’s a fantastic way to recycle those plastic bottles that might otherwise end up in a landfill. But the real magic lies in the satisfaction of nurturing life and harvesting your own food. Growing mushrooms in plastic bottles is not only a fun and educational experience, but it also provides you with a sustainable source of fresh, healthy food. I’m excited to show you how easy it is to get started!
Mushroom Cultivation in a Plastic Bottle Garden: Your DIY Guide for Home
Hello mushroom friends! Have you ever wondered how you can grow your own delicious mushrooms at home without needing a lot of space or expensive equipment? Then you’ve come to the right place! I’ll show you how to create your own little mushroom garden with simple plastic bottles and a little patience. It’s easier than you think and incredibly fun!
What you need: The Ingredients for Your Mushroom-Growing Adventure
Before we get started, let’s make sure we have everything we need. Here is a list of the materials and tools you’ll need for this DIY project:
- Plastic bottles: 1.5- or 2-liter bottles are best. The more you have, the more mushrooms you can grow! Make sure they are clean and dry.
- Mushroom spawn: This is the heart of our project! You can buy mushroom spawn online or in garden centers. Popular varieties for beginners are oyster mushrooms (Pleurotus ostreatus).
- Substrate: This is the nutrient medium for your mushrooms. Straw, sawdust, or coffee grounds are good options. I personally prefer straw because it is easy to get and process.
- Lime: If you use straw, you will need lime to adjust the pH and sterilize the straw.
- Water: Clean water is essential for hydrating the substrate.
- Spray bottle: For misting the mushrooms during growth.
- Drill or knife: For creating holes in the plastic bottles.
- Gloves: To avoid contamination.
- Large pot or bucket: For pasteurizing the substrate.
- Thermometer: To monitor the temperature of the substrate during pasteurization.
- Plastic wrap or lid: To cover the bottles during the incubation phase.
- Optional: Tape to cover the holes in the bottles if necessary.
Phase 1: Preparing the Substrate – The Foundation for Your Mushrooms
Preparing the substrate is an important step to ensure that your mushrooms grow healthy and strong. Here’s how to prepare straw as a substrate:
- Chop the straw: Cut or shred the straw into small pieces about 5-10 cm long. This facilitates pasteurization and colonization by the mushroom spawn.
- Pasteurize the straw: Fill a large pot or bucket with water and add lime (about 1 tablespoon per liter of water). The lime helps to raise the pH and kill unwanted microorganisms.
- Soak the straw: Put the chopped straw into the lime water and make sure it is completely covered. Let the straw soak for at least 24 hours.
- Heat the straw: After soaking, heat the straw in the lime water to about 65-70°C. Maintain this temperature for about 1-2 hours. This kills most unwanted microorganisms without destroying the nutrients in the straw. A thermometer is very helpful here!
- Let the straw cool: After heating, let the straw cool down until you can touch it without burning yourself. This can take a few hours.
- Drain the straw: Squeeze the excess water out of the straw until it is moist but not dripping wet. This is important so that the mushroom spawn can grow well.
Phase 2: Preparing the Plastic Bottles – The Home for Your Mushrooms
Now that our substrate is prepared, let’s take care of the plastic bottles.
- Drill holes: Drill or cut holes in the plastic bottles. The holes should be about 1-2 cm in size and spaced about 5-10 cm apart. These holes serve as ventilation and as exit points for the mushrooms. I recommend drilling the holes at a slight upward angle so that no water runs in.
- Clean the bottles: Make sure the bottles are clean and dry before you start filling them.
Phase 3: Filling and Inoculating the Bottles – The Starting Shot for Mushroom Growth
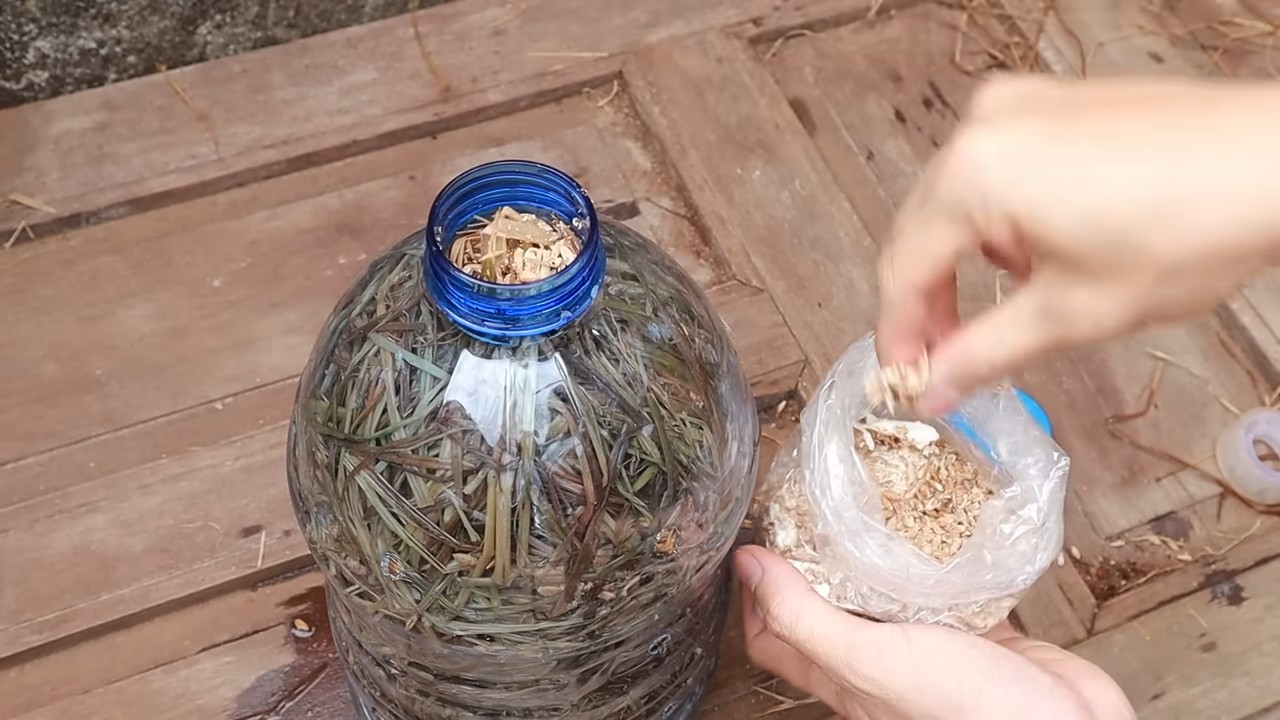
Now for the exciting part: we fill the bottles with the substrate and the mushroom spawn!
- Fill in layers: Fill the plastic bottles layer by layer with the pasteurized straw and the mushroom spawn. Start with a layer of straw, then a layer of mushroom spawn, then straw again, and so on. Make sure the mushroom spawn is well distributed in the straw. I recommend using about 5-10% of the substrate weight in mushroom spawn.
- Top layer: The top layer should consist of straw.
- Seal the bottles: Close the bottles with a lid or plastic wrap. This helps to retain moisture and prevent contamination. You can secure the wrap with a rubber band or tape.
Phase 4: Incubation – Patience is Required!
The incubation phase is crucial for the success of your mushroom cultivation. Here, the mushroom spawn must colonize the substrate.
- Dark and warm place: Place the filled bottles in a dark and warm place (about 20-25°C). A basement, a garage, or a closet is ideal.
- Regular checks: Check the bottles regularly for mold or other contamination. If you discover mold, remove the affected bottle immediately to avoid endangering the others.
- Be patient: The incubation period usually lasts 2-3 weeks. During this time, the mycelium (the fungal network) will colonize the straw. You will see white threads spreading through the straw.
Phase 5: Fruiting – The Mushrooms are Coming!
When the straw is completely colonized with mycelium, it’s time for fruiting!
- Light and moisture: Place the bottles in a brighter place, but avoid direct sunlight. The mushrooms need light to grow, but too much sun can dry them out.
- Increase humidity: Increase the humidity by spraying the bottles regularly with water. You can also place a plastic bag over the bottles to retain moisture. However, make sure that the bag is not directly on the mushrooms and that there is enough air circulation to prevent mold.
- Ventilation: Ensure sufficient ventilation by opening the plastic bag regularly or uncovering the holes in the bottles.
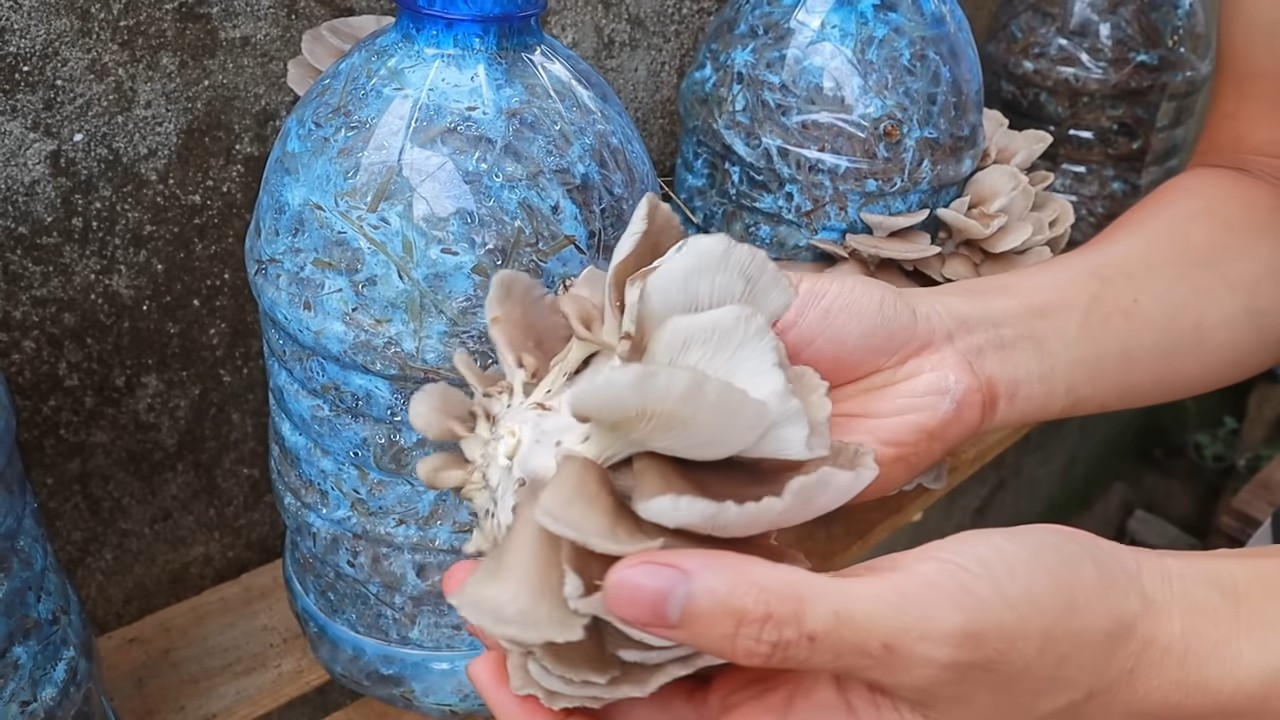
- Harvest mushrooms: After a few days, the first mushrooms will grow out of the holes. Harvest the mushrooms when they have reached their full size, but before they release spores. You can simply twist them off or cut them with a knife.
Phase 6: After the Harvest – On to New Mushrooms!
After the first harvest, you can usually achieve further harvests.
Renewed fruiting: After the resting phase, the mushrooms should start to grow again.
Resting phase: Give the bottles a rest period of about a week after the harvest. Continue to spray them regularly with water.
Conclusion
So, there you have it! Transforming humble plastic bottles into thriving mushroom farms is not just a fun project; it’s a sustainable, cost-effective, and incredibly rewarding way to enjoy fresh, delicious mushrooms right from your own home. We’ve walked you through the process, highlighting the simplicity and adaptability of this DIY method. Forget expensive kits and complicated setups. With a few readily available materials and a little patience, you can unlock the magic of mycology and cultivate your own supply of gourmet fungi.
This method is a must-try for several compelling reasons. First, it’s an excellent way to recycle plastic bottles, reducing waste and contributing to a more environmentally friendly lifestyle. Second, it’s surprisingly affordable. The initial investment is minimal, and once your mushroom culture is established, you’ll be harvesting fresh mushrooms for weeks, if not months, with minimal ongoing costs. Third, it’s incredibly satisfying. There’s something truly special about nurturing life from scratch and watching your tiny spores transform into plump, flavorful mushrooms. Finally, the taste! Homegrown mushrooms, bursting with freshness, are simply superior to anything you can buy in the store.
But the beauty of this DIY project lies in its versatility. Feel free to experiment with different mushroom varieties. Oyster mushrooms are a great starting point due to their resilience and rapid growth, but you can also try shiitake, lion’s mane, or even wine cap mushrooms once you’ve gained some experience. Consider adding different substrates to your mix. Coffee grounds, straw, and even cardboard can be incorporated to provide additional nutrients and support the growth of your fungi.
Don’t be afraid to get creative with your bottle design! You can paint them, decorate them, or even create a vertical mushroom garden by stacking multiple bottles on top of each other. The possibilities are endless.
We strongly encourage you to give this DIY mushroom growing trick a try. It’s a fantastic project for beginners and experienced gardeners alike. It’s a great way to learn about the fascinating world of fungi, reduce your environmental impact, and enjoy a delicious and healthy food source.
And most importantly, we want to hear about your experiences! Share your successes, your challenges, and your creative variations with us. Post pictures of your mushroom farms on social media using #DIYBottleMushrooms and tag us so we can see your amazing creations. Let’s build a community of mushroom enthusiasts and inspire others to embrace the joy of homegrown fungi. Your insights and experiences will help others learn and grow, and together, we can make the world a more sustainable and delicious place, one mushroom at a time. So, grab those plastic bottles, gather your supplies, and get ready to embark on a rewarding and flavorful adventure! Happy growing!
Frequently Asked Questions (FAQ)
What type of mushrooms are best for growing in plastic bottles?
Oyster mushrooms are generally considered the easiest and most forgiving for beginners. They are fast-growing, relatively resistant to contamination, and thrive on a variety of substrates. Other good options include shiitake mushrooms (though they require more patience and a hardwood-based substrate), and lion’s mane mushrooms, known for their unique texture and health benefits. Experimenting with different varieties is part of the fun, but starting with oyster mushrooms is highly recommended.
What is the best substrate to use for growing mushrooms in plastic bottles?
A mixture of pasteurized straw, coffee grounds, and sawdust is a popular and effective substrate. The straw provides bulk and structure, the coffee grounds add nitrogen, and the sawdust provides additional nutrients. You can also use cardboard, but it needs to be shredded into small pieces and thoroughly pasteurized. The key is to ensure the substrate is properly pasteurized to kill off any competing organisms that could hinder mushroom growth.
How do I pasteurize the substrate?
Pasteurization is crucial to eliminate competing molds and bacteria. There are several methods:
* **Hot Water Pasteurization:** Soak the substrate in hot water (around 160-180°F or 71-82°C) for 60-90 minutes. This is a common and effective method.
* **Steam Pasteurization:** Place the substrate in a heat-resistant container and steam it for 60-90 minutes. This method is gentler than hot water pasteurization.
* **Microwave Pasteurization:** For smaller batches, you can microwave the substrate with some water for a few minutes until it reaches a temperature of around 160-180°F (71-82°C). Be careful not to overheat it.
After pasteurization, allow the substrate to cool completely before inoculating it with mushroom spawn.
How do I inoculate the substrate with mushroom spawn?
Once the pasteurized substrate has cooled, mix it thoroughly with the mushroom spawn. The amount of spawn needed will depend on the size of the bottle and the type of mushroom, but a general guideline is to use about 5-10% spawn by volume. Ensure the spawn is evenly distributed throughout the substrate.
Where should I place the inoculated bottles?
The ideal location is a cool, dark, and humid environment. A basement, garage, or even a closet can work well. The temperature should be within the optimal range for the specific mushroom variety you are growing (usually between 60-75°F or 15-24°C). Humidity is crucial, so you may need to mist the bottles regularly or place them in a humidity tent or greenhouse.
How long does it take for mushrooms to grow?
The time it takes for mushrooms to grow varies depending on the variety, the substrate, and the environmental conditions. Oyster mushrooms typically start pinning (forming small mushroom buds) within 1-2 weeks and are ready to harvest within a few days after that. Shiitake mushrooms can take several weeks or even months to fruit. Patience is key!
How do I know when the mushrooms are ready to harvest?
Mushrooms are typically ready to harvest when the caps have fully expanded but before they start to release spores. The edges of the caps may start to curl upwards slightly. Gently twist or cut the mushrooms off at the base of the stem.
How many flushes can I get from a single bottle?
You can usually get multiple flushes (harvests) from a single bottle. After harvesting the first flush, soak the substrate in water for a few hours to rehydrate it. Then, return the bottle to its growing environment and wait for the next flush to appear. You can typically get 2-3 flushes from a single bottle before the substrate is exhausted.
What if my substrate gets contaminated with mold?
Contamination is a common problem in mushroom cultivation. If you see green, black, or other colored molds growing on your substrate, it’s best to discard the affected bottle to prevent the contamination from spreading. Proper pasteurization and maintaining a clean growing environment are crucial for preventing contamination.
Can I use this method to grow mushrooms outdoors?
Yes, you can grow mushrooms in plastic bottles outdoors, but you’ll need to protect them from direct sunlight, excessive rain, and extreme temperatures. A shaded area under a tree or a covered patio can work well. You may also need to provide additional humidity by misting the bottles regularly.
Is growing mushrooms in plastic bottles safe?
Yes, growing edible mushrooms in plastic bottles is generally safe, as long as you follow proper hygiene practices and only consume mushrooms that you have positively identified as edible. Always wash your hands thoroughly before handling the substrate and mushrooms. If you are unsure about the identity of a mushroom, do not eat it.

Leave a Comment