

Growing celery with rocks? Sounds a little unconventional, right? I know, when I first heard about this home gardening trick, I was skeptical too! But trust me, this simple DIY hack can revolutionize your celery-growing game, especially if you’re struggling with leggy, bitter stalks. For centuries, gardeners have sought ways to improve their yields and the quality of their crops. While the exact origin of using rocks for celery cultivation is a bit murky, the principle behind it taps into time-tested methods of blanching and providing support to delicate plants.
Why is this DIY trick so important? Well, let’s face it, store-bought celery often lacks the vibrant flavor and crisp texture we crave. And growing your own can be tricky! Many gardeners struggle with celery that’s too bitter, thin, or simply doesn’t thrive. This is where the rock trick comes in. By strategically placing rocks around your celery plants, you can encourage taller, blanched stalks that are sweeter and more tender. Plus, it’s a super easy and inexpensive way to boost your harvest. So, if you’re ready to unlock the secret to delicious, homegrown celery, keep reading! I’m going to walk you through everything you need to know about growing celery with rocks, step-by-step.
Growing Celery from Kitchen Scraps: A Rock-Solid Guide
Hey there, fellow plant enthusiasts! Ever feel bad about tossing those celery ends after chopping them up for a snack or soup? Well, I’ve got a super cool and easy way to give them a second life – and it involves rocks! That’s right, we’re going to grow celery from kitchen scraps using just water, a container, and some pebbles. It’s a fun project, especially for kids, and a great way to reduce food waste. While you won’t get a full-sized celery stalk right away, you’ll get some fresh celery leaves for flavoring dishes, and eventually, you can transplant it to soil for a bigger harvest. Let’s get started!
What You’ll Need
Before we dive in, let’s gather our supplies. This is a pretty low-key project, so you probably already have most of this stuff lying around.
* Celery Base: The bottom 2-3 inches of a celery stalk, where the stalks are connected. Make sure it’s firm and healthy-looking, not mushy or brown.
* Shallow Container: A bowl, dish, or even a plastic container will work. Just make sure it’s wide enough to accommodate the celery base and some rocks.
* Pebbles or Small Rocks: These are crucial for supporting the celery base and keeping it upright. River rocks, aquarium gravel, or even decorative stones will do the trick.
* Water: Tap water is fine, but filtered water is even better.
* Spray Bottle (Optional): For misting the celery leaves.
* Potting Soil (Optional): If you plan to transplant your celery to soil later.
* Small Pot (Optional): For transplanting.
Step-by-Step Instructions: Celery Regeneration Station!
Okay, let’s get our hands dirty (well, maybe just a little wet!). Here’s how to grow celery from scraps using rocks:
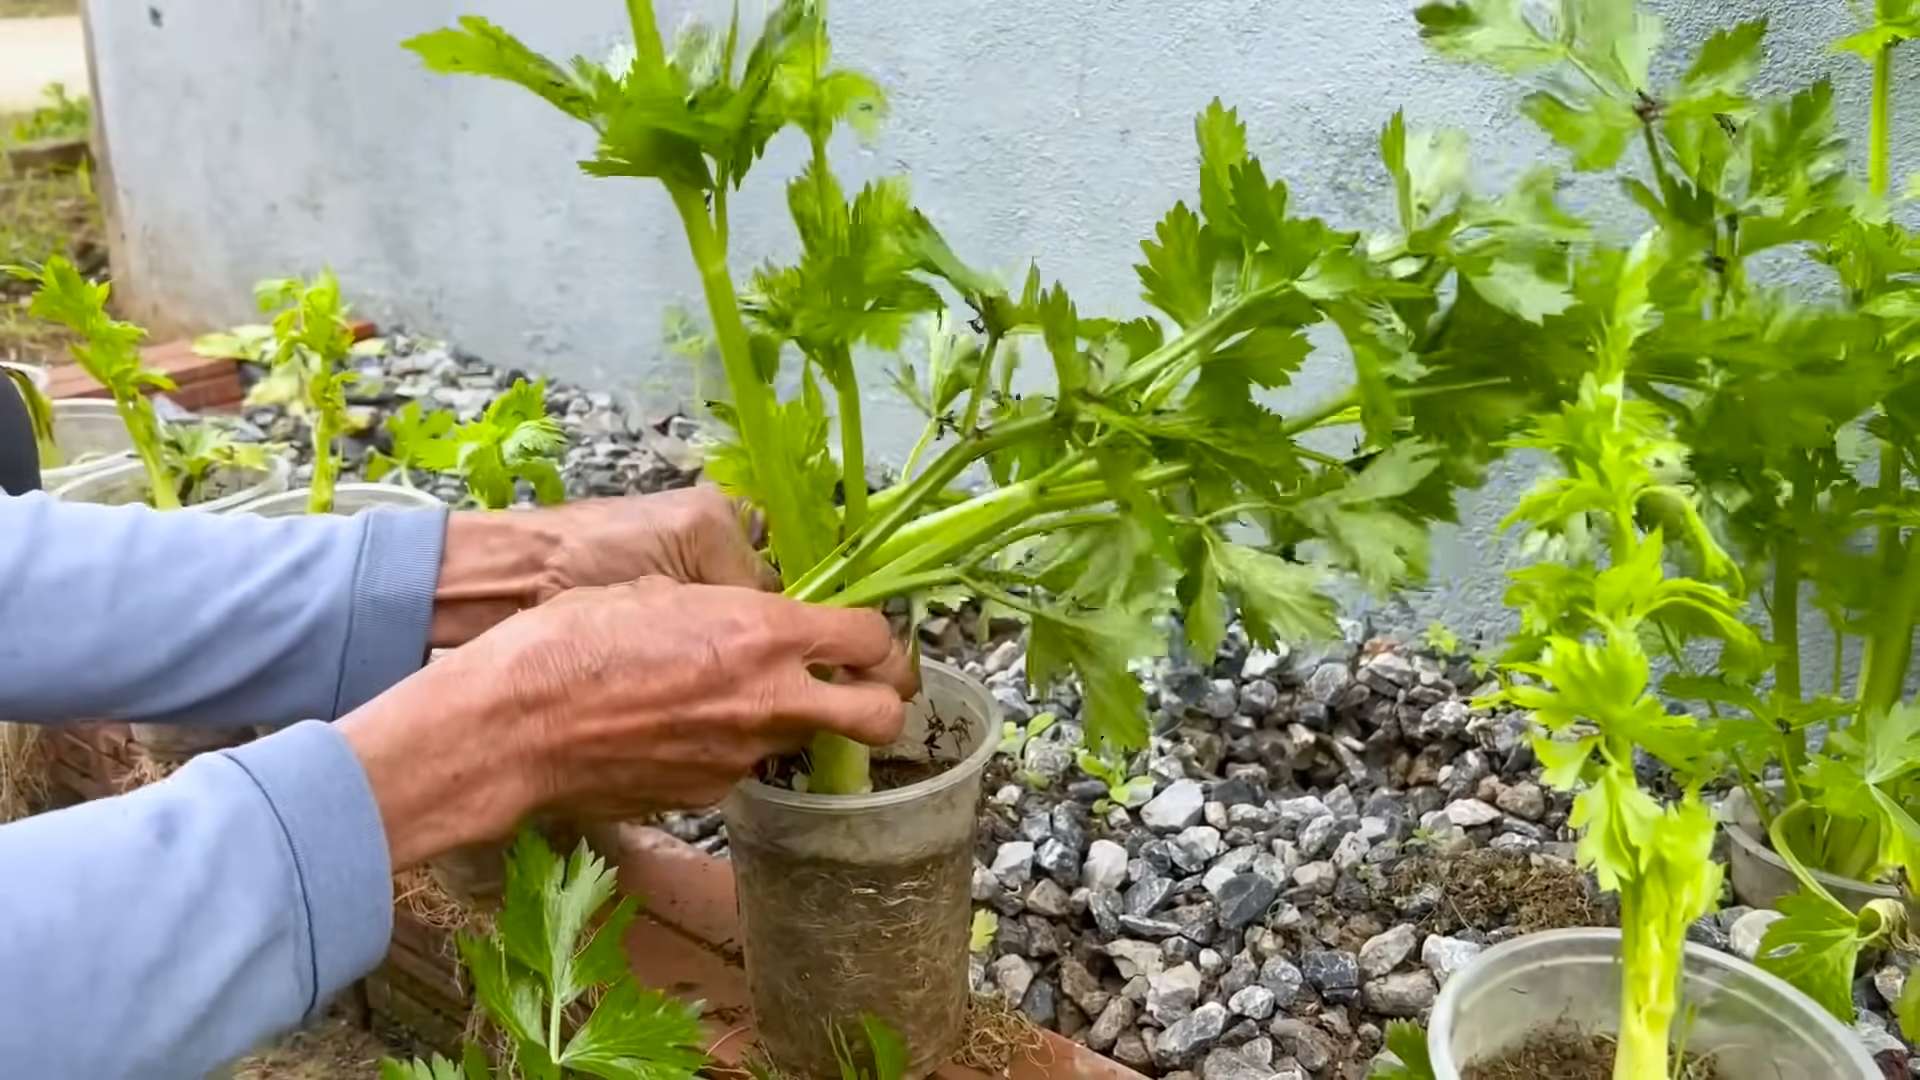
1. Prepare the Celery Base: This is the most important step. Carefully cut off the bottom 2-3 inches of your celery stalk. Try to make a clean cut. Remove any loose or damaged outer stalks. Don’t worry if it looks a little rough around the edges; we’re giving it a fresh start!
2. Arrange the Rocks: Now, let’s set up our rock bed. Place a layer of pebbles or small rocks in the bottom of your container. The rocks should be deep enough to provide a stable base for the celery.
3. Position the Celery: Carefully place the celery base, cut-side up, on top of the rocks. Make sure it’s sitting upright and not tilting to one side. The rocks should help to keep it stable.
4. Add Water: Pour water into the container until it reaches about halfway up the sides of the celery base. You don’t want to completely submerge it, just enough to keep the bottom moist. The rocks will help to wick the water up to the celery.
5. Find the Right Spot: Place your celery regeneration station in a bright, indirect sunlight location. A windowsill is perfect! Avoid direct sunlight, as it can scorch the celery.
6. Water Regularly: Check the water level every day and add more water as needed to keep the bottom of the celery base moist. Don’t let it dry out completely!
7. Change the Water: Every 2-3 days, completely change the water in the container. This will help to prevent bacteria and algae growth.
8. Observe and Wait: Now comes the fun part – watching your celery come back to life! Within a few days, you should start to see new growth emerging from the center of the celery base. These will be small, pale green leaves.
9. Misting (Optional): If you live in a dry climate, you can mist the celery leaves with water every day to help keep them hydrated.
10. Harvesting Leaves: Once the new leaves are a few inches long, you can start harvesting them. Simply snip off the leaves you need with scissors. This will encourage more growth.
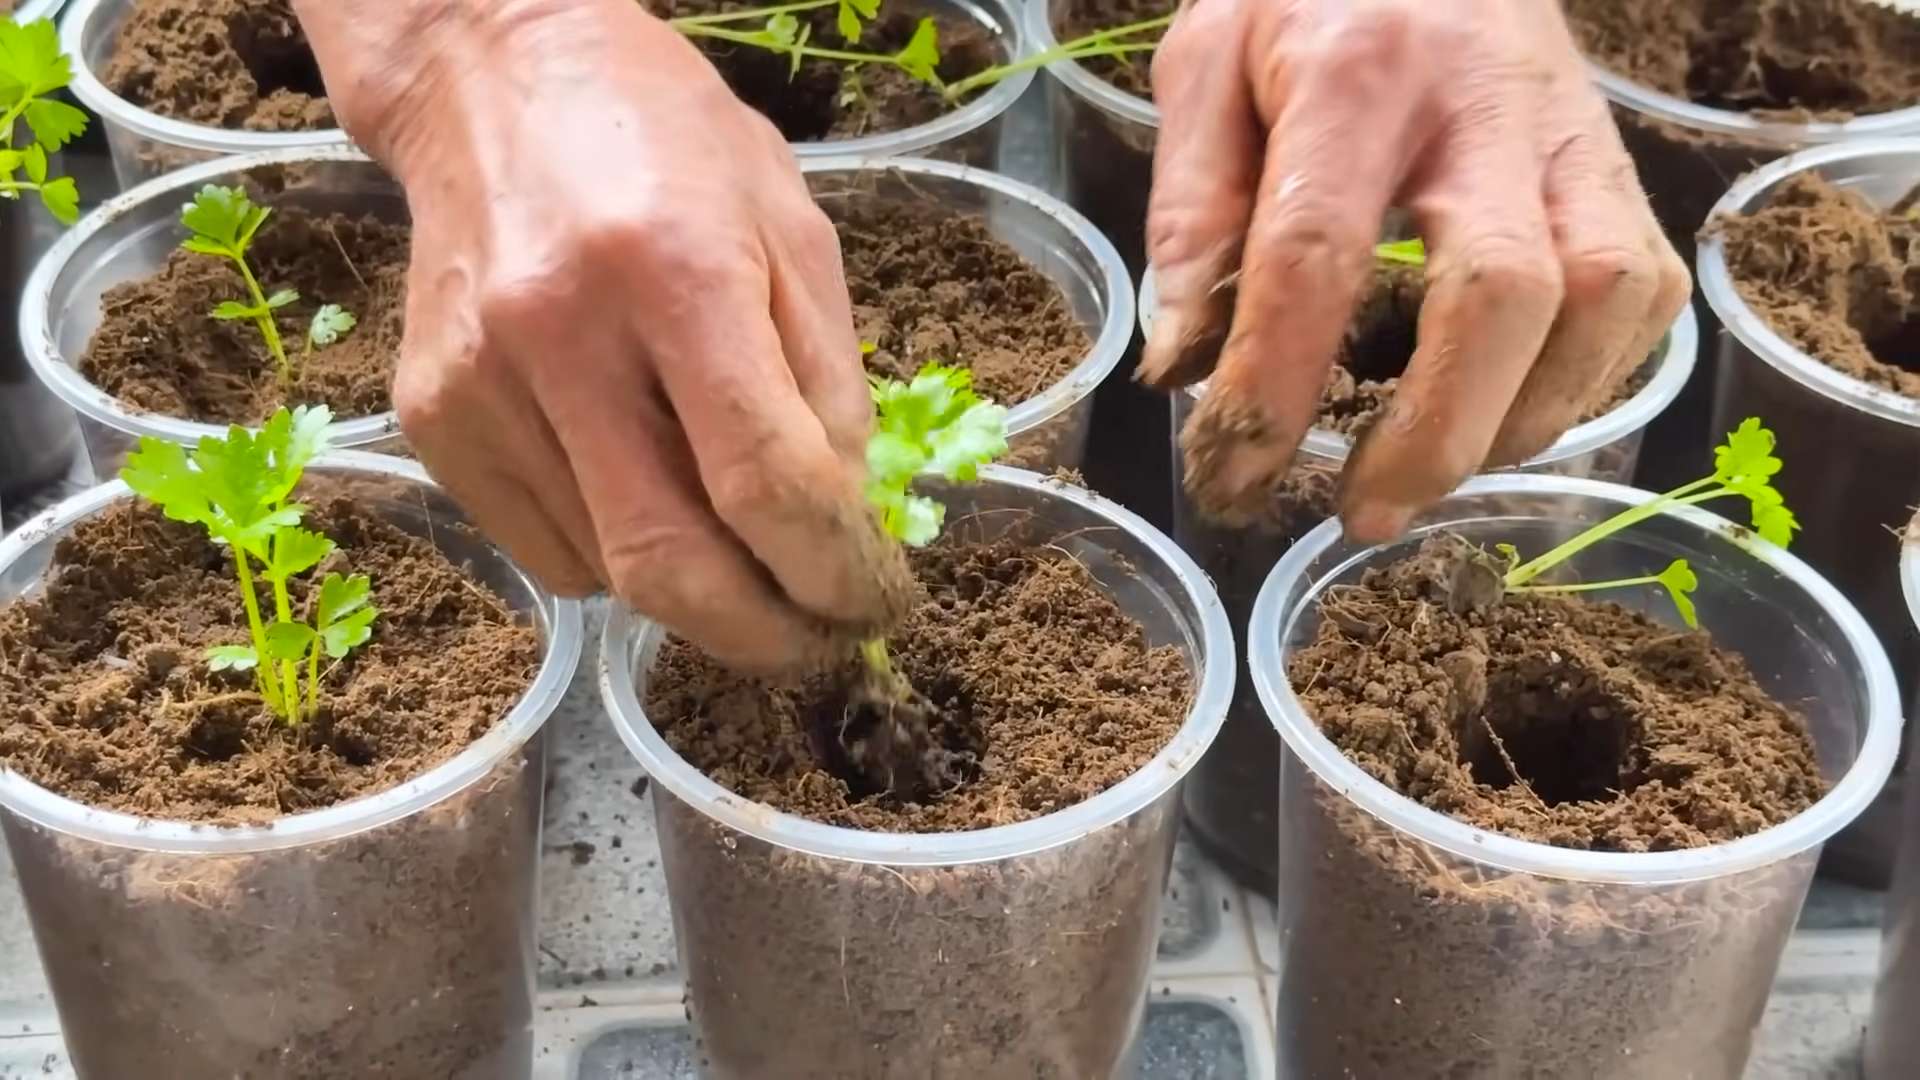
Transplanting to Soil (Optional)
If you want to grow a full-sized celery stalk, you’ll eventually need to transplant your celery to soil. Here’s how:
1. Wait for Root Growth: Before transplanting, wait until your celery has developed a good root system. You should see roots growing from the bottom of the celery base. This usually takes about 1-2 weeks.
2. Prepare the Pot: Fill a small pot with well-draining potting soil. Make a hole in the center of the soil that’s large enough to accommodate the celery base and its roots.
3. Carefully Remove the Celery: Gently remove the celery base from the water and rocks. Be careful not to damage the roots.
4. Plant the Celery: Place the celery base in the hole in the soil and gently cover the roots with soil. Press the soil down lightly to secure the celery.
5. Water Thoroughly: Water the soil thoroughly after planting.
6. Provide Sunlight: Place the pot in a sunny location. Celery needs at least 6 hours of sunlight per day.
7. Water Regularly: Keep the soil moist, but not soggy. Water when the top inch of soil feels dry to the touch.
8. Fertilize (Optional): You can fertilize your celery every few weeks with a balanced fertilizer.
9. Watch it Grow! With proper care, your celery will continue to grow and eventually produce a full-sized stalk.
Troubleshooting Tips
Even with the best intentions, things don’t always go as planned. Here are a few common issues you might encounter and how to fix them:
* Celery Base is Rotting: This is usually caused by overwatering or poor water quality. Make sure you’re changing the water regularly and not letting the celery base sit in too much water. If the base is already rotting, it might be too late to save it. Start with a fresh celery base.
* No New Growth: If you’re not seeing any new growth after a week or two, it could be due to a few factors. Make sure the celery base is getting enough sunlight and water. Also, make sure the water is clean and fresh. Sometimes, the celery base is simply not viable. Try starting with a different one.
* Leaves are Turning Yellow: This could be a sign of overwatering or underwatering. Check the soil moisture and adjust your watering accordingly. Yellowing leaves can also be a sign of nutrient deficiency. Try fertilizing your celery with a balanced fertilizer.
* Pests: Celery can be susceptible to pests like aphids and spider mites. Inspect your celery regularly for signs of pests. If you find any, you can try spraying them with insecticidal soap or neem oil.
Why Rocks? The Science Behind the Stone
You might be wondering, why use rocks at all? Well, they serve a few important purposes:
* Support: The rocks provide a stable base for the celery, preventing it from tipping over.
* Drainage: The rocks allow for good drainage, preventing the celery base from sitting in too much water and rotting.
* Aeration: The rocks create air pockets around the celery base, which helps to promote root growth.
* Aesthetics: Let’s be honest, it looks pretty cool!
Beyond the Basics: Experimenting with Celery
Once you’ve mastered the basics of growing celery from scraps, you can start experimenting with different techniques. Here are a few ideas:
* Different Containers: Try using different types of containers, such as glass jars, terracotta pots, or even recycled plastic bottles.
* Different Rocks: Experiment with different types of rocks, such as river rocks, lava rocks, or even marbles.
* Hydroponics: You can even try growing celery hydroponically, without any soil at all.
* Different Varieties: Try growing different varieties of celery, such as Pascal celery or Chinese celery.
Enjoy Your Homegrown Celery!
Growing celery from kitchen scraps is a fun and rewarding project that anyone can do. It’s a great way to reduce food waste, save money, and enjoy fresh, homegrown celery leaves. So, the next time you’re chopping up celery, don’t throw away the base! Give it a second life and watch it grow. Happy gardening!
Conclusion
So, there you have it! Growing celery with rocks isn’t just a quirky gardening experiment; it’s a surprisingly effective way to coax new life from those celery scraps you’d normally toss in the compost. It’s a testament to the resilience of nature and a fantastic way to reduce food waste while enjoying fresh, homegrown celery.
Why is this DIY trick a must-try? Because it’s incredibly simple, cost-effective, and rewarding. You don’t need a sprawling garden or fancy equipment. Just a celery base, some rocks, water, and a little patience. It’s a fantastic project for beginners, kids, or anyone looking for a low-maintenance gardening activity. Plus, it’s a great conversation starter! Imagine telling your friends you’re growing celery with rocks – they’ll be amazed!
Beyond the basic method, there’s plenty of room for experimentation. Try different types of rocks – river rocks, lava rocks, even decorative glass pebbles. See if different water sources (tap water, filtered water, rainwater) affect growth. You can also experiment with the amount of sunlight your celery receives. Some people find that a brighter location yields faster results, while others prefer a more shaded spot.
Consider adding a diluted liquid fertilizer to the water every couple of weeks once you see significant growth. This will provide your celery with the extra nutrients it needs to thrive. Just be sure to use a balanced fertilizer and follow the instructions carefully to avoid over-fertilizing.
Another variation is to transplant your rock-grown celery into soil once it has developed a strong root system. This will allow it to grow larger and produce more stalks. Choose a well-draining potting mix and a sunny location for your transplanted celery.
But the real magic of this method lies in its simplicity. It’s a reminder that even the smallest scraps can have a second life, and that gardening doesn’t have to be complicated or expensive. It’s about connecting with nature, learning about plant growth, and enjoying the fruits (or, in this case, the stalks) of your labor.
We wholeheartedly encourage you to give this DIY celery growing trick a try. It’s a fun, educational, and sustainable way to add fresh celery to your meals. And most importantly, don’t forget to share your experience! We’d love to hear about your successes, your challenges, and any variations you’ve tried. Post pictures of your rock-grown celery on social media using #RockCelery and tag us so we can see your amazing results. Let’s create a community of rock-celery growers and inspire others to embrace this simple yet effective gardening technique. Happy growing! This method is a great way to get fresh celery.
Frequently Asked Questions (FAQ)
What kind of celery works best for this method?
The best celery for regrowing is fresh, organic celery from the grocery store or farmer’s market. Look for celery with a firm base and healthy-looking stalks. Avoid celery that is wilted, discolored, or has signs of rot. The fresher the celery, the better the chances of successful regrowth. Also, make sure you have a good amount of the base still intact – at least 2-3 inches is ideal.
How long does it take to see new growth?
You should start to see new growth within a week or two. The exact timeframe will depend on factors such as the freshness of the celery, the amount of sunlight it receives, and the temperature. Be patient and consistent with watering, and you’ll eventually see small leaves sprouting from the center of the celery base. If you don’t see any growth after three weeks, it’s possible that the celery base is no longer viable, and you may need to start with a fresh one.
What kind of rocks should I use?
Any type of small to medium-sized rocks will work. River rocks, pebbles, gravel, or even decorative glass stones are all suitable options. The rocks serve to support the celery base and keep it upright in the water. Make sure the rocks are clean before using them. You can wash them with soap and water to remove any dirt or debris. Avoid using rocks that are treated with chemicals or pesticides, as these could harm the celery.
How often should I change the water?
It’s important to change the water every one to two days to prevent the growth of bacteria and algae. Stagnant water can also attract pests and create an unpleasant odor. When changing the water, gently rinse the celery base and the rocks to remove any debris. Use fresh, clean water each time.
What if my celery starts to rot?
If you notice any signs of rot, such as discoloration, mushiness, or a foul odor, remove the affected parts immediately. You can try cutting away the rotten sections and continuing to grow the remaining healthy portion. However, if the rot is extensive, it’s best to discard the celery base and start with a fresh one. To prevent rot, make sure to change the water regularly and avoid overcrowding the container.
Can I grow celery indoors year-round using this method?
Yes, you can grow celery indoors year-round using this method. Celery needs at least 6 hours of sunlight per day, so if you don’t have a sunny window, you may need to supplement with a grow light. Keep the celery in a warm location with a consistent temperature. Avoid placing it near drafts or extreme temperature fluctuations.
How do I transplant the celery to soil?
Once your celery has developed a strong root system and several new stalks, you can transplant it to soil. Choose a pot that is at least 6 inches in diameter and fill it with a well-draining potting mix. Gently remove the celery from the water and rocks, being careful not to damage the roots. Plant the celery in the pot, burying the base up to the point where the stalks begin to grow. Water thoroughly and place the pot in a sunny location.
What kind of soil is best for growing celery?
Celery prefers a rich, well-draining soil with a pH of 6.0 to 6.8. You can use a commercial potting mix or create your own by mixing equal parts of compost, peat moss, and perlite. Amend the soil with organic matter, such as compost or aged manure, to improve its fertility and drainage.
How often should I water the celery after transplanting it to soil?
Water the celery regularly, keeping the soil consistently moist but not waterlogged. Celery needs plenty of water to thrive, especially during hot weather. Check the soil moisture daily and water when the top inch feels dry to the touch. Avoid overwatering, as this can lead to root rot.
Can I eat the celery stalks that grow from the base?
Yes, you can eat the celery stalks that grow from the base. However, they may be smaller and thinner than the stalks you would find on a commercially grown celery plant. The taste may also be slightly different. The stalks are still perfectly safe to eat and can be used in salads, soups, stews, or as a snack.
Will I get a full head of celery from this method?
While you likely won’t get a full, market-sized head of celery, you will get usable stalks. Think of it more as a continuous supply of fresh celery for small-scale use. It’s a great way to add a little bit of fresh celery to your meals without having to buy a whole bunch that might go to waste.
Is this method sustainable?
Absolutely! Growing celery with rocks is a highly sustainable practice. It reduces food waste by giving celery scraps a second life. It also eliminates the need to purchase new celery, which reduces your carbon footprint. By growing your own celery, you’re also avoiding the use of pesticides and herbicides that are often used in commercial agriculture.

Leave a Comment