

Growing celery on rocks for profit? Sounds a bit unconventional, right? But trust me, this simple DIY trick can transform your kitchen scraps into a thriving little business, or at least a constant supply of fresh celery for your family! For centuries, resourceful gardeners have been finding innovative ways to maximize their yields, and this method taps into that same spirit of ingenuity.
Think about it: celery is a staple in so many dishes, from soups and salads to smoothies and snacks. But buying it week after week can add up. That’s where this DIY hack comes in. Instead of tossing those celery ends, we’re going to give them a new lease on life, using just water, rocks, and a little bit of patience. It’s a fantastic way to reduce waste, save money, and enjoy the satisfaction of growing your own food – all while potentially turning a profit!
This isn’t just about saving a few bucks; it’s about connecting with the earth and understanding the magic of propagation. Plus, imagine the bragging rights when you tell your friends you’re growing celery on rocks for profit! So, let’s dive in and discover how you can turn those humble celery scraps into a flourishing garden and maybe even a little extra income.
Growing Celery on Stones: A DIY Project for a Small Budget
Hello dear garden friends! Have you ever wondered if you can simply grow celery on stones? The answer is: Yes, you can! And it’s even easier than you think. Today I’m going to show you how to grow your own celery on stones with a few simple steps and materials you probably already have at home. This is not only a great DIY project, but also a super way to reduce food waste and at the same time get fresh celery for your kitchen. Let’s get started!
What you need:
- Celery stalk: Preferably one that you bought at the supermarket and have cut off the bottom end. Make sure it still looks firm and healthy.
- Flat bowl or plate: Something that is waterproof and can hold the celery stalk.
- Stones: Small to medium-sized stones, pebbles, or even marbles. They serve as a support for the celery and ensure that it does not sit in the water.
- Water: Tap water is perfectly sufficient.
- Sunny location: A windowsill or other bright place is ideal.
- Patience: Celery takes time to grow.
Step-by-step instructions:
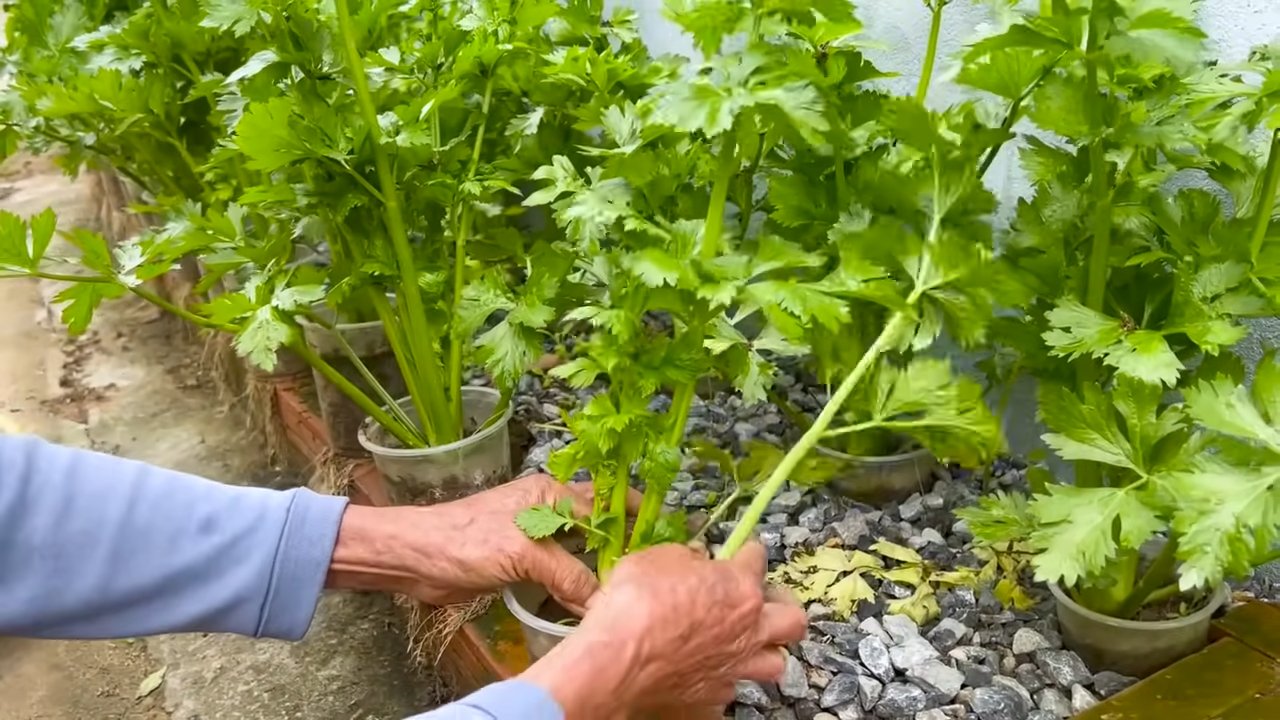
- Prepare the celery stalk: Take the celery stalk and remove the outer, wilted, or damaged stalks. Leave the heart of the celery intact. This is the part from which the new leaves will grow. If necessary, cut the stalk straight so that it can stand stably on the stones.
- Prepare the bowl: Clean your bowl or plate thoroughly. This prevents the formation of algae or bacteria.
- Place the stones: Distribute the stones evenly in the bowl. They should cover the bottom and form a stable base for the celery stalk. Make sure the stones are clean.
- Place the celery stalk: Place the celery stalk in the middle of the stones. It should stand stably and not tip over.
- Add water: Carefully pour water into the bowl until it touches the bottom of the celery stalk. Make sure that the stalk is not completely in the water, otherwise it could rot. The stones ensure that the stalk is slightly elevated.
- Choose a location: Place the bowl with the celery in a sunny location. A windowsill is ideal, as the celery needs a lot of light to grow.
- Check the water level: Check the water level daily and add more water if necessary. The water should always touch the bottom of the celery stalk. Change the water every few days to prevent the formation of algae and bacteria.
- Be patient: It will take a few days to weeks before you see the first signs of growth. Be patient and give the celery time to develop.
- Observe and care: Observe the celery regularly. When you see new leaves forming, you can continue to grow it on the stones or transplant it into soil.
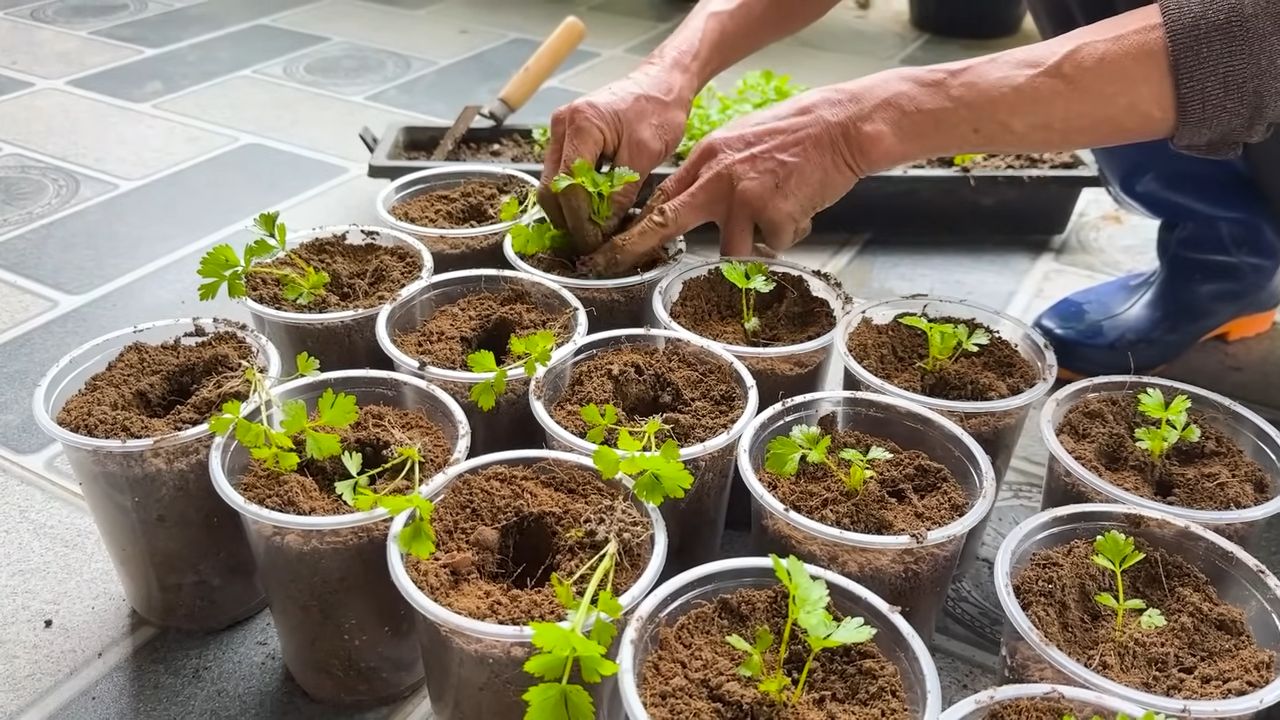
Transplanting into soil (optional):
If you wish, you can transplant the celery into a pot with soil as soon as it has formed new roots and leaves. This gives it more nutrients and allows it to grow bigger and stronger.
- Prepare the pot: Choose a pot that is large enough for the celery. Fill it with high-quality potting soil.
- Carefully remove the celery: Carefully take the celery out of the bowl and remove the stones. Be careful not to damage the roots.
- Plant the celery: Make a hole in the soil and place the celery in it. Fill the hole with soil and press it down lightly.
- Water: Water the celery thoroughly.
- Care: Place the pot in a sunny location and water the celery regularly. Fertilize it with an organic fertilizer if necessary.
Common problems and solutions:
- Rot: If the celery stalk is rotting, it is probably too wet. Reduce the amount of water and change the water more often. Make sure that the stalk is not completely in the water.
- No growth: If the celery is not growing, it may not be getting enough light. Move it to a sunnier location.
- Yellow leaves: Yellow leaves can be a sign of a nutrient deficiency. Fertilize the celery with an organic fertilizer.
- Algae formation: Algae formation in the water is normal. Change the water regularly and clean the bowl thoroughly.
Additional tips and tricks:
- Celery variety: Not all celery varieties are equally well suited for this project. It works best with stalk celery.
- Water quality: It is best to use filtered water or stale tap water to avoid chlorine.
- Humidity: Celery likes high humidity. Spray the leaves regularly with water to increase the humidity.
- Harvest: You can harvest the outer stalks of the celery as soon as they are large enough. Leave the heart of the celery intact so that it can continue to grow.
- Propagation: You can also propagate celery from seed. However, this is a bit more complex.
Why grow celery on stones?
- Sustainability: You reduce food waste by reusing the celery stalk.
- Cost-effective: You save money because you don’t have to buy new celery.
- Easy: It is a simple DIY project that anyone can do at home.
- Decorative: The growing celery is a beautiful eye-catcher on the windowsill.
- Fresh celery: You always have fresh celery on hand for your kitchen.
A few final thoughts:
Growing celery on stones is a really rewarding project. It is not only easy and inexpensive, but also a great way to connect with nature and see how new life emerges from a small stalk. I hope this guide has inspired you to try it yourself. Have fun gardening! And don’t forget to share your successes with me! I’m excited to see your results.
Celery in the kitchen: Versatile uses
Celery is not only healthy, but also incredibly versatile in the kitchen. Here are a few ideas on how you can use your home-grown celery:
- Raw: Celery sticks are a healthy snack and go well with dips like hummus or guacamole.
- Salads: Celery gives salads a crunchy texture and a fresh taste.
- Soups and stews: Celery is an important ingredient in many soups and stews. It provides an aromatic flavor.
- Smoothies: Celery can also be used in smoothies. It is rich in vitamins and minerals.
- Juices: Celery juice is a popular detox juice. It is said to have anti-inflammatory and cleansing effects.
- As a spice: Dried celery leaves can be used as a spice. They give dishes a savory taste.
Celery: A healthy vegetable
Celery is not only delicious, but also very healthy. It is rich in vitamins, minerals, and fiber. Here are some of the health benefits of celery:
Rich in minerals: Celery contains potassium, calcium, and magnesium.
Rich in vitamins: Celery contains vitamin K, vitamin C, and various B vitamins.
Conclusion
So, there you have it! Growing celery on rocks, a seemingly simple yet incredibly rewarding DIY trick, offers a sustainable and space-saving solution for fresh produce right at your fingertips. It’s more than just a gardening hack; it’s a gateway to understanding plant propagation and a step towards a more self-sufficient lifestyle. The beauty of this method lies in its accessibility. You don’t need acres of land or expensive equipment. Just a celery base, some rocks, water, and a sunny spot are all you need to embark on this green adventure.
Why is this a must-try? Because it’s efficient, educational, and environmentally conscious. You’re reducing food waste by regrowing something you’d normally discard. You’re learning about the resilience of plants and their ability to thrive in unconventional environments. And you’re minimizing your carbon footprint by growing your own food locally. Plus, let’s be honest, there’s a certain satisfaction in watching something grow from what was once considered trash.
But don’t stop at just regrowing the celery stalk! Experiment with different variations to personalize your growing experience. Try using different types of rocks – river rocks, lava rocks, or even decorative glass stones. Consider adding a diluted liquid fertilizer to the water every few weeks to boost growth. You can also try different containers – a mason jar, a glass bowl, or even a repurposed plastic container. The possibilities are endless!
For a spicier twist, try regrowing other vegetables like romaine lettuce or bok choy using the same method. The principles are the same, and you’ll be amazed at how many vegetables can be successfully regrown from their bases. Imagine having a constant supply of fresh salad greens right on your windowsill!
Ultimately, growing celery on rocks is a testament to the power of resourcefulness and the magic of nature. It’s a simple yet profound way to connect with the food we eat and appreciate the intricate processes that bring it to our tables.
We wholeheartedly encourage you to try this DIY trick and witness the wonder of regrowing celery for yourself. Don’t be afraid to experiment, adapt, and make it your own. And most importantly, share your experience with us! We’d love to hear about your successes, your challenges, and any creative variations you come up with. Post pictures of your rock-grown celery on social media using #RockCelery and let’s inspire others to join the regrowing revolution. Let’s cultivate a community of resourceful gardeners, one celery stalk at a time. This method of growing celery on rocks is not only fun but also a great way to teach children about plant life cycles.
Frequently Asked Questions (FAQ)
1. What kind of celery works best for regrowing on rocks?
The best celery for regrowing is fresh, organic celery with a healthy-looking base. Look for stalks that are firm and crisp, with vibrant green leaves. Avoid celery that is wilted, discolored, or has signs of rot. Organic celery is preferable because it is less likely to have been treated with chemicals that could inhibit regrowth. However, conventional celery can also work, just make sure to wash it thoroughly before placing it in water. The key is to start with a healthy and viable base.
2. How much of the celery stalk should I leave when cutting it for regrowing?
You should leave about 2-3 inches of the celery stalk base intact. This provides enough of the root structure for the plant to draw nutrients and begin regrowing. Make sure to cut the celery cleanly with a sharp knife to avoid damaging the base. Leaving too little of the base may result in the plant not being able to regrow, while leaving too much may lead to rotting.
3. What kind of rocks should I use?
Almost any type of rock can be used for growing celery on rocks, but some are better than others. River rocks are a popular choice because they are smooth, readily available, and provide good support for the celery base. Lava rocks are also a good option because they are porous and can help retain moisture. Avoid using rocks that are too small, as they may not provide enough support. Also, avoid using rocks that are treated with chemicals or paints, as these could leach into the water and harm the plant. Make sure to wash the rocks thoroughly before using them to remove any dirt or debris.
4. How often should I change the water?
You should change the water every 1-2 days to prevent the growth of bacteria and algae. Stagnant water can lead to root rot and other problems that can hinder the plant’s growth. When changing the water, gently rinse the celery base and rocks to remove any debris. Use fresh, clean water each time. If you notice any signs of algae growth, you can add a small amount of hydrogen peroxide to the water to help control it.
5. How much sunlight does the celery need?
Celery needs bright, indirect sunlight to thrive. Place the container in a location that receives at least 6 hours of sunlight per day, but avoid direct sunlight, which can scorch the leaves. A windowsill that faces east or west is often a good choice. If you don’t have access to enough natural light, you can supplement with a grow light.
6. How long does it take for the celery to start regrowing?
You should start to see new growth within 5-7 days. The first sign of regrowth will be small, green shoots emerging from the center of the celery base. As the plant grows, you can transplant it to a pot with soil to allow it to develop further.
7. Can I eat the regrown celery?
Yes, you can eat the regrown celery! However, the flavor may be slightly different from store-bought celery. Regrown celery tends to be more bitter and stringy, but it is still perfectly safe to eat. You can use it in salads, soups, stews, or as a snack.
8. Can I grow celery on rocks indefinitely?
While you can continue to regrow celery from the base for several cycles, the quality and yield will eventually decline. The plant will eventually exhaust its stored nutrients and become less productive. To maintain a continuous supply of fresh celery, it is best to transplant the regrown celery to a pot with soil and allow it to mature fully.
9. What if my celery starts to rot?
If you notice any signs of rot, such as a slimy or mushy texture, remove the affected parts immediately. Change the water more frequently and ensure that the celery base is not submerged too deeply. If the rot persists, it may be necessary to discard the celery and start with a fresh base.
10. Can I use fertilizer?
Yes, you can use a diluted liquid fertilizer to boost the growth of your celery. Add a small amount of fertilizer to the water every 2-3 weeks. Be careful not to over-fertilize, as this can damage the plant. A balanced fertilizer with a ratio of 10-10-10 is a good choice.
11. Is growing celery on rocks profitable?
While growing celery on rocks might not be profitable in the sense of large-scale commercial farming, it can be profitable in other ways. It reduces your grocery bill by providing fresh celery, minimizes food waste by regrowing discarded parts, and offers a rewarding and educational gardening experience. For small-scale home gardeners, the “profit” comes in the form of fresh produce, reduced waste, and the satisfaction of growing your own food.

Leave a Comment