

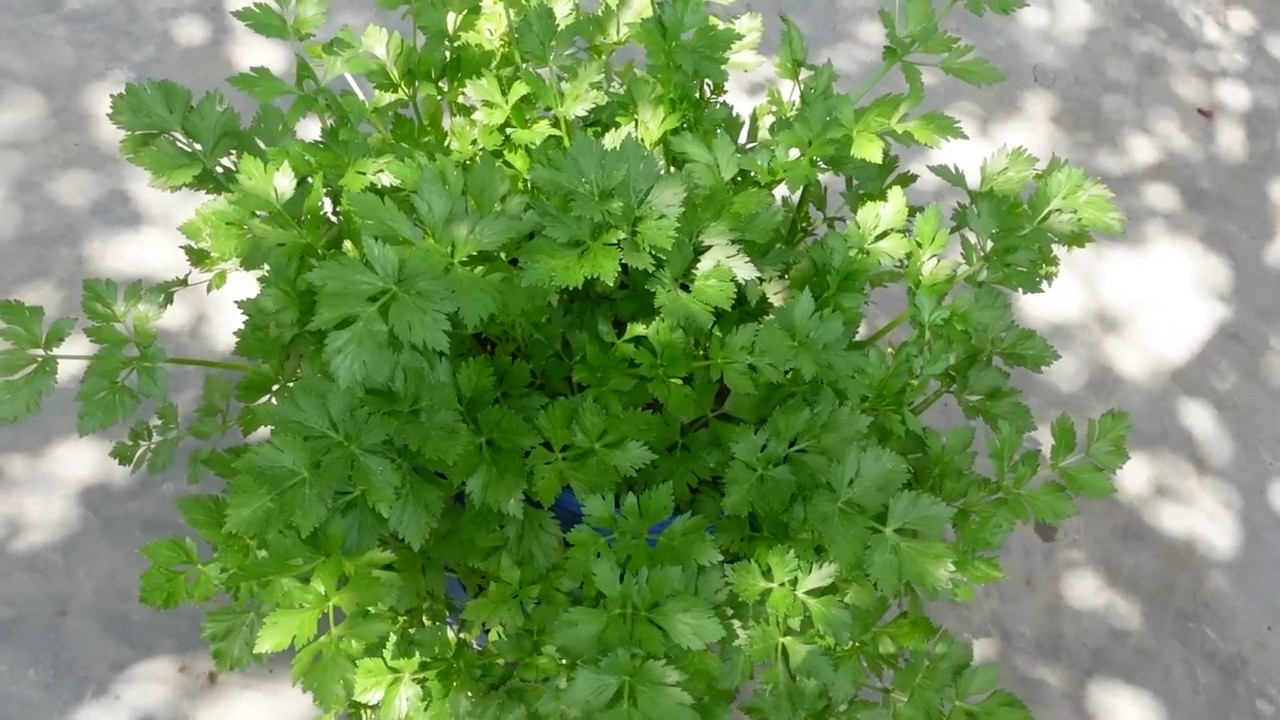
Growing Celery at Home might seem like a challenge reserved for seasoned gardeners, but I’m here to tell you it’s totally achievable, even if you’re a beginner! Forget those bland, store-bought stalks – imagine the crisp, refreshing taste of homegrown celery, bursting with flavor and packed with nutrients.
Celery has a fascinating history, dating back to ancient times where it was used more for medicinal purposes than culinary delight. The ancient Greeks and Romans valued it for its healing properties, and it wasn’t until the Middle Ages that it began to appear regularly on dinner tables. Now, it’s a staple in cuisines worldwide, adding crunch and depth to everything from soups and salads to stir-fries.
But why bother growing your own? Well, for starters, you’ll have access to the freshest celery imaginable. Plus, you can control exactly what goes into your garden, avoiding harmful pesticides and herbicides. And let’s be honest, there’s something incredibly satisfying about nurturing a plant from seed to harvest. In this DIY guide, I’ll share my favorite tricks and hacks for successfully growing celery at home, regardless of your space or experience level. Get ready to ditch the grocery store celery and embrace the rewarding experience of cultivating your own delicious, crunchy stalks!
Growing Your Own Celery: Your Comprehensive DIY Guide
Hey garden friends! Have you ever wondered if you could just grow celery yourself at home? I tried it and I can tell you: It’s easier than you think! And the best part: Not only do you reduce your plastic waste, but you also always have fresh celery on hand. In this article, I’ll show you step-by-step how to do it. Let’s go!
What you need: The Preparation
Before we get started, here’s a list of everything you’ll need for your celery adventure:
- Celery base: Preferably an organic celery, as it has not been treated with pesticides. Make sure the base looks firm and healthy.
- Shallow dish: A bowl, a plate, or a shallow Tupperware container.
- Water: Tap water is perfectly fine.
- Planter: A pot with a diameter of at least 20 cm.
- Potting soil: Preferably a high-quality vegetable soil.
- Watering can: For watering.
- Knife: For cutting the celery base.
- (Optional) Liquid fertilizer: For later fertilization.
Growing Celery from the Base: Step by Step
Now let’s get down to it! Follow these steps to grow your own celery:
- Prepare the celery base: Take your celery base and cut it about 5-7 cm from the bottom end. Be careful not to damage the root base. This is the most important part!
- Place in water: Fill your shallow dish with about 2-3 cm of water. Place the celery base with the cut side down into the water. Make sure that only the bottom part of the base is in the water, not the whole thing.
- Placement: Place the dish in a bright spot, but not in direct sun. A windowsill is ideal.
- Change the water: Change the water every 1-2 days to prevent mold and to ensure that the base always has enough moisture.
- Observe root growth: After about a week, you should see the first roots. Be patient, it can sometimes take a little longer!
- Let the leaves grow: At the same time as the roots, new, small leaves should also sprout from the center of the base. That’s a good sign!
- Transplant: Once the roots are about 5-7 cm long and the new leaves have grown well, it’s time to transplant the celery into a pot.
Transplanting into Soil: The Next Step
Now your celery gets a new home!
- Prepare the pot: Fill your planter with potting soil. Leave about 2-3 cm of space at the top.
- Dig a planting hole: Dig a hole in the middle of the pot that is large enough to accommodate the celery base.
- Insert the celery: Carefully take the celery base out of the water and place it in the planting hole. Be careful not to damage the roots.
- Fill with soil: Fill the hole with soil and press it down lightly. The base should be covered with soil about halfway up.
- Water: Water the celery thoroughly. The soil should be well moistened.
- Placement: Place the pot in a bright spot, but avoid direct sunlight for the first few days.
- Water regularly: Keep the soil moist, but not wet. Celery doesn’t like to stand in water.
Care and Harvest: How to Keep Your Celery Happy
For your celery to thrive, proper care is important:
- Watering: Water the celery regularly, especially on hot days. The soil should always be slightly moist.
- Fertilizing: After about 4-6 weeks, you can start fertilizing. Use a liquid fertilizer for vegetables and follow the instructions on the package.
- Pests: Watch out for pests like aphids or snails. If necessary, you can use natural pesticides.
- Harvest: You can harvest the outer stalks as soon as they are large enough. Simply cut them off with a knife. The celery will continue to grow and produce new stalks. You can also harvest the whole celery by pulling it out of the ground.
Common Problems and Solutions
Sometimes not everything goes smoothly. Here are some common problems and how you can solve them:
- Celery is rotting: This can happen if the celery gets too much water or if the water is not changed regularly. Make sure the base is not standing in water and change the water regularly.
- Celery is not growing: This can have various causes. Make sure the celery gets enough light, is watered regularly, and is fertilized.
- Leaves are turning yellow: This can be a sign of a nutrient deficiency. Fertilize the celery with a liquid fertilizer.
- Pests: Combat pests with natural pesticides.
Additional Tips and Tricks
Here are a few additional tips that can help you:
- Growing celery outdoors: If you have a garden, you can also grow celery outdoors. Choose a sunny location with well-draining soil.
- Growing celery in winter: You can also grow celery indoors in the winter. Place it in a bright spot and make sure it doesn’t get too cold.
- Propagating celery: You can also propagate celery by division. Simply divide the celery into several parts and plant them in separate pots.
- Celery recipes: Celery is versatile. You can eat it raw in salads, use it cooked in soups and stews, or juice it.
Why you should grow your own celery
There are many good reasons to grow your own celery:
- Fresh celery: You always have fresh celery on hand.
- Less plastic waste: You reduce your plastic waste because you don’t have to buy celery at the supermarket.
- Healthy: Home-grown celery is often healthier because it has not been treated with pesticides.
- Satisfaction: It’s a great feeling to grow and harvest something yourself.
Conclusion
Growing your own celery is a great project that is fun and provides you with fresh celery. With this guide, you should be able to grow your own celery. Good luck and have fun gardening! I hope this guide helps you start your own little celery garden. Let me know how it goes

Conclusion
So, there you have it! Growing celery at home, while it might seem daunting at first, is a surprisingly rewarding and achievable endeavor. We’ve walked you through the process, from rescuing that humble celery base to nurturing it into a thriving plant, ready to grace your kitchen with its crisp, refreshing stalks. But why should you bother with this DIY project?
The answer is multifaceted. First and foremost, home-grown celery boasts a flavor profile that far surpasses anything you’ll find in the produce aisle. The freshness is unparalleled, the taste is more intense, and you have the satisfaction of knowing exactly where your food came from and how it was grown. No pesticides, no long-distance transportation, just pure, unadulterated celery goodness.
Beyond the superior taste, growing your own celery is an incredibly sustainable practice. You’re reducing your carbon footprint by eliminating the need for commercially grown and shipped produce. You’re also minimizing food waste by regrowing something you would normally discard. It’s a small step towards a more eco-conscious lifestyle, and every little bit counts.
Furthermore, this project is a fantastic learning experience, especially for families with children. It’s a hands-on lesson in botany, patience, and the magic of watching something grow from seemingly nothing. It fosters a connection to nature and an appreciation for the food we eat.
But the benefits don’t stop there! Think of the possibilities! You can experiment with different varieties of celery, from the classic Pascal celery to the more colorful and flavorful red varieties. You can adjust the growing conditions to influence the taste and texture of your celery. You can even use your home-grown celery to create your own celery salt, celery juice, or add it to your favorite soups, stews, and salads.
Consider these variations to elevate your celery-growing game:
* Hydroponic Celery: For those with limited space or a penchant for modern gardening techniques, growing celery hydroponically is a viable option. It requires a bit more setup, but it can yield impressive results.
* Container Gardening: If you don’t have a garden, don’t fret! Celery thrives in containers, making it perfect for balconies, patios, or even sunny windowsills. Just ensure you choose a pot that’s large enough to accommodate the plant’s root system.
* Companion Planting: Celery benefits from being planted alongside certain other plants, such as onions, garlic, and tomatoes. These companions can help deter pests and improve the overall health of your celery.
Ultimately, the success of your celery-growing adventure hinges on your willingness to experiment and adapt. Don’t be afraid to try different techniques, observe your plants closely, and learn from your mistakes. Remember, gardening is a journey, not a destination.
So, what are you waiting for? Grab that celery base, follow our simple steps, and embark on your own celery-growing adventure. We’re confident that you’ll be amazed by the results. And once you’ve harvested your first batch of home-grown celery, we encourage you to share your experience with us. Post photos of your celery plants, share your tips and tricks, and let us know how you’re using your delicious, home-grown celery in your culinary creations. Let’s build a community of celery enthusiasts and inspire others to embrace the joys of DIY gardening. This **growing celery at home** trick is a game changer!
Frequently Asked Questions (FAQ)
Q1: How long does it take to grow celery from a base?
A: The time it takes to grow celery from a base can vary depending on several factors, including the variety of celery, the growing conditions, and your climate. Generally, you can expect to see new growth within a week or two of placing the celery base in water. However, it will take several months (typically 3-4 months) for the celery to mature and be ready for harvest. Be patient and provide your celery with the optimal conditions for growth, and you’ll be rewarded with a bountiful harvest.
Q2: What kind of soil is best for growing celery?
A: Celery thrives in rich, well-drained soil that is high in organic matter. The ideal soil pH for celery is between 6.0 and 6.8. Before planting, amend your soil with compost, well-rotted manure, or other organic materials to improve its fertility and drainage. If you’re growing celery in containers, use a high-quality potting mix that is specifically formulated for vegetables.
Q3: How much sunlight does celery need?
A: Celery needs at least 6 hours of sunlight per day to thrive. Choose a location in your garden that receives full sun for most of the day. If you’re growing celery indoors, place it near a sunny window or supplement with grow lights. Insufficient sunlight can result in leggy, weak plants with poor flavor.
Q4: How often should I water my celery plants?
A: Celery needs consistent moisture to grow properly. Water your celery plants deeply and regularly, especially during hot, dry weather. Aim to keep the soil consistently moist but not waterlogged. A good rule of thumb is to water when the top inch of soil feels dry to the touch. Mulching around your celery plants can help retain moisture and suppress weeds.
Q5: What are some common pests and diseases that affect celery?
A: Celery can be susceptible to a variety of pests and diseases, including aphids, celery leaf miners, slugs, snails, and fungal diseases like early blight and late blight. Regularly inspect your plants for signs of pests or diseases, and take action promptly to prevent them from spreading. Organic pest control methods, such as insecticidal soap or neem oil, can be effective for controlling aphids and other pests. Proper watering and good air circulation can help prevent fungal diseases.
Q6: How do I harvest celery?
A: You can harvest celery when the stalks are at least 6-8 inches long and have reached the desired thickness. To harvest, simply cut the stalks at the base of the plant with a sharp knife. You can harvest individual stalks as needed, or you can harvest the entire plant at once. After harvesting, store your celery in the refrigerator to keep it fresh.
Q7: Can I grow celery indoors year-round?
A: Yes, you can grow celery indoors year-round, provided you have the right conditions. Celery needs plenty of sunlight, consistent moisture, and well-drained soil to thrive indoors. You may also need to supplement with grow lights, especially during the winter months. Choose a container that is large enough to accommodate the plant’s root system, and be sure to provide adequate ventilation to prevent fungal diseases.
Q8: My celery stalks are bitter. What could be the reason?
A: Bitter celery stalks can be caused by several factors, including insufficient watering, excessive heat, and nutrient deficiencies. Ensure that your celery plants are receiving consistent moisture, especially during hot weather. Amend your soil with compost or other organic materials to improve its fertility. You can also try blanching your celery stalks by covering them with soil or paper for a few weeks before harvesting. This will help to reduce the bitterness.
Q9: Can I use the celery leaves?
A: Absolutely! Celery leaves are often overlooked, but they are packed with flavor and nutrients. You can use celery leaves in soups, stews, salads, or as a garnish. They can also be dried and used as a seasoning. Don’t let those valuable leaves go to waste!
Q10: What are the benefits of eating celery?
A: Celery is a low-calorie, nutrient-rich vegetable that offers a variety of health benefits. It is a good source of vitamins A, C, and K, as well as folate and potassium. Celery also contains antioxidants and anti-inflammatory compounds that may help protect against chronic diseases. Eating celery can help lower blood pressure, improve digestion, and boost your immune system.

Leave a Comment