

Growing Celery Along Fence: Unlock the secrets to a thriving garden with clever DIY tricks! Have you ever dreamed of a lush, productive garden but felt limited by space or resources? I know I have! That’s why I’m so excited to share this fantastic method for maximizing your garden’s potential: growing celery along your fence.
Celery, with its crisp stalks and refreshing flavor, has been cultivated for centuries. Originating in the Mediterranean region, it was initially valued for its medicinal properties before becoming a culinary staple. Now, imagine bringing that history and flavor right to your backyard, utilizing a space you might not have considered before.
Why grow celery along your fence? Well, for starters, it’s a brilliant space-saving technique, especially if you have a small garden or balcony. Fences provide natural support and protection from harsh winds, creating an ideal microclimate for your celery to flourish. Plus, it’s a fantastic way to add a touch of greenery and beauty to an otherwise plain structure. This DIY trick not only helps you yield a bountiful harvest of fresh, organic celery, but it also enhances the aesthetic appeal of your outdoor space. Who wouldn’t want that? Let’s dive into the simple steps to successfully growing celery along fence and transform your garden today!
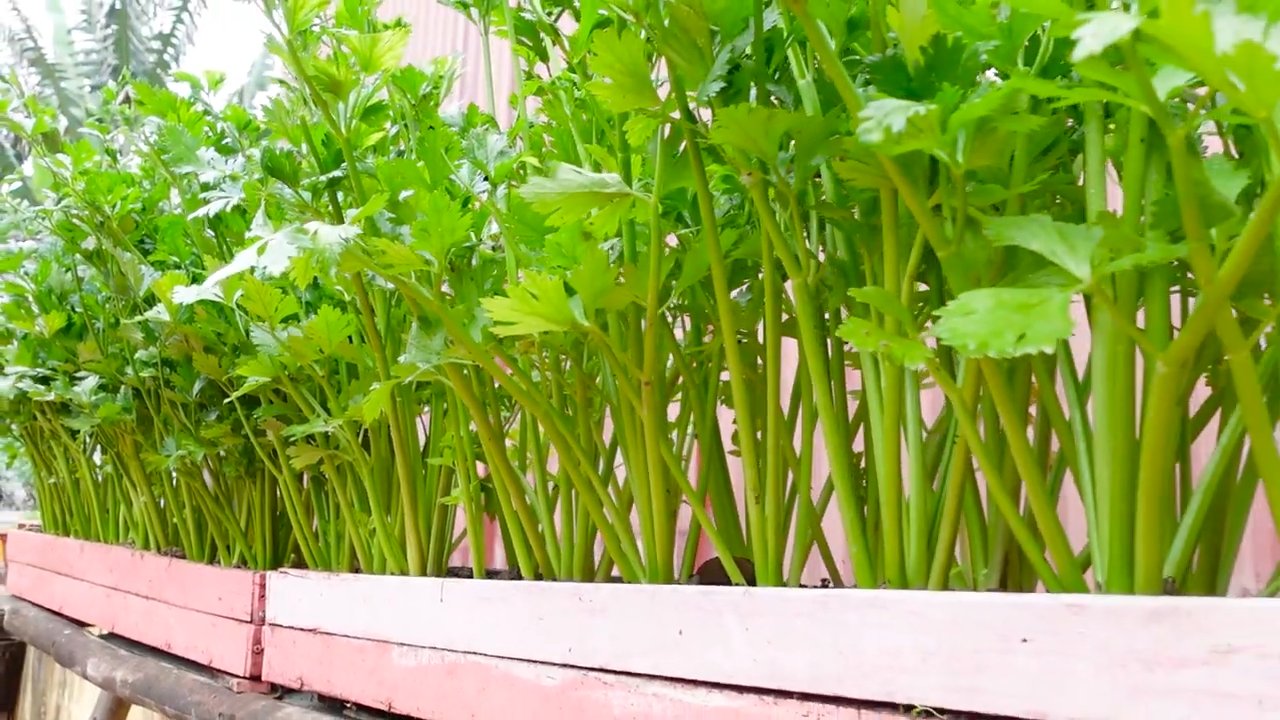
Homemade Raised Bed: Growing Celery on the Fence
Hey everyone! Are you also tired of expensive celery from the supermarket? Today I’m going to show you how you can easily and space-savingly grow celery on your fence. This is not only super practical but also looks really cool! We are basically building a vertical celery bed. Let’s go!
What you need:
- Celery stalk: Preferably one that still has a bit of a root base.
- Plant pots: The size depends on how much celery you want to grow. I recommend pots with a diameter of at least 15 cm.
- Potting soil: Good, nutrient-rich potting soil is important for healthy growth.
- Coconut coir substrate: Helps to retain moisture in the soil.
- Fertilizer: Slow-release fertilizer or liquid fertilizer for vegetables.
- Fence hangers or baskets: Suitable for your plant pots. Make sure they are stable and can support the weight of the pots.
- Watering can or hose: To water your celery plants.
- Garden shears or knife: To cut the celery stalk.
- Gloves: To keep your hands clean.
- Optional: Mulch (e.g., straw or wood chips) for moisture retention and weed control.
Preparation of the Celery Stalk:
- Prepare the celery stalk: After you have bought your celery at the supermarket and used the stalks, cut the stalk about 5-7 cm above the root base. Be careful not to damage the roots.
- Place the stalk in water: Place the cut stalk in a glass of water. The water should cover the stalk by about 2-3 cm. Place the glass in a bright place, but not in direct sunlight.
- Observe root formation: Change the water every 1-2 days. After about a week, you should see new roots growing. Small green leaves in the middle of the stalk are also a good sign!
Preparing the Planters:
- Choose pots: Choose plant pots that are large enough for the celery. I recommend pots with a diameter of at least 15 cm. You can also use larger pots if you want to grow several celery plants in one pot.
- Clean the pots: Clean the pots thoroughly to ensure that there are no pathogens or pests.
- Prepare drainage: Place a layer of pebbles or clay shards at the bottom of the pots to ensure good drainage. This prevents waterlogging, which celery does not tolerate.
- Mix the soil: Mix the potting soil with some coconut coir substrate. The coconut coir substrate helps to retain moisture in the soil and loosen the earth. I usually use a ratio of 3 parts potting soil to 1 part coconut coir.
- Fill the pots: Fill the pots with the soil mixture, but leave about 2-3 cm of space to the rim.
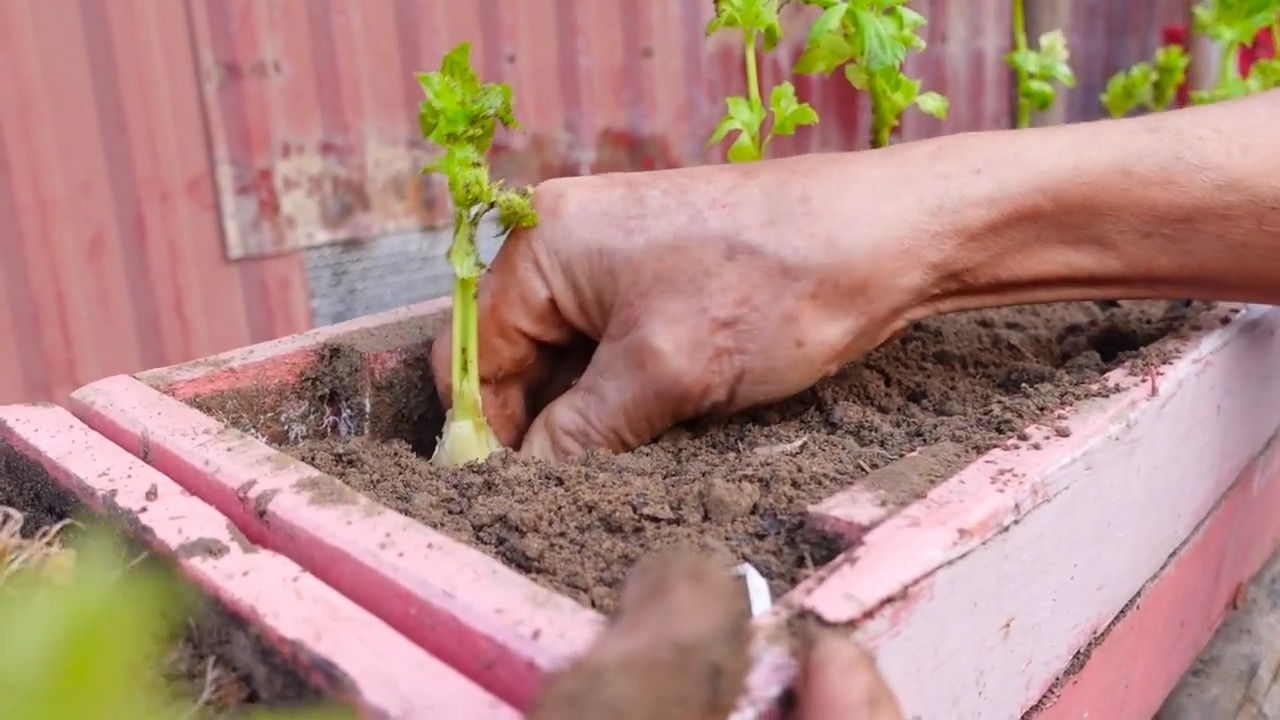
Planting the Celery:
- Carefully remove the celery from the water: When the roots are about 2-3 cm long, you can plant the celery. Carefully remove the stalk from the water and be careful not to damage the roots.
- Dig a planting hole: Dig a small hole in the soil in the middle of the pot. The hole should be deep enough for the celery roots to fit well.
- Insert the celery: Carefully place the celery stalk in the hole and cover the roots with soil. Press the soil lightly to make the celery stable.
- Water in: Water the celery thoroughly after planting. This helps to settle the soil and provide the roots with moisture.
Attaching the Fence Hangers:
- Choose fence hangers: Choose fence hangers or baskets that are strong enough to support the weight of the planted pots. Make sure that the hangers can be securely attached to your fence.
- Attach the hangers: Attach the fence hangers to your fence at regular intervals. I placed my hangers about 30 cm apart.
- Hang the pots: Carefully hang the planted pots in the fence hangers. Make sure the pots are secure and cannot fall down.
Caring for the Celery:
- Watering: Celery needs a lot of water, especially during the growing season. Water your celery plants regularly, especially on hot days. The soil should always be slightly moist, but not wet.
- Fertilizing: Fertilize your celery plants regularly with a slow-release fertilizer or liquid fertilizer for vegetables. I fertilize my plants every 2-3 weeks.
- Sunlight: Celery needs a lot of sun to grow well. Make sure your plants get at least 6 hours of sun per day.
- Pest control: Check your celery plants regularly for pests such as aphids or snails. If necessary, you can use natural pesticides.
- Mulching: Mulch the soil around your celery plants with straw or wood chips. This helps to retain moisture in the soil and combat weeds.
- Harvesting: You can harvest the outer stalks of the celery as soon as they are large enough. Simply cut the stalks with garden shears or a knife. The celery will continue to grow and produce new stalks.
Additional Tips:
- Celery in the shade: If you live in a very hot region, it may be a good idea to grow celery in a semi-shady spot. Too much sun can burn the leaves.
- Celery in winter: In colder regions, it may be necessary to bring the celery indoors for the winter. Place the pots in a bright, cool place and water them sparingly.
- Propagating celery: You can also grow celery from seed. This is a bit more time-consuming, but it’s worth it if you want to grow a larger amount of celery.
- Companion planting: You can combine celery well with other plants such as tomatoes, cabbage, or lettuce. These plants benefit from each other and grow better together.
- Blanching celery: To get white celery, you can cover the stalks with cardboard or fabric about 2-3 weeks before harvesting. This prevents the stalks from turning green.
Common Problems and Solutions:
- Yellow leaves: Yellow leaves can be a sign of a nutrient deficiency. Fertilize your plants with a suitable fertilizer.
- Snail infestation: Snails can eat the leaves of the celery. Hand-pick the snails or use natural snail repellents.
- Aphids: Aphids can infest the leaves of the celery and weaken it. Spray the plants with a soapy water solution or use natural pesticides.
- Waterlogging: Waterlogging can lead to root rot. Make sure the pots have good drainage and do not overwater.
Conclusion:
Growing celery on the fence is a great way to grow vegetables in a space-saving and sustainable way.
Conclusion
So, there you have it! Growing celery along a fence isn’t just a quirky gardening experiment; it’s a practical, space-saving, and visually appealing way to cultivate this crisp and refreshing vegetable. By utilizing vertical space, you can maximize your garden’s potential, even if you’re working with limited square footage. This method also offers the added benefit of natural support for your celery stalks, reducing the risk of them bending or breaking under their own weight.
But the advantages don’t stop there. The fence provides a degree of protection from harsh winds and intense sunlight, creating a more stable and favorable microclimate for your celery to thrive. Plus, let’s be honest, a row of lush, green celery plants cascading along a fence is simply beautiful! It adds a touch of rustic charm and visual interest to your garden, transforming a functional structure into a living, breathing work of art.
Don’t be afraid to experiment with different varieties of celery to find the ones that best suit your taste and growing conditions. Consider planting companion herbs like parsley or cilantro nearby to attract beneficial insects and further enhance the flavor of your celery. You could even try training other climbing vegetables, such as cucumbers or beans, along the same fence to create a truly integrated and productive vertical garden.
And remember, the key to successful celery cultivation, whether along a fence or in a traditional garden bed, is consistent moisture and nutrient-rich soil. Regular watering and fertilization will ensure that your plants receive the nourishment they need to develop strong, healthy stalks.
We wholeheartedly encourage you to give this DIY trick a try. It’s a rewarding and sustainable way to grow your own fresh produce, and it’s sure to impress your friends and neighbors. Once you’ve experienced the satisfaction of harvesting your own homegrown celery, you’ll never want to go back to store-bought again.
Most importantly, we want to hear about your experiences! Share your photos, tips, and challenges in the comments below. Let’s build a community of gardeners who are passionate about growing their own food and maximizing their garden’s potential. Together, we can learn from each other and create thriving, sustainable gardens that nourish our bodies and our souls. So, grab your seeds, find a fence, and get ready to embark on a celery-growing adventure! You’ll be amazed at what you can achieve with a little creativity and a whole lot of love. This method of growing celery along a fence is a game changer.
Frequently Asked Questions (FAQ)
What type of fence is best for growing celery?
The ideal fence for growing celery is one that provides adequate support and allows for sufficient sunlight penetration. A chain-link fence, a wooden picket fence, or even a sturdy trellis can all work well. The key is to ensure that the fence is strong enough to support the weight of the mature celery plants and that it doesn’t cast too much shade on the growing area. Consider the orientation of your fence and choose a location that receives at least six hours of sunlight per day. If your fence is solid, you may need to provide additional support for the celery stalks as they grow taller. You can do this by tying them loosely to the fence with twine or using plant clips.
How do I prepare the soil for growing celery along a fence?
Celery thrives in rich, well-drained soil that is high in organic matter. Before planting, amend the soil along the base of the fence with compost, aged manure, or other organic amendments. This will improve the soil’s fertility, drainage, and water-holding capacity. Aim for a soil pH between 6.0 and 6.8. You can test your soil pH using a home testing kit or by sending a sample to your local agricultural extension office. If your soil is too acidic, you can add lime to raise the pH. If it’s too alkaline, you can add sulfur to lower the pH. Ensure the soil is loose and free of rocks or debris to allow for proper root development.
How often should I water celery grown along a fence?
Celery requires consistent moisture to thrive. Water your celery plants regularly, especially during hot, dry weather. Aim to keep the soil consistently moist but not waterlogged. A good rule of thumb is to water deeply whenever the top inch of soil feels dry to the touch. Consider using a soaker hose or drip irrigation system to deliver water directly to the roots of the plants, minimizing water loss through evaporation. Mulching around the base of the plants with straw, wood chips, or other organic mulch can also help to retain moisture in the soil.
What are some common pests and diseases that affect celery, and how can I prevent them?
Celery is susceptible to a variety of pests and diseases, including aphids, celery leaf miners, and celery blight. To prevent these problems, practice good garden hygiene. Remove any dead or diseased leaves promptly, and keep the area around your plants free of weeds. Encourage beneficial insects, such as ladybugs and lacewings, which prey on aphids and other pests. You can attract these beneficial insects by planting flowers like marigolds and sunflowers in your garden. If you notice signs of pests or diseases, treat them promptly with an appropriate organic insecticide or fungicide. Crop rotation can also help to prevent soilborne diseases from building up in your garden.
Can I grow celery along a fence in containers?
Yes, you can definitely grow celery along a fence in containers! This is a great option if you have limited space or if you want to grow celery in a location where the soil is not suitable. Choose large containers that are at least 12 inches deep and wide to accommodate the celery’s root system. Fill the containers with a high-quality potting mix that is rich in organic matter. Provide support for the celery stalks by attaching a trellis or stakes to the containers. Water the containers regularly, and fertilize the plants every two to three weeks with a balanced liquid fertilizer.
How do I harvest celery grown along a fence?
You can begin harvesting celery when the stalks are at least 6 inches long and have reached a desirable size. To harvest, simply cut the stalks off at the base of the plant with a sharp knife. You can harvest individual stalks as needed, or you can harvest the entire plant at once. After harvesting, store the celery in the refrigerator to keep it fresh. Celery can be stored in the refrigerator for up to two weeks if it is wrapped tightly in plastic wrap or stored in a sealed container.
What are some variations on growing celery along a fence?
There are many creative ways to adapt this method to suit your specific needs and preferences. You could try using different types of fencing materials, such as bamboo or recycled pallets. You could also create a tiered system by attaching shelves or planters to the fence, allowing you to grow multiple rows of celery at different heights. Another variation is to interplant celery with other vegetables or herbs, such as lettuce, spinach, or parsley. This can help to create a more diverse and productive garden ecosystem. You can also experiment with different varieties of celery, such as Pascal celery, Utah celery, or Chinese celery.
Leave a Comment