

Growing bush beans in pots might sound intimidating, especially if you’re new to gardening, but trust me, it’s easier than you think! Imagine stepping outside your door and harvesting fresh, crisp bush beans for your dinner – all grown right on your patio or balcony. That’s the magic we’re unlocking today!
Beans, in general, have a rich history, dating back thousands of years. They’ve been a staple food in many cultures, providing essential nutrients and playing a vital role in sustainable agriculture. From ancient civilizations to modern-day gardens, beans have always been a reliable and rewarding crop. Now, we’re bringing that tradition to your home, even if you only have a small space.
Why should you try growing bush beans in pots? Well, for starters, it’s incredibly convenient. No sprawling garden required! Plus, container gardening allows you to control the soil quality, protect your plants from pests, and even extend the growing season by moving your pots indoors during colder weather. In this DIY guide, I’ll share my favorite tips and tricks for successfully growing these delicious and nutritious legumes in containers. Get ready to enjoy a bountiful harvest of homegrown goodness!
Growing Bush Beans in Pots: A Complete DIY Guide
Hey there, fellow gardening enthusiasts! I’m so excited to share my tried-and-true method for growing bush beans in pots. It’s surprisingly easy, even if you’re a complete beginner, and the reward of fresh, homegrown beans is absolutely worth it. Forget those bland supermarket beans – get ready for a burst of flavor straight from your patio!
Why Bush Beans in Pots?
Bush beans are perfect for container gardening because, well, they’re *bushy*! Unlike pole beans, they don’t need a trellis to climb, making them ideal for smaller spaces like balconies, patios, or even a sunny windowsill. Plus, you can easily move them around to follow the sun or protect them from unexpected frost.
What You’ll Need
Before we dive in, let’s gather our supplies. Here’s a checklist to make sure you’re all set:
* **Bush Bean Seeds:** Choose your favorite variety! I personally love ‘Blue Lake Bush’ for its classic flavor and high yield, but ‘Contender’ and ‘Provider’ are also excellent choices. Look for seeds specifically labeled as “bush beans.”
* **Pots:** You’ll need pots that are at least 12 inches in diameter and 12 inches deep. This gives the roots plenty of room to grow. I prefer using fabric pots because they allow for better drainage and aeration, but plastic or terracotta pots work just fine too.
* **Potting Mix:** Don’t use garden soil! It’s too heavy and compacts easily, which can suffocate the roots. Instead, opt for a high-quality potting mix that’s specifically formulated for containers.
* **Fertilizer:** A balanced, slow-release fertilizer is ideal. Look for one with an NPK ratio of around 10-10-10. You can also use organic options like compost or worm castings.
* **Watering Can or Hose:** Essential for keeping your beans hydrated.
* **Trowel:** For planting the seeds.
* **Optional: Mulch:** Mulch helps retain moisture, suppress weeds, and regulate soil temperature. Straw, wood chips, or even dried leaves work well.
* **Optional: Plant Labels:** To keep track of which variety you planted in each pot.
Getting Started: Planting Your Bush Bean Seeds
This is where the magic begins! Follow these steps carefully to give your bean seeds the best possible start:
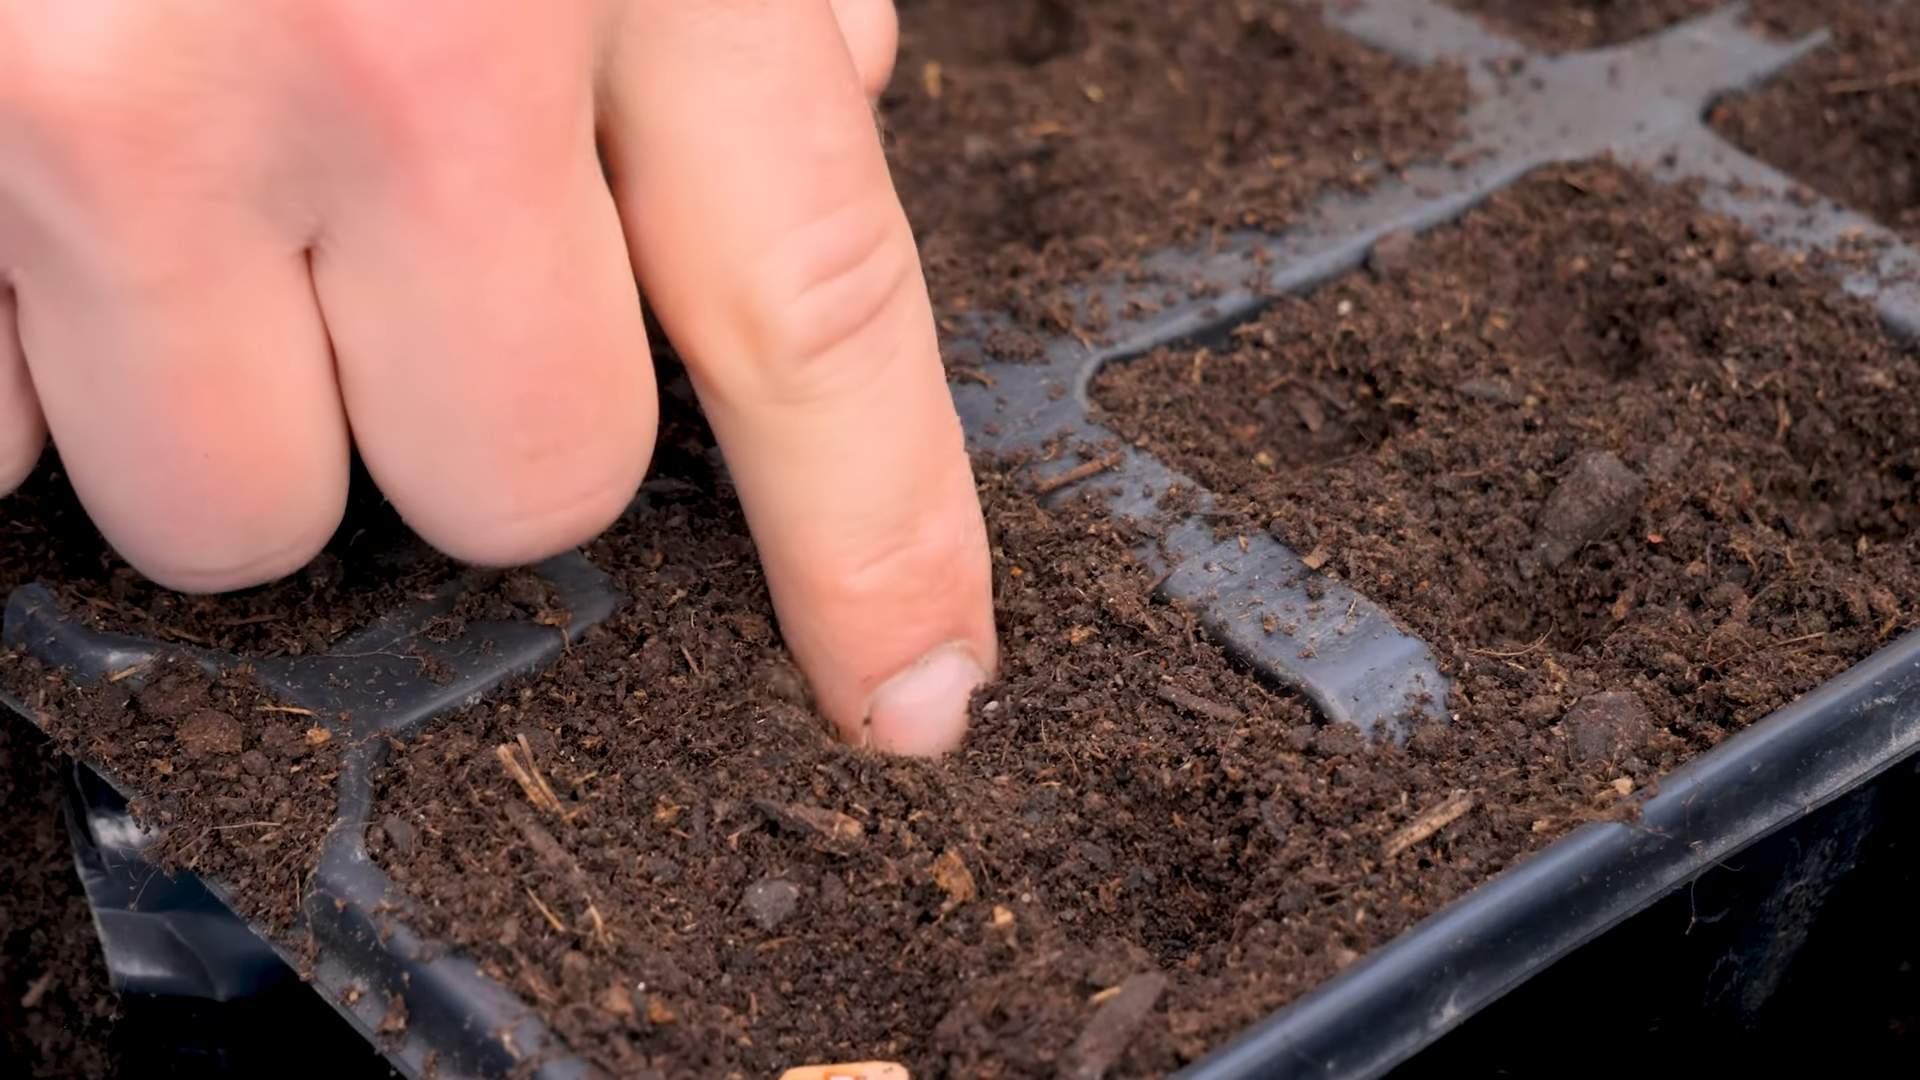
1. **Prepare Your Pots:** Fill your pots with potting mix, leaving about an inch or two of space at the top. Gently tap the pot to settle the soil.
2. **Sow the Seeds:** Bush beans are typically planted directly into the pot, as they don’t transplant well. Make small holes about 1 inch deep and 2-3 inches apart. I usually plant 3-4 seeds per pot to ensure good germination.
3. **Cover the Seeds:** Gently cover the seeds with potting mix and lightly pat down the soil.
4. **Water Thoroughly:** Water the pots deeply until water drains out of the bottom. This helps to settle the soil and provide the seeds with the moisture they need to germinate.
5. **Find a Sunny Spot:** Place your pots in a location that receives at least 6-8 hours of direct sunlight per day. Bush beans thrive in full sun.
6. **Be Patient:** Germination usually takes about 7-14 days, depending on the temperature and moisture levels. Keep the soil consistently moist but not waterlogged during this time.
Caring for Your Bush Bean Plants
Once your seedlings emerge, it’s time to provide them with the care they need to flourish.
1. **Thinning (If Necessary):** If more than one seed germinates in each spot, thin them out by snipping off the weaker seedlings at the soil line. Leave the strongest seedling in each spot.
2. **Watering:** Bush beans need consistent moisture, especially during flowering and pod development. Water deeply whenever the top inch of soil feels dry to the touch. Avoid overhead watering, as this can promote fungal diseases. I prefer to water at the base of the plant.
3. **Fertilizing:** Apply a balanced, slow-release fertilizer according to the package instructions. You can also side-dress with compost or worm castings every few weeks to provide additional nutrients.
4. **Weeding:** Keep the pots free of weeds, as they can compete with your bean plants for nutrients and water. Gently pull out any weeds that appear.
5. **Mulching (Optional):** Apply a layer of mulch around the base of the plants to help retain moisture, suppress weeds, and regulate soil temperature.
6. **Pest Control:** Keep an eye out for common bean pests like aphids, bean beetles, and spider mites. If you spot any pests, you can try spraying them with insecticidal soap or neem oil. I always prefer organic pest control methods whenever possible.
7. **Support (Sometimes Needed):** While bush beans are generally self-supporting, some varieties may benefit from a small stake or cage, especially if they become heavy with pods. This can prevent the plants from falling over.
Harvesting Your Bush Beans
This is the most rewarding part! You’ll typically be able to start harvesting your bush beans about 50-60 days after planting.
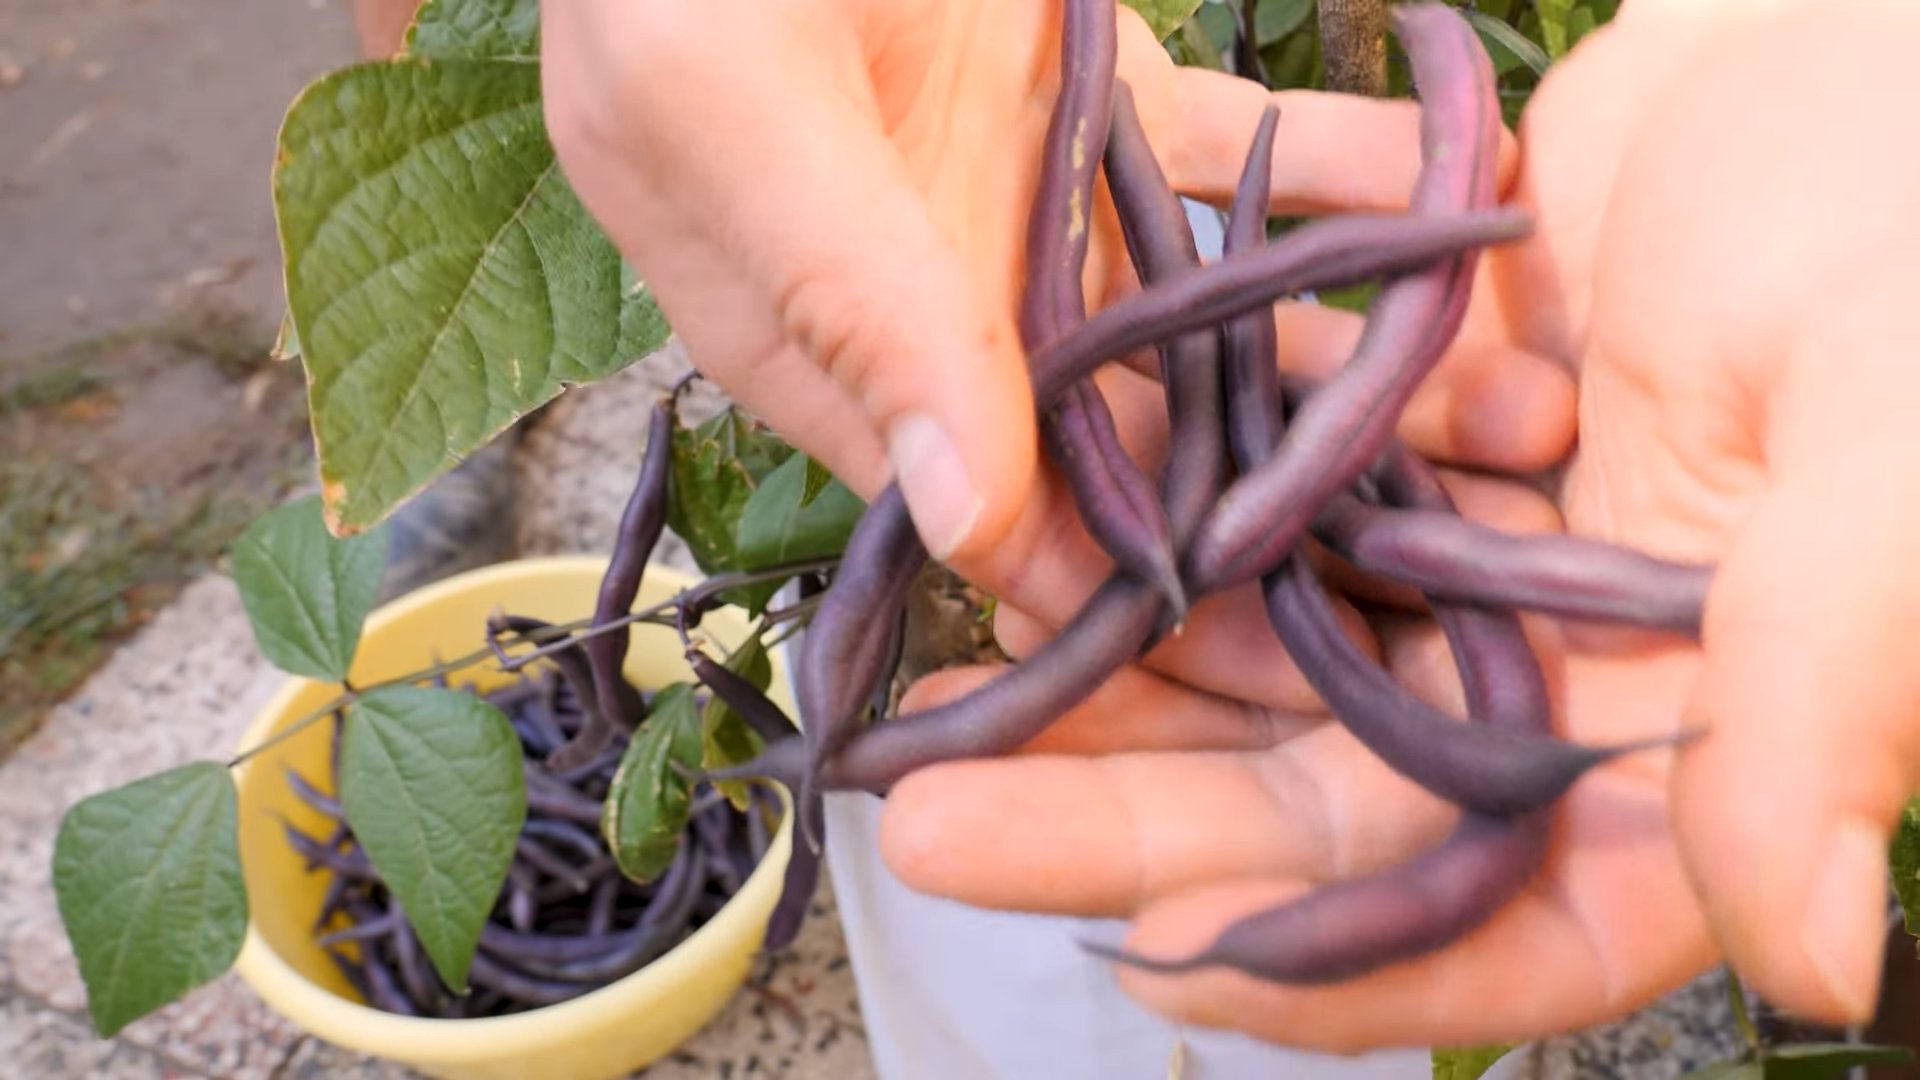
1. **Check for Readiness:** The beans are ready to harvest when the pods are firm, plump, and easily snap off the plant. They should be about the size of your finger.
2. **Harvest Regularly:** Harvest your beans every few days to encourage continued production. The more you harvest, the more beans the plant will produce.
3. **Pick Carefully:** Gently snap the beans off the plant, being careful not to damage the stems or leaves.
4. **Enjoy Your Harvest:** Freshly harvested bush beans are delicious steamed, sautéed, or added to salads and soups. You can also freeze or can them for later use.
Troubleshooting Common Problems
Even with the best care, you might encounter a few challenges along the way. Here are some common problems and how to address them:
* **Poor Germination:** This could be due to old seeds, cold soil, or overwatering. Make sure your seeds are fresh, the soil temperature is above 60°F (15°C), and you’re not overwatering.
* **Yellowing Leaves:** This could be a sign of nutrient deficiency, overwatering, or underwatering. Check the soil moisture and fertilize if necessary.
* **Lack of Flowers or Pods:** This could be due to insufficient sunlight, poor pollination, or nutrient deficiency. Make sure your plants are getting enough sunlight and fertilize with a balanced fertilizer.
* **Pest Infestations:** As mentioned earlier, keep an eye out for common bean pests and treat them with insecticidal soap or neem oil.
* **Disease:** Fungal diseases like powdery mildew can be a problem in humid conditions. Ensure good air circulation and avoid overhead watering. You can also treat with a fungicide if necessary.
Choosing the Right Pot
Selecting the right pot is crucial for successful bush bean cultivation. Here’s a more detailed look at pot considerations:
* **Size Matters:** As I mentioned earlier, a pot that’s at least 12 inches in diameter and 12 inches deep is essential. This provides ample space for the roots to develop and prevents the plant from becoming root-bound. If you’re planting multiple plants in one pot, you’ll need an even larger container.
* **Material Considerations:**
* **Terracotta Pots:** These are porous, allowing for good air circulation and drainage. However, they can dry out quickly, especially in hot weather.
* **Plastic Pots:** These are lightweight, inexpensive, and retain moisture well. However, they can overheat in direct sunlight and may not provide as good air circulation as terracotta pots.
* **Fabric Pots:** These are my personal favorite! They allow for excellent drainage and aeration, preventing root rot. They’re also lightweight and easy to move around.
* **Drainage is Key:** Regardless of the material you choose, make sure your pot has drainage holes to prevent waterlogging. If your pot doesn’t have drainage holes, you can drill some yourself.
* **Color Considerations:** Dark-colored pots absorb more heat than light-colored pots. In hot climates, it’s best to choose light-colored pots to prevent the soil from overheating.
Soil Preparation: The Foundation for Success
The quality of your potting mix is just as important as the size of your pot. Here’s what you need to know about soil preparation:
* **Avoid Garden Soil:** As I mentioned earlier, garden soil is too heavy and compacts easily, which can suffocate the roots.
* **Choose a High-Quality Potting Mix:** Look for a potting mix that’s specifically formulated for containers. These mixes are typically lighter and more porous than garden soil, providing better drainage and aeration.
* **Amendments:** You can amend your potting mix with compost, worm castings, or other organic materials to improve its fertility and drainage.
* **pH Level:** Bush beans prefer a slightly
Conclusion
So, there you have it! Growing bush beans in pots is not only achievable, but it’s also a rewarding and surprisingly simple way to bring fresh, homegrown goodness right to your doorstep. Forget the sprawling garden plot – with a few pots, some quality soil, and a handful of bush bean seeds, you can enjoy a bountiful harvest of crisp, delicious beans all season long.
Why is this DIY trick a must-try? Because it democratizes gardening! It empowers anyone, regardless of space constraints or gardening experience, to cultivate their own food. Imagine stepping outside your apartment or onto your balcony and picking fresh beans for dinner. It’s a connection to nature, a source of pride, and a way to ensure you’re eating the freshest, most flavorful produce possible. Plus, it’s incredibly satisfying to watch those tiny seeds sprout and transform into a thriving, bean-producing plant.
But the benefits don’t stop there. Growing your own bush beans allows you to control the growing environment, minimizing the risk of pests and diseases that can plague traditional gardens. You can choose organic methods, ensuring that your beans are free from harmful chemicals. And let’s not forget the cost savings! A packet of seeds is far cheaper than buying beans at the grocery store, especially when you consider the continuous harvest you’ll enjoy.
Ready to take your bean growing to the next level? Consider these variations and suggestions:
* Succession Planting: Plant a new batch of seeds every two to three weeks to ensure a continuous harvest throughout the growing season. This way, you’ll always have fresh beans ready to pick.
* Companion Planting: Plant marigolds or nasturtiums near your bush beans to deter pests. These flowers are natural insect repellents and can help keep your bean plants healthy.
* Vertical Support: While bush beans don’t require extensive support like pole beans, providing a small trellis or some stakes can help keep the plants upright and prevent the beans from touching the soil. This can reduce the risk of rot and disease.
* Variety is the Spice of Life: Experiment with different varieties of bush beans! There are green beans, yellow wax beans, purple beans, and even beans with unique flavor profiles. Find your favorites and enjoy the diversity of flavors.
* Container Size Matters: While we’ve emphasized the ease of growing in pots, remember that the size of the pot does matter. A larger pot (at least 12 inches in diameter) will provide more room for the roots to grow and will retain moisture better, leading to healthier and more productive plants.
* Soil Enrichment: Amend your potting mix with compost or other organic matter to provide your bush beans with the nutrients they need to thrive. A well-nourished plant is a happy plant!
Growing bush beans in pots is a fantastic way to experience the joys of gardening, even if you have limited space. It’s a simple, rewarding, and delicious way to connect with nature and enjoy fresh, homegrown produce. So, grab some seeds, find a sunny spot, and get planting!
We’re confident that you’ll be amazed at how easy and rewarding it is to grow your own bush beans. Don’t be afraid to experiment, learn from your mistakes, and most importantly, have fun!
Now, we want to hear from you! Have you tried growing bush beans in pots before? What tips and tricks have you learned along the way? Share your experiences, photos, and questions in the comments below. Let’s create a community of pot-growing bean enthusiasts and help each other succeed! We can’t wait to see your bean-tastic creations!
Frequently Asked Questions (FAQ)
What is the best time to plant bush beans in pots?
The best time to plant bush beans is after the last frost in your area. Bush beans are warm-season crops and are sensitive to cold temperatures. Soil temperature should be consistently above 60°F (15°C) for optimal germination. You can start seeds indoors 2-3 weeks before the last expected frost to get a head start, but be sure to harden them off before transplanting them into pots outdoors. Check your local weather forecast and planting guides for specific dates in your region.
How much sunlight do bush beans need when grown in pots?
Bush beans require at least 6-8 hours of direct sunlight per day to thrive. Choose a location for your pots that receives ample sunlight throughout the day. If you live in a particularly hot climate, some afternoon shade may be beneficial to prevent the plants from overheating. If you don’t have a spot that receives enough natural sunlight, you can supplement with grow lights.
What type of soil is best for growing bush beans in pots?
Use a well-draining potting mix specifically formulated for containers. Avoid using garden soil, as it can become compacted in pots and hinder drainage. A good potting mix will retain moisture while allowing excess water to drain away, preventing root rot. You can also amend the potting mix with compost or other organic matter to improve its fertility and drainage.
How often should I water bush beans in pots?
Water your bush beans regularly, especially during hot and dry weather. The soil should be kept consistently moist, but not waterlogged. Check the soil moisture by sticking your finger about an inch into the soil. If it feels dry, it’s time to water. Water deeply, allowing the water to drain out of the bottom of the pot. Avoid overhead watering, as this can promote fungal diseases.
Do bush beans need fertilizer when grown in pots?
Yes, bush beans benefit from regular fertilization, especially when grown in pots. Use a balanced fertilizer (e.g., 10-10-10) or a fertilizer specifically formulated for vegetables. Follow the instructions on the fertilizer package for application rates and frequency. You can also use organic fertilizers, such as compost tea or fish emulsion. Avoid over-fertilizing, as this can lead to excessive foliage growth and reduced bean production.
How long does it take for bush beans to mature and produce beans?
Bush beans typically mature and produce beans in 50-60 days from planting. However, this can vary depending on the variety, growing conditions, and climate. Check the seed packet for specific information on the maturity time of your chosen variety. You can start harvesting beans when they are firm, plump, and easily snap off the plant.
What are some common pests and diseases that affect bush beans?
Common pests that can affect bush beans include aphids, bean beetles, and spider mites. Diseases include powdery mildew, bean rust, and anthracnose. Regularly inspect your plants for signs of pests or diseases. You can control pests with insecticidal soap, neem oil, or by handpicking them off the plants. Prevent diseases by providing good air circulation, avoiding overhead watering, and using disease-resistant varieties.
Can I grow bush beans indoors?
While it’s possible to grow bush beans indoors, it can be challenging to provide them with the necessary sunlight and growing conditions. If you want to try growing them indoors, choose a sunny location near a south-facing window or use grow lights to supplement natural light. You’ll also need to ensure good air circulation and provide adequate support for the plants.
How do I harvest bush beans?
Harvest bush beans when the pods are firm, plump, and easily snap off the plant. Use scissors or pruning shears to cut the beans from the plant, being careful not to damage the stems. Harvest regularly to encourage continued production. Overripe beans can become tough and stringy.
Can I save seeds from my bush bean plants?
Yes, you can save seeds from your bush bean plants, but only if they are open-pollinated varieties. Hybrid varieties will not produce true-to-type seeds. To save seeds, allow some of the bean pods to dry completely on the plant. Once the pods are dry and brittle, shell the beans and store them in an airtight container in a cool, dry place.

Leave a Comment