

Growing Bok Choy at Home can be surprisingly easy and rewarding, even if you don’t have a sprawling garden! Have you ever dreamed of snipping fresh, crisp greens right from your backyard (or balcony!) for a delicious stir-fry? Well, dream no more! This DIY guide is packed with simple tricks and hacks that will transform you into a Bok Choy-growing pro in no time.
Bok Choy, also known as Chinese cabbage, has been cultivated in China for over 5,000 years. It’s a staple in Asian cuisine, prized for its mild, slightly sweet flavor and crunchy texture. Beyond its culinary appeal, Bok Choy is packed with vitamins and nutrients, making it a healthy and delicious addition to any diet.
In today’s busy world, finding time for gardening can feel like a luxury. But what if I told you that growing Bok Choy at home doesn’t require hours of back-breaking labor? This DIY article will show you how to maximize your yield with minimal effort, whether you have a large garden or just a few pots on your windowsill. We’ll cover everything from choosing the right seeds to protecting your plants from pests, ensuring you have a bountiful harvest of fresh, homegrown Bok Choy. So, let’s get our hands dirty and start growing!
Growing Bok Choy at Home: A Beginner’s Guide
Hey there, fellow gardening enthusiasts! I’m so excited to share my experience with growing bok choy at home. It’s surprisingly easy, even if you’re a complete newbie like I was not too long ago. Bok choy, also known as pak choi, is a delicious and nutritious leafy green that’s perfect for stir-fries, soups, and salads. Plus, it grows relatively quickly, so you’ll be enjoying your homegrown harvest in no time!
Choosing the Right Bok Choy Variety
Before we dive into the nitty-gritty, let’s talk about choosing the right bok choy variety. There are several options available, each with its own unique characteristics.
* Dwarf Varieties: These are perfect for container gardening or small spaces. They mature quickly and produce smaller, more compact heads. Some popular dwarf varieties include ‘Joi Choi’ and ‘Mei Qing Choi’.
* Standard Varieties: These varieties grow larger and take a bit longer to mature. They’re a great choice if you have more space and want a larger harvest. ‘Shanghai Green’ and ‘White Stem’ are excellent standard varieties.
* Red Varieties: For a pop of color in your garden, consider growing a red bok choy variety like ‘Red Choi’. They have a slightly different flavor than the green varieties, but they’re just as delicious.
I personally love growing ‘Joi Choi’ because it’s so easy to manage in my small balcony garden. But feel free to experiment and find the variety that works best for you!
Getting Started: Seeds vs. Seedlings
You have two options when it comes to starting your bok choy: seeds or seedlings.
* Seeds: Starting from seeds is more economical and gives you more control over the growing process. However, it requires a bit more patience and attention.
* Seedlings: Buying seedlings from a local nursery is a quicker and easier option, especially if you’re short on time or don’t have a lot of experience with seed starting.
I’ve tried both methods, and I personally prefer starting from seeds. There’s something so rewarding about watching those tiny seeds sprout and grow into healthy plants!
Planting Bok Choy: A Step-by-Step Guide
Okay, let’s get our hands dirty! Here’s a step-by-step guide to planting bok choy, whether you’re starting from seeds or seedlings.
Planting from Seeds
1. Choose the Right Time: Bok choy is a cool-season crop, so it’s best to plant it in early spring or late summer/early fall. Avoid planting during the hottest months of the year, as the plants may bolt (go to seed prematurely). I usually start my seeds indoors about 4-6 weeks before the last expected frost in spring, or directly sow them in the garden in late summer.
2. Prepare the Soil: Bok choy prefers well-drained, fertile soil with a pH of 6.0 to 7.5. Amend your soil with compost or other organic matter to improve its fertility and drainage. I like to add a generous amount of composted manure to my garden beds before planting.
3. Sow the Seeds: Sow the seeds about 1/4 to 1/2 inch deep and 1 inch apart. If you’re planting in rows, space the rows about 12 inches apart. Gently water the soil after planting.
4. Thin the Seedlings: Once the seedlings emerge and have a few true leaves, thin them to about 6-8 inches apart. This will give the plants enough room to grow and prevent overcrowding. Don’t just throw away the thinned seedlings! You can transplant them to another location or even eat them as microgreens.
5. Water Regularly: Keep the soil consistently moist, but not waterlogged. Water deeply whenever the top inch of soil feels dry. I usually water my bok choy plants every other day, or more often during hot weather.
Planting Seedlings
1. Choose Healthy Seedlings: Select seedlings that are healthy, vigorous, and free from pests and diseases. Avoid seedlings that are leggy or have yellowing leaves.
2. Prepare the Soil: Just like with seeds, you’ll need to prepare the soil before planting seedlings. Amend it with compost or other organic matter to improve its fertility and drainage.
3. Dig Holes: Dig holes that are slightly larger than the root balls of the seedlings. Space the holes about 6-8 inches apart.
4. Plant the Seedlings: Gently remove the seedlings from their containers and loosen the root balls. Place the seedlings in the holes and backfill with soil. Make sure the top of the root ball is level with the surrounding soil.
5. Water Thoroughly: Water the seedlings thoroughly after planting. This will help them settle into their new home and prevent transplant shock.
Caring for Your Bok Choy Plants
Once your bok choy plants are established, it’s important to provide them with the care they need to thrive.
* Watering: Bok choy needs consistent moisture to grow well. Water deeply whenever the top inch of soil feels dry. Avoid overhead watering, as this can lead to fungal diseases. I prefer to use a soaker hose or drip irrigation to water my bok choy plants.
* Fertilizing: Bok choy is a heavy feeder, so it’s important to fertilize it regularly. Use a balanced fertilizer or a fertilizer specifically formulated for leafy greens. I like to use a liquid fertilizer diluted to half strength every two weeks.
* Weeding: Keep the area around your bok choy plants free of weeds. Weeds can compete with the plants for nutrients and water, and they can also harbor pests and diseases. I usually hand-pull weeds as soon as I see them.
* Pest Control: Bok choy can be susceptible to pests such as aphids, cabbage worms, and flea beetles. Inspect your plants regularly for signs of pests and take action if necessary. I like to use organic pest control methods, such as insecticidal soap or neem oil.
* Sunlight: Bok choy prefers full sun, but it can tolerate partial shade. Aim for at least 6 hours of sunlight per day. In hot climates, providing some afternoon shade can help prevent bolting.
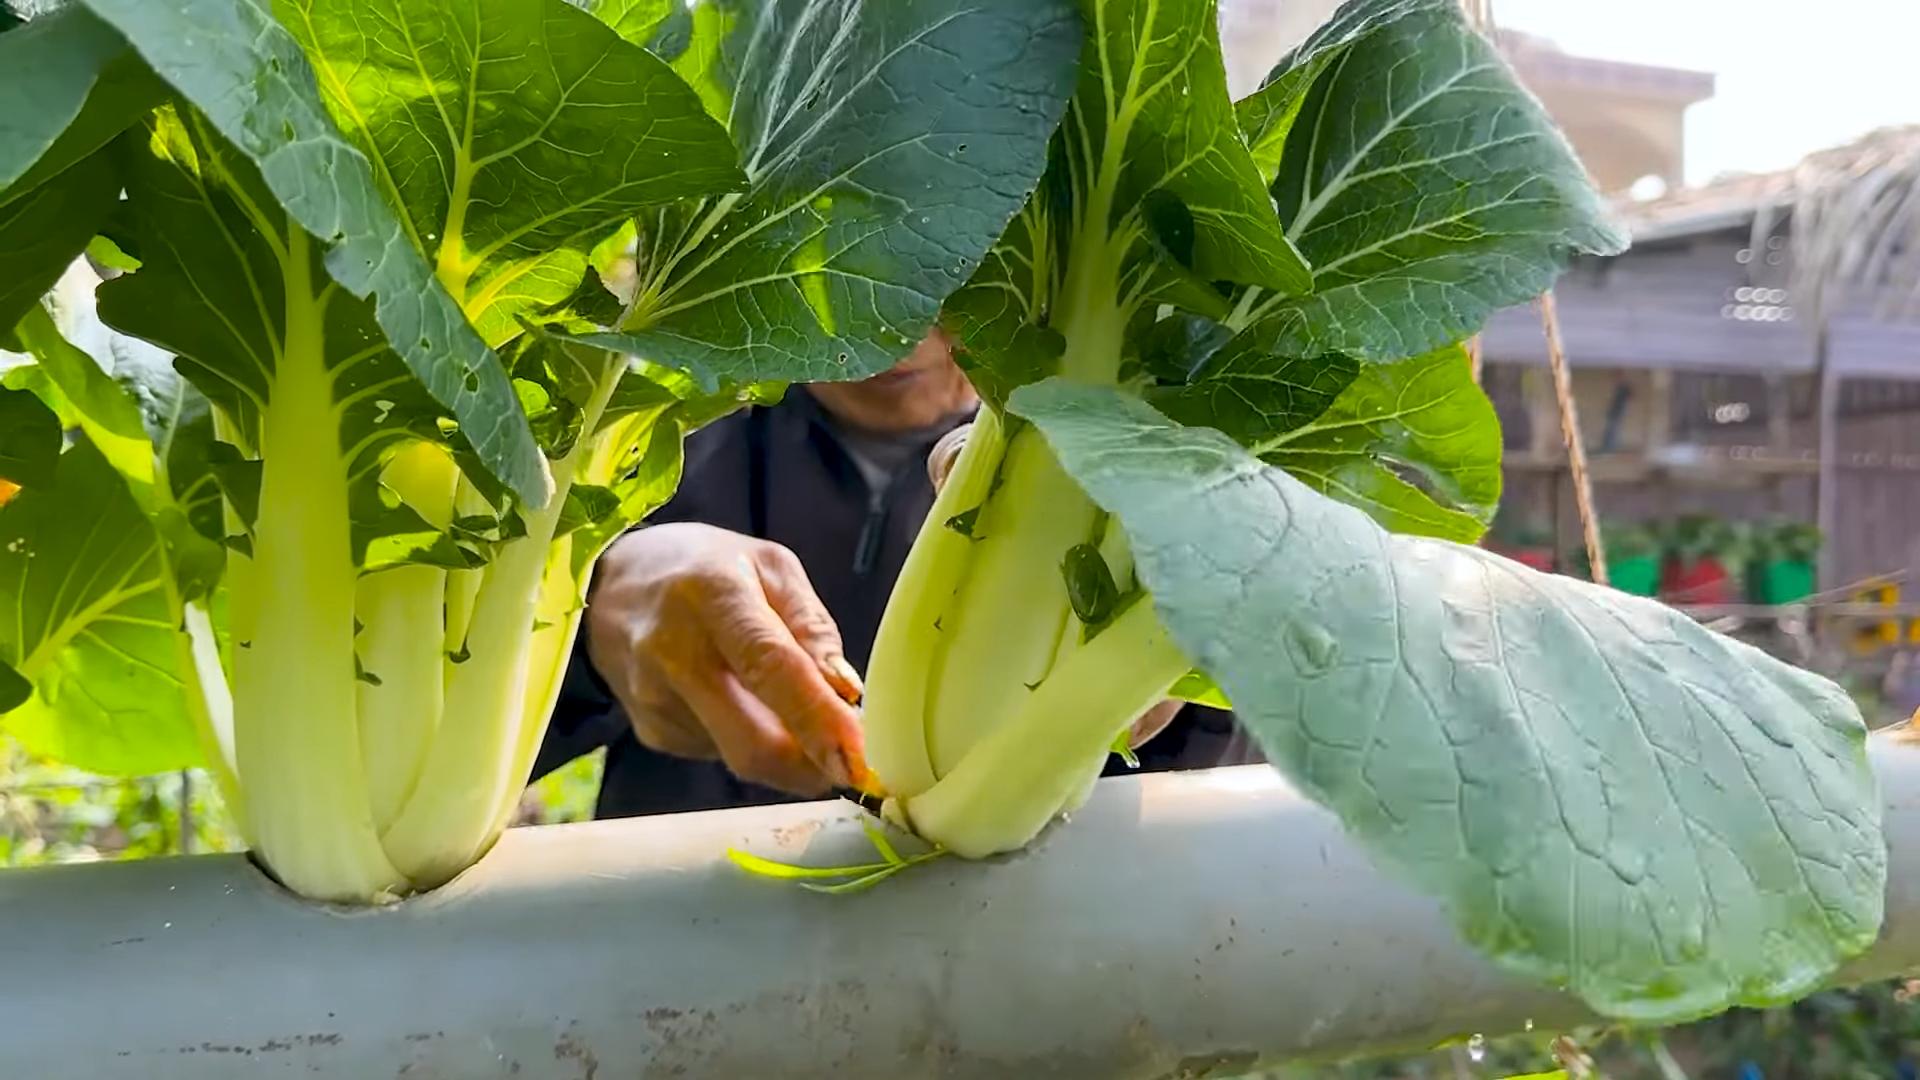
Harvesting Your Bok Choy
The best part of growing bok choy is, of course, harvesting it! You can harvest bok choy at any stage of growth, depending on your preference.
* Baby Bok Choy: You can harvest baby bok choy when the leaves are about 4-6 inches long. These tender leaves are perfect for salads and stir-fries.
* Mature Bok Choy: You can harvest mature bok choy when the heads are about 8-12 inches tall. Cut the entire head at the base of the plant.
I usually harvest my bok choy leaves as needed, rather than harvesting the entire head at once. This allows me to enjoy a continuous harvest over a longer period of time.
To harvest, simply cut the outer leaves with a sharp knife, leaving the inner leaves to continue growing. Be sure to wash the leaves thoroughly before using them.
Troubleshooting Common Problems
Even with the best care, you may encounter some problems when growing bok choy. Here are a few common issues and how to address them:
* Bolting: Bolting is when the plant prematurely goes to seed. This can happen if the weather is too hot or if the plant is stressed. To prevent bolting, plant bok choy in early spring or late summer/early fall, and provide it with consistent moisture and shade during hot weather.
* Pests: As mentioned earlier, bok choy can be susceptible to pests such as aphids, cabbage worms, and flea beetles. Inspect your plants regularly for signs of pests and take action if necessary.
* Diseases: Bok choy can also be susceptible to diseases such as downy mildew and clubroot. To prevent diseases, plant bok choy in well-drained soil, avoid overhead watering, and practice crop rotation.
Enjoying Your Homegrown Bok Choy
Congratulations! You’ve successfully grown bok choy at home. Now it’s time to enjoy the fruits (or rather, vegetables) of your labor.
Bok choy is a versatile vegetable that can be used in a variety of dishes. Here are a few of my favorite ways to enjoy it:
* Stir-fries: Bok choy is a classic ingredient in stir-fries. It adds a delicious crunch and a boost of nutrients.
* Soups: Bok choy can be added to soups for extra flavor and texture.
* Salads: Baby bok choy leaves are a great addition to salads.
* Steamed: Steamed bok choy is a simple and healthy side dish.
* Grilled: Grilled bok choy is a delicious and smoky treat.
I hope this guide has inspired you to try growing bok choy at
Conclusion
So, there you have it! Growing bok choy at home is not only achievable, but it’s also incredibly rewarding. From the crisp, tender leaves in your salads to the satisfying crunch in your stir-fries, the flavor of homegrown bok choy is simply unmatched. Forget those limp, store-bought bunches that have traveled miles – imagine stepping into your garden or onto your balcony and harvesting fresh, vibrant bok choy whenever you need it.
This DIY trick, as we’ve outlined, offers a simple, cost-effective, and sustainable way to enjoy this nutritious vegetable. It bypasses the uncertainties of relying on grocery store availability and allows you to control the entire growing process, ensuring your bok choy is free from unwanted pesticides and chemicals. Plus, there’s a unique satisfaction that comes from nurturing a plant from seed to table.
But the beauty of growing bok choy at home lies in its adaptability. Feel free to experiment with different varieties! Try growing baby bok choy for a quicker harvest and more delicate flavor, or explore the vibrant colors of red bok choy for an added visual appeal to your dishes. You can also adjust the planting schedule to extend your harvest season, ensuring a continuous supply of fresh greens. Consider companion planting with herbs like dill or chamomile, which can help deter pests and enhance the flavor of your bok choy.
Don’t be afraid to get your hands dirty and embrace the learning process. Gardening is all about experimentation and discovery. Even if you encounter a few challenges along the way, remember that every mistake is an opportunity to learn and improve.
We wholeheartedly encourage you to give this DIY trick a try. It’s a fantastic way to connect with nature, enjoy fresh, healthy food, and add a touch of green to your life. Once you’ve harvested your first batch of homegrown bok choy, we’d love to hear about your experience! Share your tips, successes, and even your challenges in the comments below. Let’s create a community of bok choy enthusiasts and learn from each other. What are you waiting for? Start growing your own delicious bok choy today!
Frequently Asked Questions (FAQ)
1. What is the best time of year to start growing bok choy at home?
Bok choy thrives in cooler temperatures, making spring and fall the ideal seasons for planting. Avoid the intense heat of summer, as it can cause the plants to bolt (go to seed prematurely), resulting in bitter-tasting leaves. If you live in a region with mild winters, you may even be able to grow bok choy throughout the winter months. For spring planting, start seeds indoors 4-6 weeks before the last expected frost. For fall planting, sow seeds directly into the garden in late summer or early fall, about 6-8 weeks before the first expected frost.
2. What kind of soil is best for growing bok choy?
Bok choy prefers well-draining soil that is rich in organic matter. Amend your garden soil with compost or well-rotted manure before planting to improve its fertility and drainage. A slightly acidic to neutral soil pH (around 6.0 to 7.0) is ideal. You can test your soil pH using a home testing kit or by sending a sample to your local agricultural extension office. If your soil is too acidic, you can add lime to raise the pH.
3. How much sunlight does bok choy need?
Bok choy needs at least 4-6 hours of sunlight per day to thrive. While it can tolerate some shade, especially during the hottest part of the day, insufficient sunlight can result in leggy growth and reduced yields. Choose a planting location that receives ample sunlight, particularly in the morning.
4. How often should I water my bok choy plants?
Bok choy needs consistent moisture to grow well. Water deeply and regularly, especially during dry periods. Aim to keep the soil consistently moist but not waterlogged. Overwatering can lead to root rot, so ensure your soil has good drainage. Mulching around the plants can help retain moisture and suppress weeds.
5. What are some common pests and diseases that affect bok choy?
Common pests that can affect bok choy include aphids, cabbage worms, flea beetles, and slugs. Regularly inspect your plants for signs of infestation and take appropriate action. You can use organic pest control methods such as insecticidal soap, neem oil, or handpicking pests off the plants. Diseases that can affect bok choy include downy mildew and clubroot. Ensure good air circulation around your plants and avoid overhead watering to prevent these diseases. Crop rotation can also help reduce the risk of soilborne diseases.
6. How do I harvest bok choy?
You can harvest bok choy at any stage of growth, depending on your preference. For baby bok choy, harvest when the leaves are about 4-6 inches long. For mature bok choy, harvest when the heads are firm and compact, typically about 6-8 inches in diameter. You can harvest the entire head at once by cutting it off at the base, or you can harvest individual leaves as needed, starting with the outer leaves.
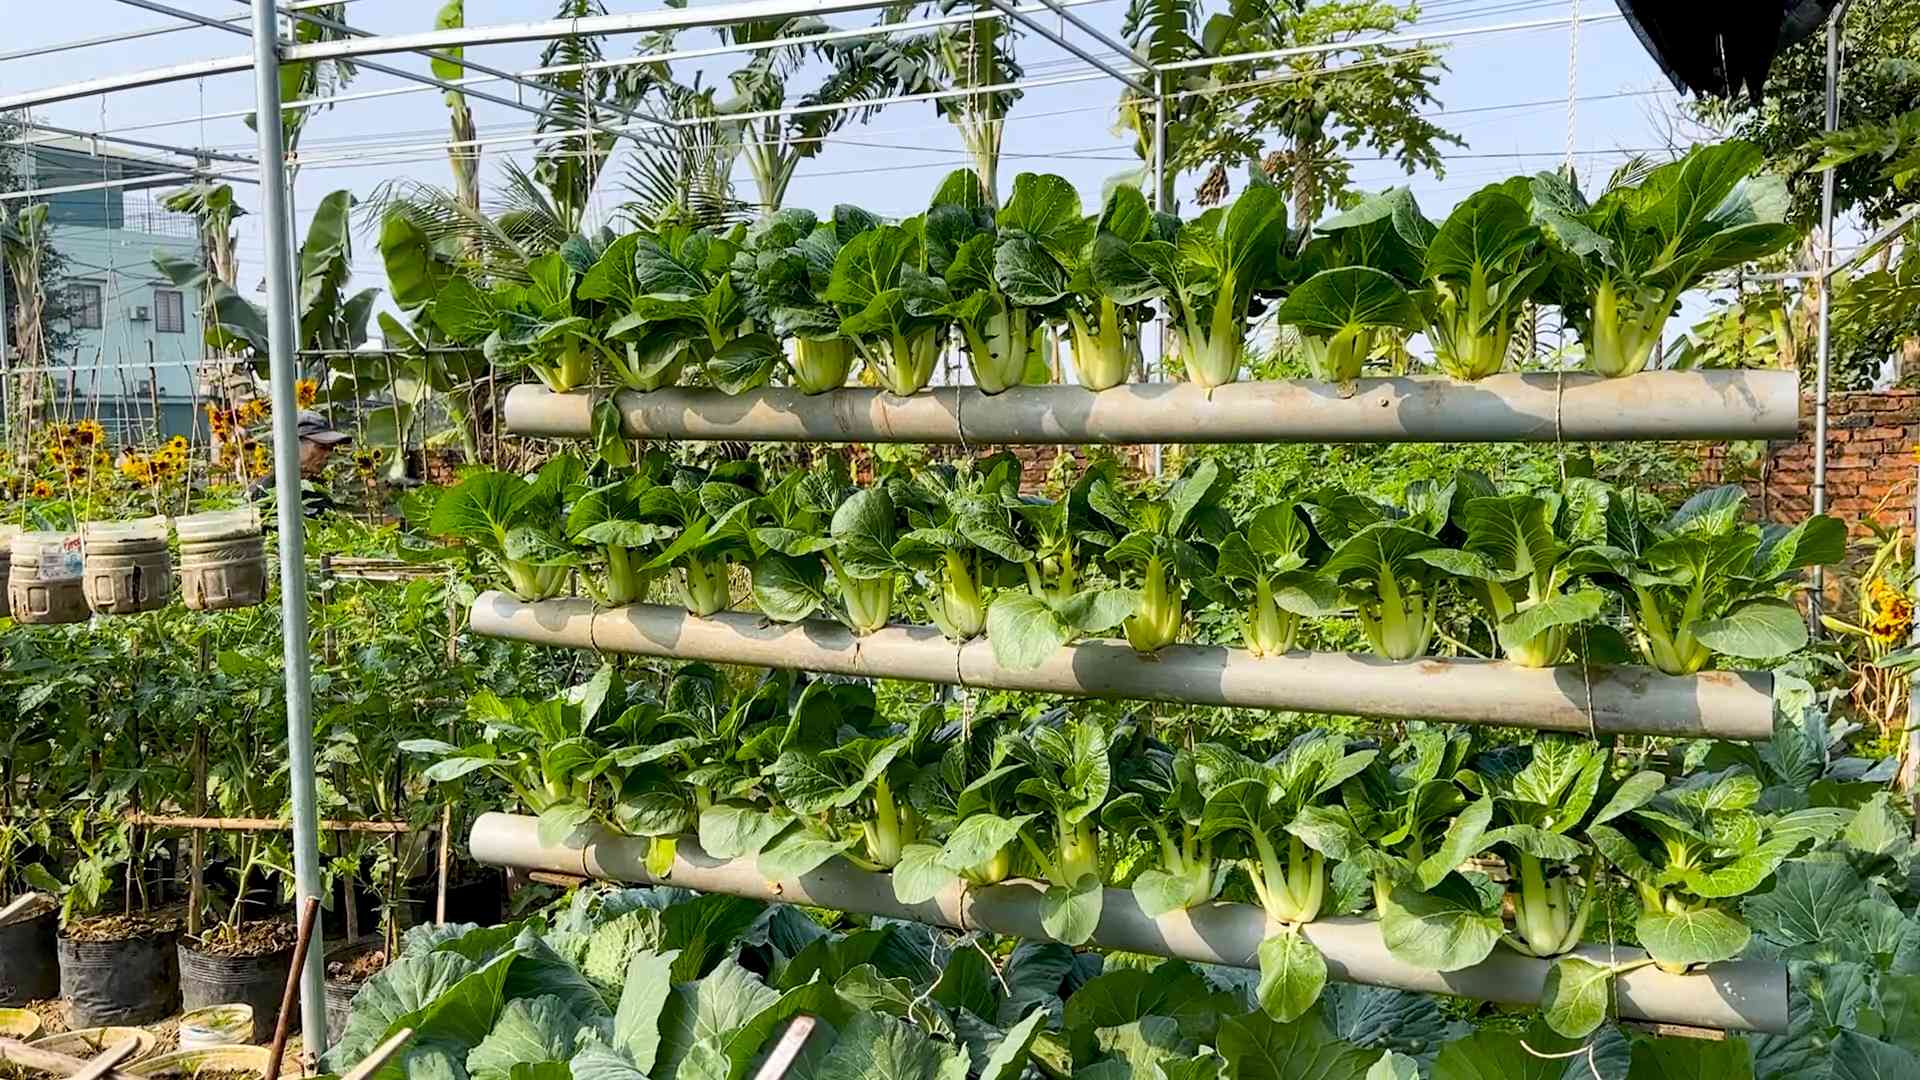
7. Can I grow bok choy in containers?
Yes, bok choy can be successfully grown in containers. Choose a container that is at least 12 inches deep and wide to allow sufficient room for the roots to grow. Use a well-draining potting mix and ensure the container has drainage holes. Water regularly and fertilize with a balanced fertilizer every few weeks. Container-grown bok choy may require more frequent watering than plants grown in the ground.
8. How do I prevent bok choy from bolting?
Bolting is when a plant prematurely flowers and goes to seed, often due to stress from heat or lack of water. To prevent bolting, plant bok choy in the spring or fall when temperatures are cooler. Provide consistent moisture and avoid letting the soil dry out. Choose bolt-resistant varieties of bok choy. If you notice signs of bolting, such as a tall flower stalk emerging from the center of the plant, harvest the bok choy immediately.
9. What are some good companion plants for bok choy?
Companion planting can help improve the growth and health of your bok choy. Good companion plants for bok choy include:
* **Aromatic herbs:** Dill, chamomile, and mint can help deter pests.
* **Legumes:** Peas and beans can fix nitrogen in the soil, benefiting bok choy.
* **Alliums:** Garlic and onions can repel pests and improve soil health.
* **Marigolds:** These flowers can attract beneficial insects and deter nematodes.
Avoid planting bok choy near other members of the brassica family, such as cabbage, broccoli, and cauliflower, as they can attract the same pests and diseases.
10. How do I store harvested bok choy?
To store harvested bok choy, wash it thoroughly and pat it dry. Wrap the bok choy in a damp paper towel and place it in a plastic bag in the refrigerator. It should keep for up to a week. You can also freeze bok choy, but it will lose some of its crispness. To freeze, blanch the bok choy in boiling water for 2-3 minutes, then plunge it into ice water to stop the cooking process. Drain well and freeze in freezer bags or containers.
Leave a Comment