

Grow Winged Beans at Home? Absolutely! Imagine stepping into your backyard and harvesting vibrant, nutritious beans that you grew yourself. It’s easier than you think, and this guide is packed with DIY tricks to make it a reality, even if you’re a complete beginner. Forget those bland, store-bought vegetables; we’re talking about fresh, flavorful winged beans straight from your garden to your table!
Winged beans, also known as asparagus peas or Goa beans, have a rich history, particularly in Southeast Asia and Papua New Guinea, where they’ve been cultivated for centuries. They’re a nutritional powerhouse, offering a complete protein source and a wealth of vitamins and minerals. But beyond their nutritional value, they’re also incredibly versatile in the kitchen, adding a unique texture and flavor to stir-fries, salads, and soups.
So, why should you learn to grow winged beans at home? Well, for starters, you’ll have access to a fresh, sustainable food source right at your fingertips. Plus, gardening is a fantastic way to relieve stress, connect with nature, and get some exercise. And let’s be honest, there’s nothing quite as satisfying as watching your plants thrive and then enjoying the fruits (or in this case, the beans!) of your labor. This DIY guide will provide you with simple, effective hacks to overcome common gardening challenges and ensure a bountiful harvest of winged beans. Let’s get started!
Grow Your Own Winged Beans: A Complete DIY Guide
Hey there, fellow gardening enthusiasts! Ever heard of winged beans? They’re these amazing, versatile legumes that are not only delicious but also incredibly nutritious. The entire plant is edible – the pods, leaves, flowers, seeds, and even the tubers! I’ve been growing them for a few years now, and I’m excited to share my secrets to help you cultivate your own winged bean bounty.
What You’ll Need
Before we dive in, let’s gather our supplies. This is what I’ve found works best for me:
* Winged bean seeds (obviously!). You can find these online or at specialty seed stores.
* Well-draining soil. A mix of compost, potting soil, and a little bit of sand works wonders.
* Large pots or a garden bed with plenty of space. These vines can get quite large!
* A sturdy trellis or support structure. Think bamboo poles, netting, or even an existing fence.
* Organic fertilizer. I prefer compost tea or a balanced slow-release fertilizer.
* Watering can or hose.
* Gardening gloves.
* Optional: Seed starting trays and a heat mat (for starting seeds indoors).
Getting Started: Seed Preparation and Germination
Winged bean seeds have a hard outer shell, so we need to give them a little head start to ensure successful germination. Here’s how I do it:
1. Scarification: Gently nick the seed coat with a knife or sandpaper. Be careful not to damage the inner part of the seed! This helps water penetrate the seed more easily.
2. Soaking: Place the scarified seeds in a bowl of lukewarm water and let them soak for 12-24 hours. This further softens the seed coat and encourages germination.
3. Starting Indoors (Optional): If you live in a cooler climate or want a head start on the growing season, you can start your seeds indoors. Fill seed starting trays with your well-draining soil mix. Plant each seed about 1 inch deep. Keep the soil moist and warm (around 70-80°F). A heat mat can be helpful here.
4. Direct Sowing: If you live in a warmer climate with a long growing season, you can sow the seeds directly into your garden bed or pots. Make sure the soil temperature is consistently above 65°F. Plant the seeds about 1 inch deep and space them about 12-18 inches apart.
Planting and Setting Up Your Support System
Once your seedlings have sprouted (either indoors or outdoors), it’s time to get them settled into their permanent home.
1. Choosing the Right Location: Winged beans need at least 6-8 hours of sunlight per day. Choose a location that receives plenty of sunshine. Also, make sure the soil is well-draining.
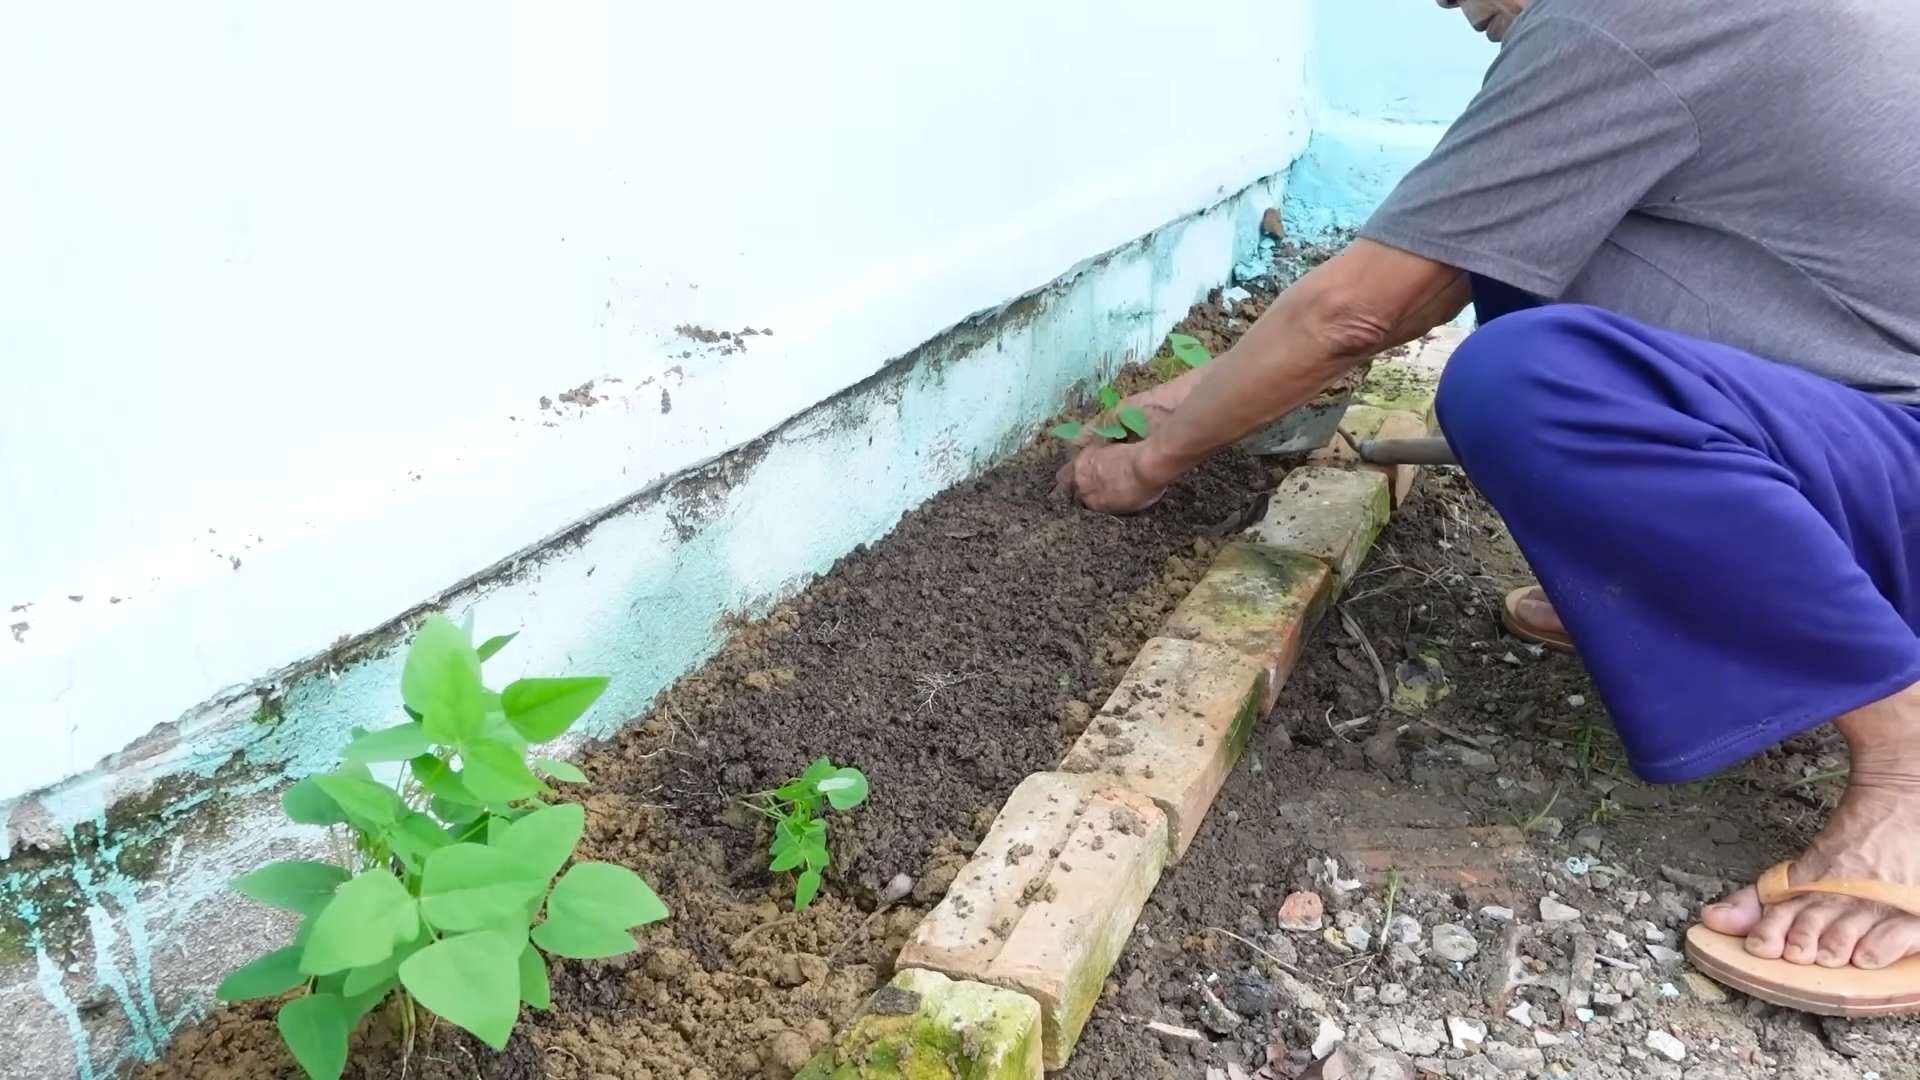
2. Preparing the Soil: If you’re planting in a garden bed, amend the soil with plenty of compost. This will improve drainage and provide essential nutrients. If you’re planting in pots, use a high-quality potting mix.
3. Transplanting Seedlings (If Starting Indoors): Gently remove the seedlings from the seed starting trays, being careful not to damage the roots. Dig a hole in the prepared soil that is large enough to accommodate the root ball. Place the seedling in the hole and backfill with soil. Water thoroughly.
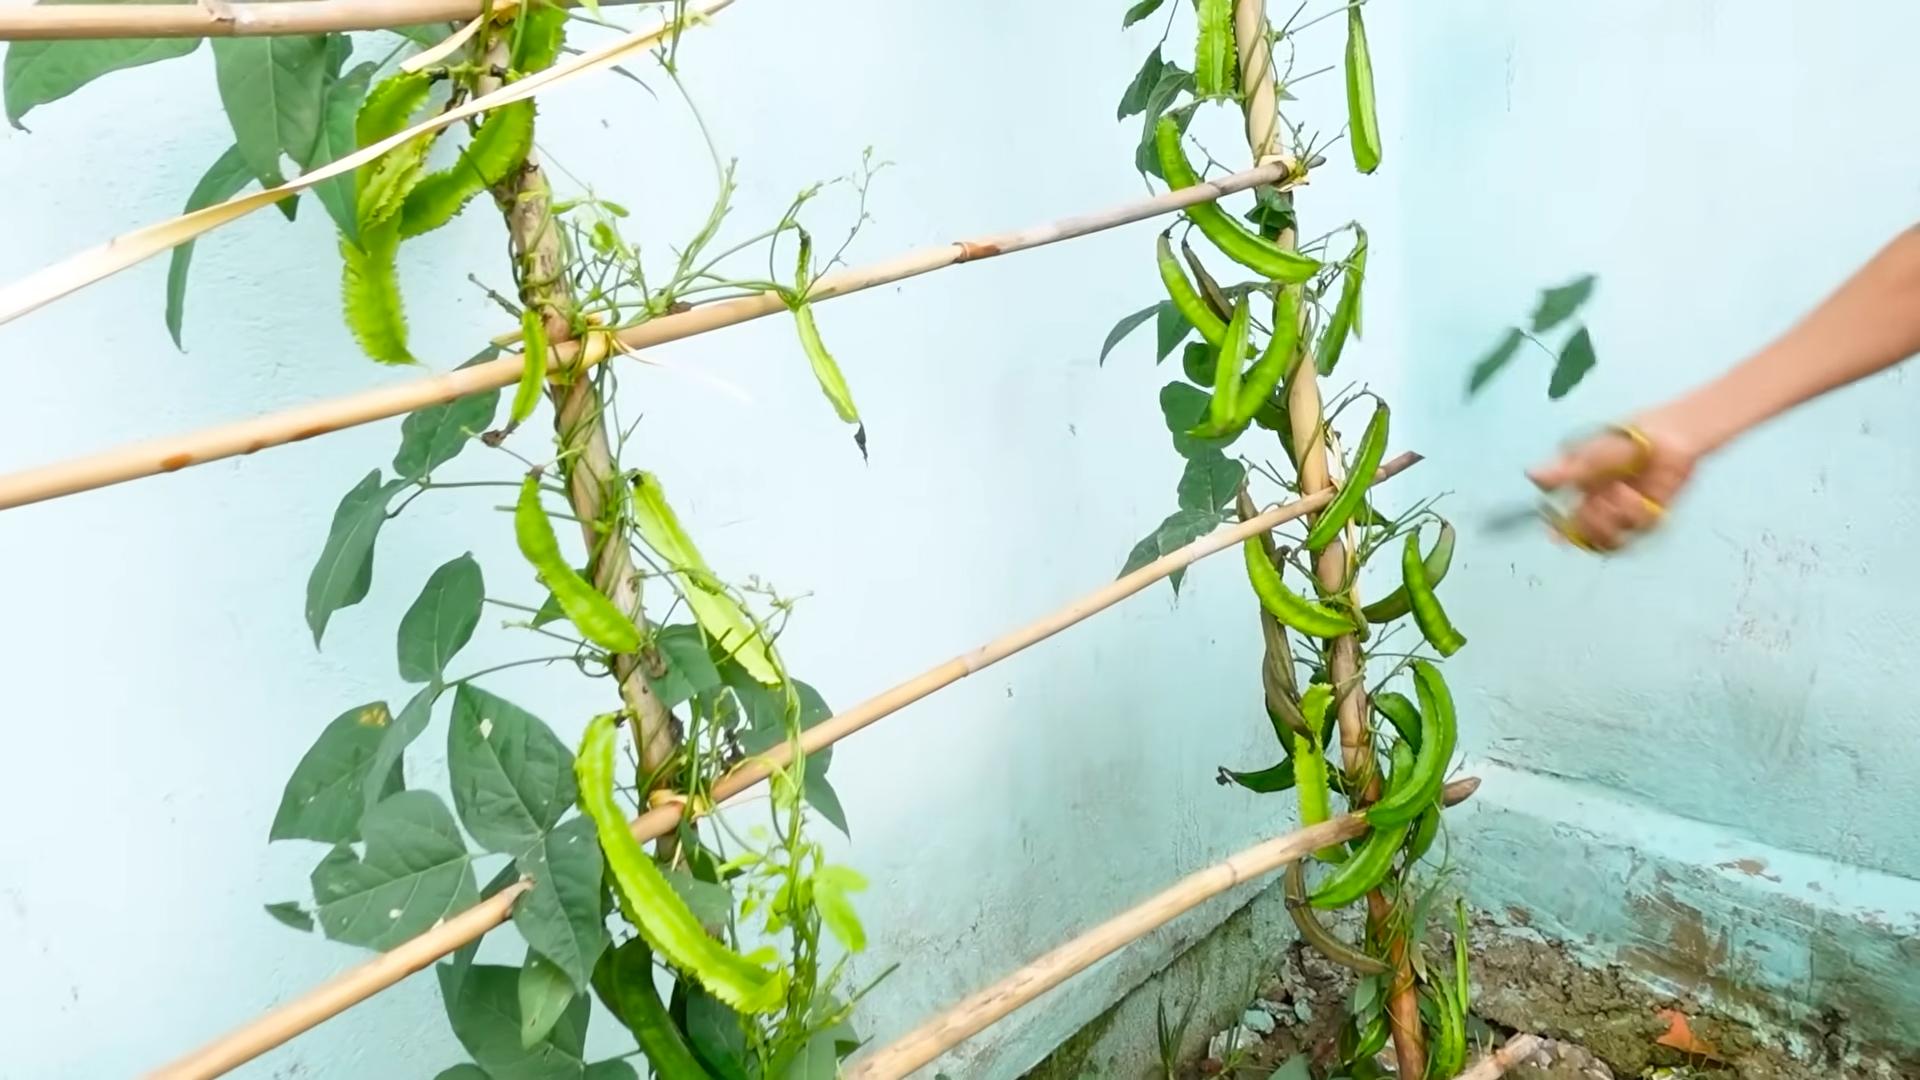
4. Setting Up the Trellis: Winged beans are climbing vines, so they need a sturdy support structure to grow on. Install your trellis or support system before or shortly after planting. Make sure it’s tall enough to accommodate the mature vines, which can reach 6-12 feet in length. I’ve found that a simple A-frame trellis made from bamboo poles works great. You can also use netting stretched between posts or even train the vines to grow on an existing fence.
5. Guiding the Vines: As the vines grow, gently guide them onto the trellis. You may need to tie them to the support structure with twine or plant clips.
Caring for Your Winged Bean Plants
Now that your winged beans are planted and supported, it’s time to provide them with the care they need to thrive.
1. Watering: Water your winged bean plants regularly, especially during dry periods. Keep the soil consistently moist, but avoid overwatering, which can lead to root rot. I usually water deeply every few days, depending on the weather.
2. Fertilizing: Winged beans are heavy feeders, so they benefit from regular fertilization. Apply a balanced organic fertilizer every 2-3 weeks. Compost tea is also a great option.
3. Weeding: Keep the area around your winged bean plants free of weeds. Weeds compete with the plants for nutrients and water.
4. Pest and Disease Control: Winged beans are relatively pest-resistant, but they can be susceptible to aphids, spider mites, and bean beetles. Inspect your plants regularly for signs of pests or disease. If you find any, treat them with an organic insecticide or fungicide. I prefer using neem oil for pest control.
5. Pruning: Pruning isn’t strictly necessary, but it can help to promote bushier growth and increase pod production. You can prune the vines to control their size and shape.
Harvesting Your Winged Beans
The best part of growing winged beans is, of course, the harvest!
1. When to Harvest: You can start harvesting the pods when they are young and tender, about 6-8 inches long. The pods are most flavorful when they are still green and have not yet developed tough fibers. You can also harvest the leaves, flowers, and seeds. The tubers can be harvested in the fall, after the plants have died back.
2. How to Harvest: Simply snip the pods from the vine with scissors or pruning shears. Be careful not to damage the plant.
3. Storing Your Harvest: Fresh winged bean pods can be stored in the refrigerator for up to a week. You can also freeze them for longer storage. The seeds can be dried and stored in an airtight container.
Enjoying Your Winged Bean Bounty
Winged beans are incredibly versatile in the kitchen. Here are a few ways I like to use them:
* Pods: Stir-fried, steamed, boiled, or added to soups and stews.
* Leaves: Eaten raw in salads or cooked like spinach.
* Flowers: Added to salads or used as a garnish.
* Seeds: Roasted and eaten as a snack or ground into flour.
* Tubers: Boiled, roasted, or fried like potatoes.
Troubleshooting
Even with the best care, you might encounter some challenges along the way. Here are a few common problems and how to address them:
* Poor Germination: Make sure your seeds are fresh and viable. Scarify and soak the seeds before planting. Ensure the soil temperature is warm enough.
* Slow Growth: Winged beans need plenty of sunlight and nutrients. Make sure they are getting enough of both.
* Yellowing Leaves: This could be a sign of nutrient deficiency or overwatering. Check the soil moisture and fertilize if necessary.
* Pest Infestation: Inspect your plants regularly for pests and treat them with an organic insecticide.
* Lack of Pod Production: This could be due to insufficient sunlight, poor pollination, or nutrient deficiency. Make sure your plants are getting enough sunlight and fertilizer. You can also try hand-pollinating the flowers.
Advanced Techniques for Winged Bean Cultivation
Want to take your winged bean growing to the next level? Here are a few advanced techniques I’ve experimented with:
1. Succession Planting: Plant new seeds every few weeks to extend your harvest season.
2. Companion Planting: Plant winged beans alongside beneficial companion plants, such as basil, marigolds, and rosemary. These plants can help to deter pests and attract pollinators.
3. Saving Seeds: If you want to save seeds from your winged bean plants for future planting, allow the pods to dry completely on the vine. Once they are dry, remove the seeds and store them in an airtight container in a cool, dry place.
4. Soil Testing: Conduct a soil test to determine the nutrient content of your soil. This will help you to tailor your fertilization program to meet the specific needs of your winged bean plants.
5. Vertical Gardening: If you have limited space, consider growing winged beans vertically on a trellis or fence. This can help to maximize your growing area.
Understanding Winged Bean Varieties
There are several varieties of winged beans available, each with its own unique characteristics. Here are a few popular varieties:
1. Chimbu: A popular variety from Papua New Guinea, known for its high yield and disease resistance.
2. UPS 122: A high-yielding variety with long, slender pods.
3.
Conclusion
So, there you have it! Growing winged beans at home is not just a gardening project; it’s an adventure in flavor, sustainability, and self-sufficiency. This often-overlooked legume offers a unique culinary experience, providing edible pods, leaves, flowers, seeds, and even tubers – a true “one-stop shop” for the resourceful gardener. Forget those bland, store-bought vegetables; imagine stepping into your backyard and harvesting fresh, vibrant winged beans, bursting with nutrients and a distinctive, slightly nutty taste.
Why is this DIY trick a must-try? Because it empowers you to control the quality of your food, reduce your carbon footprint, and connect with nature in a tangible way. You’ll be amazed at how rewarding it is to nurture a plant from seed to harvest, knowing that you’re providing yourself and your family with healthy, delicious food. Plus, the stunning purple flowers of the winged bean vine add a touch of exotic beauty to any garden.
But the benefits don’t stop there. Growing your own winged beans allows you to experiment with different varieties, each with its own unique characteristics. You can try growing the ‘Chimbu’ variety, known for its early maturity, or the ‘UPS 122’ for its high yield. Consider exploring different trellising methods to maximize your growing space and create a visually appealing garden feature. You can even experiment with companion planting, pairing your winged beans with beneficial herbs and flowers to attract pollinators and deter pests.
For those who live in cooler climates, don’t despair! You can still enjoy the delights of winged beans by starting them indoors and transplanting them outdoors after the last frost. Or, consider growing them in containers in a greenhouse or sunny windowsill. With a little creativity and adaptation, anyone can successfully cultivate these versatile legumes.
We encourage you to embrace the challenge and embark on your own winged bean growing journey. It’s a rewarding experience that will not only enhance your culinary repertoire but also deepen your connection to the natural world. Don’t be afraid to experiment, learn from your mistakes, and most importantly, have fun!
And once you’ve harvested your first crop of winged beans, be sure to share your experiences with us! We’d love to hear about your successes, challenges, and favorite ways to prepare these delicious legumes. Share your photos, recipes, and tips in the comments below – let’s build a community of winged bean enthusiasts! Remember, the best way to learn is by sharing knowledge and experiences. So, get out there, get your hands dirty, and discover the joy of growing your own winged beans. You’ll be amazed at what you can achieve! This is truly a rewarding experience that will bring joy and deliciousness to your life.
FAQ
What are winged beans, and why should I grow them?
Winged beans (Psophocarpus tetragonolobus), also known as goa beans or asparagus peas, are a versatile legume native to Southeast Asia. They are unique because almost every part of the plant is edible, including the pods, leaves, flowers, seeds, and tubers. Growing them offers several benefits:
* **Nutritional Value:** Winged beans are packed with protein, vitamins, and minerals, making them a healthy addition to your diet.
* **Sustainability:** Growing your own food reduces your reliance on commercial agriculture and lowers your carbon footprint.
* **Culinary Versatility:** Winged beans can be used in a variety of dishes, from stir-fries and salads to soups and stews.
* **Ornamental Value:** The plant produces beautiful purple flowers, adding aesthetic appeal to your garden.
* **Self-Sufficiency:** Growing your own food empowers you to control the quality and source of your food.
What climate is best for growing winged beans?
Winged beans thrive in warm, humid climates with temperatures between 70°F and 85°F (21°C and 29°C). They are sensitive to frost and require a long growing season of at least 120 days. If you live in a cooler climate, you can start the seeds indoors and transplant them outdoors after the last frost. You can also grow them in a greenhouse or container garden.
How do I start winged beans from seed?
1. **Soak the seeds:** Soak the seeds in warm water for 24 hours before planting to improve germination.
2. **Planting:** Sow the seeds directly into the ground or in seed trays, about 1 inch deep.
3. **Soil:** Use well-draining soil that is rich in organic matter.
4. **Watering:** Keep the soil consistently moist but not waterlogged.
5. **Sunlight:** Provide plenty of sunlight, at least 6-8 hours per day.
6. **Support:** Winged beans are climbing plants, so provide a trellis, fence, or other support structure for them to grow on.
What kind of support structure do winged beans need?
Winged beans are vigorous climbers and require a sturdy support structure to grow on. A trellis, fence, or even a sturdy bamboo pole will work well. The support should be at least 6-8 feet tall to accommodate the plant’s growth. Ensure the structure is strong enough to support the weight of the mature plant and its pods.
How often should I water winged beans?
Winged beans need consistent moisture, especially during hot weather. Water deeply whenever the top inch of soil feels dry. Avoid overwatering, as this can lead to root rot. Mulching around the base of the plant can help retain moisture and suppress weeds.
What are some common pests and diseases that affect winged beans?
Winged beans are relatively pest-resistant, but they can be susceptible to aphids, spider mites, and bean beetles. Regularly inspect your plants for signs of infestation and take appropriate action, such as spraying with insecticidal soap or neem oil. Diseases like fungal leaf spot can also occur in humid conditions. Ensure good air circulation around the plants and avoid overhead watering to prevent fungal problems.
When can I harvest winged beans?
You can start harvesting the pods when they are young and tender, typically about 6-8 inches long. The pods are best eaten when they are still green and before the seeds inside have fully developed. You can also harvest the leaves, flowers, and tubers at various stages of the plant’s growth.
How do I cook winged beans?
Winged beans can be cooked in a variety of ways, including stir-frying, steaming, boiling, and grilling. They have a slightly nutty flavor and a crisp texture. The young pods can be eaten whole, while the mature pods may need to be stringed before cooking. The leaves and flowers can be added to salads or stir-fries. The tubers can be boiled or roasted like potatoes.
Can I save seeds from my winged bean plants?
Yes, you can save seeds from your winged bean plants for future planting. Allow some of the pods to mature fully on the vine until they turn brown and dry. Harvest the pods and remove the seeds. Dry the seeds thoroughly and store them in an airtight container in a cool, dry place.
Are there any companion plants that are beneficial for winged beans?
Yes, several companion plants can benefit winged beans. These include:
* **Marigolds:** Repel nematodes and other pests.
* **Basil:** Deters aphids and other insects.
* **Nasturtiums:** Attract beneficial insects and act as a trap crop for aphids.
* **Rosemary:** Repels bean beetles.
* **Garlic:** Deters a wide range of pests.
What are some variations I can try when growing winged beans?
* **Different Varieties:** Experiment with different varieties of winged beans to find the ones that grow best in your area and suit your taste preferences.
* **Trellising Methods:** Try different trellising methods to maximize your growing space and create a visually appealing garden feature.
* **Container Gardening:** Grow winged beans in containers if you have limited space or live in a cooler climate.
* **Vertical Gardening:** Utilize vertical gardening techniques to grow winged beans on walls or fences.
* **Hydroponics:** Explore hydroponic growing methods for a unique and efficient way to cultivate winged beans.

Leave a Comment