

Grow wheatgrass in water – sounds too good to be true, right? I thought so too, until I discovered how incredibly simple and rewarding it is! Forget messy soil and complicated setups; this DIY method lets you cultivate vibrant, nutrient-packed wheatgrass right in your kitchen with just water.
Wheatgrass has a fascinating history, dating back to ancient Egypt and Mesopotamia, where it was revered for its health benefits. Today, it’s a popular superfood, packed with vitamins, minerals, and antioxidants. But let’s be honest, buying wheatgrass juice every day can get expensive! That’s where this DIY trick comes in.
Imagine having a fresh supply of wheatgrass readily available for smoothies, juices, or even as a healthy snack for your furry friends. This method is perfect for apartment dwellers, busy individuals, or anyone looking for a sustainable and cost-effective way to boost their well-being. Plus, it’s a fantastic project to get the kids involved in, teaching them about plant growth and healthy eating habits. So, ditch the expensive store-bought juice and let’s learn how to grow wheatgrass in water – it’s easier than you think, and I’m here to guide you every step of the way!
Growing Wheatgrass in Water: A Simple DIY Guide
Hello dear plant friends! Are you in the mood for a green boost of freshness straight from your own kitchen? Wheatgrass is super healthy and can be easily grown in water. I’ll show you how it’s done – completely without soil and with minimal effort. Let’s get started!
What you need:
- Wheat seeds (preferably specifically for wheatgrass, available in organic stores or online)
- A large glass jar or a bowl (e.g., a canning jar or a salad bowl)
- A sieve or a piece of cheesecloth
- Water (preferably filtered or boiled, cooled water)
- A dark place (e.g., a cupboard or a drawer)
- Patience (approx. 7-10 days)
Step-by-Step Guide:
- Prepare the seeds: First, we need to soak the wheat seeds. Put the seeds in a bowl and cover them with plenty of water. Let them soak for 8-12 hours, preferably overnight. Soaking helps the seeds to germinate faster. I usually do this in the evening, then they are ready the next morning.
- Prepare the container: While the seeds are soaking, you can prepare your glass jar or bowl. Clean it thoroughly with hot water and dish soap to ensure that there are no bacteria or mold spores. Then rinse it well so that no soap residue remains.
- Rinse the seeds: After soaking, drain the water and rinse the seeds thoroughly under running water. This is important to remove any germs or impurities.
- Put the seeds in the container: Distribute the soaked and rinsed seeds evenly on the bottom of your container. Make sure they are not too close together so they have enough space to germinate. A thin layer is perfectly sufficient.
- Cover the container: Cover the container with a sieve or a piece of cheesecloth. This prevents dirt or insects from getting in and at the same time ensures good ventilation. Secure the sieve or cheesecloth with a rubber band so that it does not slip.
- The first watering: Fill the container with water so that the seeds are just covered. Swirl the water slightly to ensure that all seeds are moistened. Then drain the water immediately. The seeds should be moist, but not standing in water.
- The dark place: Place the container in a dark place. This is important so that the seeds can germinate. A cupboard, a drawer, or a dark basement room are suitable.
- Regular rinsing: Rinse the seeds twice a day with fresh water. Fill the container with water, swirl it slightly, and then drain the water immediately. Make sure the seeds always remain moist, but not standing in water. Regular rinsing prevents mold and ensures good ventilation.
- The first green: After about 2-3 days, you should see the first small roots and sprouts. This is a good sign!
- Bring light into the dark: Once the sprouts are about 1-2 cm long, you can move the container to a bright place, but avoid direct sunlight. A windowsill is ideal. The light promotes the growth of the wheatgrass.
- Continue rinsing: Continue to rinse the wheatgrass twice a day with fresh water. Make sure it always remains moist, but not standing in water.
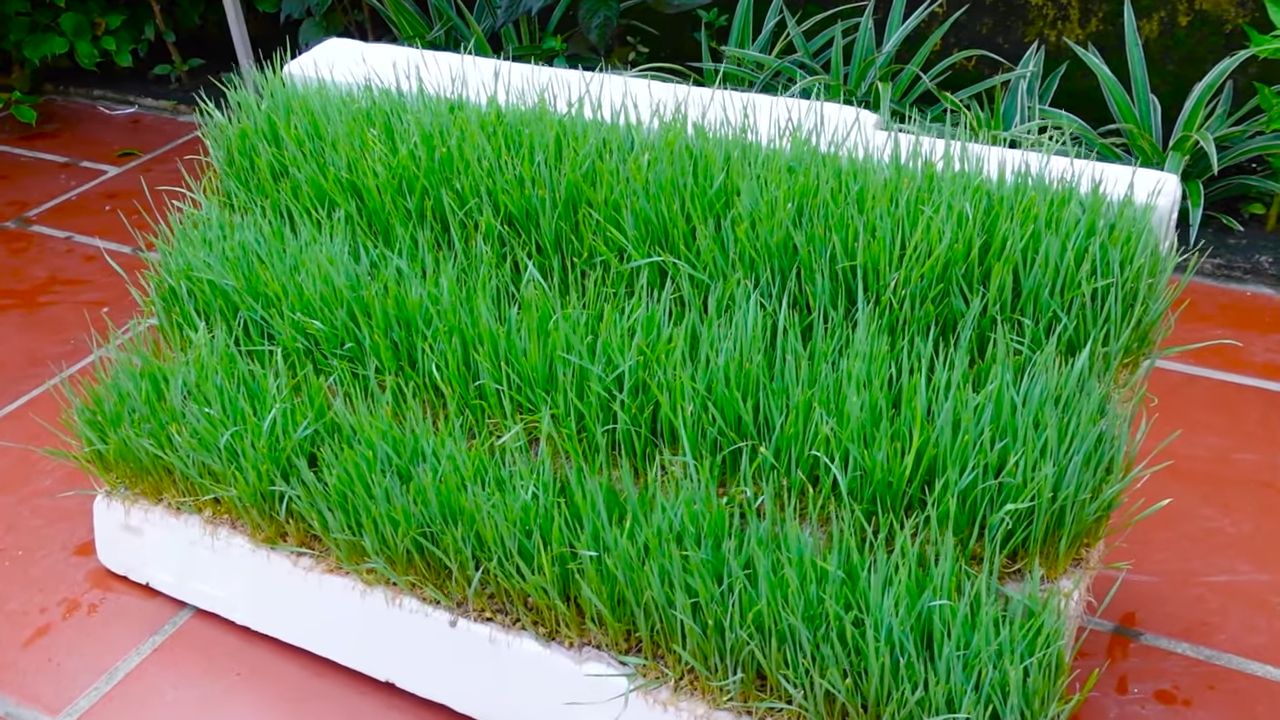
- Observe the growth: Watch the wheatgrass as it grows. It should reach a height of about 10-15 cm within 5-7 days.
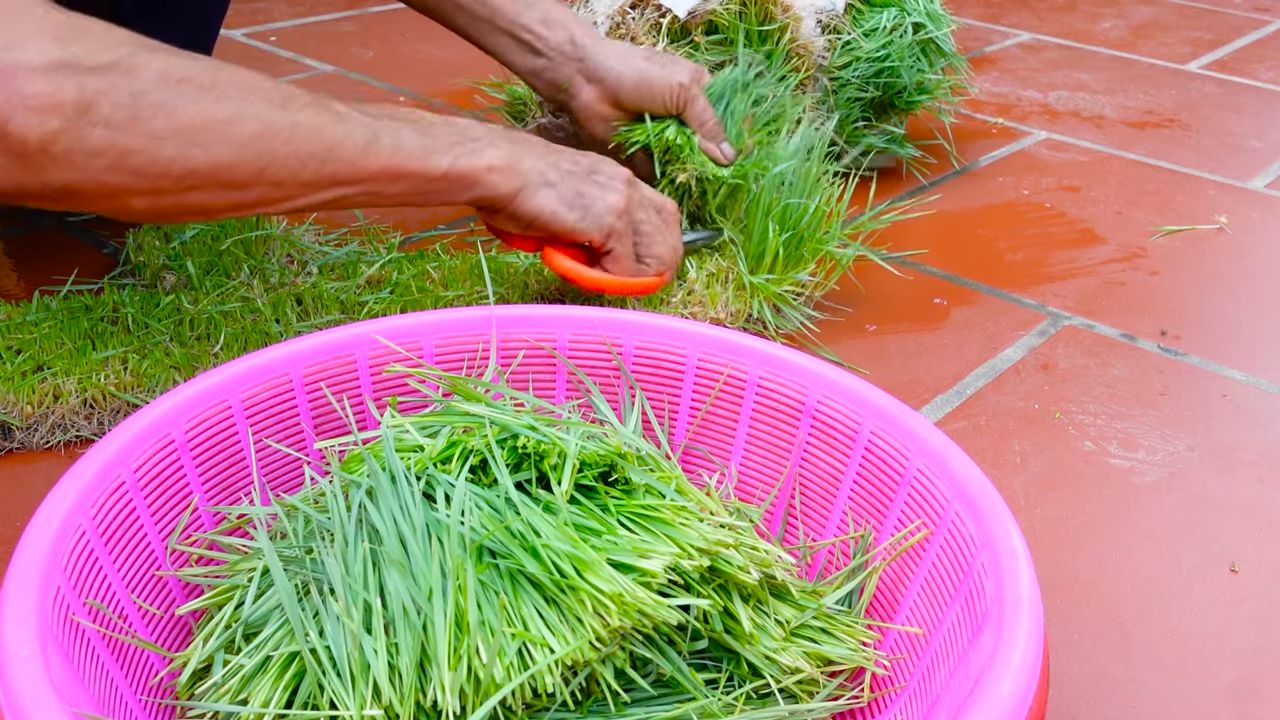
- The harvest: When the wheatgrass has reached the desired height, you can harvest it. Cut it with scissors just above the root.
- The juice: You can use the harvested wheatgrass directly to make wheatgrass juice. Put it in a juicer or blender and press the juice. You can drink the juice straight or add it to smoothies or other juices.
Common Problems and Solutions:
- Mold growth: If you discover mold on the seeds or the wheatgrass, it is a sign that it is too moist or the ventilation is insufficient. Remove the mold immediately and rinse the seeds or wheatgrass thoroughly with water. In the future, make sure you rinse more regularly and provide better ventilation.
- No germination: If the seeds do not germinate, there can be various reasons. Maybe the seeds were too old or of poor quality. Or they were not soaked or rinsed sufficiently. Try it with fresh seeds and make sure you follow the instructions carefully.
- Slow growth: If the wheatgrass grows slowly, it may be due to a lack of light or a temperature that is too low. Place the container in a brighter place and ensure a comfortable room temperature.
Additional Tips:
- The right variety: Make sure you use wheat seeds specifically for wheatgrass. These varieties are particularly germinable and provide a good yield.
- Water quality: It is best to use filtered or boiled, cooled water for rinsing and watering. This prevents germs or impurities from impairing the growth of the wheatgrass.
- Hygiene: Pay attention to good hygiene to avoid mold growth. Clean the container regularly and rinse the seeds or wheatgrass thoroughly with water.
- Storage: It is best to use the harvested wheatgrass immediately. If you want to store it, wrap it in a damp cloth and store it in the refrigerator. It will keep there for about 1-2 days.
- Reuse: After harvesting, you can compost the roots and the remaining seeds or use them as fertilizer for other plants.
The Benefits of Wheatgrass
Wheatgrass is a real superfood! It is rich in vitamins, minerals, enzymes, and chlorophyll. It is said to have a detoxifying effect, strengthen the immune system, and increase energy. I prefer to drink my wheatgrass juice in the morning on an empty stomach – a real pick-me-up!
Wheatgrass in the Kitchen
Wheatgrass juice is of course the classic, but you can also integrate wheatgrass into your diet in other ways.
- Smoothies: Add a handful of wheatgrass to your smoothie. It gives it a green color and a fresh taste.
- Juices: Mix wheatgrass juice with other juices, such as apple, carrot, or orange juice.
- Salads: Chop the wheatgrass and add it to your salad.
- Soups: Puree the wheatgrass with your soup.
Important note: Start with small amounts of wheatgrass, as it can have a strong detoxifying effect. Increase the amount slowly to get your body used to it.
I hope this guide helps you to grow your own wheatgrass in water. It’s really easy and fun! Good luck and enjoy!
Conclusion
So, there you have it! Growing your own wheatgrass in water is not just a trendy health fad; it’s a remarkably simple, cost-effective, and rewarding way to bring fresh, nutrient-packed goodness right into your home. Forget expensive juice bar visits or pre-packaged wheatgrass shots that often lack the vibrant freshness you crave. With this easy DIY method, you’re in complete control, ensuring the highest quality and maximum nutritional benefit.
Why is this DIY trick a must-try? Because it empowers you to take charge of your health and well-being. You’re bypassing the middleman, eliminating unnecessary packaging, and reducing your carbon footprint – all while enjoying the unparalleled taste and health benefits of freshly grown wheatgrass. Think of it as your own personal, miniature wheatgrass farm, providing you with a constant supply of this potent superfood.
But the beauty of this method lies not only in its simplicity but also in its adaptability. Feel free to experiment with different types of wheatgrass seeds to discover your favorite flavor profile. Some prefer the sweeter taste of hard red wheat, while others enjoy the slightly more robust flavor of hard white wheat. You can also play around with the sprouting time to achieve your desired level of sweetness and tenderness.
Consider adding a touch of creativity to your wheatgrass growing setup. Use repurposed glass jars or decorative trays to create an aesthetically pleasing display that brightens up your kitchen or living space. Imagine the vibrant green shoots adding a pop of color and life to your home!
And don’t limit yourself to just juicing! While wheatgrass juice is undoubtedly the most popular way to consume this superfood, there are countless other ways to incorporate it into your diet. Add freshly cut wheatgrass to your smoothies for an extra boost of vitamins and minerals. Sprinkle it on salads or soups for a burst of fresh flavor and nutrients. You can even use it as a garnish for your favorite dishes.
The possibilities are endless! The key is to embrace the process, experiment with different techniques, and discover what works best for you.
We wholeheartedly encourage you to try this simple yet transformative DIY trick. Growing wheatgrass in water is an incredibly rewarding experience that will not only benefit your health but also connect you with the natural world in a meaningful way.
Once you’ve experienced the joy of growing your own wheatgrass, we’d love to hear about your journey! Share your tips, tricks, and photos with us in the comments section below. Let’s create a community of wheatgrass enthusiasts and inspire others to embrace this healthy and sustainable practice. What challenges did you face? What variations did you try? What are your favorite ways to use your homegrown wheatgrass? Your insights and experiences will be invaluable to others who are just starting out.
So, go ahead, give it a try! You’ll be amazed at how easy and rewarding it is to grow your own wheatgrass in water. And who knows, you might just discover a new passion for gardening and healthy living.
Frequently Asked Questions (FAQ)
What kind of wheatgrass seeds should I use?
The most common types of wheatgrass seeds are hard red wheat and hard white wheat. Hard red wheat tends to have a slightly sweeter flavor, while hard white wheat has a more robust, grassy taste. Ultimately, the best type of seed is a matter of personal preference. Experiment with both to see which one you prefer. Make sure to purchase seeds specifically labeled for sprouting or growing wheatgrass, as these are typically untreated and safe for consumption. Avoid using seeds intended for planting in fields, as they may be treated with chemicals.
How long does it take to grow wheatgrass in water?
The entire process, from soaking the seeds to harvesting the wheatgrass, typically takes about 7-10 days. The initial soaking period is usually 8-12 hours. After that, the seeds will begin to sprout within 1-2 days. The wheatgrass will then grow to a harvestable height (around 4-7 inches) in about 5-7 days. The exact timeframe may vary depending on factors such as temperature, humidity, and the specific type of wheatgrass seeds used.
How often should I water the wheatgrass?
It’s crucial to keep the wheatgrass seeds and sprouts consistently moist, but not waterlogged. Water them at least twice a day, or even more frequently if the environment is particularly dry. Use a spray bottle to gently mist the seeds and sprouts, ensuring that they are evenly moistened. Avoid overwatering, as this can lead to mold growth. The goal is to keep the seeds and sprouts damp enough to encourage germination and growth, but not so wet that they become soggy.
How do I prevent mold growth on my wheatgrass?
Mold growth is a common concern when growing wheatgrass, but it can be prevented with proper care. First, ensure that you are using clean containers and fresh water. Rinse the seeds thoroughly before soaking them to remove any debris or contaminants. Second, provide adequate ventilation to the wheatgrass. This will help to prevent moisture buildup and reduce the risk of mold growth. Third, avoid overwatering the wheatgrass. As mentioned earlier, it’s important to keep the seeds and sprouts moist, but not waterlogged. If you do notice any mold growth, remove the affected areas immediately. You can also try spraying the wheatgrass with a diluted solution of hydrogen peroxide to kill any remaining mold spores.
How do I harvest wheatgrass?
Once the wheatgrass has reached a height of about 4-7 inches, it’s ready to harvest. Use a pair of clean scissors or a sharp knife to cut the wheatgrass just above the soil line. Harvest only the amount of wheatgrass that you plan to use immediately, as it will begin to wilt and lose its nutritional value if stored for too long. You can store freshly harvested wheatgrass in the refrigerator for up to a week, but it’s best to use it as soon as possible.
Can I regrow wheatgrass after harvesting it?
While wheatgrass can technically be regrown after harvesting, the second harvest will typically be less nutritious and less flavorful than the first. The first harvest contains the highest concentration of vitamins, minerals, and enzymes. If you choose to regrow your wheatgrass, be sure to provide it with adequate water and sunlight. However, for optimal nutritional benefits, it’s generally recommended to start with fresh seeds for each batch of wheatgrass.
What are the health benefits of wheatgrass?
Wheatgrass is a nutritional powerhouse, packed with vitamins, minerals, enzymes, and antioxidants. It’s a rich source of vitamins A, C, and E, as well as minerals like iron, calcium, and magnesium. Wheatgrass is also a good source of chlorophyll, which is believed to have detoxifying and anti-inflammatory properties. Some of the potential health benefits of wheatgrass include boosting the immune system, improving digestion, increasing energy levels, and detoxifying the body. However, it’s important to note that more research is needed to fully understand the health benefits of wheatgrass.
How should I consume wheatgrass?
The most common way to consume wheatgrass is in juice form. You can use a wheatgrass juicer or a regular juicer to extract the juice from the freshly harvested wheatgrass. Wheatgrass juice has a strong, grassy flavor, so it’s often mixed with other juices, such as apple juice or orange juice, to make it more palatable. You can also add freshly cut wheatgrass to smoothies, salads, or soups. Start with a small amount of wheatgrass and gradually increase the amount as you become accustomed to the taste.
Are there any side effects of consuming wheatgrass?
While wheatgrass is generally considered safe for consumption, some people may experience mild side effects, such as nausea, diarrhea, or headaches, especially when first starting to consume it. These side effects are usually temporary and subside as the body adjusts to the wheatgrass. If you experience any persistent or severe side effects, discontinue use and consult with a healthcare professional. It’s also important to note that wheatgrass may interact with certain medications, so it’s always best to talk to your doctor before adding it to your diet, especially if you have any underlying health conditions.

Leave a Comment