

Grow Tomatoes at Home, even if you think you don’t have a green thumb! Have you ever bitten into a perfectly ripe, sun-warmed tomato, bursting with flavor, and wished you could experience that taste more often? I know I have! For centuries, tomatoes have been a staple in cuisines around the world, from the vibrant sauces of Italy to the refreshing salads of the Mediterranean. But the sad truth is, store-bought tomatoes often lack that incredible, homegrown taste.
That’s where this DIY guide comes in! I’m going to share some simple, yet effective, tricks and hacks that will empower you to grow tomatoes at home, regardless of your space or experience level. Imagine harvesting your own juicy, flavorful tomatoes right from your backyard, balcony, or even a sunny windowsill. No more bland, tasteless supermarket tomatoes!
In today’s world, where we’re increasingly conscious of where our food comes from and the impact it has on the environment, growing your own food is more important than ever. Plus, let’s be honest, there’s something incredibly satisfying about nurturing a plant from seed to fruit. So, are you ready to ditch the store-bought disappointment and embark on a rewarding journey of growing your own delicious tomatoes? Let’s get started!
Growing Tomatoes at Home: A Comprehensive DIY Guide
Hey there, fellow gardening enthusiasts! I’m so excited to share my tried-and-true method for growing delicious, juicy tomatoes right in your own backyard (or even on your balcony!). Forget those bland, store-bought tomatoes – nothing beats the taste of homegrown goodness. This guide will walk you through every step, from choosing the right variety to harvesting your bountiful crop. Let’s get started!
Choosing Your Tomato Varieties
Before we even think about planting, we need to decide what kind of tomatoes we want to grow. The options are endless, and it can be a little overwhelming! Here’s a breakdown of some popular types to help you choose:
* **Determinate Tomatoes:** These are bush-type tomatoes that grow to a certain size and then stop. They produce most of their fruit all at once, making them great for canning or making sauce. Popular determinate varieties include Roma, Celebrity, and Rutgers.
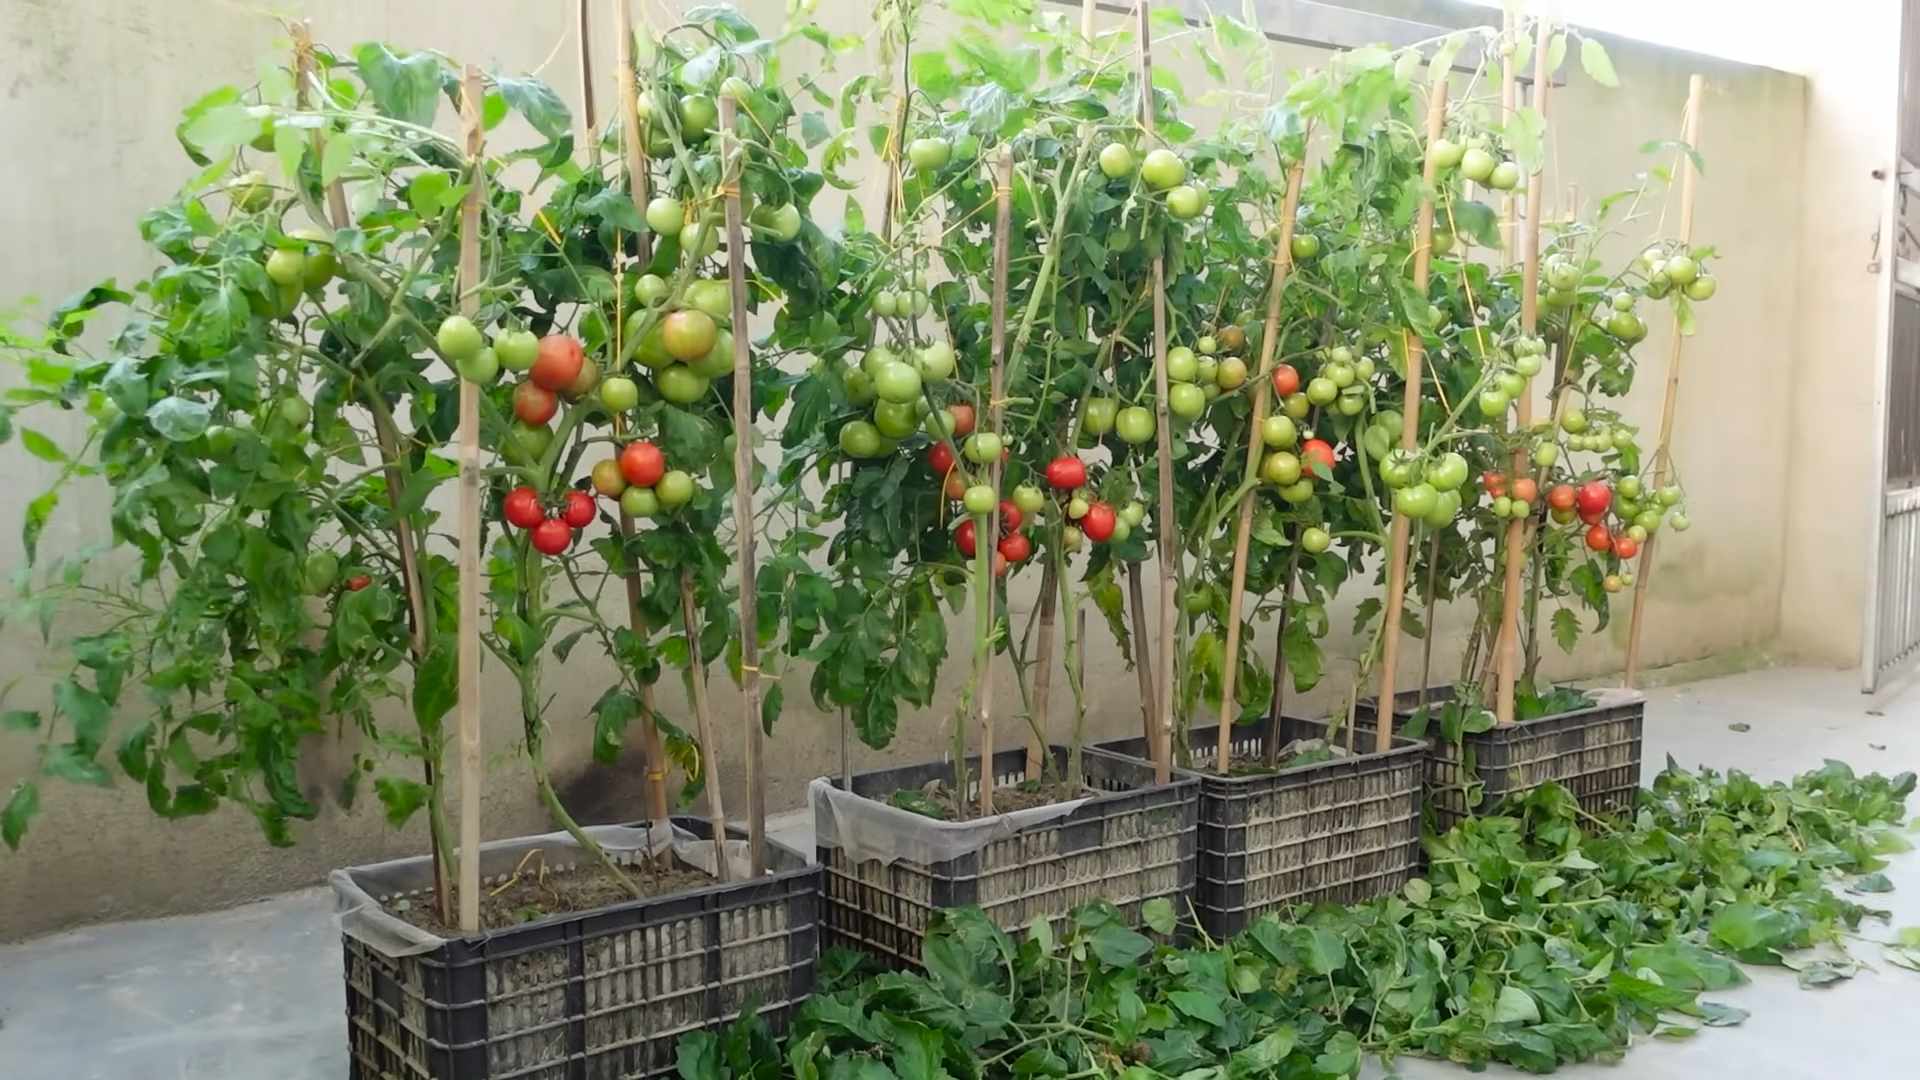
* **Indeterminate Tomatoes:** These are vining tomatoes that keep growing and producing fruit throughout the season. They require staking or caging for support. Indeterminate varieties include Better Boy, Big Boy, Brandywine, and Cherry tomatoes.
* **Cherry Tomatoes:** These small, sweet tomatoes are perfect for snacking and salads. They come in both determinate and indeterminate varieties. Sun Gold and Sweet 100 are popular choices.
* **Heirloom Tomatoes:** These are older varieties that have been passed down through generations. They often have unique flavors and colors. Brandywine, Cherokee Purple, and Mortgage Lifter are some well-known heirloom varieties.
Consider your space and your taste preferences when choosing your tomato varieties. If you have limited space, determinate varieties might be a better choice. If you want a continuous harvest throughout the season, go for indeterminate varieties.
Getting Started: Seeds vs. Seedlings
You have two main options for starting your tomato plants: from seed or from seedlings (also known as transplants).
* **Starting from Seed:** This gives you more control over the varieties you grow and can be more cost-effective. However, it requires more time and effort. You’ll need to start your seeds indoors 6-8 weeks before the last expected frost.
* **Buying Seedlings:** This is a quicker and easier option, especially for beginners. You can find a wide variety of tomato seedlings at your local garden center. Just make sure to choose healthy-looking plants with sturdy stems and no signs of disease.
I personally prefer starting from seed because I love the feeling of nurturing a plant from its earliest stages. But if you’re short on time or space, buying seedlings is perfectly fine!
Starting Seeds Indoors (If You Choose This Route)
If you’re going the seed route, here’s what you’ll need:
* **Seed starting trays or small pots:** Make sure they have drainage holes.
* **Seed starting mix:** This is a sterile, lightweight mix that’s specifically designed for starting seeds.
* **Tomato seeds:** Choose your desired varieties.
* **Grow lights:** These provide the necessary light for your seedlings to grow strong and healthy.
* **Heat mat (optional):** This can help speed up germination.
* **Spray bottle:** For watering your seedlings.
Now, let’s get those seeds started!
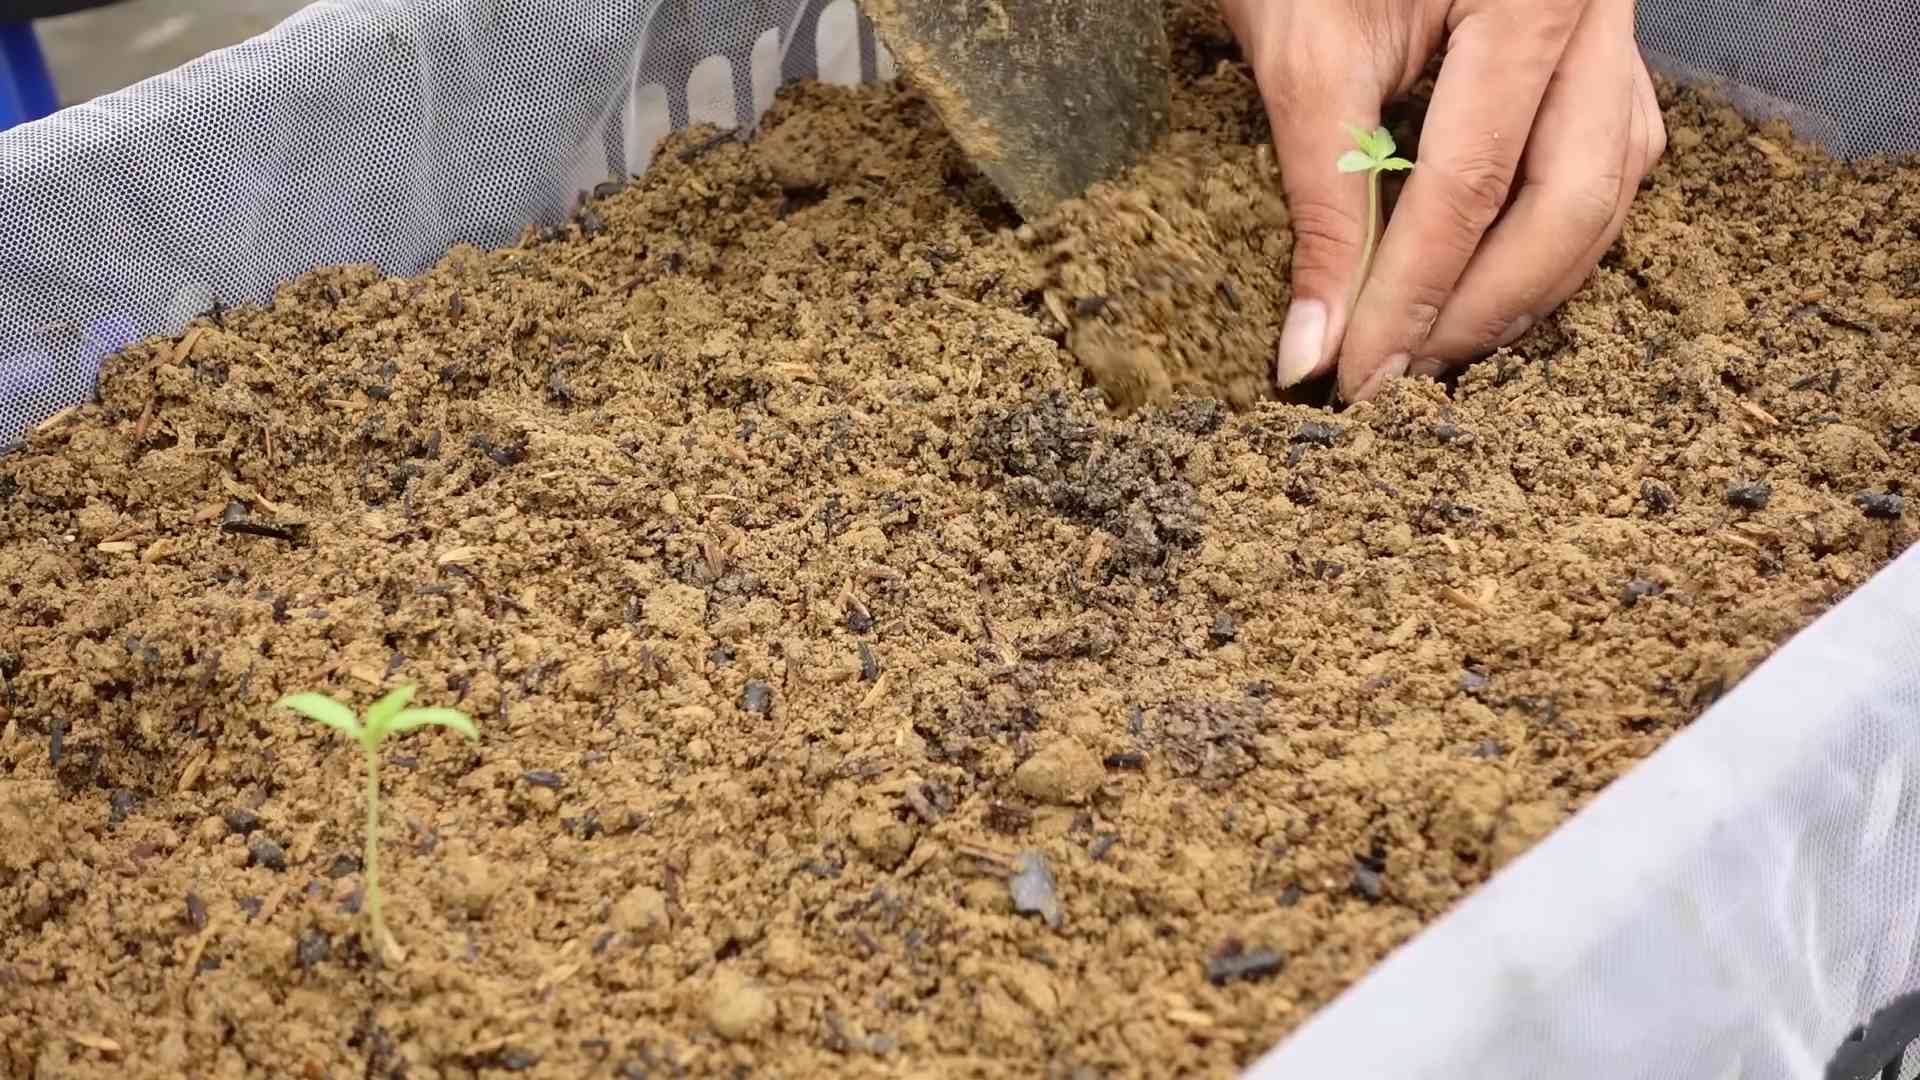
1. **Fill your seed starting trays or pots with seed starting mix.** Gently press the mix down to remove any air pockets.
2. **Sow your tomato seeds.** Plant 2-3 seeds per cell or pot, about 1/4 inch deep.
3. **Water gently.** Use a spray bottle to moisten the soil. Avoid overwatering, which can lead to damping off (a fungal disease that kills seedlings).
4. **Cover the trays or pots with a clear plastic dome or plastic wrap.** This will help create a humid environment that promotes germination.
5. **Place the trays or pots on a heat mat (if using) and under grow lights.** The ideal temperature for germination is around 75-85°F (24-29°C).
6. **Keep the soil moist but not soggy.** Check the soil daily and water as needed.
7. **Once the seeds germinate (usually within 5-10 days), remove the plastic dome or plastic wrap.**
8. **Thin the seedlings.** Once the seedlings have their first true leaves (the second set of leaves), thin them to one plant per cell or pot. Choose the strongest, healthiest-looking seedling and snip off the others at the soil line.
9. **Continue to grow the seedlings under grow lights for 6-8 weeks.** Water them regularly and fertilize them with a diluted liquid fertilizer every 2 weeks.
10. **Harden off the seedlings.** About a week before you plan to transplant them outdoors, gradually acclimate them to outdoor conditions. Start by placing them outside for a few hours each day in a sheltered location, gradually increasing the amount of time they spend outdoors.
Preparing Your Garden Bed
Whether you started your plants from seed or bought seedlings, you’ll need to prepare your garden bed before transplanting. Tomatoes need at least 6-8 hours of sunlight per day and well-drained soil.
1. **Choose a sunny location.**
2. **Test your soil.** A soil test will tell you the pH level and nutrient content of your soil. Tomatoes prefer a slightly acidic soil pH of 6.0-6.8.
3. **Amend your soil.** If your soil is heavy clay or sandy, amend it with compost or other organic matter to improve drainage and fertility.
4. **Till or dig the soil.** Loosen the soil to a depth of at least 12 inches.
5. **Add fertilizer.** Incorporate a slow-release fertilizer into the soil according to the package directions. I like to use a fertilizer that’s specifically formulated for tomatoes.
Transplanting Your Tomato Plants
Now for the exciting part – planting your tomatoes!
1. **Wait until the danger of frost has passed.** Tomatoes are very sensitive to frost.
2. **Choose a cloudy day or plant in the late afternoon.** This will help prevent the plants from getting stressed.
3. **Dig a hole that’s slightly larger than the root ball of the tomato plant.**
4. **Remove the tomato plant from its container.** Gently loosen the roots.
5. **Plant the tomato plant deeply.** Bury the stem up to the first set of leaves. This will encourage the plant to develop more roots along the buried stem, resulting in a stronger, healthier plant.
6. **Space the plants appropriately.** Determinate tomatoes should be spaced 2-3 feet apart, while indeterminate tomatoes should be spaced 3-4 feet apart.
7. **Water thoroughly.**
8. **Add mulch.** Mulch helps to retain moisture, suppress weeds, and regulate soil temperature. I like to use straw or shredded leaves.
Supporting Your Tomato Plants
Indeterminate tomato varieties need support to keep them from sprawling on the ground. Here are a few options:
* **Stakes:** Drive a sturdy stake into the ground next to each plant and tie the plant to the stake with soft twine.
* **Cages:** Place a tomato cage around each plant.
* **Trellises:** Train the plants to grow up a trellis.
I personally prefer using cages because they provide good support and allow the plants to grow naturally.
Caring for Your Tomato Plants
Once your tomato plants are in the ground, it’s important to provide them with proper care.
* **Water regularly.** Tomatoes need consistent moisture, especially during hot, dry weather. Water deeply at the base of the plant, avoiding getting the leaves wet.
* **Fertilize regularly.** Feed your tomato plants with a liquid fertilizer every 2-3 weeks.
* **Prune your tomato plants.** Pruning helps to improve air circulation and encourage fruit production. Remove suckers (the small shoots that grow between the main stem and the branches) regularly.
* **Watch out for pests and diseases.** Common tomato pests include aphids, tomato hornworms, and whiteflies. Common tomato diseases include early blight, late blight, and blossom end rot. Take action to control pests and diseases as soon as you notice them.
* **Weed regularly.** Weeds compete with tomato plants for water and nutrients.
Harvesting Your Tomatoes
The moment we’ve all been waiting for – harvesting!
1. **Wait until the tomatoes are fully ripe.** Ripe tomatoes will be firm to the touch and have a deep, rich color.
2. **Gently twist the tomato off the vine.**
3. **Enjoy your homegrown tomatoes!**
Don’t refrigerate your tomatoes unless they are overripe. Refrigeration can affect their flavor and texture. Store them at room temperature for the best taste.
Troubleshooting Common Tomato Problems
Even with the best care, you might encounter some problems along the way. Here are a few common issues and how to address them:
* **Blossom End Rot:** This is caused by a calcium deficiency. Make sure your soil has enough calcium and water your plants consistently.
* **Early Blight:**
Conclusion
So, there you have it! Growing tomatoes at home isn’t just a gardening trend; it’s a rewarding experience that connects you to your food in a profound way. From the vibrant colors to the unmatched flavor of a sun-ripened tomato, the benefits are undeniable. This DIY approach, focusing on simplicity and accessibility, empowers even the most novice gardener to cultivate a thriving tomato patch, regardless of space constraints or prior experience.
We’ve walked you through the essential steps, from selecting the right variety for your climate and space to nurturing your seedlings and providing the support they need to flourish. Remember, patience is key. Gardening is a journey, and there will be learning curves along the way. Don’t be discouraged by initial setbacks; instead, view them as opportunities to refine your technique and deepen your understanding of these wonderful plants.
The beauty of this method lies in its adaptability. Feel free to experiment with different tomato varieties to discover your personal favorites. Consider adding companion plants like basil or marigolds to deter pests and enhance the flavor of your tomatoes. For those with limited sunlight, explore grow lights to supplement natural light and ensure optimal growth. You can even try different container sizes and materials to find what works best for your specific environment.
This DIY method for growing tomatoes at home is a must-try because it offers a sustainable, cost-effective, and incredibly satisfying way to enjoy fresh, delicious tomatoes all season long. Imagine the pride you’ll feel serving a salad made with tomatoes you nurtured from seed to harvest. Think of the joy of sharing your homegrown bounty with friends and family.
But the real magic happens when you personalize the process. Try saving seeds from your best tomatoes to plant the following year, creating a lineage of homegrown goodness. Experiment with different fertilizers and soil amendments to optimize growth and flavor. The possibilities are endless!
We are confident that with a little effort and dedication, you can successfully grow tomatoes at home and reap the rewards of your labor. Don’t just take our word for it, though. We encourage you to embark on this gardening adventure and discover the joys of homegrown tomatoes for yourself.
Once you’ve experienced the satisfaction of harvesting your own tomatoes, we’d love to hear about your journey! Share your tips, tricks, and triumphs in the comments below. Let us know which varieties you’ve grown, what challenges you’ve faced, and what you’ve learned along the way. Your experiences can inspire and empower other aspiring gardeners to take the plunge and discover the magic of growing tomatoes at home. Let’s build a community of tomato enthusiasts, sharing our knowledge and passion for these amazing fruits!
Frequently Asked Questions (FAQ)
What are the best tomato varieties to grow at home for beginners?
For beginners, determinate tomato varieties are often recommended. These varieties grow to a specific size and produce all their fruit at once, making them easier to manage. Some excellent choices include Roma, Celebrity, and Bush Early Girl. Indeterminate varieties, on the other hand, continue to grow and produce fruit throughout the season, requiring more pruning and support. If you’re up for a bit more of a challenge, try cherry tomatoes like Sungold or Black Cherry, which are known for their exceptional flavor and prolific yields. Ultimately, the best variety depends on your climate, space, and personal preferences. Research which varieties thrive in your region and choose those that appeal to your taste buds.
How much sunlight do tomatoes need to grow successfully?
Tomatoes are sun-loving plants and require at least 6-8 hours of direct sunlight per day to thrive. Without sufficient sunlight, they will produce fewer flowers and fruits, and the fruits that do develop may be smaller and less flavorful. If you don’t have a spot in your garden that receives full sun, consider using grow lights to supplement natural light. Position the grow lights close to the plants and adjust their height as the plants grow.
What type of soil is best for growing tomatoes in containers?
The ideal soil for growing tomatoes in containers is a well-draining potting mix that is rich in organic matter. Avoid using garden soil, as it can become compacted in containers and restrict root growth. A good potting mix will retain moisture while allowing excess water to drain away, preventing root rot. You can also amend your potting mix with compost or other organic materials to improve its fertility and drainage. Consider adding perlite or vermiculite to further enhance drainage and aeration.
How often should I water my tomato plants?
The frequency of watering depends on several factors, including the weather, the size of the container, and the type of soil. Generally, you should water your tomato plants deeply whenever the top inch of soil feels dry to the touch. Avoid overwatering, as this can lead to root rot. During hot, dry weather, you may need to water your plants daily. In cooler, wetter weather, you may only need to water them every few days. The best way to determine if your plants need water is to check the soil moisture regularly.
How do I prevent common tomato diseases and pests?
Prevention is key when it comes to tomato diseases and pests. Start by selecting disease-resistant varieties and planting them in well-drained soil. Provide adequate spacing between plants to allow for good air circulation. Water your plants at the base to avoid wetting the foliage, which can promote fungal diseases. Regularly inspect your plants for signs of pests or diseases and take action promptly. Common tomato pests include aphids, whiteflies, and tomato hornworms. You can control these pests with insecticidal soap, neem oil, or by handpicking them off the plants. Common tomato diseases include early blight, late blight, and blossom end rot. You can prevent these diseases by using a copper fungicide, providing adequate calcium to the soil, and avoiding overwatering.
What is blossom end rot, and how can I prevent it?
Blossom end rot is a common tomato problem caused by a calcium deficiency. It appears as a dark, leathery spot on the bottom of the tomato fruit. While the soil may contain enough calcium, the plant may not be able to absorb it properly due to inconsistent watering or other factors. To prevent blossom end rot, ensure that your tomato plants receive consistent watering, especially during fruit development. Avoid letting the soil dry out completely between waterings. You can also add calcium to the soil by amending it with bone meal or crushed eggshells.
When is the best time to harvest tomatoes?
The best time to harvest tomatoes is when they are fully colored, slightly soft to the touch, and easily detach from the vine. The exact color will depend on the variety. Avoid picking tomatoes that are still green or hard, as they will not ripen properly off the vine. You can also harvest tomatoes that are slightly underripe if you anticipate frost or other adverse weather conditions. Place the harvested tomatoes in a cool, dry place to ripen.
Can I grow tomatoes indoors?
Yes, you can grow tomatoes indoors, but it requires providing them with adequate light, warmth, and humidity. Choose a sunny location near a south-facing window or use grow lights to supplement natural light. Select compact, determinate varieties that are well-suited for container growing. Provide your plants with well-draining potting mix and water them regularly. You may also need to hand-pollinate the flowers to ensure fruit set.
How do I prune tomato plants?
Pruning tomato plants can improve air circulation, promote fruit production, and prevent diseases. The specific pruning techniques will depend on the type of tomato plant. Determinate varieties generally require minimal pruning, while indeterminate varieties require more extensive pruning. For indeterminate varieties, remove suckers (the small shoots that grow between the main stem and the branches) to encourage the plant to focus its energy on fruit production. You can also remove yellowing or diseased leaves to improve air circulation and prevent the spread of diseases.
How do I save tomato seeds for next year?
Saving tomato seeds is a great way to preserve your favorite varieties and ensure a supply of seeds for future growing seasons. To save tomato seeds, select ripe, healthy tomatoes from disease-free plants. Cut the tomatoes in half and scoop out the seeds and pulp into a jar. Add a small amount of water to the jar and let it sit for several days, stirring occasionally. This process will ferment the seeds, removing the gelatinous coating that inhibits germination. After a few days, rinse the seeds thoroughly and spread them out on a paper towel to dry completely. Once the seeds are dry, store them in an airtight container in a cool, dark place.
Leave a Comment