

Grow Sweet Potatoes Home – sounds like a dream, right? Imagine harvesting your own vibrant, nutrient-packed sweet potatoes right from your backyard! Forget those bland, store-bought spuds; we’re talking about homegrown goodness bursting with flavor. For centuries, sweet potatoes have been a staple in diets across the globe, from South America where they originated, to Asia and Africa, prized for their versatility and nutritional benefits. They’re not just delicious; they’re packed with vitamins and antioxidants, making them a superfood you can easily cultivate yourself.
But let’s be honest, the thought of growing your own food can sometimes feel intimidating. That’s where this DIY guide comes in! I’m here to show you that growing sweet potatoes at home is not only achievable, but also incredibly rewarding. We’ll break down the process into simple, easy-to-follow steps, revealing some clever tricks and hacks that will have you harvesting a bountiful crop in no time. Whether you have a sprawling garden or just a small patio, I’ll show you how to grow sweet potatoes home successfully. So, ditch the grocery store and let’s get our hands dirty!
Growing Sweet Potatoes at Home: A Beginner’s Guide
Hey there, fellow gardening enthusiasts! I’m so excited to share my experience with growing sweet potatoes at home. It’s surprisingly easy and rewarding, and nothing beats the taste of homegrown sweet potatoes. This guide will walk you through every step, from sprouting slips to harvesting your delicious bounty.
Getting Started: Sprouting Sweet Potato Slips
The first step in growing sweet potatoes is to sprout slips. Slips are the leafy shoots that grow from the sweet potato itself, and they’re what you’ll plant in the ground. You can’t just plant a sweet potato directly! Here’s how to get those slips growing:
* Choosing Your Sweet Potato: Select a healthy, organic sweet potato. Organic is important because non-organic potatoes may be treated to prevent sprouting. Look for one that’s firm and free from blemishes.
* The Water Method: This is the method I prefer because it’s so visual and easy to monitor.
* The Soil Method: This method is a bit less messy, but you won’t see the roots developing as easily.
Step-by-Step: The Water Method
1. Prepare Your Sweet Potato: Wash your sweet potato thoroughly to remove any dirt.
2. Insert Toothpicks: Insert three or four toothpicks around the middle of the sweet potato, evenly spaced. These will act as supports to suspend the potato in water.
3. Submerge the Bottom Half: Place the sweet potato in a jar or glass filled with water, ensuring that the bottom half of the potato is submerged. The top half should remain above the water line.
4. Find a Sunny Spot: Place the jar in a warm, sunny location. A windowsill is perfect.
5. Maintain Water Level: Check the water level daily and add more water as needed to keep the bottom half of the potato submerged.
6. Wait for Sprouts: Be patient! It can take several weeks for sprouts (slips) to appear. You’ll start to see small roots growing from the bottom and leafy shoots emerging from the top.
7. Harvesting the Slips: Once the slips are 6-8 inches long, they’re ready to be harvested. Gently twist or cut them off the sweet potato. I prefer twisting, as it seems to cause less stress to the mother potato.
8. Rooting the Slips: Place the harvested slips in a glass of water, making sure the bottom inch or two is submerged. Within a few days, you’ll see roots developing.
Step-by-Step: The Soil Method
1. Prepare a Container: Choose a container that’s large enough to hold the sweet potato. A plastic storage bin or a large pot works well.
2. Fill with Soil: Fill the container with a well-draining potting mix.
3. Bury the Sweet Potato: Bury the sweet potato horizontally in the soil, leaving about an inch of the top exposed.
4. Water Thoroughly: Water the soil thoroughly after planting.
5. Find a Warm Spot: Place the container in a warm location.
6. Keep Soil Moist: Keep the soil consistently moist, but not waterlogged.
7. Wait for Sprouts: Again, patience is key! It will take several weeks for slips to emerge from the soil.
8. Harvesting the Slips: Once the slips are 6-8 inches long, carefully dig them out of the soil, trying to get as much of the root system as possible.
Preparing Your Garden Bed
Sweet potatoes need plenty of sunshine and well-drained soil. Here’s how to prepare your garden bed for planting:
* Sunlight: Choose a location that receives at least 6-8 hours of direct sunlight per day.
* Soil: Sweet potatoes prefer loose, sandy loam soil. If your soil is heavy clay, amend it with compost, sand, and other organic matter to improve drainage.
* Soil pH: The ideal soil pH for sweet potatoes is between 5.5 and 6.5. You can test your soil pH with a soil testing kit.
* Fertilizing: Sweet potatoes don’t need a lot of fertilizer. In fact, too much nitrogen can lead to excessive vine growth and fewer potatoes. Before planting, amend the soil with compost or a slow-release fertilizer that’s low in nitrogen.
* Creating Ridges: Sweet potatoes grow best in raised ridges or mounds. This helps with drainage and allows the potatoes to develop more easily. Create ridges that are about 8-10 inches high and 12 inches wide.
Step-by-Step: Preparing the Garden Bed
1. Clear the Area: Remove any weeds, rocks, or debris from the planting area.
2. Amend the Soil: Dig in compost, sand, and other organic matter to improve drainage and fertility.
3. Test the Soil pH: Test the soil pH and adjust as needed. You can add lime to raise the pH or sulfur to lower it.
4. Create Ridges: Use a hoe or shovel to create raised ridges or mounds in the planting area. Space the ridges about 3-4 feet apart.
5. Water the Soil: Water the soil thoroughly before planting.
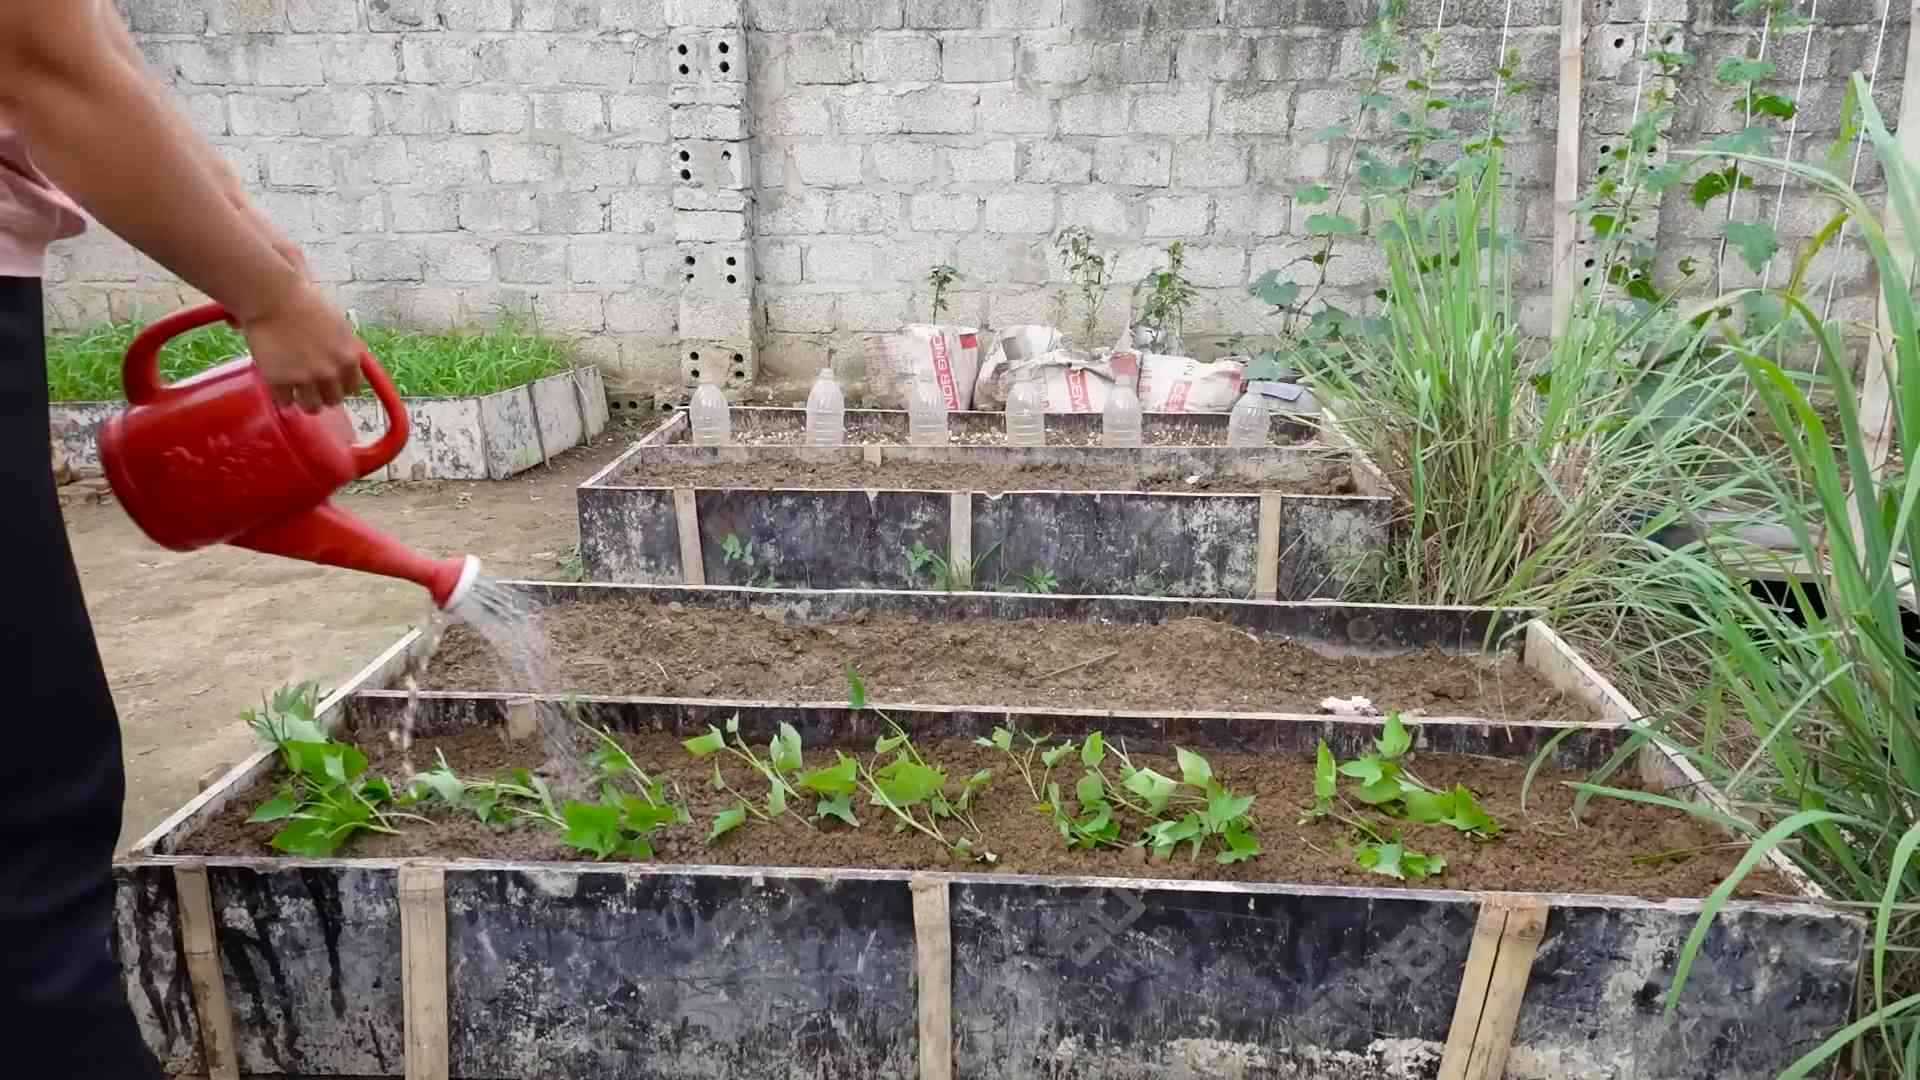
Planting Your Sweet Potato Slips
Now comes the fun part – planting your sweet potato slips!
* Timing: Plant your slips after the last frost, when the soil has warmed up to at least 60°F (15°C).
* Spacing: Space the slips about 12-18 inches apart along the ridges.
* Planting Depth: Plant the slips deep enough so that the roots are covered with soil, but the leaves are above the ground.
Step-by-Step: Planting the Slips
1. Dig a Hole: Dig a small hole in the top of the ridge, deep enough to accommodate the roots of the slip.
2. Plant the Slip: Gently place the slip in the hole, making sure the roots are spread out.
3. Cover with Soil: Cover the roots with soil and gently firm the soil around the base of the slip.
4. Water Thoroughly: Water the newly planted slips thoroughly.
5. Mulch (Optional): Apply a layer of mulch around the plants to help retain moisture and suppress weeds. Straw or hay works well.
Caring for Your Sweet Potato Plants
Sweet potatoes are relatively low-maintenance plants, but they do need some care to thrive.
* Watering: Water regularly, especially during dry periods. Sweet potatoes need consistent moisture to develop properly.
* Weeding: Keep the garden bed free of weeds. Weeds can compete with the sweet potatoes for nutrients and water.
* Fertilizing (If Needed): If your plants are looking pale or stunted, you can apply a side dressing of a balanced fertilizer. Be careful not to over-fertilize, as this can lead to excessive vine growth.
* Vine Management: Sweet potato vines can spread quite a bit. You can prune them back if they’re getting out of control. Some gardeners even lift the vines occasionally to prevent them from rooting at the nodes, which can divert energy away from the potatoes. I’ve found that this isn’t always necessary, but it’s something to consider.
Step-by-Step: Caring for the Plants
1. Water Regularly: Water deeply whenever the top inch of soil feels dry.
2. Weed Regularly: Remove any weeds that appear in the garden bed.
3. Fertilize (If Needed): If your plants are looking pale, apply a side dressing of fertilizer according to the package directions.
4. Manage Vines (Optional): Prune back the vines if they’re getting too long or lift them occasionally to prevent rooting at the nodes.
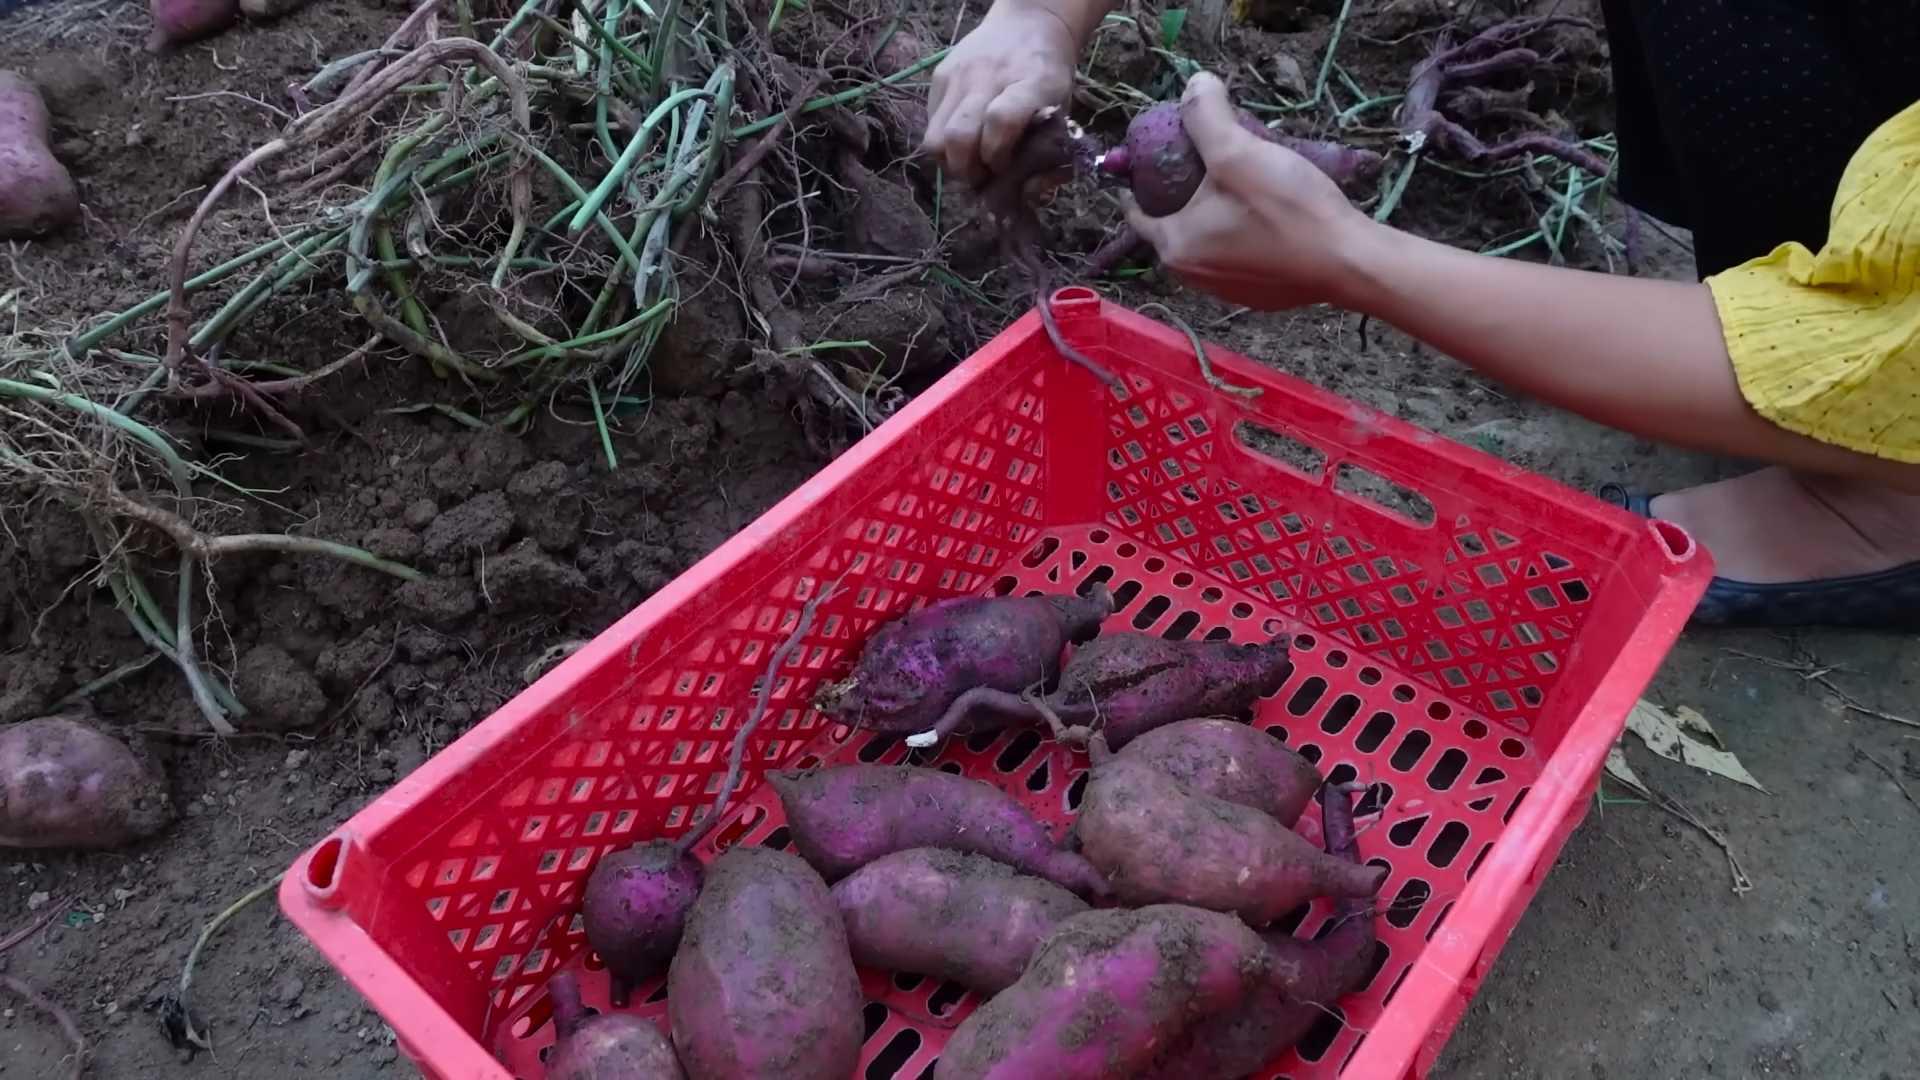
Harvesting Your Sweet Potatoes
The moment you’ve been waiting for! Harvesting sweet potatoes is a rewarding experience.
* Timing: Sweet potatoes are typically ready to harvest about 90-120 days after planting. A good indicator is when the leaves start to turn yellow and the vines begin to die back.
* Weather: Harvest on a dry day.
* Tools: You’ll need a garden fork or shovel. Be careful not to damage the potatoes when digging.
Step-by-Step: Harvesting the Sweet Potatoes
1. Loosen the Soil: Use a garden fork or shovel to loosen the soil around the plants. Start about a foot away from the base of the plant to avoid damaging the potatoes.
2. Carefully Dig Up the Potatoes: Gently lift the plants from the ground, being careful not to puncture the potatoes.
3. Brush Off the Soil: Brush off any excess soil from the potatoes.
4. C
Conclusion
So, there you have it! Growing sweet potatoes at home is not only achievable, but it’s also incredibly rewarding. Forget those bland, store-bought sweet potatoes; imagine sinking your teeth into a freshly harvested, vibrant orange sweet potato that you nurtured from sprout to tuber. The flavor difference alone is reason enough to give this DIY project a try.
But the benefits extend far beyond just taste. Think about the satisfaction of knowing exactly where your food comes from, free from pesticides and grown with your own two hands. Plus, it’s a fantastic way to connect with nature, learn about the growing process, and even get the kids involved in a fun and educational activity.
This method of growing sweet potatoes at home, starting with slips, is particularly appealing because it allows you to control the entire process. You can select the varieties you love most, ensure optimal growing conditions, and harvest at the peak of ripeness. It’s a level of customization you simply can’t achieve with store-bought produce.
Ready to take your sweet potato game to the next level? Consider experimenting with different varieties. Beauregard is a classic choice, known for its vibrant orange flesh and sweet flavor. But don’t be afraid to branch out and try something new, like the Japanese sweet potato with its purple skin and creamy white flesh, or the Covington, known for its disease resistance.
Another variation to consider is container gardening. If you’re short on space, you can successfully grow sweet potatoes in large containers or grow bags. Just make sure they’re deep enough to accommodate the developing tubers. This is a great option for apartment dwellers or those with limited garden space.
And finally, don’t forget the leaves! Sweet potato leaves are edible and nutritious, offering a mild, spinach-like flavor. They can be steamed, sautéed, or added to soups and stews. It’s a fantastic way to make the most of your sweet potato plants.
We wholeheartedly encourage you to embark on this sweet potato growing adventure. It’s a relatively simple process with a huge payoff. The taste of homegrown sweet potatoes is simply unmatched, and the satisfaction of nurturing your own food is incredibly rewarding.
Once you’ve harvested your first crop, we’d love to hear about your experience! Share your photos, tips, and tricks in the comments below. Let’s build a community of home gardeners who are passionate about growing their own delicious and nutritious sweet potatoes. Happy growing!
Frequently Asked Questions (FAQ)
What are sweet potato slips, and where can I get them?
Sweet potato slips are sprouts that grow from a mature sweet potato. They are essentially baby sweet potato plants. You can purchase slips from nurseries, garden centers, or online retailers. Alternatively, you can easily grow your own slips by suspending a sweet potato in water or planting it in moist soil. Make sure about 1/3 of the potato is submerged in water. Place the potato in a warm, sunny location, and within a few weeks, you should see slips sprouting from the potato. Once the slips are 6-8 inches long, gently twist them off the potato and root them in water before planting.
How much sunlight do sweet potatoes need?
Sweet potatoes thrive in full sun, requiring at least 6-8 hours of direct sunlight per day. Adequate sunlight is crucial for healthy growth and abundant tuber production. If you’re growing sweet potatoes indoors or in a partially shaded area, you may need to supplement with artificial lighting to ensure they receive enough light.
What type of soil is best for growing sweet potatoes?
Sweet potatoes prefer well-drained, sandy loam soil that is rich in organic matter. The soil should be loose and friable to allow the tubers to develop easily. Avoid heavy clay soils, as they can restrict tuber growth and lead to misshapen sweet potatoes. Before planting, amend the soil with compost or well-rotted manure to improve drainage and fertility. A slightly acidic soil pH of 6.0 to 6.5 is ideal.
How often should I water sweet potatoes?
Sweet potatoes need consistent moisture, especially during the initial stages of growth. Water deeply and regularly, ensuring the soil remains consistently moist but not waterlogged. Once the plants are established, you can reduce watering frequency, allowing the soil to dry out slightly between waterings. Avoid overhead watering, as it can promote fungal diseases. Drip irrigation or soaker hoses are the best options for watering sweet potatoes.
When is the best time to harvest sweet potatoes?
Sweet potatoes are typically ready to harvest about 90-120 days after planting. The exact timing will depend on the variety and growing conditions. A good indicator is when the leaves start to turn yellow and the vines begin to die back. Harvest before the first frost, as frost can damage the tubers. To harvest, carefully dig around the plants with a garden fork, being careful not to damage the sweet potatoes. Gently lift the tubers from the soil and brush off any excess dirt.
How do I cure sweet potatoes after harvesting?
Curing is an essential step in the sweet potato harvesting process. Curing allows the skins to harden and the starches to convert to sugars, resulting in a sweeter and more flavorful sweet potato. To cure sweet potatoes, place them in a warm, humid location (80-85°F and 85-90% humidity) for 7-10 days. A greenhouse, shed, or even a spare room with a humidifier can work well. After curing, store the sweet potatoes in a cool, dry, and well-ventilated location (55-60°F) for several months.
Can I grow sweet potatoes in containers?
Yes, you can successfully grow sweet potatoes in containers, especially if you have limited garden space. Choose a large container or grow bag that is at least 12-18 inches deep and wide. Fill the container with well-draining potting mix and plant the sweet potato slips. Provide adequate sunlight, water, and fertilizer. Container-grown sweet potatoes may not produce as many tubers as those grown in the ground, but you can still harvest a decent crop.
What are some common pests and diseases that affect sweet potatoes?
Sweet potatoes can be susceptible to various pests and diseases, including sweet potato weevils, wireworms, flea beetles, and fungal diseases like stem rot and black rot. To prevent pest and disease problems, practice crop rotation, use disease-free slips, and maintain good soil drainage. Inspect your plants regularly for signs of pests or diseases and take appropriate action if necessary. Organic pest control methods, such as neem oil or insecticidal soap, can be effective for controlling many common pests.
Can I eat the leaves of sweet potato plants?
Yes, sweet potato leaves are edible and nutritious. They have a mild, spinach-like flavor and can be used in a variety of dishes. Harvest young, tender leaves and cook them like you would spinach or other leafy greens. Sweet potato leaves are a good source of vitamins A and C, as well as fiber and antioxidants.
How do I store sweet potatoes long-term?
Proper storage is crucial for preserving the quality and flavor of sweet potatoes. After curing, store sweet potatoes in a cool, dry, and well-ventilated location (55-60°F). Avoid storing them in the refrigerator, as this can cause them to develop a hard core and lose their flavor. Store sweet potatoes in a single layer in a basket, crate, or cardboard box. Check them periodically for signs of spoilage and discard any that are soft or rotten. With proper storage, sweet potatoes can last for several months.


Leave a Comment