

Grow Sweet Potatoes Home, and unlock a world of delicious possibilities right in your backyard! Have you ever dreamed of harvesting your own vibrant, orange-fleshed sweet potatoes, knowing exactly where they came from and how they were grown? This isn’t just about gardening; it’s about connecting with the earth and enjoying the fruits (or rather, roots!) of your labor.
Sweet potatoes have a rich history, dating back thousands of years in Central and South America. They’ve been a staple food source for countless cultures, prized for their nutritional value and versatility in the kitchen. From savory stews to sweet pies, the sweet potato has nourished and delighted generations.
But why should you learn to grow sweet potatoes home? In today’s world, knowing where our food comes from is more important than ever. Plus, store-bought sweet potatoes can sometimes lack the freshness and flavor of homegrown varieties. By taking control of the growing process, you can ensure you’re getting the most delicious and nutritious sweet potatoes possible, free from unwanted chemicals and pesticides.
In this article, I’m going to share my favorite DIY tricks and hacks for successfully growing sweet potatoes at home, even if you have limited space or gardening experience. Get ready to roll up your sleeves and embark on a rewarding journey of homegrown goodness!
Growing Sweet Potatoes at Home: A Comprehensive DIY Guide
Hello, dear gardening friends! Have you ever wondered how to grow those delicious, orange sweet potatoes that are so versatile in the kitchen yourself? I’ll show you how you can easily do it at home! It’s easier than you think and incredibly fun. Let’s dive into the world of sweet potato cultivation together!
What you need for growing sweet potatoes:
- Sweet potatoes: Organic sweet potatoes are best, as they are less likely to have been treated with growth inhibitors.
- A glass of water or a jar: To place the sweet potato in.
- Toothpicks: To stabilize the sweet potato in the glass of water.
- Potting soil: For later planting of the slips.
- Pots or planters: Of a sufficient size for the sweet potato plants.
- Pruning shears or a knife: To cut off the slips.
- Watering can: To water the plants.
- Garden bed or large container: For the final planting (optional, depending on space).
- Compost or organic fertilizer: For a good supply of nutrients.
- Patience: Sweet potatoes need some time to grow.
Phase 1: Starting Sweet Potato “Slips” (Shoots)
The first phase is crucial because this is where we grow the so-called “slips,” which are the shoots that we will later plant. Don’t worry, it’s really child’s play!
- Prepare the sweet potato: Choose a healthy sweet potato. You can cut it in half or leave it whole, depending on how many slips you want to grow. If you cut it in half, make sure the cut surface is clean.
- Insert toothpicks: Stick four toothpicks around the middle of the sweet potato. These will serve to stabilize the sweet potato in the glass of water.
- Place in the glass of water: Fill a glass or jar with water. The sweet potato should be suspended in the water so that the lower end (about one-third to one-half) is in the water. The toothpicks prevent the sweet potato from being completely submerged.
- Place in a warm and bright spot: Put the glass with the sweet potato in a warm and bright place, but not in direct sunlight. A windowsill is ideal.
- Check the water level: Make sure the water level is always sufficient so that the lower end of the sweet potato remains in the water. Change the water every few days to prevent algae growth.
- Wait and watch: After a few weeks (it can take 2-4 weeks), small roots and shoots (slips) should form on the sweet potato. Be patient, it takes time!
Phase 2: Rooting the Slips
Once the slips have reached a length of about 15-20 cm, we can separate them from the sweet potato and root them.
- Cut off the slips: Carefully cut the slips from the sweet potato with clean pruning shears or a knife. Be careful not to damage the sweet potato.
- Place in water: Put the cut slips into a glass of water. Make sure the lower leaves are not in the water, as they could rot.
- Wait for root formation: Place the glass with the slips back in a warm and bright place. After a few days to a week, small roots should form.
Phase 3: Planting the Rooted Slips
Now comes the exciting part: planting the rooted slips!
- Prepare the pots: Fill pots or planters with good potting soil. You can enrich the soil with some compost or organic fertilizer to give the plants a good start.
- Make planting holes: Make small holes in the soil, large enough to accommodate the roots of the slips.
- Plant the slips: Carefully place the rooted slips into the planting holes and cover the roots with soil. Gently press the soil down.
- Water: Water the freshly planted slips thoroughly.
- Place in a warm and bright spot: Place the pots in a warm and bright location.
Phase 4: Caring for the Sweet Potato Plants
Sweet potato plants need regular care to grow well and produce many tubers.
- Water regularly: Keep the soil moist, but not wet. Sweet potatoes do not like waterlogging.
- Fertilize: Fertilize the plants regularly with an organic fertilizer or compost.
- Provide support (optional): Sweet potatoes are vining plants. You can offer them a trellis or support to climb on, but it’s not strictly necessary.
- Control pests: Watch out for pests like aphids or slugs. You can use organic pest control methods if needed.
Phase 5: Planting Outdoors (Optional)
When the weather is warm enough (no more risk of frost), you can plant the sweet potato plants outdoors.
- Harden off: Before planting them out, you should harden off the plants for a few days by placing them outside during the day and bringing them back in at night.
- Choose a suitable location: Select a sunny spot with well-draining soil.
- Dig planting holes: Dig holes large enough to accommodate the root balls of the plants.
- Plant them: Carefully place the plants in the holes and cover the roots with soil. Gently press the soil down.
- Water: Water the newly planted plants thoroughly.
- Mulch: Mulch the soil around the plants with straw or leaves to retain moisture and suppress weeds.
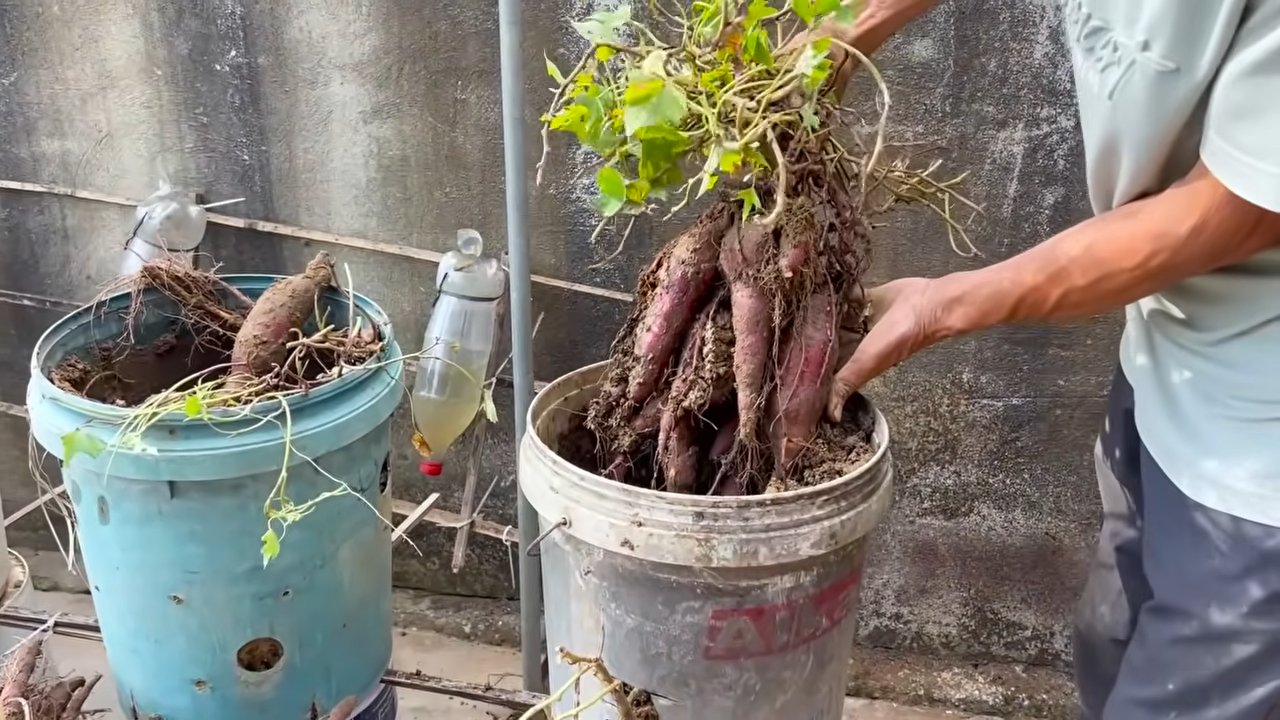
Phase 6: Harvest Time!
After about 3-4 months (depending on the variety and weather conditions), the sweet potatoes are ready for harvest.
- Recognize harvest time: The leaves of the plants will start to turn yellow and die back. This is a sign that the tubers are ripe.
- Dig carefully: Carefully dig up the sweet potatoes with a digging fork or spade. Be careful not to damage the tubers.
- Let them dry: Let the harvested sweet potatoes dry for a few days in a warm, dry place. This allows the skin to harden (a process called “curing”) and makes the sweet potatoes last longer.
- Store: Store the cured sweet potatoes in a cool, dark, and dry place.
Additional Tips and Tricks:
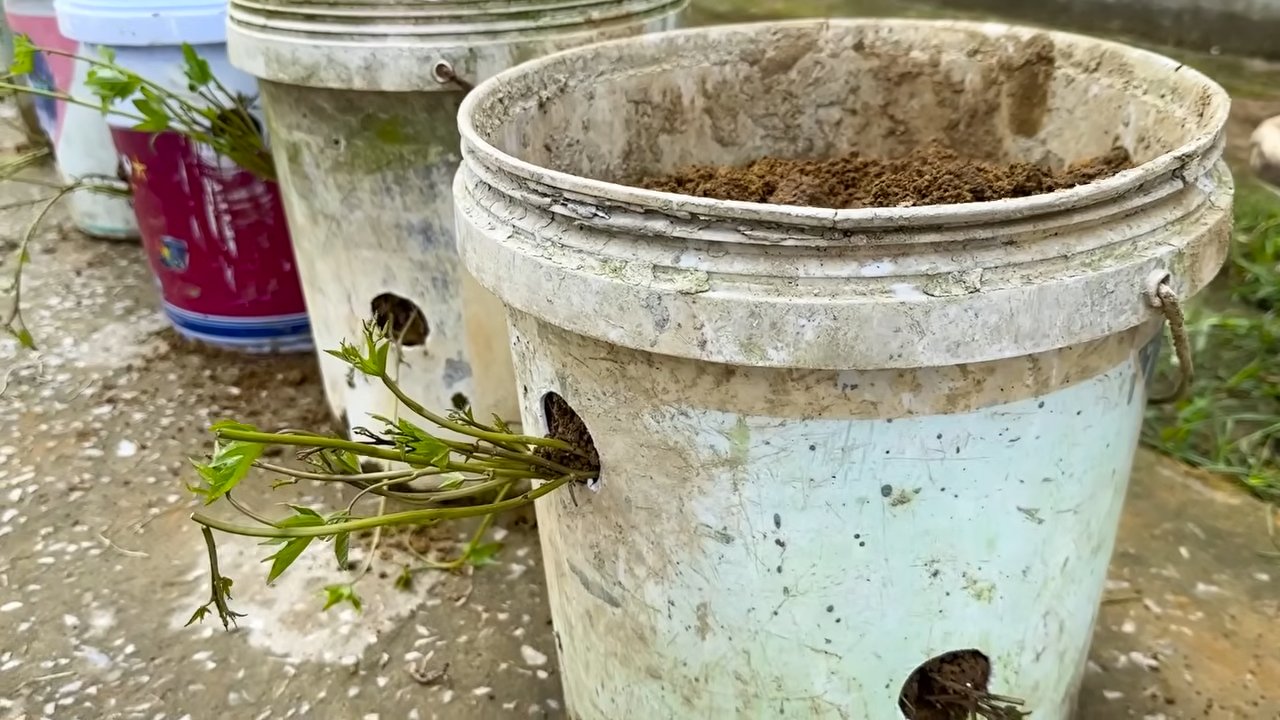
Sweet potatoes in pots: If you don’t have a garden…
Variety selection: There are many different varieties of sweet potatoes. Find out which varieties grow well in your region.
Soil improvement: Sweet potatoes prefer loose and well-draining soil. You can improve the soil with compost or sand.
Crop rotation: Do not plant sweet potatoes in the same spot every year to prevent diseases and pests.
Conclusion
So, there you have it! Growing sweet potatoes at home isn’t just a fun gardening project; it’s a rewarding journey that culminates in a delicious and nutritious harvest. We’ve walked you through the simple steps, from sprouting slips to nurturing your plants and finally, reaping the benefits of your labor. This DIY trick is a must-try for several compelling reasons.
First and foremost, the taste of homegrown sweet potatoes is simply unparalleled. Forget the bland, often fibrous varieties you find in the supermarket. Homegrown sweet potatoes boast a richer, sweeter flavor and a smoother, creamier texture that will elevate your favorite recipes. Imagine roasting them with a drizzle of maple syrup and a sprinkle of cinnamon, or mashing them into a vibrant side dish with a touch of butter and nutmeg. The possibilities are endless!
Beyond the superior taste, growing your own sweet potatoes offers a sense of accomplishment and connection to nature. There’s something incredibly satisfying about nurturing a plant from a simple slip to a thriving vine laden with delicious tubers. It’s a tangible reminder of the power of nature and the rewards of patience and care. Plus, you’ll know exactly where your food is coming from and what went into growing it – no harmful pesticides or questionable farming practices.
But the benefits don’t stop there. Growing sweet potatoes at home is also a sustainable and eco-friendly practice. By reducing your reliance on commercially grown produce, you’re minimizing your carbon footprint and supporting local food systems. You can even compost your kitchen scraps to enrich the soil and further reduce waste.
Now, let’s talk about variations. While we’ve focused on the traditional method of sprouting slips from a whole sweet potato, there are other approaches you can explore. For example, you can try growing sweet potatoes in containers, which is ideal if you have limited space or live in an apartment. Just be sure to choose a large container with good drainage and use a high-quality potting mix.
Another variation is to experiment with different varieties of sweet potatoes. From the classic orange-fleshed Beauregard to the purple-skinned Okinawan, there’s a sweet potato variety to suit every taste and preference. Do some research and choose varieties that are well-suited to your climate and growing conditions.
Finally, don’t be afraid to get creative with your sweet potato recipes. While roasting and mashing are classic preparations, there are countless other ways to enjoy this versatile vegetable. Try adding them to soups, stews, and curries for a boost of flavor and nutrition. You can even bake them into pies, cakes, and muffins for a healthy and delicious treat.
So, what are you waiting for? Grab a sweet potato, a jar of water, and get ready to embark on a rewarding gardening adventure. We encourage you to try this DIY trick and experience the joy of growing your own sweet potatoes at home. And don’t forget to share your experiences with us! We’d love to hear about your successes, your challenges, and your favorite sweet potato recipes. Share your photos and stories on social media using #HomegrownSweetPotatoes and let’s inspire others to join the movement. Happy growing!
Frequently Asked Questions (FAQ)
1. What is the best time to start growing sweet potatoes?
The ideal time to start growing sweet potatoes is typically in the late spring or early summer, after the last frost has passed and the soil has warmed up to at least 65 degrees Fahrenheit (18 degrees Celsius). Sweet potatoes require a long growing season of at least 100-120 days to mature fully. Starting them indoors a few weeks before the last frost can give you a head start. Check your local climate data to determine the best planting time for your region.
2. How much sunlight do sweet potatoes need?
Sweet potatoes thrive in full sunlight, requiring at least 6-8 hours of direct sunlight per day. Insufficient sunlight can result in smaller tubers and reduced yields. Choose a planting location that receives ample sunlight throughout the day. If you’re growing sweet potatoes in containers, make sure to place them in a sunny spot.
3. What type of soil is best for growing sweet potatoes?
Sweet potatoes prefer well-drained, sandy loam soil that is rich in organic matter. Heavy clay soil can hinder tuber development and lead to misshapen sweet potatoes. Amend heavy soil with compost, aged manure, or other organic materials to improve drainage and fertility. A slightly acidic soil pH of 6.0-6.5 is ideal.
4. How often should I water sweet potatoes?
Sweet potatoes need consistent moisture, especially during the early stages of growth. Water deeply and regularly, especially during dry spells. Avoid overwatering, as this can lead to root rot. Once the plants are established, you can reduce watering frequency, but be sure to monitor the soil moisture and water when the top inch or two feels dry.
5. How do I know when my sweet potatoes are ready to harvest?
Sweet potatoes are typically ready to harvest in the fall, before the first frost. The foliage will start to turn yellow and die back, indicating that the tubers are mature. You can also dig up a test sweet potato to check for size and maturity. The tubers should be firm, smooth, and free of blemishes.
6. How do I cure sweet potatoes after harvesting?
Curing sweet potatoes is essential for improving their flavor and storage life. After harvesting, gently brush off any excess soil and allow the sweet potatoes to dry in a warm, humid place (80-85 degrees Fahrenheit and 85-90% humidity) for 7-10 days. This process allows the skins to harden and heal any minor cuts or bruises. After curing, store the sweet potatoes in a cool, dry, and well-ventilated place (55-60 degrees Fahrenheit) for several months.
7. Can I grow sweet potatoes in containers?
Yes, you can successfully grow sweet potatoes in containers, especially if you have limited space. Choose a large container (at least 20 gallons) with good drainage and fill it with a high-quality potting mix. Plant the slips about 4-6 inches deep and provide regular watering and fertilization. Container-grown sweet potatoes may not produce as many tubers as those grown in the ground, but you can still enjoy a decent harvest.
8. What are some common pests and diseases that affect sweet potatoes?
Sweet potatoes can be susceptible to various pests and diseases, including sweet potato weevils, wireworms, flea beetles, and fungal diseases like stem rot and black rot. Monitor your plants regularly for signs of infestation or disease and take appropriate action. Use organic pest control methods whenever possible, such as handpicking pests, using insecticidal soap, or applying neem oil. Ensure good air circulation and avoid overwatering to prevent fungal diseases.
9. Can I eat the sweet potato leaves?
Yes, sweet potato leaves are edible and nutritious. They can be cooked and eaten like spinach or other leafy greens. Choose young, tender leaves and avoid older, tougher leaves. Sweet potato leaves are a good source of vitamins A and C, as well as fiber and antioxidants.
10. How can I prevent my sweet potatoes from cracking or splitting?
Cracking or splitting in sweet potatoes can be caused by inconsistent watering or nutrient deficiencies. Ensure that your plants receive consistent moisture, especially during tuber development. Amend the soil with compost or other organic materials to improve water retention and nutrient availability. Avoid over-fertilizing with nitrogen, as this can promote excessive foliage growth at the expense of tuber development.

Leave a Comment