

Grow Radish Indoors? Absolutely! Imagine fresh, peppery radishes gracing your salads and snacks, even when the snow is falling outside. Forget those bland, store-bought veggies – with a few simple tricks, you can cultivate a vibrant radish patch right on your windowsill. For centuries, people have sought ways to extend the growing season, and indoor gardening, including growing radishes indoors, is a modern take on this age-old pursuit. From ancient Roman greenhouses to Victorian orangeries, the desire to nurture plants year-round has always been strong.
But why should *you* bother with growing radishes indoors? Well, for starters, it’s incredibly rewarding! There’s something magical about watching tiny seeds sprout and transform into edible delights. Plus, it gives you control over the growing environment, minimizing pests and diseases. More importantly, it provides access to fresh, healthy food regardless of the weather. In today’s world, where access to fresh produce can be a challenge, mastering the art of growing radishes indoors is a valuable skill. So, let’s dive into the secrets of cultivating these crunchy, colorful gems within the comfort of your own home!
Grow Radishes Indoors: A Beginner’s Guide
Hey there, fellow gardening enthusiasts! Ever craved that peppery crunch of a fresh radish but didn’t want to brave the elements or wait for the outdoor growing season? Well, good news! You can absolutely grow radishes indoors, and it’s surprisingly easy. I’m going to walk you through everything you need to know to cultivate your own little radish patch right in your home.
What You’ll Need
Before we dive in, let’s gather our supplies. Here’s a checklist of everything you’ll need to successfully grow radishes indoors:
* Radish Seeds: Choose a variety that matures quickly. ‘Cherry Belle’ and ‘French Breakfast’ are excellent choices for indoor growing.
* Containers: You’ll need containers that are at least 6 inches deep. I prefer using plastic pots or even repurposed containers like yogurt tubs (just make sure to clean them thoroughly!).
* Potting Mix: Use a well-draining potting mix. Avoid using garden soil, as it can compact and hinder root growth.
* Grow Lights (Optional but Recommended): Radishes need plenty of light. If you don’t have a sunny windowsill, grow lights are a must.
* Watering Can or Spray Bottle: For gentle watering.
* Fertilizer (Optional): A balanced liquid fertilizer can give your radishes a boost.
* Small Shovel or Trowel: For planting the seeds.
* Labels: To mark what you’ve planted.
Choosing the Right Radish Variety
Not all radishes are created equal, especially when it comes to indoor growing. You want to select varieties that are known for their quick maturation. Here are a few of my favorites:
* ‘Cherry Belle’: These are classic, round, bright red radishes that mature in about 22 days. They’re reliable and easy to grow.
* ‘French Breakfast’: These are elongated, red radishes with a white tip. They have a milder flavor and mature in about 25 days.
* ‘Sparkler’: Similar to ‘Cherry Belle’ but with a white tip. They mature in around 24 days.
* ‘Easter Egg’: A mix of different colored radishes (red, pink, purple, white) that mature at slightly different rates, adding a fun variety to your harvest.
Step-by-Step Planting Guide
Now for the fun part – planting! Follow these steps to get your radish seeds started:
1. Prepare Your Containers:
* Make sure your containers are clean and have drainage holes. If you’re using repurposed containers, drill a few holes in the bottom.
* Fill the containers with potting mix, leaving about an inch of space at the top.
* Gently pat down the soil to create a firm but not compacted surface.
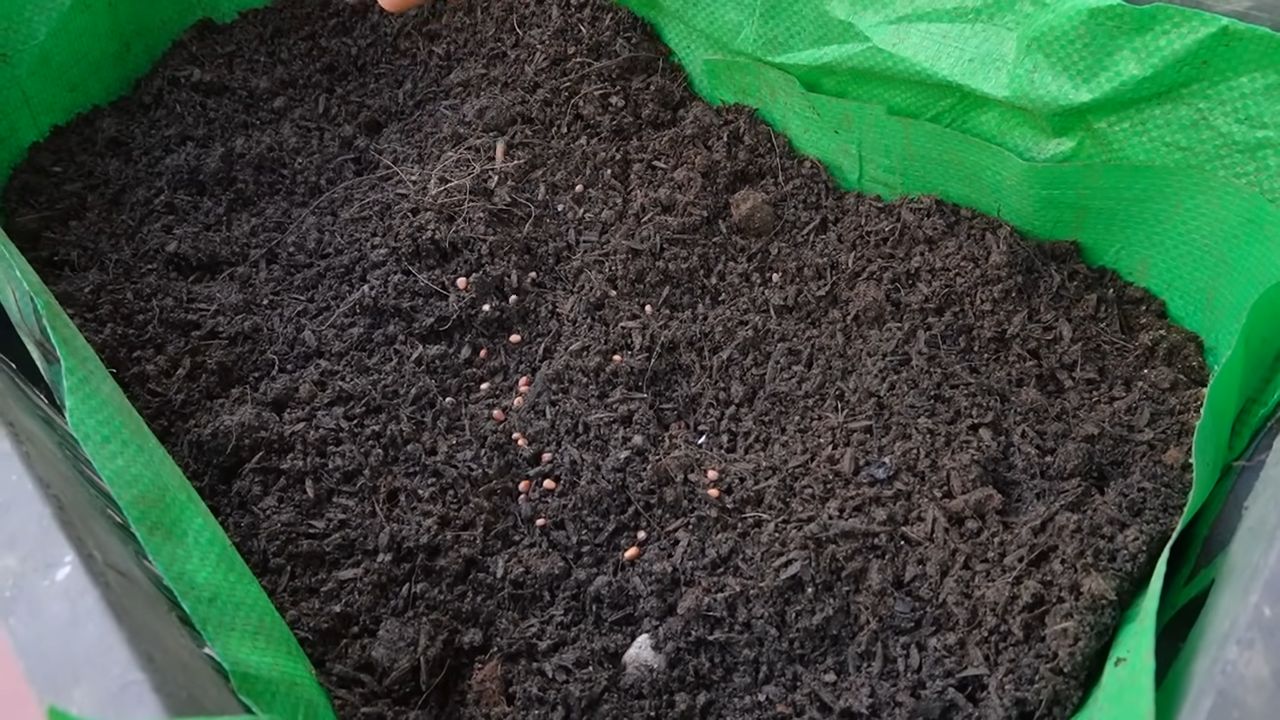
2. Sow the Seeds:
* Radishes need space to grow, so don’t overcrowd them. I usually sow seeds about 1 inch apart.
* Make small indentations in the soil (about 1/2 inch deep) using your finger or a pencil.
* Place one or two seeds in each indentation.
* Cover the seeds with potting mix and gently pat down the soil.
3. Water Thoroughly:
* Water the soil gently but thoroughly until it’s evenly moist. Avoid overwatering, which can lead to rot.
* I like to use a spray bottle for the initial watering to avoid disturbing the seeds.
4. Provide Light:
* Place your containers in a sunny windowsill that receives at least 6 hours of direct sunlight per day.
* If you don’t have enough natural light, use grow lights. Position the lights a few inches above the soil surface and keep them on for 12-14 hours per day.
5. Maintain Consistent Moisture:
* Keep the soil consistently moist but not waterlogged. Check the soil moisture daily by sticking your finger into the soil. If the top inch feels dry, it’s time to water.
* Water gently to avoid disturbing the seedlings.
Caring for Your Radishes
Once your radishes have sprouted, it’s important to provide them with the right care to ensure a healthy and bountiful harvest.
1. Thinning Seedlings:
* Once your seedlings have developed their first true leaves (the second set of leaves that appear after the initial seed leaves), it’s time to thin them.
* Thinning involves removing some of the seedlings to give the remaining ones enough space to grow.
* Choose the strongest seedlings and gently pull out the weaker ones. Aim for a spacing of about 2 inches between plants.
2. Watering:
* Continue to water your radishes regularly, keeping the soil consistently moist.
* Avoid letting the soil dry out completely, as this can cause the radishes to become tough and bitter.
* Also, avoid overwatering, as this can lead to root rot.
3. Fertilizing (Optional):
* If you want to give your radishes a boost, you can fertilize them with a balanced liquid fertilizer diluted to half strength.
* Fertilize every two weeks, starting when the seedlings are about 2 weeks old.
* Be careful not to over-fertilize, as this can cause the radishes to develop excessive foliage at the expense of root growth.
4. Light:
* Ensure your radishes continue to receive plenty of light. If you’re using grow lights, adjust their height as the plants grow to keep them a few inches above the foliage.
* Rotate your containers regularly to ensure that all sides of the plants receive equal light exposure.
5. Temperature:
* Radishes prefer cool temperatures, ideally between 60°F and 70°F (15°C and 21°C).
* Avoid placing your radishes near heat sources, such as radiators or vents.
Dealing with Pests and Diseases
Fortunately, radishes are relatively pest-resistant, especially when grown indoors. However, there are a few potential problems to watch out for:
* Aphids: These tiny insects can suck the sap from your plants, causing them to become weak and stunted. If you notice aphids, you can try washing them off with a strong stream of water or using insecticidal soap.
* Flea Beetles: These small beetles can chew holes in the leaves of your radishes. You can control flea beetles by covering your plants with row covers or using insecticidal soap.
* Root Rot: This fungal disease can cause the roots of your radishes to rot. It’s usually caused by overwatering or poor drainage. To prevent root rot, make sure your containers have drainage holes and avoid overwatering.
Harvesting Your Radishes
The best part of growing radishes is, of course, harvesting them! Most radish varieties mature in about 22-30 days, so you won’t have to wait long.
1. Check for Maturity:
* Radishes are ready to harvest when their roots are about 1 inch in diameter.
* You can gently brush away some of the soil around the base of the plant to check the size of the root.
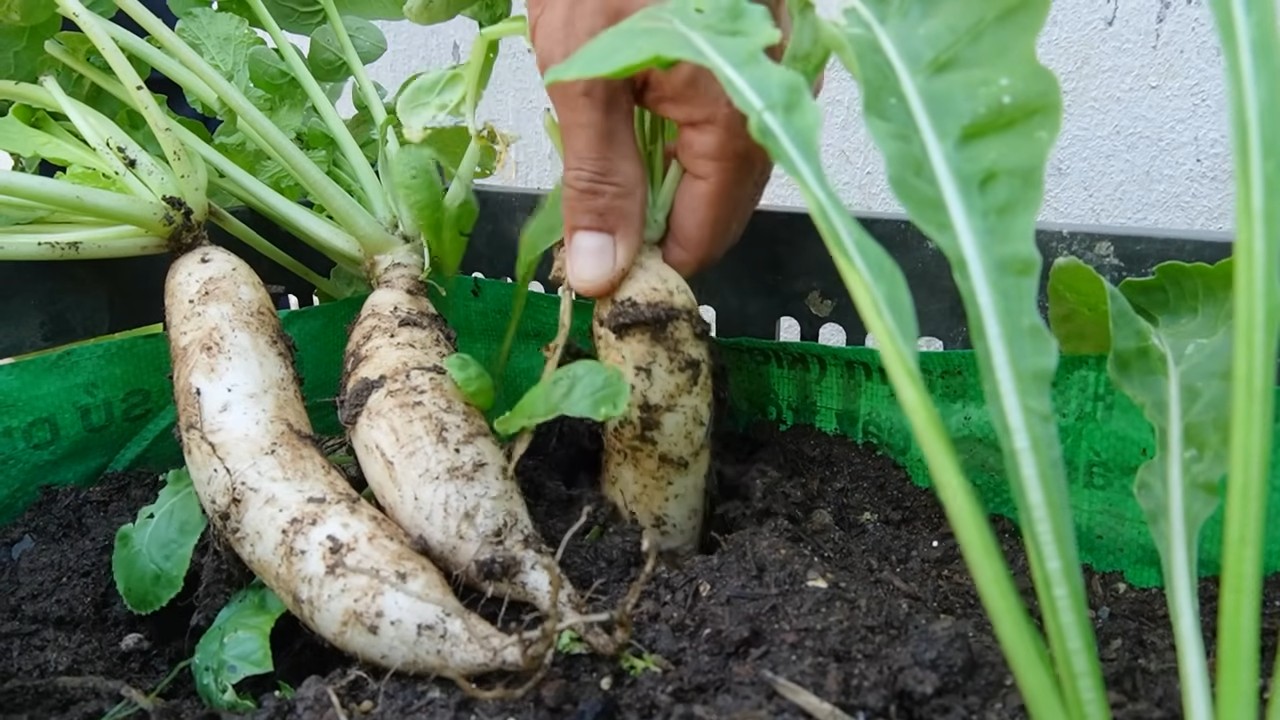
2. Harvest Carefully:
* To harvest your radishes, gently pull them out of the soil.
* If the soil is dry, you may need to loosen it first with a trowel.
3. Wash and Enjoy:
* Wash your radishes thoroughly to remove any dirt.
* You can eat them raw in salads, sandwiches, or as a snack. You can also cook them by roasting, sautéing, or pickling.
Tips for Success
Here are a few extra tips to help you grow the best possible radishes indoors:
* Use a good quality potting mix: This will provide your radishes with the nutrients they need to grow.
* Don’t overcrowd your plants: Give your radishes enough space to grow by thinning the seedlings.
* Water regularly: Keep the soil consistently moist but not waterlogged.
* Provide plenty of light: Radishes need at least 6 hours of direct sunlight per day, or 12-14 hours of grow light.
* Harvest promptly: Radishes can become tough and bitter if they’re left in the ground too long.
Troubleshooting
Even with the best care, you might encounter some challenges. Here are a few common problems and how to address them:
* Radishes are small and underdeveloped: This could be due to insufficient light, overcrowding, or poor soil. Make sure your radishes are getting enough light, thin the seedlings, and use a good quality potting mix.
* Rad
Conclusion
So, there you have it! Growing radishes indoors is not only possible, but it’s also surprisingly simple and rewarding. Forget those bland, store-bought radishes that lack that peppery punch. With this DIY trick, you can enjoy fresh, crisp, and flavorful radishes right from your windowsill, regardless of the season. Imagine adding a vibrant burst of flavor to your salads, tacos, or even just enjoying them as a crunchy snack.
This method offers a fantastic way to connect with your food, even if you don’t have a sprawling garden. It’s a project that’s perfect for beginners, families with children, or anyone looking to add a touch of green to their indoor space. Plus, it’s a sustainable way to reduce your reliance on commercially grown produce.
But the beauty of this DIY project lies in its adaptability. Feel free to experiment with different radish varieties. Consider trying French Breakfast radishes for their mild flavor and elongated shape, or perhaps the vibrant Cherry Belle for their classic red hue. You can also adjust the growing medium to suit your preferences. While a standard potting mix works well, you might want to try adding some compost or perlite to improve drainage and aeration.
Don’t be afraid to get creative with your container choices, too. While we’ve suggested using a standard pot, you can repurpose old containers like plastic tubs or even milk cartons. Just make sure they have adequate drainage holes.
And remember, the key to successful indoor radish growing is consistent moisture, adequate light, and proper ventilation. Keep a close eye on your seedlings, and don’t be afraid to adjust your watering schedule or lighting as needed.
We are confident that you’ll find this DIY trick for growing radishes indoors to be a game-changer. It’s a simple, affordable, and incredibly satisfying way to enjoy fresh, homegrown produce year-round.
Now, it’s your turn! We encourage you to give this method a try and experience the joy of harvesting your own radishes. And most importantly, we want to hear about your experiences. Share your photos, tips, and tricks in the comments below. Let’s build a community of indoor radish growers and inspire others to embrace the joys of homegrown food. What are you waiting for? Get planting!
Frequently Asked Questions (FAQ)
Q: What kind of radishes are best for growing indoors?
A: While you can technically grow any radish variety indoors, some tend to perform better than others. Smaller, faster-maturing varieties like Cherry Belle, French Breakfast, and Easter Egg radishes are generally recommended. These varieties are well-suited to container gardening and don’t require as much space as larger varieties. Experimenting with different types is part of the fun, so don’t be afraid to try others and see what works best for you!
Q: How much light do radishes need when grown indoors?
A: Radishes need at least 6 hours of direct sunlight per day to thrive. If you don’t have a sunny windowsill, you can supplement with grow lights. Fluorescent or LED grow lights are excellent options. Position the lights a few inches above the seedlings and keep them on for 12-14 hours per day. Insufficient light can lead to leggy growth and poor radish development.
Q: What type of soil should I use for growing radishes indoors?
A: A well-draining potting mix is essential for growing radishes indoors. Avoid using garden soil, as it can be too heavy and compact, leading to drainage problems. A good potting mix will retain moisture while allowing excess water to drain away. You can also amend your potting mix with compost or perlite to improve drainage and aeration.
Q: How often should I water my indoor radishes?
A: Radishes need consistent moisture to grow properly. Water your plants when the top inch of soil feels dry to the touch. Avoid overwatering, as this can lead to root rot. Ensure that your container has adequate drainage holes to prevent water from pooling at the bottom. A good rule of thumb is to water thoroughly until water drains out of the bottom of the pot.
Q: How long does it take for radishes to mature when grown indoors?
A: Radishes are known for their quick growth. Most varieties will mature in 3-4 weeks when grown indoors under optimal conditions. The exact time will depend on the variety and growing conditions. Keep an eye on your radishes and harvest them when they reach the desired size.
Q: How do I know when my radishes are ready to harvest?
A: Radishes are typically ready to harvest when their roots reach about 1 inch in diameter. You can gently brush away some of the soil around the base of the plant to check the size of the radish. If they are the right size, gently pull them from the soil. Don’t wait too long to harvest, as radishes can become woody and bitter if left in the ground for too long.
Q: Can I grow radishes indoors year-round?
A: Yes, you can grow radishes indoors year-round, provided you have adequate light and temperature control. Indoor growing allows you to bypass seasonal limitations and enjoy fresh radishes whenever you want.
Q: What are some common problems when growing radishes indoors, and how can I fix them?
A: Some common problems include leggy growth (due to insufficient light), root rot (due to overwatering), and pests (such as aphids). To prevent leggy growth, ensure your radishes receive enough light. To prevent root rot, avoid overwatering and ensure good drainage. If you encounter pests, you can try using insecticidal soap or neem oil.
Q: Can I eat the radish greens?
A: Absolutely! Radish greens are edible and nutritious. They have a peppery flavor similar to the radish root. You can add them to salads, stir-fries, or soups. Make sure to wash them thoroughly before eating.
Q: How can I make my radishes taste less spicy?
A: The spiciness of radishes can vary depending on the variety and growing conditions. If you prefer a milder flavor, try growing French Breakfast radishes or soaking your harvested radishes in cold water for a few hours before eating. This can help to reduce their pungency.

Leave a Comment