

Grow Purple Kohlrabi Rooftop gardens are becoming increasingly popular, and for good reason! Imagine stepping onto your roof and harvesting vibrant, delicious purple kohlrabi, fresh from your own urban oasis. It’s not just a dream; it’s an achievable reality with a little know-how and some clever DIY tricks.
Rooftop gardening, while seemingly modern, has roots stretching back centuries. From the Hanging Gardens of Babylon to the more recent victory gardens of World War II, humans have always found ways to cultivate food in unconventional spaces. Today, with increasing urbanization and a growing desire for sustainable living, rooftop gardens are experiencing a major resurgence.
But why grow purple kohlrabi rooftop, specifically? Well, kohlrabi is a nutritional powerhouse, packed with vitamins and fiber. Plus, the purple variety adds a beautiful splash of color to your garden and your plate! Many people find traditional gardening intimidating, but rooftop gardening, especially with kohlrabi, can be surprisingly manageable. This DIY guide will provide you with simple, step-by-step instructions and clever hacks to overcome common challenges like limited space, weight restrictions, and weather exposure. I’m excited to share these tips with you, so you can enjoy fresh, homegrown kohlrabi even if you don’t have a traditional backyard!
Growing Purple Kohlrabi on Your Rooftop: A DIY Guide
Hey there, fellow rooftop gardeners! I’m so excited to share my experience growing vibrant purple kohlrabi right on my rooftop. It’s surprisingly easy, rewarding, and adds a pop of color (and deliciousness!) to your urban garden. This guide will walk you through every step, from choosing the right container to harvesting your beautiful purple bulbs. Let’s get started!
Choosing the Right Container and Soil
Before we even think about seeds, let’s talk about where our kohlrabi will call home.
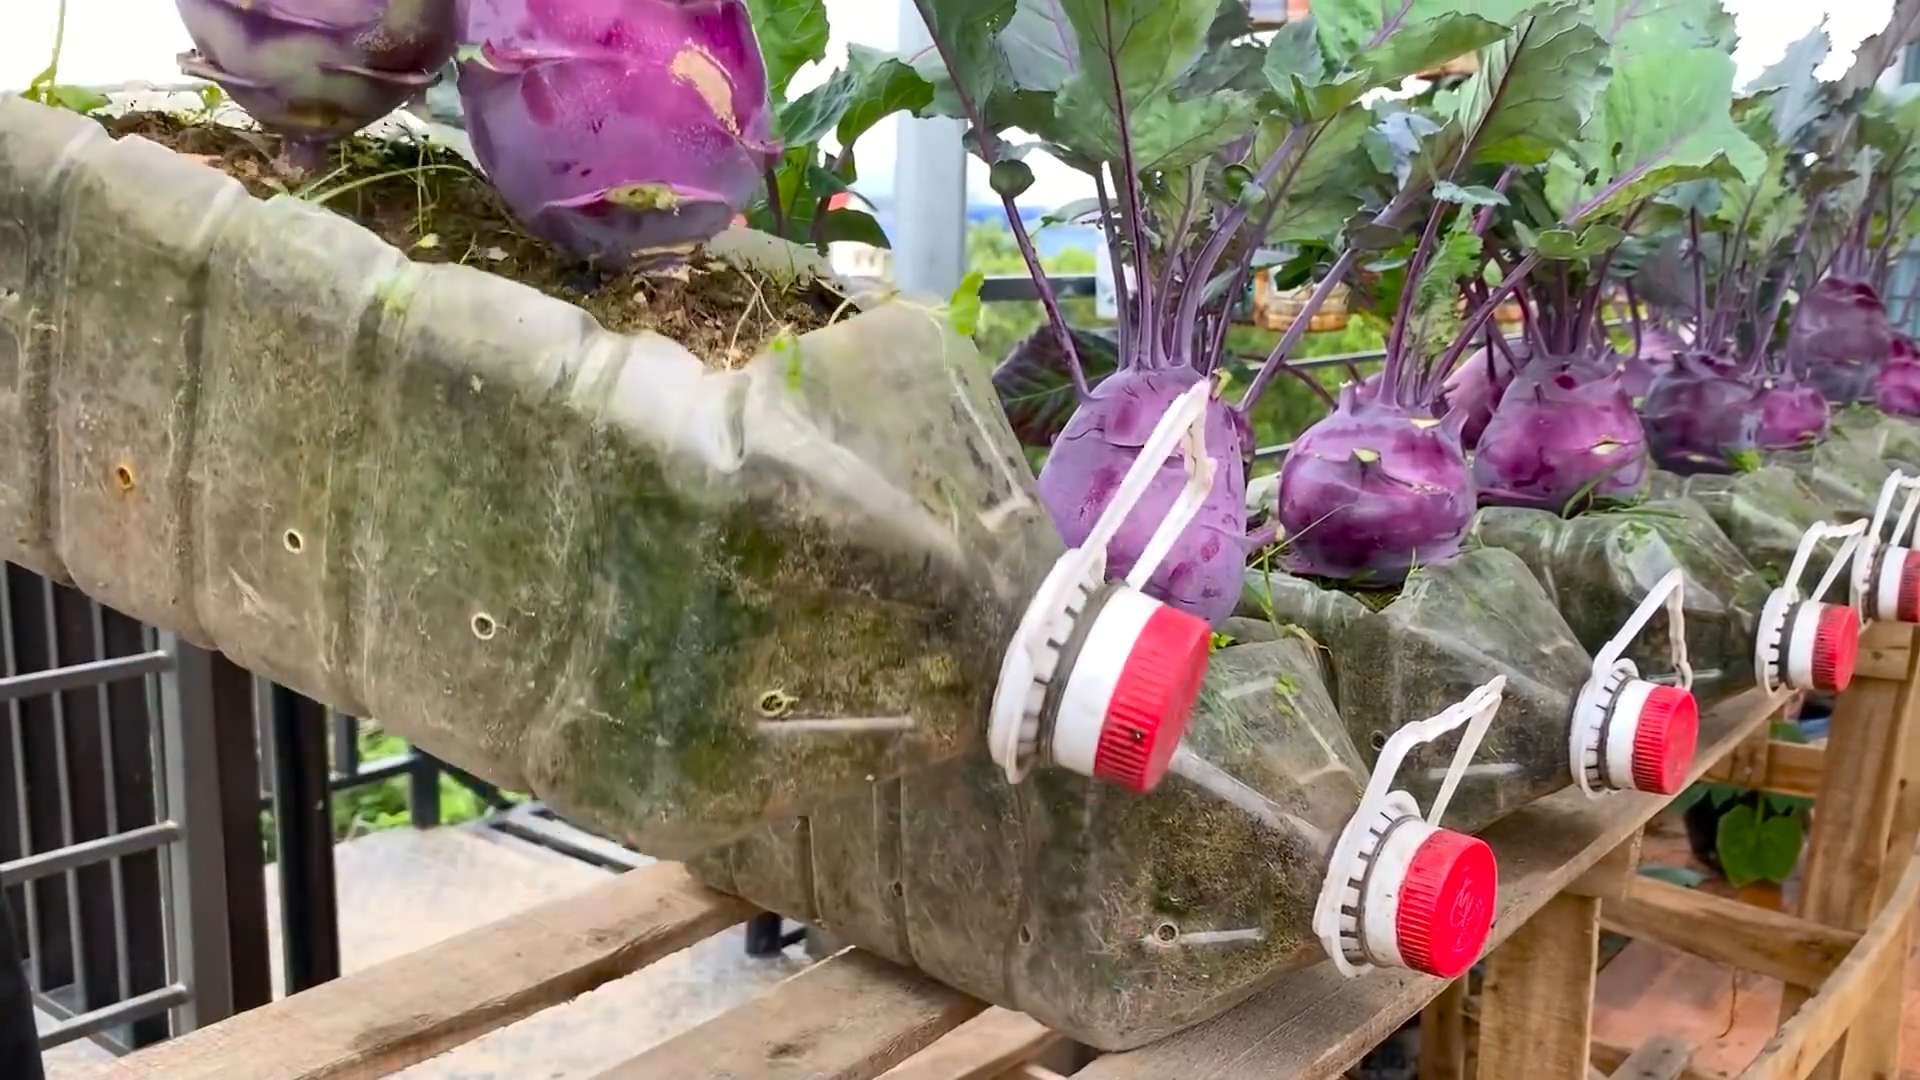
* Container Size: Kohlrabi needs room to grow, but not as much as, say, a tomato plant. I’ve found that a container at least 12 inches deep and 12 inches in diameter works perfectly. This gives the bulb enough space to develop without being cramped.
* Material: You can use plastic, terracotta, or even repurposed containers like old buckets (just make sure they’re food-grade!). I personally love using fabric grow bags because they allow for excellent drainage and aeration.
* Drainage: This is crucial! Kohlrabi hates sitting in soggy soil. Ensure your container has plenty of drainage holes. If not, drill some!
* Soil: Forget using garden soil straight from the ground. It’s often too heavy and doesn’t drain well. Instead, opt for a high-quality potting mix. I like to make my own blend using equal parts:
* Compost: Provides essential nutrients and improves soil structure.
* Peat Moss (or Coco Coir): Helps retain moisture.
* Perlite: Improves drainage and aeration.
* A handful of slow-release fertilizer: Gives your kohlrabi a boost in the early stages.
Sowing the Seeds
Now for the fun part – planting!
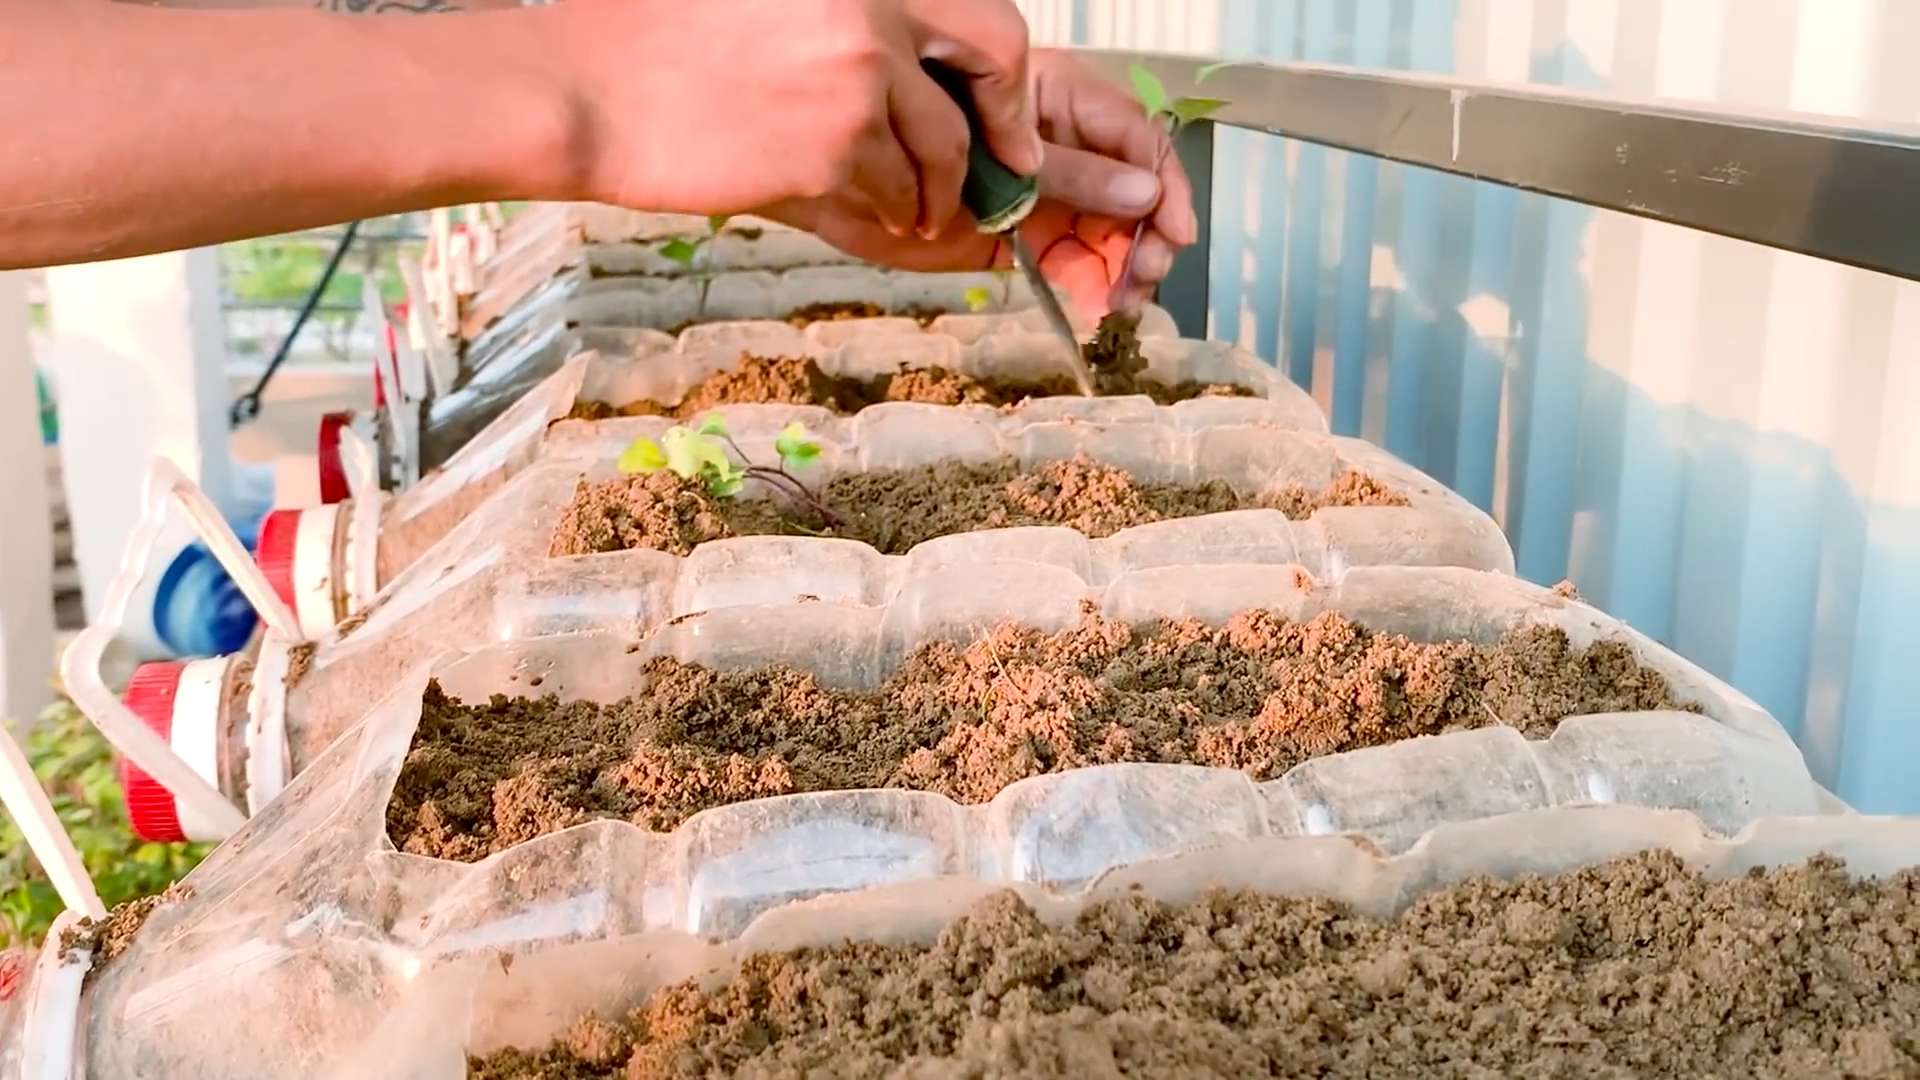
1. Timing is Key: Kohlrabi is a cool-season crop, meaning it thrives in cooler temperatures. I usually start my seeds indoors about 4-6 weeks before the last expected frost. If you live in a warmer climate, you can sow seeds directly into the container in early spring or fall.
2. Starting Indoors (Optional): If you’re starting indoors, use seed starting trays or small pots filled with seed starting mix. Sow the seeds about ¼ inch deep and gently water them. Keep the soil moist but not soggy.
3. Direct Sowing: If you’re sowing directly into the container, sow the seeds about ½ inch deep and space them about 2-3 inches apart. You can always thin them out later if too many germinate.
4. Germination: Kohlrabi seeds typically germinate within 5-10 days. Keep the soil consistently moist during this time.
5. Light: Once the seedlings emerge, they need plenty of light. If you’re starting indoors, place them under grow lights or in a sunny window. Rotate the seedlings regularly to prevent them from becoming leggy.
Transplanting (If Starting Indoors)
If you started your seeds indoors, it’s time to transplant them to their final container.
1. Harden Off: Before transplanting, you need to “harden off” the seedlings. This means gradually exposing them to outdoor conditions over a period of about a week. Start by placing them outside for an hour or two each day, gradually increasing the amount of time they spend outdoors. This helps them acclimate to the sun, wind, and temperature changes.
2. Transplanting Time: Once the seedlings are hardened off, it’s time to transplant them. Choose a cloudy day or transplant in the late afternoon to avoid shocking the plants.
3. Gently Remove Seedlings: Carefully remove the seedlings from their seed starting trays or pots. Try to disturb the roots as little as possible.
4. Planting Depth: Plant the seedlings at the same depth they were growing in their original containers.
5. Spacing: Space the seedlings about 6-8 inches apart in the container.
6. Water Thoroughly: After transplanting, water the seedlings thoroughly.
Caring for Your Kohlrabi
Now that your kohlrabi is planted, it’s time to provide it with the care it needs to thrive.
1. Watering: Kohlrabi needs consistent moisture, especially during bulb development. Water deeply whenever the top inch of soil feels dry. Avoid overwatering, as this can lead to root rot.
2. Fertilizing: Feed your kohlrabi every 2-3 weeks with a balanced liquid fertilizer. You can also side-dress with compost or aged manure.
3. Sunlight: Kohlrabi needs at least 6 hours of sunlight per day. Choose a sunny spot on your rooftop for your container.
4. Weeding: Keep the container free of weeds. Weeds compete with the kohlrabi for nutrients and water.
5. Pest Control: Kohlrabi can be susceptible to pests like aphids, cabbage worms, and flea beetles. Regularly inspect your plants for signs of pests. You can control pests with insecticidal soap, neem oil, or by hand-picking them off the plants. I prefer organic methods whenever possible.
6. Mulching: Add a layer of mulch around the base of the plants to help retain moisture, suppress weeds, and regulate soil temperature. Straw, wood chips, or shredded leaves work well.
Harvesting Your Purple Treasure
The moment we’ve all been waiting for – harvesting!
1. Timing: Kohlrabi is typically ready to harvest about 50-60 days after planting. The bulb should be about 2-3 inches in diameter. Don’t let it get too large, as it can become tough and woody.
2. Harvesting Method: To harvest, simply cut the bulb from the stem with a sharp knife. Leave about an inch of stem attached.
3. Leafy Greens: Don’t throw away the leaves! Kohlrabi leaves are also edible and can be used in salads, stir-fries, or soups. Harvest the leaves when they are young and tender.
4. Storage: Kohlrabi can be stored in the refrigerator for several weeks. Remove the leaves before storing.
Troubleshooting
Even with the best care, you might encounter some problems along the way. Here are a few common issues and how to address them:
* Bulb Cracking: This can be caused by inconsistent watering. Make sure to water your kohlrabi regularly and deeply.
* Pest Infestations: As mentioned earlier, kohlrabi can be susceptible to pests. Regularly inspect your plants and take action as soon as you notice any problems.
* Slow Growth: This could be due to a lack of nutrients or sunlight. Make sure your kohlrabi is getting enough fertilizer and sunlight.
* Woody Bulbs: This is usually caused by letting the bulbs get too large before harvesting. Harvest them when they are 2-3 inches in diameter.
Enjoying Your Harvest
Now that you’ve harvested your beautiful purple kohlrabi, it’s time to enjoy it! Kohlrabi can be eaten raw or cooked.
* Raw: Peel the bulb and slice it thinly. It has a mild, slightly sweet flavor and a crisp texture. It’s delicious in salads, slaws, or as a snack with dip.
* Cooked: Kohlrabi can be steamed, boiled, roasted, or stir-fried. It has a similar flavor to broccoli or cabbage. It’s a great addition to soups, stews, and side dishes.
Recipe Ideas
Here are a few of my favorite ways to enjoy kohlrabi:
* Kohlrabi Slaw: Shredded kohlrabi, carrots, and cabbage tossed in a creamy dressing.
* Roasted Kohlrabi: Cubed kohlrabi roasted with olive oil, herbs, and spices.
* Kohlrabi and Potato Soup: A creamy and comforting soup made with kohlrabi, potatoes, and broth.
* Kohlrabi Stir-Fry: Sliced kohlrabi stir-fried with vegetables and your favorite sauce.
Why Grow Purple Kohlrabi?
Besides being visually stunning, purple kohlrabi offers several benefits:
Hey there, fellow rooftop gardeners! I’m so excited to share my experience growing vibrant purple kohlrabi right on my rooftop. It’s surprisingly easy, rewarding, and adds a pop of color (and deliciousness!) to your urban garden. This guide will walk you through every step, from choosing the right container to harvesting your beautiful purple bulbs. Let’s get started!
Choosing the Right Container and Soil
Before we even think about seeds, let’s talk about where our kohlrabi will call home.
* Container Size: Kohlrabi needs room to grow, but not as much as, say, a tomato plant. I’ve found that a container at least 12 inches deep and 12 inches in diameter works perfectly. This gives the bulb enough space to develop without being cramped.
* Material: You can use plastic, terracotta, or even repurposed containers like old buckets (just make sure they’re food-grade!). I personally love using fabric grow bags because they allow for excellent drainage and aeration.
* Drainage: This is crucial! Kohlrabi hates sitting in soggy soil. Ensure your container has plenty of drainage holes. If not, drill some!
* Soil: Forget using garden soil straight from the ground. It’s often too heavy and doesn’t drain well. Instead, opt for a high-quality potting mix. I like to make my own blend using equal parts:
* Compost: Provides essential nutrients and improves soil structure.
* Peat Moss (or Coco Coir): Helps retain moisture.
* Perlite: Improves drainage and aeration.
* A handful of slow-release fertilizer: Gives your kohlrabi a boost in the early stages.
Sowing the Seeds
Now for the fun part – planting!
1. Timing is Key: Kohlrabi is a cool-season crop, meaning it thrives in cooler temperatures. I usually start my seeds indoors about 4-6 weeks before the last expected frost. If you live in a warmer climate, you can sow seeds directly into the container in early spring or fall.
2. Starting Indoors (Optional): If you’re starting indoors, use seed starting trays or small pots filled with seed starting mix. Sow the seeds about ¼ inch deep and gently water them. Keep the soil moist but not soggy.
3. Direct Sowing: If you’re sowing directly into the container, sow the seeds about ½ inch deep and space them about 2-3 inches apart. You can always thin them out later if too many germinate.
4. Germination: Kohlrabi seeds typically germinate within 5-10 days. Keep the soil consistently moist during this time.
5. Light: Once the seedlings emerge, they need plenty of light. If you’re starting indoors, place them under grow lights or in a sunny window. Rotate the seedlings regularly to prevent them from becoming leggy.
Transplanting (If Starting Indoors)
If you started your seeds indoors, it’s time to transplant them to their final container.
1. Harden Off: Before transplanting, you need to “harden off” the seedlings. This means gradually exposing them to outdoor conditions over a period of about a week. Start by placing them outside for an hour or two each day, gradually increasing the amount of time they spend outdoors. This helps them acclimate to the sun, wind, and temperature changes.
2. Transplanting Time: Once the seedlings are hardened off, it’s time to transplant them. Choose a cloudy day or transplant in the late afternoon to avoid shocking the plants.
3. Gently Remove Seedlings: Carefully remove the seedlings from their seed starting trays or pots. Try to disturb the roots as little as possible.
4. Planting Depth: Plant the seedlings at the same depth they were growing in their original containers.
5. Spacing: Space the seedlings about 6-8 inches apart in the container.
6. Water Thoroughly: After transplanting, water the seedlings thoroughly.
Caring for Your Kohlrabi
Now that your kohlrabi is planted, it’s time to provide it with the care it needs to thrive.
1. Watering: Kohlrabi needs consistent moisture, especially during bulb development. Water deeply whenever the top inch of soil feels dry. Avoid overwatering, as this can lead to root rot.
2. Fertilizing: Feed your kohlrabi every 2-3 weeks with a balanced liquid fertilizer. You can also side-dress with compost or aged manure.
3. Sunlight: Kohlrabi needs at least 6 hours of sunlight per day. Choose a sunny spot on your rooftop for your container.
4. Weeding: Keep the container free of weeds. Weeds compete with the kohlrabi for nutrients and water.
5. Pest Control: Kohlrabi can be susceptible to pests like aphids, cabbage worms, and flea beetles. Regularly inspect your plants for signs of pests. You can control pests with insecticidal soap, neem oil, or by hand-picking them off the plants. I prefer organic methods whenever possible.
6. Mulching: Add a layer of mulch around the base of the plants to help retain moisture, suppress weeds, and regulate soil temperature. Straw, wood chips, or shredded leaves work well.
Harvesting Your Purple Treasure
The moment we’ve all been waiting for – harvesting!
1. Timing: Kohlrabi is typically ready to harvest about 50-60 days after planting. The bulb should be about 2-3 inches in diameter. Don’t let it get too large, as it can become tough and woody.
2. Harvesting Method: To harvest, simply cut the bulb from the stem with a sharp knife. Leave about an inch of stem attached.
3. Leafy Greens: Don’t throw away the leaves! Kohlrabi leaves are also edible and can be used in salads, stir-fries, or soups. Harvest the leaves when they are young and tender.
4. Storage: Kohlrabi can be stored in the refrigerator for several weeks. Remove the leaves before storing.
Troubleshooting
Even with the best care, you might encounter some problems along the way. Here are a few common issues and how to address them:
* Bulb Cracking: This can be caused by inconsistent watering. Make sure to water your kohlrabi regularly and deeply.
* Pest Infestations: As mentioned earlier, kohlrabi can be susceptible to pests. Regularly inspect your plants and take action as soon as you notice any problems.
* Slow Growth: This could be due to a lack of nutrients or sunlight. Make sure your kohlrabi is getting enough fertilizer and sunlight.
* Woody Bulbs: This is usually caused by letting the bulbs get too large before harvesting. Harvest them when they are 2-3 inches in diameter.
Enjoying Your Harvest
Now that you’ve harvested your beautiful purple kohlrabi, it’s time to enjoy it! Kohlrabi can be eaten raw or cooked.
* Raw: Peel the bulb and slice it thinly. It has a mild, slightly sweet flavor and a crisp texture. It’s delicious in salads, slaws, or as a snack with dip.
* Cooked: Kohlrabi can be steamed, boiled, roasted, or stir-fried. It has a similar flavor to broccoli or cabbage. It’s a great addition to soups, stews, and side dishes.
Recipe Ideas
Here are a few of my favorite ways to enjoy kohlrabi:
* Kohlrabi Slaw: Shredded kohlrabi, carrots, and cabbage tossed in a creamy dressing.
* Roasted Kohlrabi: Cubed kohlrabi roasted with olive oil, herbs, and spices.
* Kohlrabi and Potato Soup: A creamy and comforting soup made with kohlrabi, potatoes, and broth.
* Kohlrabi Stir-Fry: Sliced kohlrabi stir-fried with vegetables and your favorite sauce.
Why Grow Purple Kohlrabi?
Besides being visually stunning, purple kohlrabi offers several benefits:
* Nutritious: Kohlrabi is packed with vitamins, minerals, and fiber.
* Easy to Grow: It’s a relatively easy crop to grow, even in containers.
* Unique Flavor: It has a mild, slightly sweet flavor that’s different from other vegetables.
* Versatile: It can be eaten raw or cooked in a variety of ways.
* Beautiful: The vibrant purple color adds a touch of beauty to your garden and your plate.
Final Thoughts
Growing purple kohlrabi on your rooftop is a fun and rewarding experience. With a
Conclusion
So, there you have it! Growing purple kohlrabi on your rooftop isn’t just a quirky gardening experiment; it’s a rewarding journey that brings vibrant color and delicious flavor right to your doorstep. We’ve explored the ins and outs of cultivating this unique vegetable in a rooftop environment, from selecting the right containers and soil to providing optimal sunlight and water. The benefits extend beyond the aesthetic appeal of those striking purple globes. You’re gaining access to a nutrient-rich food source, reducing your carbon footprint, and creating a beautiful, functional space in an otherwise underutilized area.
But why is this DIY trick a must-try? Because it empowers you to take control of your food source, even in the most urban of settings. It’s a tangible way to connect with nature, learn about the growing process, and enjoy the unparalleled satisfaction of harvesting your own produce. Plus, let’s be honest, those vibrant purple kohlrabi are conversation starters! Imagine serving a salad featuring your homegrown kohlrabi – your guests will be amazed.
Don’t be afraid to experiment with variations! Try interplanting your kohlrabi with companion plants like marigolds or nasturtiums to deter pests and attract beneficial insects. Consider succession planting, sowing seeds every few weeks, to ensure a continuous harvest throughout the growing season. You could even explore different varieties of purple kohlrabi, each with its own subtle nuances in flavor and texture. Some varieties are more heat-tolerant than others, so research which ones thrive best in your specific climate.
Growing purple kohlrabi on your rooftop is an adventure waiting to happen. It’s a chance to unleash your inner gardener, embrace sustainable living, and add a touch of purple magic to your life. We’ve provided you with the knowledge and tools to get started, but the real magic happens when you get your hands dirty and experience the joy of watching your kohlrabi flourish.
So, what are you waiting for? Grab your seeds, prepare your containers, and embark on this exciting rooftop gardening endeavor. We’re confident that you’ll be delighted with the results. And most importantly, we want to hear about your experience! Share your photos, tips, and triumphs in the comments below. Let’s create a community of rooftop kohlrabi growers and inspire others to embrace the joys of urban gardening. We can’t wait to see your purple kohlrabi creations!
Frequently Asked Questions (FAQ)
What are the best containers for growing purple kohlrabi on a rooftop?
Choosing the right containers is crucial for successful rooftop kohlrabi cultivation. Look for containers that are at least 12 inches deep and wide to accommodate the kohlrabi’s root system. Fabric pots are an excellent option as they allow for good drainage and aeration, preventing root rot. Plastic containers are also suitable, but ensure they have drainage holes. Consider the weight of the containers, especially when filled with soil and water, to ensure your rooftop can handle the load. Dark-colored containers can absorb more heat, which can be beneficial in cooler climates but may overheat the soil in hotter regions. In that case, opt for lighter-colored containers or consider using reflective materials to shield them from direct sunlight. Remember to factor in the size of your rooftop and the number of plants you intend to grow when selecting your containers.
How often should I water my rooftop purple kohlrabi plants?
Watering frequency depends on several factors, including the weather, the type of container you’re using, and the stage of growth of your kohlrabi plants. Generally, you should aim to keep the soil consistently moist but not waterlogged. Check the soil moisture level regularly by sticking your finger about an inch into the soil. If it feels dry, it’s time to water. During hot, dry weather, you may need to water daily, while in cooler, wetter conditions, you may only need to water every few days. Water deeply, ensuring the water reaches the roots. Avoid overhead watering, as this can lead to fungal diseases. Consider using a soaker hose or drip irrigation system to deliver water directly to the soil. Mulching around the plants can also help retain moisture and reduce the need for frequent watering.
What kind of soil is best for growing purple kohlrabi?
Purple kohlrabi thrives in well-draining, fertile soil that is rich in organic matter. A good potting mix specifically formulated for vegetables is an excellent choice. You can also amend your existing soil with compost, aged manure, or other organic materials to improve its drainage, fertility, and water-holding capacity. The ideal soil pH for kohlrabi is between 6.0 and 7.5. You can test your soil pH using a soil testing kit and amend it accordingly if necessary. Avoid using heavy clay soils, as they can become waterlogged and inhibit root growth. If you’re using containers, make sure the potting mix is lightweight and designed for container gardening.
How much sunlight do purple kohlrabi plants need?
Purple kohlrabi requires at least 6 hours of direct sunlight per day to thrive. Choose a location on your rooftop that receives ample sunlight throughout the day. If your rooftop is partially shaded, try to position your kohlrabi plants in the area that receives the most sunlight. If you’re growing kohlrabi indoors under grow lights, provide them with at least 12-14 hours of light per day. Insufficient sunlight can result in leggy growth, reduced yields, and pale-colored kohlrabi bulbs.
What are some common pests and diseases that affect purple kohlrabi, and how can I prevent them?
Common pests that can affect purple kohlrabi include aphids, cabbage worms, flea beetles, and slugs. To prevent pest infestations, inspect your plants regularly for signs of damage. Handpick pests off the plants or use insecticidal soap or neem oil to control infestations. Row covers can also be used to protect your plants from pests. Common diseases that can affect kohlrabi include clubroot, black rot, and downy mildew. To prevent diseases, ensure good air circulation around your plants, avoid overhead watering, and practice crop rotation. Use disease-resistant varieties of kohlrabi if available. If you notice signs of disease, remove the affected leaves or plants immediately to prevent the spread of the disease.
When is the best time to harvest purple kohlrabi?
Purple kohlrabi is typically ready to harvest when the bulbs are about 2-3 inches in diameter. The exact time to harvest will depend on the variety of kohlrabi you’re growing and the growing conditions. Check the seed packet or plant tag for specific harvesting instructions. The bulbs should be firm and smooth. If they become too large, they can become tough and woody. To harvest, simply cut the bulb from the stem just above the soil line. The leaves are also edible and can be harvested at any time.
Can I grow purple kohlrabi in the winter?
Whether you can grow purple kohlrabi in the winter depends on your climate. Kohlrabi is a cool-season crop that can tolerate light frosts. In mild climates, you may be able to grow kohlrabi throughout the winter. In colder climates, you may need to protect your plants from frost by covering them with row covers or bringing them indoors. You can also start kohlrabi seeds indoors in late winter and transplant them outdoors in early spring.
How can I store harvested purple kohlrabi?
Harvested purple kohlrabi can be stored in the refrigerator for several weeks. Remove the leaves and store them separately. Wrap the bulbs in a damp paper towel and place them in a plastic bag. You can also freeze kohlrabi. To freeze, blanch the bulbs for 2-3 minutes, then cool them in ice water. Drain well and pack them into freezer bags or containers.
What are some ways to use purple kohlrabi in cooking?
Purple kohlrabi is a versatile vegetable that can be used in a variety of dishes. It can be eaten raw, cooked, or pickled. Raw kohlrabi has a mild, slightly sweet flavor and a crisp texture. It can be grated into salads, sliced for crudités, or used as a topping for sandwiches. Cooked kohlrabi can be steamed, boiled, roasted, or stir-fried. It has a slightly sweeter flavor when cooked. It can be used in soups, stews, gratins, and side dishes. The leaves of the kohlrabi are also edible and can be used in salads or cooked like spinach.
Is growing purple kohlrabi on a rooftop organic?
Growing purple kohlrabi on a rooftop can absolutely be organic! By using organic potting mix, fertilizers, and pest control methods, you can ensure that your kohlrabi is grown without synthetic chemicals. Look for potting mixes that are certified organic and avoid using synthetic fertilizers or pesticides. Instead, use compost, aged manure, or other organic materials to fertilize your plants. For pest control, use natural methods such as handpicking pests, using insecticidal soap or neem oil, or attracting beneficial insects to your garden. Growing your own kohlrabi organically allows you to control the inputs and ensure that you’re eating healthy, chemical-free produce.


Leave a Comment