

Grow Pineapple from the comfort of your own backyard, even if all you have is a humble plastic chair! Sounds impossible? I’m here to tell you it’s not only possible, but surprisingly rewarding. Forget those expensive grocery store pineapples – imagine plucking a juicy, homegrown pineapple, bursting with flavor, right from your own DIY setup.
For centuries, the pineapple has been a symbol of hospitality and luxury. From its origins in South America, it traveled the world, becoming a prized possession and a status symbol. Now, you can bring that touch of tropical elegance to your home, regardless of your space constraints. This isn’t just about growing a fruit; it’s about connecting with a rich history and experiencing the satisfaction of nurturing life.
Why do you need this DIY trick? Because let’s face it, store-bought pineapples can be expensive and often lack the vibrant flavor of a truly fresh, ripe fruit. Plus, who wouldn’t want to impress their friends and family with their green thumb skills? This guide will show you how to grow pineapple using a simple, cost-effective method, even if you’re short on space. We’ll transform that ordinary plastic chair into a mini-pineapple paradise, making gardening accessible and fun for everyone. Get ready to embark on a tropical adventure, right in your own backyard!
Transform Your Old Plastic Chair into a Pineapple Planter!
Hey there, fellow DIY enthusiasts! Are you tired of that old, faded plastic chair sitting in your backyard, collecting dust? Instead of tossing it out, let’s give it a vibrant new life as a unique and eye-catching pineapple planter! This project is not only a fun way to recycle but also adds a tropical touch to your garden or patio. I’ll guide you through each step, making it super easy and enjoyable.
What You’ll Need:
Before we dive in, gather these materials. Trust me, having everything ready will make the process much smoother.
* An old plastic chair (preferably one with a sturdy back and seat)
* A drill with various sized drill bits (for drainage and attaching components)
* A jigsaw (or a handsaw if you’re feeling extra ambitious!)
* Measuring tape
* Marker or pen
* Heavy-duty landscape fabric or burlap
* Potting soil (lots of it!)
* Pineapple plant (either a top you’ve rooted or a small pineapple plant from a nursery)
* Gloves (to protect your hands)
* Safety glasses (essential for drilling and sawing)
* Optional: Exterior paint or spray paint (for a fresh look)
* Optional: Decorative stones, pebbles, or mulch (for finishing touches)
* Optional: Zip ties or strong twine (for securing landscape fabric)
Preparing the Chair: The Foundation for Your Pineapple Paradise
This is where we get the chair ready to become a planter. Don’t worry, it’s easier than it sounds!
1. Clean the Chair: Start by giving your plastic chair a good scrub with soap and water. Remove any dirt, grime, or cobwebs. This will ensure that any paint (if you choose to use it) adheres properly and that your plants have a clean environment. Let it dry completely.
2. Assess the Chair’s Structure: Carefully inspect the chair for any cracks or weaknesses. If there are any major structural issues, this project might not be suitable. However, minor cracks can often be reinforced later.
3. Optional: Painting the Chair: If you want to give your chair a fresh new look, now’s the time to paint it! Choose an exterior paint or spray paint that’s designed for plastic. Apply several thin coats, allowing each coat to dry completely before applying the next. This will prevent drips and ensure a smooth, even finish. I personally love bright, tropical colors like yellow, green, or even a vibrant blue!
Creating the Planting Space: Making Room for Your Pineapple
Now comes the fun part – transforming the chair’s seat into a planter!
1. Mark the Cutting Lines: Decide how much of the chair’s seat you want to remove to create the planting space. I usually aim for a large enough opening to accommodate the pineapple plant and plenty of soil. Use your measuring tape and marker to draw a clear outline on the seat. You can create a circular, square, or even a more organic shape – it’s up to you! Remember to leave enough of the seat intact to provide structural support.
2. Drill Pilot Holes: Before you start sawing, drill pilot holes along the inside of your marked cutting lines. This will make it easier to insert the jigsaw blade and prevent the plastic from cracking. Use a drill bit that’s slightly larger than the jigsaw blade.
3. Cut Out the Seat: Carefully use your jigsaw to cut along the marked lines. Take your time and follow the lines closely. If you’re using a handsaw, be prepared for a bit more elbow grease! Remember to wear your safety glasses to protect your eyes from flying debris.
4. Smooth the Edges: Once you’ve cut out the seat, use sandpaper or a file to smooth any rough edges. This will prevent you from accidentally cutting yourself later on.
5. Drill Drainage Holes: This is crucial for the health of your pineapple plant! Drill several drainage holes in the bottom of the chair’s seat. These holes will allow excess water to drain out, preventing root rot.
Lining the Planter: Creating a Cozy Home for Your Pineapple
This step ensures that the soil stays in place and doesn’t leak out through the drainage holes.
1. Measure the Planting Area: Measure the inside of the cut-out area of the chair seat. You’ll need enough landscape fabric or burlap to line the entire space, including the sides.
2. Cut the Fabric: Cut the landscape fabric or burlap to the appropriate size. Make sure you have enough material to overlap the edges of the cut-out area.
3. Line the Planter: Carefully line the inside of the cut-out area with the landscape fabric or burlap. Overlap the edges of the fabric over the top of the chair seat.
4. Secure the Fabric (Optional): You can use zip ties or strong twine to secure the landscape fabric or burlap to the chair. This will help to keep it in place and prevent it from shifting. I usually drill small holes around the edge of the cut-out area and thread the zip ties or twine through them.
Planting Your Pineapple: Bringing Your Creation to Life
The moment we’ve been waiting for!
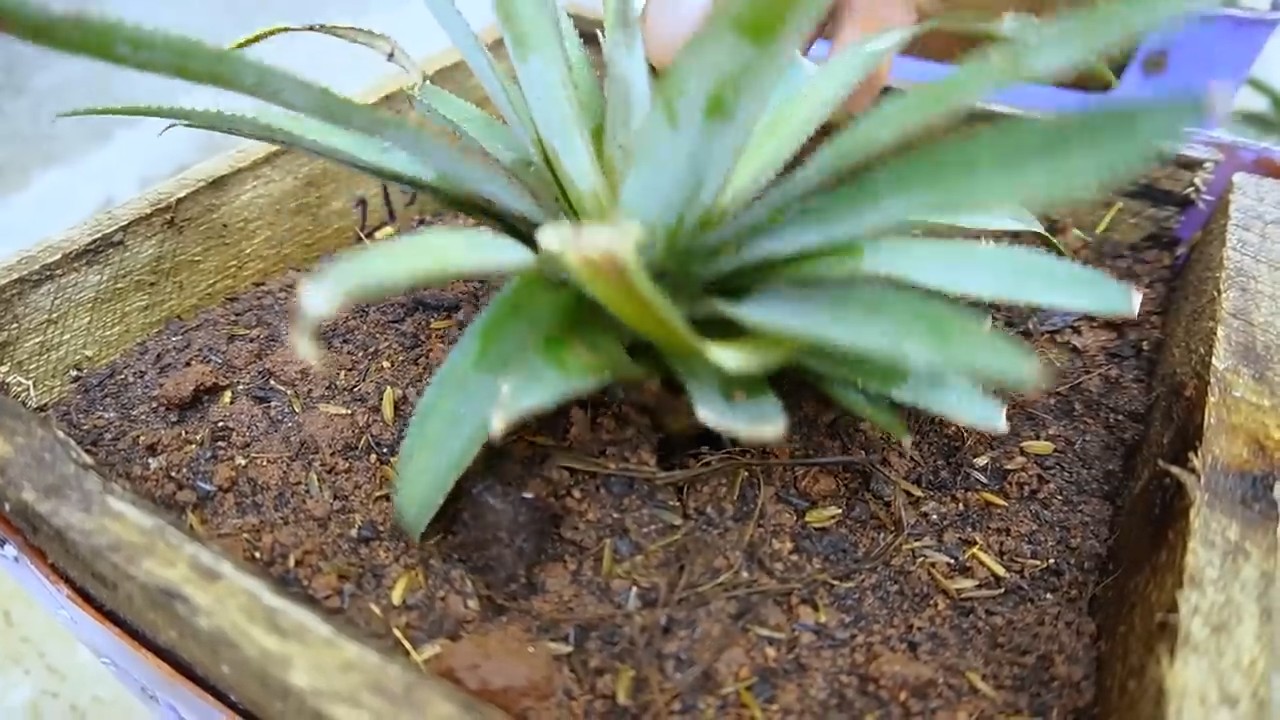
1. Add Potting Soil: Fill the lined planter with potting soil. Leave enough space at the top for your pineapple plant.
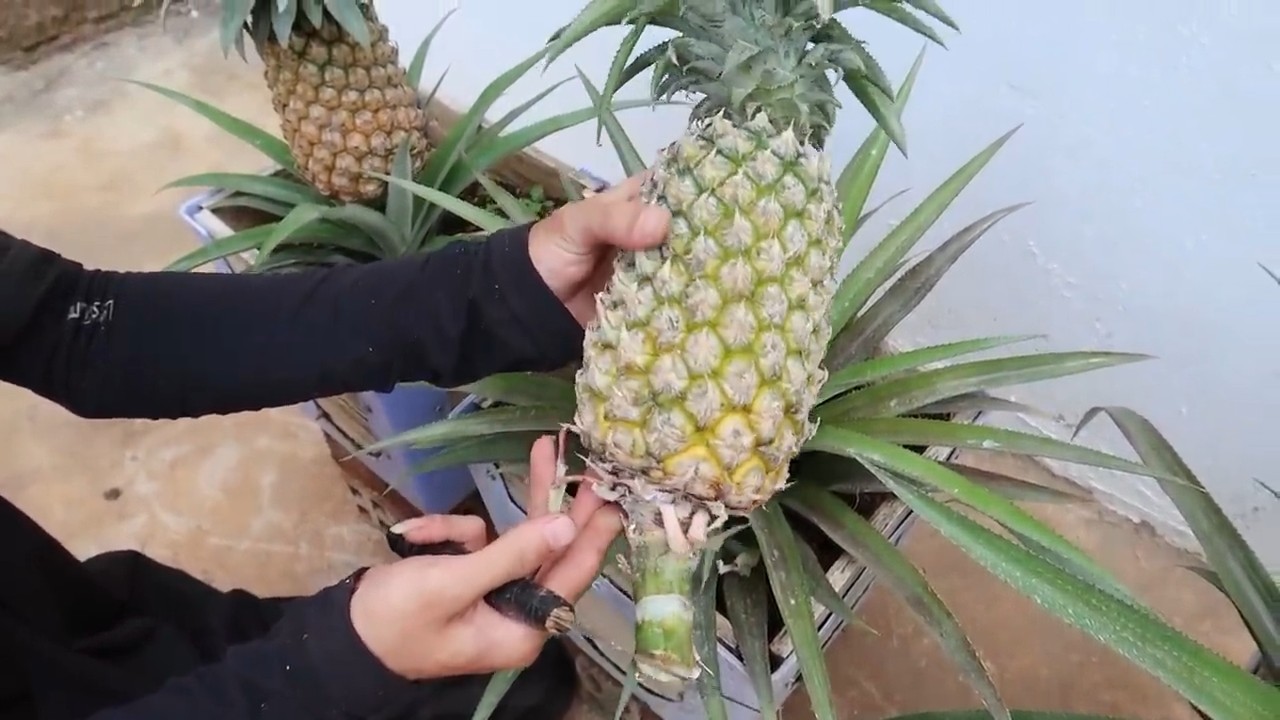
2. Plant the Pineapple: Carefully remove your pineapple plant from its container and gently loosen the roots. Place the plant in the center of the planter and fill in around it with more potting soil.
3. Water Thoroughly: Water the pineapple plant thoroughly until water drains out of the drainage holes.
4. Add Finishing Touches (Optional): Add a layer of decorative stones, pebbles, or mulch around the base of the pineapple plant. This will help to retain moisture and add a decorative touch.
Caring for Your Pineapple Planter: Keeping Your Tropical Treasure Thriving
Now that your pineapple planter is complete, it’s important to provide it with the proper care to ensure that your pineapple plant thrives.
* Sunlight: Pineapple plants need plenty of sunlight, so place your planter in a sunny location that receives at least 6 hours of direct sunlight per day.
* Watering: Water your pineapple plant regularly, especially during hot, dry weather. Allow the soil to dry out slightly between waterings. Avoid overwatering, as this can lead to root rot.
* Fertilizing: Fertilize your pineapple plant every few months with a balanced fertilizer. Follow the instructions on the fertilizer package.
* Protection from Frost: Pineapple plants are sensitive to frost, so if you live in an area with cold winters, you’ll need to bring your planter indoors or protect it from frost.
* Pruning: Remove any dead or yellowing leaves from your pineapple plant.
Troubleshooting: Addressing Common Issues
Even with the best care, you might encounter some issues with your pineapple planter. Here are some common problems and how to address them:
* Yellowing Leaves: Yellowing leaves can be a sign of overwatering, underwatering, or nutrient deficiency. Adjust your watering schedule and fertilize your plant if necessary.
* Root Rot: Root rot is caused by overwatering and poor drainage. Make sure your planter has adequate drainage holes and avoid overwatering. If you suspect root rot, you may need to repot your plant in fresh soil.
* Pests: Pineapple plants can be susceptible to pests such as mealybugs and scale. Inspect your plant regularly for pests and treat them with an appropriate insecticide if necessary.
Final Thoughts: Enjoy Your Unique Creation!
Congratulations! You’ve successfully transformed an old plastic chair into a beautiful and unique pineapple planter. Now, sit back, relax, and enjoy your tropical creation. This project is a great way to recycle, add a touch of personality to your garden, and impress your friends and neighbors. Happy planting! I hope you found this guide helpful and inspiring. Don’t be afraid to experiment and personalize your pineapple planter to make it truly your own.
Conclusion
So, there you have it! Transforming an ordinary plastic chair into a thriving pineapple plant haven is not just a fun DIY project; it’s a sustainable and visually stunning way to bring a touch of the tropics to your home. We’ve explored how to repurpose something often overlooked – the humble plastic chair – into a functional and beautiful piece of garden art. This isn’t just about growing pineapples; it’s about embracing creativity, resourcefulness, and a love for all things green.
Why is this DIY trick a must-try? Because it offers a unique blend of practicality and aesthetics. It’s a space-saving solution for urban gardeners, a conversation starter for guests, and a rewarding experience for anyone who enjoys nurturing plants. Imagine harvesting your own sweet, juicy pineapples right from your patio or balcony, all thanks to a repurposed plastic chair! The satisfaction is unparalleled.
But the beauty of this project lies in its adaptability. Feel free to experiment with different chair styles and sizes. A smaller chair might be perfect for a single, prized pineapple plant, while a larger, more robust chair could accommodate multiple plants or even a companion planting scheme. Consider adding other tropical plants around the base of the chair to create a mini-ecosystem. Bromeliads, orchids, or even colorful annuals can complement the pineapple’s spiky foliage and add visual interest.
Don’t be afraid to get creative with the chair itself. Paint it in vibrant colors to match your garden décor, or add decorative elements like shells, stones, or mosaic tiles. The possibilities are endless! You could even incorporate a small irrigation system to automate watering and make maintenance even easier. Think about adding a slow-release fertilizer to the soil mix to provide your pineapple plants with a steady supply of nutrients.
Remember to choose a well-draining soil mix specifically formulated for pineapples or bromeliads. Proper drainage is crucial to prevent root rot and ensure healthy growth. And don’t forget to provide your pineapple plants with plenty of sunlight. They thrive in warm, sunny locations, so choose a spot that receives at least six hours of direct sunlight each day.
We are confident that this project will bring you joy and a bountiful harvest. The key to success lies in patience, attention to detail, and a genuine love for gardening. So, gather your supplies, unleash your creativity, and embark on this exciting DIY adventure.
We encourage you to try this unique method of growing pineapples and share your experiences with us! Post photos of your pineapple chair creations on social media using #PineappleChairGarden and tag us so we can see your amazing work. We can’t wait to see what you come up with! Let’s inspire others to embrace sustainable gardening practices and transform ordinary objects into extraordinary works of art. This method of grow pineapple is a game changer.
Frequently Asked Questions (FAQ)
1. What type of plastic chair is best for this project?
The ideal plastic chair is one that is sturdy and has a relatively deep seat. Avoid chairs with intricate designs or flimsy construction, as they may not be able to support the weight of the soil and plants. A simple, solid plastic chair is your best bet. Look for chairs made from recycled plastic for an even more eco-friendly approach. The chair should also have drainage holes or be easily modified to create them. Without proper drainage, the soil will become waterlogged, leading to root rot and potentially killing your pineapple plant.
2. What kind of soil should I use for growing pineapples in a chair?
Pineapples require well-draining soil that is rich in organic matter. A mixture of potting soil, perlite, and compost is ideal. Avoid using heavy clay soil, as it will retain too much moisture. You can also add a small amount of sand to improve drainage. A slightly acidic soil pH is also beneficial for pineapple growth. Consider testing your soil pH and amending it with sulfur if necessary.
3. How often should I water my pineapple plant in a chair?
Water your pineapple plant thoroughly when the top inch of soil feels dry to the touch. Avoid overwatering, as this can lead to root rot. During the warmer months, you may need to water more frequently. In the winter, reduce watering as the plant’s growth slows down. Always check the soil moisture before watering to ensure that the plant needs it. You can also use a moisture meter to get an accurate reading.
4. How much sunlight does a pineapple plant need?
Pineapples thrive in full sun, requiring at least six hours of direct sunlight per day. If you live in a particularly hot climate, you may need to provide some afternoon shade to prevent the leaves from scorching. If you are growing your pineapple plant indoors, place it near a sunny window or use a grow light to supplement natural light. Insufficient sunlight can lead to stunted growth and reduced fruit production.
5. How long does it take to grow a pineapple from a top?
It typically takes 2-3 years to grow a pineapple from a top. Patience is key! The first year is primarily focused on root development and vegetative growth. In the second year, the plant will begin to mature and may produce a flower stalk. The pineapple fruit will develop from the flower stalk over several months. Factors such as climate, soil conditions, and sunlight exposure can affect the growth rate.
6. How do I know when my pineapple is ripe?
A ripe pineapple will have a fragrant aroma and a slightly soft feel when gently squeezed. The color of the skin will also change from green to yellow or golden brown, depending on the variety. You can also try gently pulling on one of the leaves. If it comes out easily, the pineapple is likely ripe. Avoid picking the pineapple too early, as it will not ripen further off the plant.
7. Can I grow other plants in the same chair as my pineapple?
Yes, you can! Companion planting can be beneficial for pineapple plants. Consider planting low-growing herbs like basil or oregano around the base of the pineapple plant. These herbs can help to repel pests and improve soil health. You can also plant colorful annuals like marigolds or petunias to add visual interest to your pineapple chair garden. Just be sure to choose plants that have similar light and water requirements as the pineapple.
8. How do I protect my pineapple plant from pests and diseases?
Regularly inspect your pineapple plant for signs of pests or diseases. Common pests include mealybugs, scale, and spider mites. You can control these pests with insecticidal soap or neem oil. Root rot is a common disease that can affect pineapple plants. To prevent root rot, ensure that the soil is well-draining and avoid overwatering. You can also use a fungicide to treat root rot if it occurs.
9. What if I live in a cold climate? Can I still grow a pineapple in a chair?
Yes, you can still grow a pineapple in a chair, even if you live in a cold climate. The key is to grow the pineapple in a container that can be easily moved indoors during the winter months. Place the pineapple plant in a sunny location indoors and provide supplemental light if necessary. Reduce watering during the winter months as the plant’s growth slows down. You can move the pineapple plant back outdoors in the spring when the weather warms up.
10. How do I fertilize my pineapple plant in a chair?
Pineapples are heavy feeders and benefit from regular fertilization. Use a balanced fertilizer specifically formulated for pineapples or bromeliads. Apply the fertilizer according to the package directions. You can also use a slow-release fertilizer to provide a steady supply of nutrients to the plant. Fertilize your pineapple plant regularly during the growing season (spring and summer) and reduce fertilization during the winter months.
Leave a Comment