

Grow Onions with Onion Technique: Imagine harvesting a basket overflowing with plump, juicy onions, all grown right in your backyard! Sounds like a dream, right? Well, it doesn’t have to be! This DIY guide unlocks the secrets to a simple yet incredibly effective method for cultivating these kitchen staples: the onion technique.
For centuries, onions have been a cornerstone of cuisines worldwide, adding depth and flavor to countless dishes. From ancient Egypt, where they were revered and even used as offerings, to modern-day kitchens, onions hold a special place. But growing them can sometimes feel intimidating, especially for beginner gardeners. That’s where this clever trick comes in!
Let’s face it, store-bought onions can be expensive, and you never quite know where they’ve come from or what they’ve been treated with. With this easy DIY project, you can take control of your food source, save money, and enjoy the satisfaction of nurturing your own produce. I’m going to show you how to grow onions with onion technique, even if you have limited space or gardening experience. This hack will help you maximize your yield and minimize waste. Get ready to transform your garden and your cooking with this simple, sustainable, and rewarding gardening adventure!
Regrowing Onions from Scraps: A Gardener’s Delight!
Hey there, fellow green thumbs! Ever feel guilty tossing those onion ends after chopping them up for dinner? Well, fret no more! I’m going to show you how to regrow onions from those very scraps, turning kitchen waste into a bountiful supply of fresh onions. It’s easier than you think, and incredibly rewarding. Plus, it’s a fantastic way to save money and reduce your environmental impact. Let’s get started!
What You’ll Need
Before we dive in, let’s gather our supplies. This is a pretty low-key project, so you probably have most of this stuff already:
* **Onion Scraps:** The bottom 1-2 inches of an onion, with the roots still attached (even if they’re dried out, they can often be revived!). I usually save these after cooking.
* **A Small Container:** A glass jar, a plastic cup, or even a yogurt container will work perfectly. Just make sure it’s clean.
* **Water:** Tap water is fine.
* **Potting Soil:** Any good quality potting soil will do.
* **A Pot or Garden Bed:** To transplant your onion once it’s established.
* **Optional: Rooting Hormone:** This can help speed up the rooting process, but it’s not essential.
* **Optional: Fertilizer:** A balanced liquid fertilizer will give your onions a boost once they’re planted in soil.
The Water Propagation Method: Bringing Your Onion Back to Life
This is the easiest and most common method for regrowing onions from scraps. We’ll start by encouraging root growth in water before transplanting to soil.
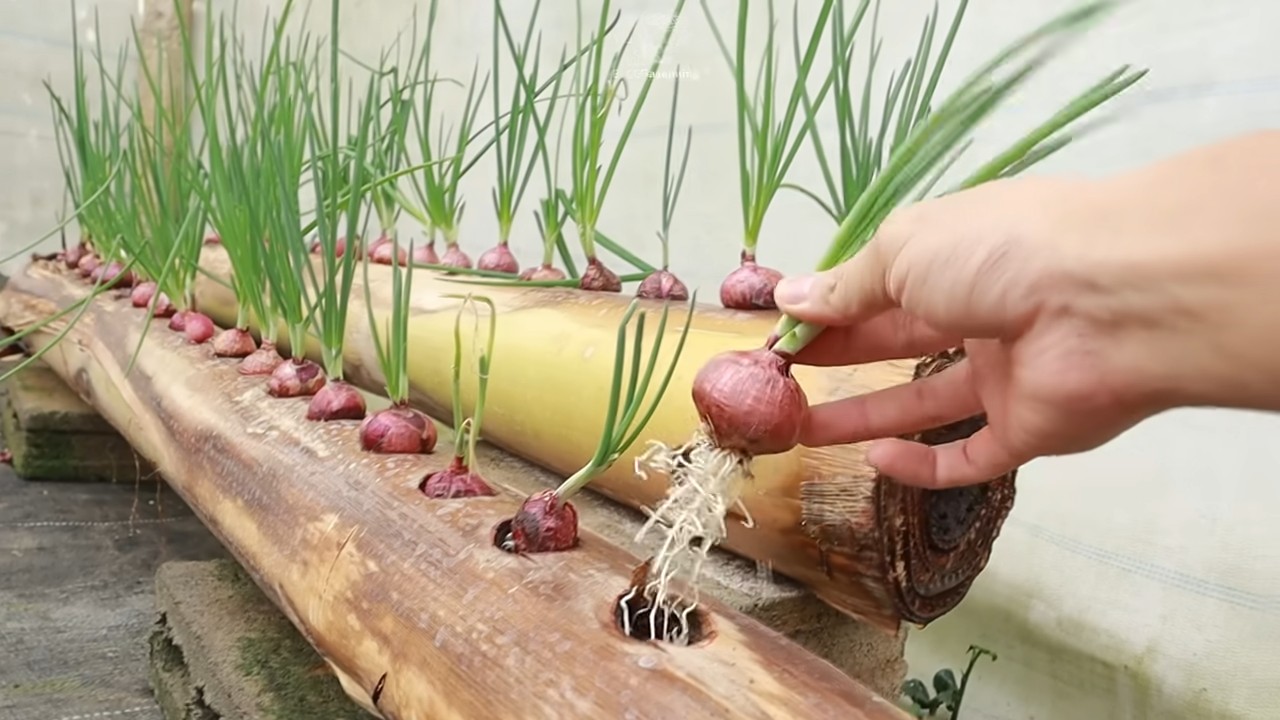
1. **Prepare Your Onion Scrap:** Take your onion bottom and gently remove any loose or decaying outer layers. Be careful not to damage the roots. If the roots are particularly long, you can trim them slightly, but don’t cut them off completely.
2. **Place the Onion in Water:** Fill your container with enough water so that the bottom of the onion is submerged, but the top cut part is above the water line. You only want the roots to be in the water, not the entire onion base. This prevents rotting.
3. **Find a Sunny Spot:** Place your container in a bright, sunny location. A windowsill is ideal. Onions need plenty of sunlight to grow.
4. **Change the Water Regularly:** Change the water every 1-2 days to keep it fresh and prevent bacteria from growing. This is crucial for healthy root development. I usually set a reminder on my phone so I don’t forget.
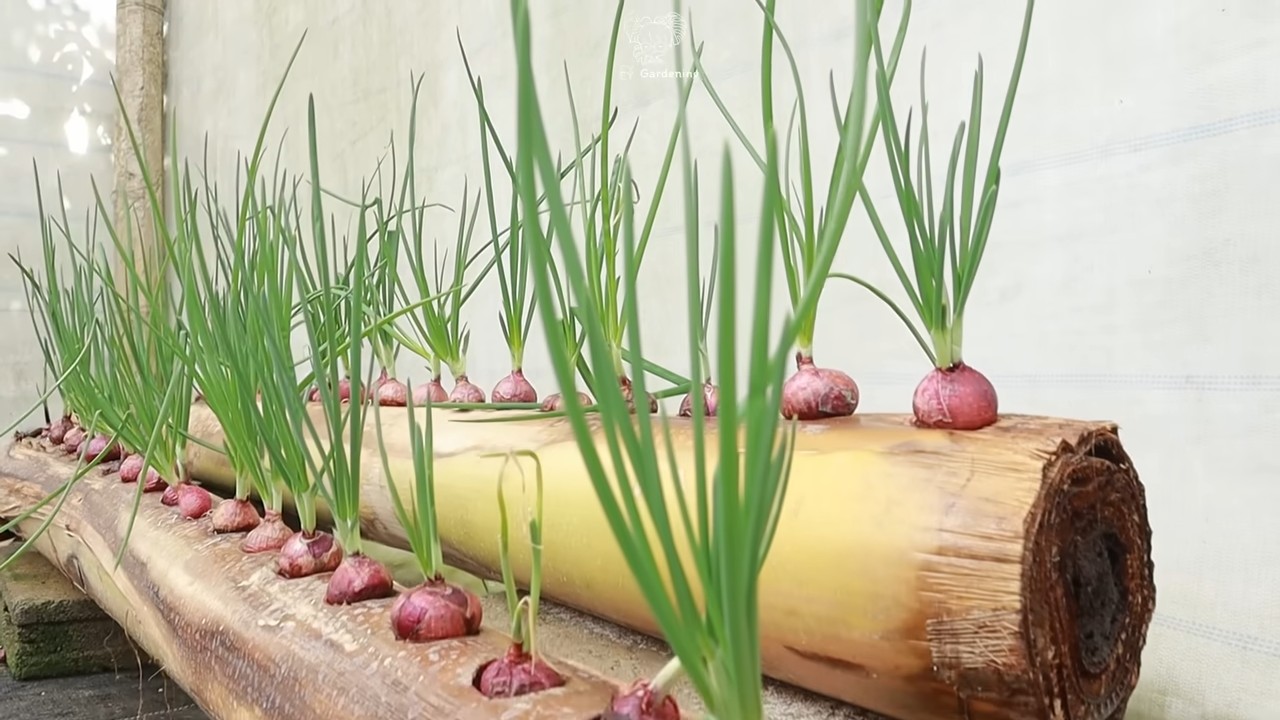
5. **Observe Root Growth:** Within a few days, you should start to see new roots emerging from the bottom of the onion. You might also notice green shoots sprouting from the top. This is a sign that your onion is happy and healthy!
6. **Wait for Sufficient Root Growth:** Allow the roots to grow for about a week or two, until they are a few inches long. The more roots, the better the chances of successful transplanting.
Transplanting to Soil: Giving Your Onion a Permanent Home
Once your onion has developed a good root system, it’s time to move it to soil. This will provide it with the nutrients it needs to grow into a full-sized onion (or at least produce some delicious green onions!).
1. **Prepare Your Pot or Garden Bed:** Choose a pot that is at least 6 inches in diameter, or select a spot in your garden that receives plenty of sunlight. Make sure the soil is well-draining.
2. **Dig a Hole:** Dig a hole in the soil that is large enough to accommodate the onion and its roots.
3. **Carefully Remove the Onion from the Water:** Gently remove the onion from the water, being careful not to damage the roots.
4. **Plant the Onion:** Place the onion in the hole, making sure that the roots are spread out. Cover the onion with soil, leaving the top of the onion (where the green shoots are emerging) exposed.
5. **Water Thoroughly:** Water the soil thoroughly after planting.
6. **Provide Ongoing Care:** Keep the soil moist but not soggy. Water regularly, especially during dry periods. Fertilize every few weeks with a balanced liquid fertilizer.
Alternative Method: Planting Directly in Soil
While I prefer the water propagation method for its higher success rate, you can also try planting the onion scrap directly into soil. This method is a bit riskier, as the onion is more susceptible to rotting if the soil is too wet.
1. **Prepare Your Onion Scrap:** As with the water propagation method, remove any loose or decaying outer layers from the onion scrap.
2. **Prepare Your Pot or Garden Bed:** Choose a pot or garden bed with well-draining soil.
3. **Dig a Hole:** Dig a hole in the soil that is deep enough to accommodate the onion scrap.
4. **Plant the Onion:** Place the onion scrap in the hole, with the root end facing down. Cover the onion with soil, leaving the top of the onion exposed.
5. **Water Sparingly:** Water the soil sparingly, just enough to keep it moist. Avoid overwatering, as this can cause the onion to rot.
6. **Monitor for Growth:** Keep an eye on the onion for signs of growth. If you see new green shoots emerging, that’s a good sign!
Caring for Your Regrown Onions: Ensuring a Healthy Harvest
Once your onions are planted, it’s important to provide them with the care they need to thrive. Here are a few tips:
* **Sunlight:** Onions need at least 6 hours of sunlight per day.
* **Watering:** Water regularly, especially during dry periods. Avoid overwatering, as this can lead to root rot. The soil should be moist, not soggy.
* **Fertilizing:** Fertilize every few weeks with a balanced liquid fertilizer. This will provide your onions with the nutrients they need to grow.
* **Weeding:** Keep the area around your onions free of weeds. Weeds can compete with your onions for nutrients and water.
* **Pest Control:** Keep an eye out for pests, such as aphids and onion maggots. If you see any pests, take action to control them. Insecticidal soap or neem oil can be effective for many common pests.
* **Harvesting:** You can harvest the green shoots of your onions at any time. Simply snip them off with scissors. The onion bulb itself will take longer to mature, typically several months. You’ll know it’s ready to harvest when the tops start to turn yellow and fall over.
What to Expect: From Scrap to Table
Don’t expect to grow massive, store-bought onions from scraps. While it’s possible, it’s more likely that you’ll get a continuous supply of green onions. These are perfect for adding flavor to salads, soups, and other dishes. You might also get a smaller onion bulb, which is still a great accomplishment!
The type of onion you use will also affect the outcome. Yellow onions tend to be the most reliable for regrowing, but you can experiment with other varieties as well.
Troubleshooting: Common Issues and Solutions
* **Onion Rotting:** This is usually caused by overwatering. Make sure the soil is well-draining and avoid watering too frequently. If your onion starts to rot, remove it from the soil and try again with a fresh scrap.
* **Slow Growth:** This could be due to a lack of sunlight or nutrients. Make sure your onions are getting enough sunlight and fertilize them regularly.
* **Yellowing Leaves:** This could be a sign of overwatering, underwatering, or a nutrient deficiency. Check the soil moisture and adjust your watering accordingly. Fertilize if necessary.
* **Pests:** Inspect your onions regularly for pests. If you find any, take action to control them.
Why This Works: The Science Behind the Magic
The reason this works is that the onion base still contains the plant’s meristem, which is a region of actively dividing cells responsible for growth. Even after you’ve chopped off the top of the onion, the meristem is still capable of producing new roots and shoots. By providing the onion with water, sunlight, and nutrients, you’re giving it the resources it needs to regenerate.
Beyond Onions: Other Vegetables You Can Regrow
The onion regrowing trick is just the tip of the iceberg! You can also regrow other vegetables from scraps, such as:
* **Garlic:** Plant individual cloves in soil.
* **Celery:** Place the base in water until roots appear, then transplant to soil.
* **Lettuce:** Place the base in water until roots appear, then transplant to soil.
* **Ginger:** Plant a piece of ginger with a bud in soil.
* **Potatoes:** Plant potatoes with “eyes” in soil.
Final Thoughts: Embrace the Green Life!
Regrowing onions from scraps is a fun, easy, and rewarding way to reduce waste and grow your own food. It’s a great project for beginners and
Conclusion
So, there you have it! The simple yet incredibly effective method of growing onions from onion scraps. This isn’t just about saving a few pennies; it’s about embracing a sustainable lifestyle, reducing food waste, and experiencing the sheer joy of nurturing life from something you would normally discard. The beauty of this DIY trick lies in its accessibility. You don’t need a sprawling garden or expensive equipment. A small pot, some soil, and a bit of patience are all you need to embark on this rewarding journey.
This method of growing onions from scraps is a must-try for several compelling reasons. First and foremost, it’s incredibly cost-effective. Think about how often you buy onions. Now imagine significantly reducing that expense by simply regrowing them from the base you usually toss away. Over time, the savings can really add up! Secondly, it’s an environmentally friendly practice. By regrowing your onion scraps, you’re actively participating in reducing food waste, which contributes to a healthier planet. Every little bit helps! Thirdly, it’s a fantastic learning experience, especially for children. It’s a tangible way to teach them about plant life cycles, sustainability, and the importance of reducing waste.
But the benefits don’t stop there. Homegrown onions often boast a fresher, more vibrant flavor than store-bought ones. Imagine adding that extra zing to your favorite dishes, knowing that you grew the key ingredient yourself. The satisfaction is unparalleled.
Don’t be afraid to experiment with variations! Try using different types of onions – red, yellow, or white – to see which ones thrive best in your environment. You can also experiment with different soil types and watering schedules to optimize growth. Consider planting your regrown onions in raised beds or containers for easier management. If you live in a colder climate, you can start the process indoors and then transplant the seedlings outdoors once the weather warms up.
Growing onions from onion scraps is more than just a gardening hack; it’s a gateway to a more sustainable and fulfilling lifestyle. It’s a chance to connect with nature, reduce your environmental footprint, and enjoy the delicious rewards of your own labor.
We wholeheartedly encourage you to give this DIY trick a try. It’s easy, fun, and incredibly rewarding. Once you’ve experienced the joy of harvesting your own homegrown onions, you’ll be hooked! And most importantly, we want to hear about your experiences. Share your photos, tips, and stories in the comments below. Let’s build a community of resourceful gardeners who are passionate about sustainability and delicious food. What are you waiting for? Grab that onion base and get growing!
Frequently Asked Questions (FAQ)
How long does it take to grow onions from onion scraps?
The time it takes to grow onions from scraps can vary depending on several factors, including the type of onion, the growing conditions (sunlight, soil, water), and the climate. Generally, you can expect to see new green shoots emerging within a week or two of planting the onion base. However, it will take several months for the onion to mature into a full-sized bulb. You can typically harvest green onions (scallions) within a few weeks of growth. For larger bulb onions, be patient and allow them to grow for at least 90-120 days. Remember that consistent watering and adequate sunlight are crucial for optimal growth.
What part of the onion do I need to regrow it?
You need the bottom part of the onion, the root end, to regrow it. This is the part that you typically cut off and discard when preparing onions for cooking. Make sure to leave about an inch or two of the onion attached to the root base. This will provide the necessary nutrients and energy for the onion to start regrowing. Avoid damaging the roots when cutting the onion.
Can I regrow onions in water only?
Yes, you can initially regrow onions in water. Place the onion base in a shallow dish or glass with just enough water to cover the roots. Change the water every day or two to prevent bacterial growth. Once the roots have developed and new green shoots have emerged, you can transplant the onion into soil for continued growth. Growing in soil will provide the necessary nutrients for the onion to develop a larger bulb.
What kind of soil is best for growing onions?
Onions thrive in well-draining, fertile soil that is rich in organic matter. A loamy soil is ideal. You can amend your soil with compost, aged manure, or other organic materials to improve its fertility and drainage. Onions also prefer slightly acidic to neutral soil pH (around 6.0 to 7.0). Before planting, consider testing your soil pH and amending it accordingly.
How much sunlight do onions need?
Onions need at least 6-8 hours of direct sunlight per day to grow properly. Choose a sunny location in your garden or on your patio for your onion plants. If you are growing onions indoors, place them near a south-facing window where they will receive the most sunlight. If you don’t have enough natural light, you can supplement with grow lights.
How often should I water my regrown onions?
Water your regrown onions regularly, keeping the soil consistently moist but not waterlogged. The frequency of watering will depend on the weather conditions and the type of soil you are using. In general, water deeply whenever the top inch of soil feels dry to the touch. Avoid overwatering, as this can lead to root rot.
Can I grow onions from scraps indoors?
Yes, you can definitely grow onions from scraps indoors. This is a great option if you live in an apartment or have limited outdoor space. Choose a sunny location near a window or use grow lights to provide adequate light. Use a well-draining potting mix and water regularly. You may not get as large of a bulb as you would outdoors, but you can still harvest the green shoots for use as scallions.
What are some common problems when growing onions from scraps?
Some common problems when growing onions from scraps include root rot, pests, and diseases. Root rot can occur if the soil is too wet or poorly drained. To prevent root rot, ensure that your soil is well-draining and avoid overwatering. Pests such as onion maggots and thrips can also attack onion plants. You can control these pests with organic insecticides or by using row covers. Diseases such as downy mildew and purple blotch can also affect onions. To prevent these diseases, ensure good air circulation around your plants and avoid overhead watering.
Can I use the green shoots of regrown onions?
Absolutely! The green shoots of regrown onions are delicious and can be used in a variety of dishes. They have a mild onion flavor and can be used as a substitute for scallions or chives. Chop them up and add them to salads, soups, stir-fries, or as a garnish for your favorite dishes. Harvesting the green shoots will also encourage the onion to produce more growth.
How do I know when my regrown onions are ready to harvest?
You can harvest the green shoots (scallions) at any time once they have reached a sufficient size. For bulb onions, wait until the tops of the plants start to turn yellow and fall over. This indicates that the onion is mature and ready to be harvested. Gently dig up the onions and allow them to dry in the sun for a few days before storing them.

Leave a Comment