

Grow Napa Cabbage: Your Guide to a Bountiful Harvest
Growing Napa cabbage, with its delicate leaves and sweet flavor, might seem daunting, but I’m here to tell you it’s surprisingly achievable, even for beginner gardeners! This article is your passport to a successful Napa cabbage harvest, packed with simple grow Napa cabbage tricks and DIY solutions that will transform your gardening experience. I’ll share my own hard-earned wisdom and some clever hacks that have helped me cultivate beautiful, healthy heads year after year.
For centuries, cabbage has held a significant place in culinary traditions across the globe. From hearty stews to refreshing salads, its versatility is undeniable. But there’s something particularly satisfying about growing your own food, knowing exactly where it comes from and how it was nurtured. This isn’t just about saving money; it’s about connecting with nature and enjoying the freshest, most flavorful Napa cabbage imaginable.
Why You Need These Grow Napa Cabbage Tricks
Let’s face it: growing vegetables can be challenging. Pests, diseases, and unpredictable weather can easily derail your efforts. That’s why I’ve compiled these grow Napa cabbage tips and DIY solutions. They’re designed to help you overcome common obstacles, maximizing your yield and minimizing frustration. Whether you’re struggling with pest control, soil preparation, or simply want to boost your harvest, this guide will equip you with the knowledge and practical techniques to succeed. You’ll learn how to create the perfect growing environment for your Napa cabbage, ensuring healthy growth and a delicious harvest you can be proud of. So, let’s get started on your journey to becoming a Napa cabbage growing expert!
Growing Your Own Delicious Napa Cabbage: A Step-by-Step Guide
Growing your own Napa cabbage is incredibly rewarding! It’s a surprisingly easy vegetable to cultivate, even for beginner gardeners. This guide will walk you through the entire process, from seed to harvest. Let’s get started!
Phase 1: Planning and Preparation
- Choose the right time: Napa cabbage is a cool-season crop. The best time to plant is in early spring or late summer/early fall, depending on your climate. Check your local frost dates – you want to avoid planting too early and risking frost damage, or too late and having the cabbage bolt (go to seed) before it matures.
- Select a sunny spot: Napa cabbage needs at least six hours of sunlight per day. Find a location in your garden that receives ample sunshine.
- Prepare the soil: Napa cabbage thrives in well-drained, fertile soil. Amend your soil with compost or other organic matter to improve its structure and nutrient content. A soil test can help determine if you need to add any specific nutrients.
- Choose your method: You can start Napa cabbage from seed directly in the garden or start seedlings indoors about 6-8 weeks before the last expected frost. Starting indoors gives you a head start, but direct sowing is also perfectly viable.
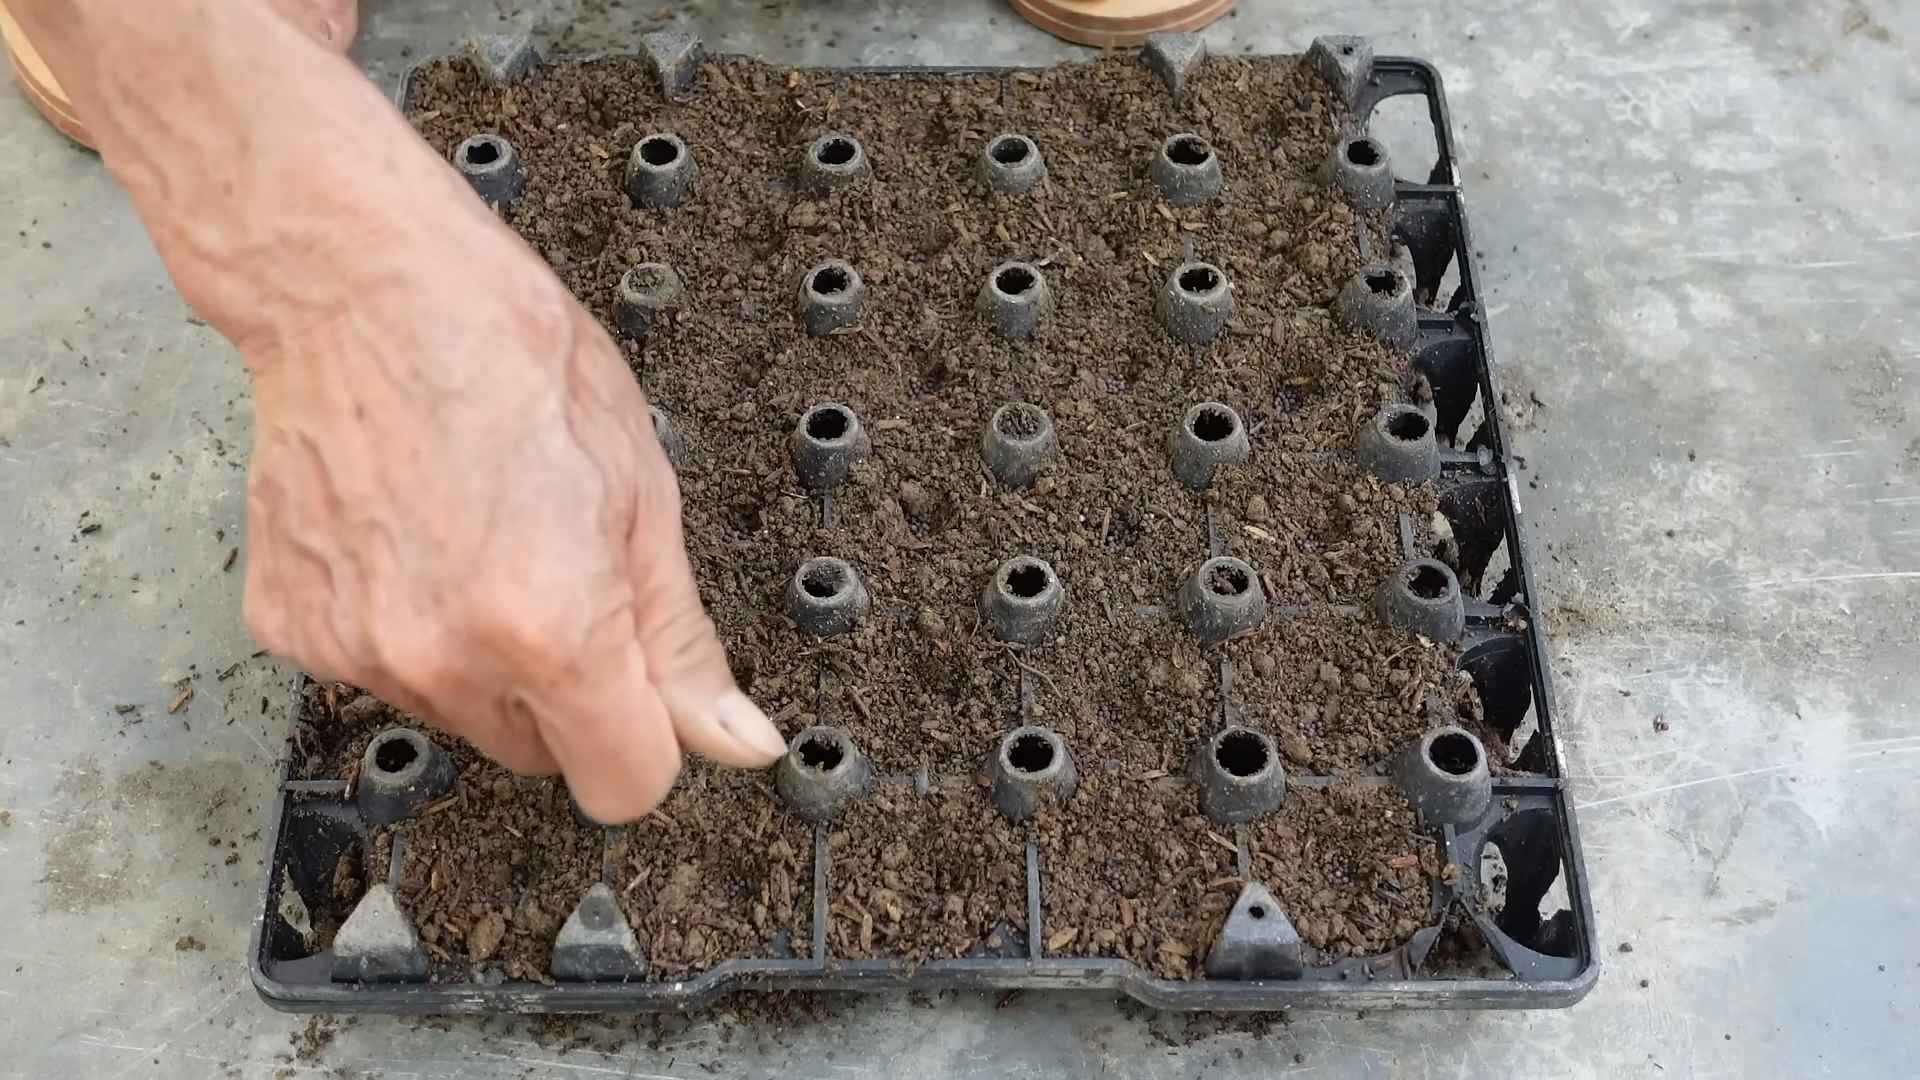
Phase 2: Starting from Seed (Indoor Method)
- Fill seed trays: Use seed starting mix, not garden soil, as it’s lighter and drains better, preventing damping off (a fungal disease that kills seedlings).
- Sow the seeds: Plant seeds about ¼ inch deep and 1 inch apart. Gently water the soil, ensuring it’s moist but not soggy.
- Provide warmth and light: Place the seed trays in a warm location (around 70-75°F) with plenty of light. You may need to use grow lights to supplement natural sunlight, especially during shorter days.
- Thin seedlings: Once the seedlings have developed their first true leaves (the leaves that appear after the cotyledons, or seed leaves), thin them out to give each plant enough space to grow. Leave the strongest seedlings and discard the weaker ones.
- Harden off seedlings: Before transplanting outdoors, gradually acclimate the seedlings to outdoor conditions. Start by placing them outside for a few hours each day, gradually increasing the time over a week or two.
Phase 3: Starting from Seed (Direct Sowing Method)
- Prepare the seedbed: Loosen the soil to a depth of about 12 inches. Remove any rocks or weeds.
- Sow the seeds: Plant seeds about ¼ inch deep and 1 inch apart. Space rows about 18 inches apart.
- Water gently: Water the seeds thoroughly after planting. Keep the soil consistently moist but not waterlogged.
- Thin seedlings: Once the seedlings have developed their first true leaves, thin them to one plant every 12-18 inches. This spacing allows for optimal growth.
Phase 4: Transplanting (For Indoor-Started Seedlings)
- Prepare the planting holes: Dig holes slightly larger than the root balls of your seedlings. Space the holes 12-18 inches apart.
- Gently remove seedlings: Carefully remove the seedlings from their trays, being mindful not to damage their roots.
- Plant the seedlings: Place the seedlings in the holes, ensuring the top of the root ball is level with the soil surface. Fill in the holes with soil and gently firm it around the base of the plants.
- Water thoroughly: Water the newly transplanted seedlings deeply to help them settle in.
Phase 5: Ongoing Care
- Watering: Water regularly, especially during dry periods. Aim to keep the soil consistently moist but not waterlogged. Overwatering can lead to root rot.
- Weeding: Regularly remove weeds to prevent competition for nutrients and water.
- Fertilizing: A balanced fertilizer can be applied every few weeks, but it’s not strictly necessary if you’ve amended your soil well with compost. Follow the instructions on the fertilizer package.
- Pest and disease control: Monitor your plants for pests and diseases. Common pests include aphids and cabbage worms. Use organic pest control methods if necessary.
- Protecting from pests: Consider using row covers to protect your plants from pests, especially cabbage worms. These are lightweight fabrics that allow sunlight and water to reach the plants while keeping pests out.
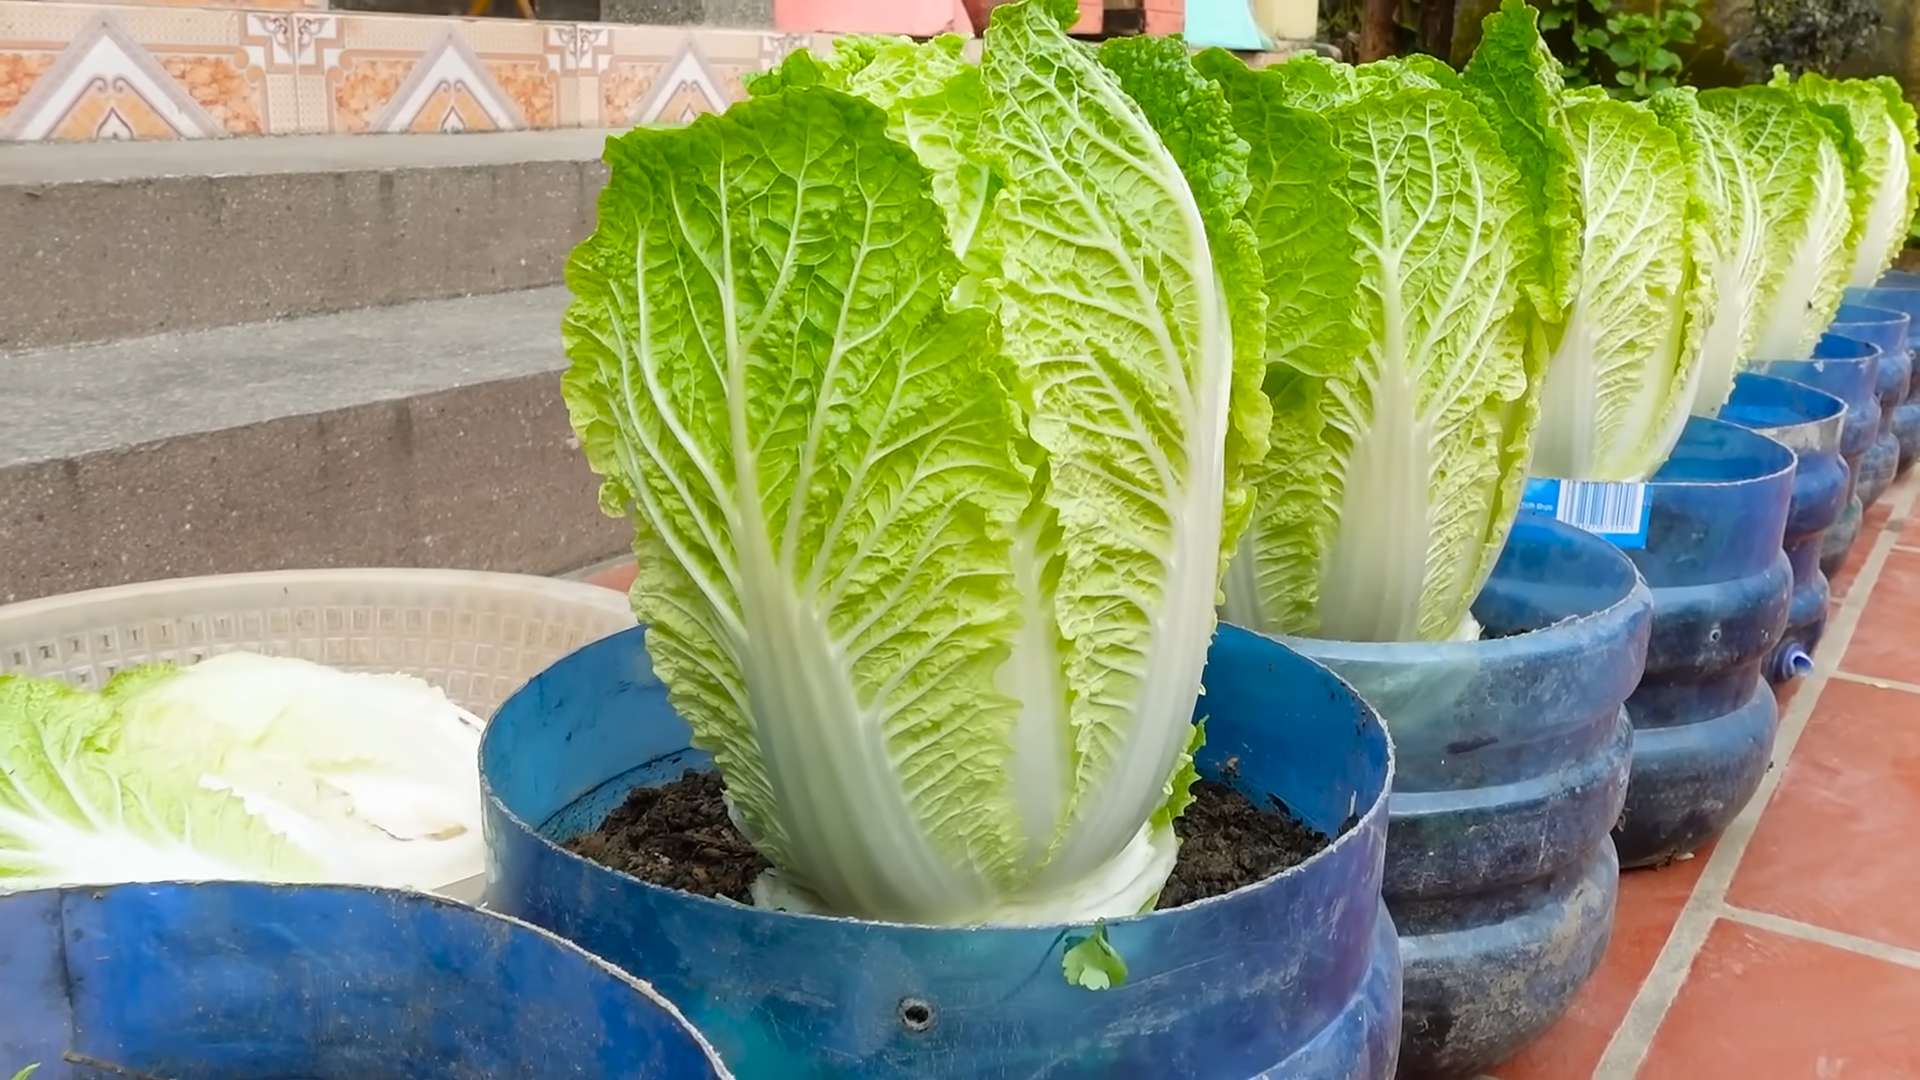
Phase 6: Harvesting
- Harvest time: Napa cabbage is typically ready for harvest 60-75 days after transplanting, depending on the variety and growing conditions. The heads should be firm and tightly packed.
- Harvesting technique: Use a sharp knife to cut the cabbage head from the base of the plant. Be careful not to damage the surrounding plants.
- Storage: Store harvested Napa cabbage in the refrigerator for up to a week. You can also preserve it by pickling or freezing.
Troubleshooting
Problem: Yellowing leaves
Possible causes: Nutrient deficiency, overwatering, or pest infestation. Check your soil’s nutrient levels and adjust watering accordingly. Inspect for pests and treat if necessary.
Problem: Bolting (premature flowering)
Possible causes: High temperatures, long days, or stress. Planting at the right time and providing consistent moisture can help prevent bolting.
Problem: Pests (aphids, cabbage worms)
Possible solutions: Handpick pests, use insecticidal soap, or introduce beneficial insects like ladybugs.
With a little planning and care, you’ll be enjoying the delicious taste of homegrown Napa cabbage in no time! Remember to adapt these instructions to your specific climate and growing conditions for best results.
Conclusion
So there you have it – a comprehensive guide to growing your own Napa cabbage! This DIY approach isn’t just about saving money; it’s about experiencing the unparalleled satisfaction of nurturing a plant from seed to harvest. The vibrant green leaves, the crisp texture, and the delicious, slightly sweet flavor of homegrown Napa cabbage are simply unmatched. This method of growing Napa cabbage is a must-try for anyone, from seasoned gardeners to complete beginners. The process is surprisingly straightforward, requiring minimal specialized equipment and offering a high reward for the relatively small amount of effort involved. You’ll be amazed at the quality and freshness of the cabbage you produce, and the knowledge gained will empower you to tackle other gardening projects with confidence.
Beyond the basic method outlined, there are numerous avenues for experimentation and customization. For instance, you can explore different varieties of Napa cabbage, each offering unique characteristics in terms of size, leaf texture, and flavor profile. Consider trying early, mid-season, or late-season varieties to extend your harvest throughout the growing season. Experiment with companion planting, incorporating herbs like dill or basil nearby to potentially deter pests and improve overall plant health. If space is limited, consider vertical gardening techniques, using trellises or hanging planters to maximize your yield. Furthermore, you can adjust the planting density based on your available space and desired cabbage size. Closer spacing will result in smaller, more compact heads, while wider spacing will encourage larger heads. Remember to always monitor your plants for pests and diseases, and address any issues promptly to ensure a bountiful harvest. Don’t be afraid to adapt the techniques to suit your specific climate and growing conditions. The beauty of gardening is its adaptability, and this DIY approach to growing Napa cabbage allows for plenty of room for personal experimentation and refinement.
We strongly encourage you to try this method of growing Napa cabbage and share your experiences with us! Whether you’re a seasoned gardener or a complete novice, we believe you’ll find this process rewarding and enjoyable. Post your photos and success stories on social media using the hashtag #GrowNapaCabbageDIY. Let’s build a community of home gardeners who are passionate about growing their own fresh, delicious produce. Share your tips, tricks, and challenges – we’re all learning together! Remember, the journey of growing your own food is as rewarding as the final harvest itself. So grab your seeds, get your hands dirty, and embark on this fulfilling adventure of growing your own Napa cabbage. You won’t regret it! The taste of homegrown vegetables is a truly unforgettable experience. The satisfaction of nurturing a plant from seed to a delicious, healthy meal is a feeling that will keep you coming back for more. This DIY approach to growing Napa cabbage is a fantastic way to connect with nature, learn valuable gardening skills, and enjoy the freshest, most flavorful Napa cabbage you’ve ever tasted. So, what are you waiting for? Let’s get growing!
Frequently Asked Questions
What type of soil is best for growing Napa cabbage?
Napa cabbage thrives in loose, well-draining soil rich in organic matter. Amend heavy clay soils with compost or other organic materials to improve drainage and aeration. A slightly acidic to neutral pH (6.0-7.0) is ideal.
How much sunlight does Napa cabbage need?
Napa cabbage requires at least six hours of direct sunlight per day for optimal growth. Choose a location in your garden that receives ample sunlight, especially during the crucial early stages of growth.
When is the best time to plant Napa cabbage seeds?
The best time to plant Napa cabbage seeds depends on your climate. In cooler climates, start seeds indoors 6-8 weeks before the last expected frost. In warmer climates, direct sow seeds outdoors after the last frost, or in the fall for a fall/winter harvest.
How often should I water my Napa cabbage?
Water your Napa cabbage regularly, keeping the soil consistently moist but not waterlogged. The frequency of watering will depend on your climate and soil conditions. Aim for about 1 inch of water per week, either through rainfall or supplemental irrigation.
What are some common pests and diseases that affect Napa cabbage?
Common pests include aphids, cabbage worms, and flea beetles. Diseases include downy mildew and black rot. Regularly inspect your plants for signs of pests or diseases and take appropriate action, such as using insecticidal soap or neem oil for pests, or removing infected plants to prevent the spread of disease.
How long does it take for Napa cabbage to mature?
The time it takes for Napa cabbage to mature varies depending on the variety and growing conditions, but generally ranges from 50 to 75 days from transplanting or direct sowing. Check the seed packet for specific maturity information for your chosen variety.
Can I grow Napa cabbage in containers?
Yes, you can grow Napa cabbage in containers, provided they are large enough (at least 12 inches in diameter) to accommodate the root system. Choose containers with drainage holes to prevent waterlogging.
What should I do with my harvested Napa cabbage?
Harvest Napa cabbage when the heads are firm and dense. Store harvested cabbage in the refrigerator for up to a week, or freeze it for longer storage. You can also pickle or ferment Napa cabbage for a longer shelf life and unique flavor profiles.
What are the benefits of growing my own Napa cabbage?
Growing your own Napa cabbage offers numerous benefits, including access to fresh, flavorful cabbage free from pesticides and other chemicals, the satisfaction of nurturing a plant from seed to harvest, and the potential to save money on grocery bills. It’s also a rewarding and educational experience for gardeners of all levels.
My Napa cabbage plants are bolting. What should I do?
Bolting, where the plant prematurely sends up a flower stalk, is often caused by heat stress or long days. To prevent bolting, choose a variety suited to your climate and plant in cooler months. Providing consistent moisture can also help.
Leave a Comment