

Grow mushrooms at home? Absolutely! Imagine plucking fresh, flavorful mushrooms right from your own kitchen, ready to elevate your next culinary masterpiece. Forget those bland, store-bought varieties; with a few simple tricks, you can cultivate a thriving mushroom patch indoors, bringing a touch of earthy magic to your everyday life.
Mushroom cultivation has a rich history, dating back centuries in various cultures. From ancient Chinese medicinal practices to European foraging traditions, mushrooms have always held a special place in our relationship with nature. Today, the art of growing your own mushrooms is experiencing a resurgence, fueled by a desire for fresh, sustainable food and a connection to the natural world.
But why should you learn to grow mushrooms at home? Well, beyond the sheer joy of harvesting your own food, it’s incredibly rewarding. It’s a fantastic way to reduce your carbon footprint, save money on groceries, and impress your friends with your newfound green thumb (or should I say, brown thumb?). Plus, it’s a fascinating project that’s surprisingly easy to get started with. I’m going to show you some simple DIY tricks and hacks that will have you harvesting your own delicious mushrooms in no time. Get ready to unlock the secrets of indoor mushroom cultivation and transform your home into a miniature fungal farm!
Grow Your Own Gourmet Mushrooms at Home: A Beginner’s Guide
Hey there, fellow fungi enthusiasts! Ever dreamt of harvesting your own delicious mushrooms right in your kitchen? Well, dream no more! Growing mushrooms at home is surprisingly achievable, even for beginners. I’m going to walk you through a simple and effective method using readily available materials. Get ready to impress your friends (and your taste buds!) with your homegrown delicacies.
Choosing Your Mushroom Variety
Before we dive in, let’s talk about which mushrooms are easiest to grow at home. While you can technically cultivate many varieties, some are much more forgiving for beginners. Here are a few of my top recommendations:
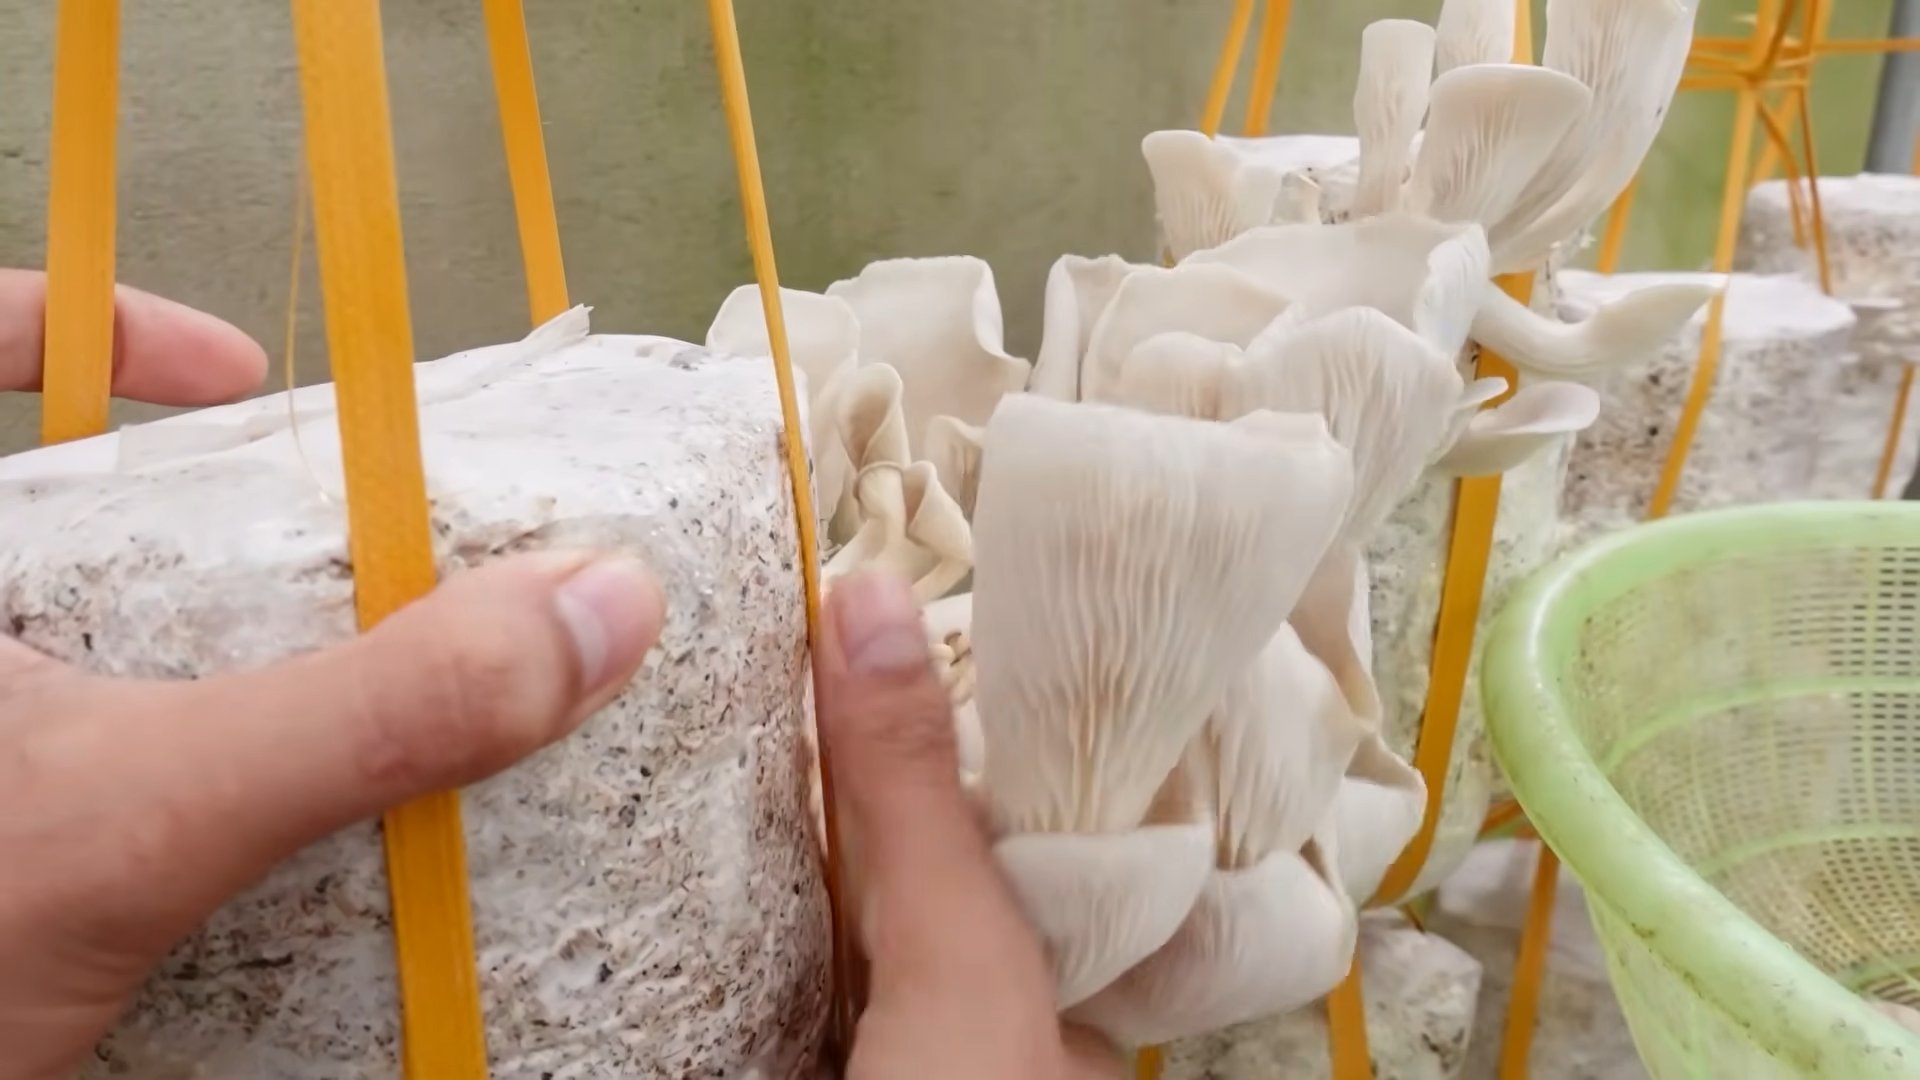
* Oyster Mushrooms (Pleurotus spp.): These are arguably the easiest to grow. They’re fast-growing, versatile in the kitchen, and can thrive on a variety of substrates (more on that later!). You can find different colored oyster mushrooms like pearl, blue, pink, and golden.
* Shiitake Mushrooms (Lentinula edodes): Shiitakes are another great option. They take a bit longer to fruit than oysters, but they’re incredibly flavorful and well worth the wait. They typically grow on hardwood logs or supplemented sawdust.
* Wine Cap Mushrooms (Stropharia rugosoannulata): These are fantastic for outdoor gardens. They’re relatively easy to cultivate in wood chips and straw and add a beautiful touch to your landscaping.
For this guide, I’ll focus on growing oyster mushrooms, as they’re the most beginner-friendly.
Gathering Your Supplies
Okay, let’s get our hands dirty! Here’s what you’ll need to get started:
* Oyster Mushroom Spawn: This is essentially the “seed” for your mushrooms. You can purchase it online from reputable mushroom suppliers. It usually comes in the form of sawdust spawn, grain spawn, or plug spawn. I recommend sawdust spawn for this method.
* Substrate: This is the material your mushrooms will grow on. For oyster mushrooms, pasteurized straw is an excellent choice. You can also use coffee grounds, cardboard, or a combination of these.
* Heat-Resistant Bags: These are crucial for pasteurizing your substrate. Oven bags or polypropylene bags work well. Make sure they can withstand high temperatures.
* Large Pot or Container: You’ll need a large pot or container to pasteurize your straw.
* Spray Bottle: For misting your mushrooms to maintain humidity.
* Gloves: To keep everything clean and prevent contamination.
* Rubbing Alcohol: For sanitizing your work area and tools.
* Scale: To measure the substrate and spawn.
* Optional: A fruiting chamber (a clear plastic tub with holes for ventilation) can help maintain humidity, but it’s not strictly necessary.
Step-by-Step Instructions: Growing Oyster Mushrooms
Alright, let’s get down to business! Here’s a detailed guide to growing your own oyster mushrooms:
1. Preparing Your Work Area
Cleanliness is key when growing mushrooms. Contamination from mold or bacteria can ruin your entire crop.
1. Sanitize Everything: Thoroughly clean your work surface with rubbing alcohol. Wipe down your gloves, spray bottle, and any other tools you’ll be using.
2. Wash Your Hands: Wash your hands thoroughly with soap and water before handling the spawn or substrate.
2. Pasteurizing the Straw Substrate
Pasteurization kills off competing organisms in the straw, giving your mushroom spawn a head start.
1. Chop the Straw: Cut the straw into smaller pieces, about 2-4 inches long. This makes it easier to pack into the bags and allows the mycelium (the mushroom’s root system) to colonize it more effectively.
2. Soak the Straw: Place the chopped straw in your large pot or container and cover it with water. You might need to weigh it down to keep it submerged. Let it soak for at least 24 hours. This hydrates the straw, making it more suitable for mushroom growth.
3. Heat the Straw: Drain the soaked straw and transfer it to your heat-resistant bags. Don’t pack it too tightly, as you want to allow for some airflow.
4. Pasteurize: Place the bags of straw in a large pot and cover them with water. Bring the water to a temperature of 160-180°F (71-82°C) and maintain that temperature for 60-90 minutes. Use a thermometer to monitor the water temperature. This process kills off most of the unwanted microorganisms.
5. Cool Down: Carefully remove the bags from the hot water and let them cool completely. This can take several hours. You want the straw to be cool enough to handle without burning yourself.
3. Inoculating the Substrate
This is where you introduce the mushroom spawn to the pasteurized straw.
1. Open the Bag: Once the straw is completely cool, carefully open one of the bags.
2. Mix in the Spawn: Using clean gloves, mix the oyster mushroom spawn into the pasteurized straw. A good ratio is about 5-10% spawn to substrate by weight. For example, if you have 5 pounds of straw, use 0.25-0.5 pounds of spawn. Distribute the spawn evenly throughout the straw.
3. Seal the Bag: Reseal the bag tightly. You can use tape or a zip tie.
4. Repeat: Repeat the process for any remaining bags of straw.
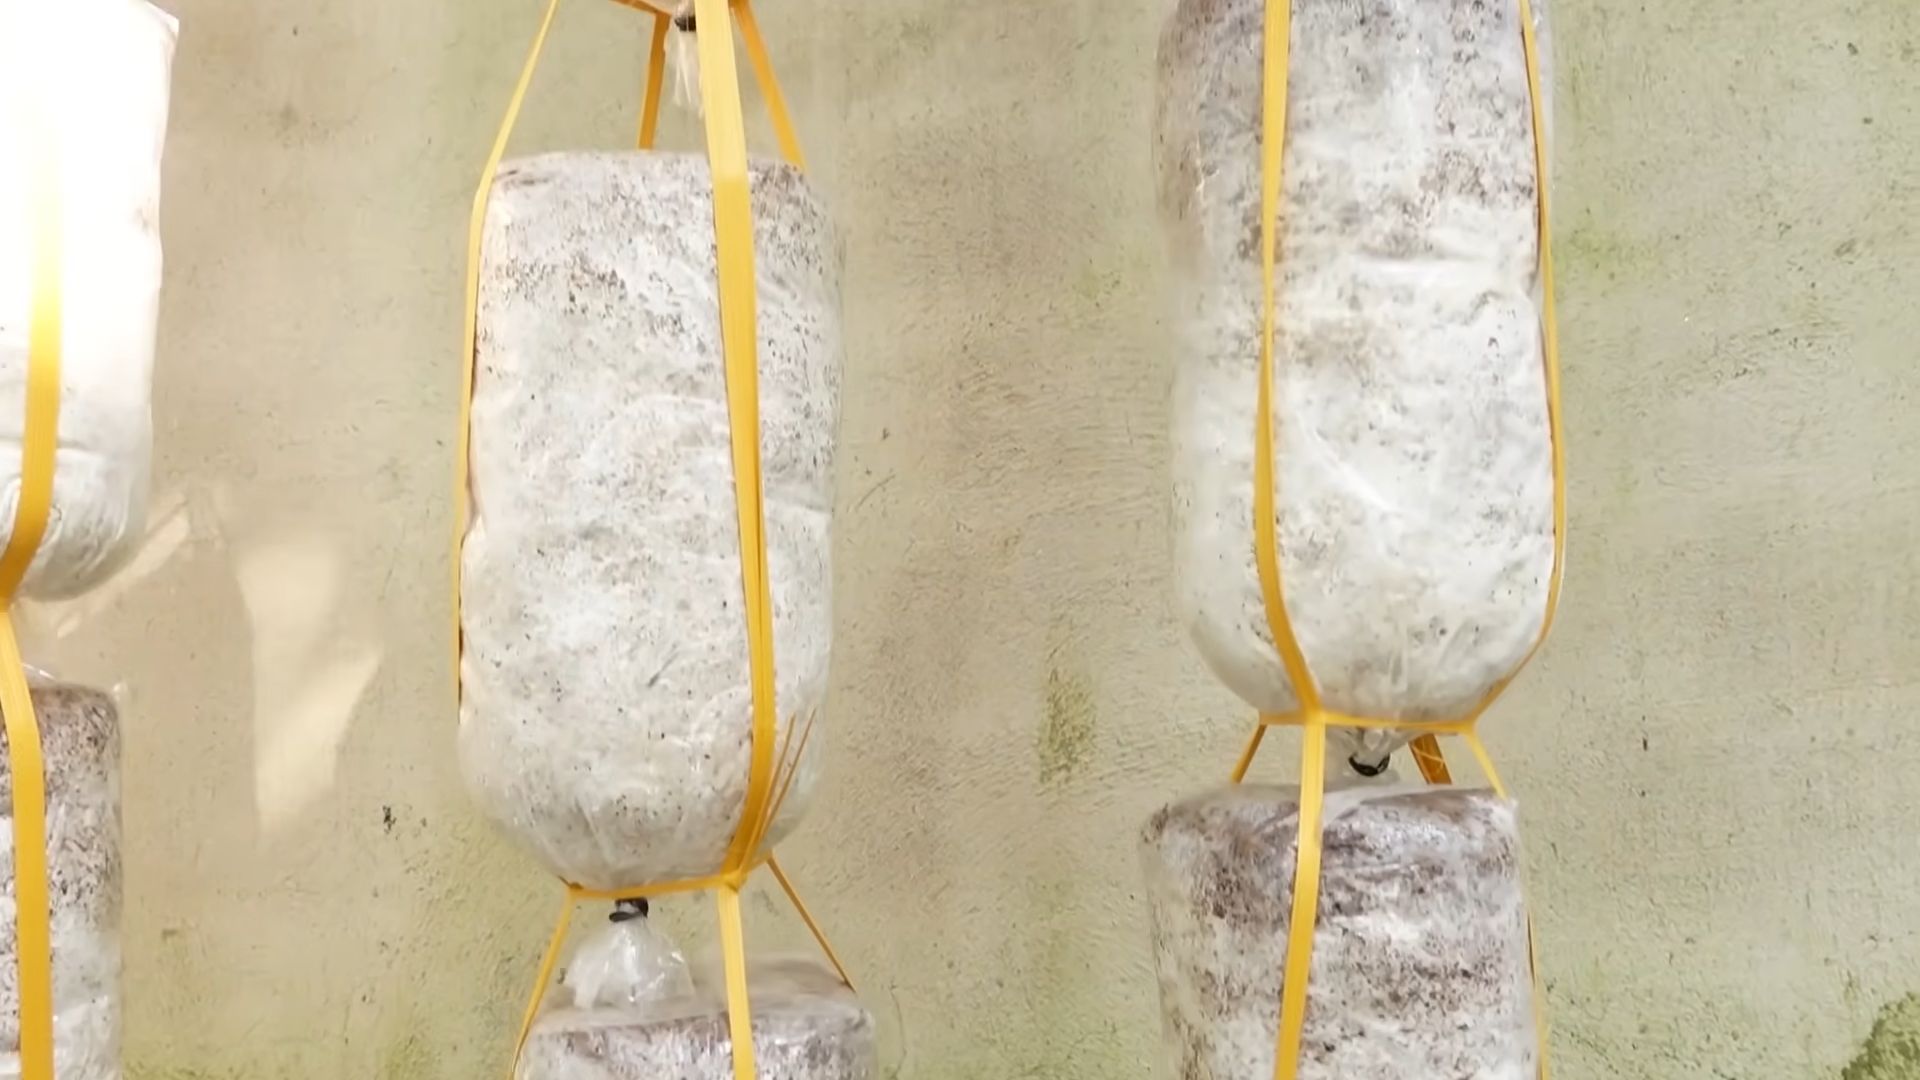
4. Incubation: Letting the Mycelium Grow
Now comes the waiting game! The mycelium needs time to colonize the straw.
1. Find a Dark, Warm Place: Place the inoculated bags in a dark, warm place with a temperature of 65-75°F (18-24°C). A closet, basement, or spare room works well.
2. Monitor Colonization: Check the bags regularly. You should start to see white, fuzzy mycelium spreading throughout the straw within a week or two.
3. Ventilation (Optional): After a few weeks, you can poke a few small holes in the bags to allow for some air exchange. This can help speed up colonization.
5. Fruiting: Harvesting Your Mushrooms
Once the straw is fully colonized (it will be almost entirely white), it’s time to trigger fruiting!
1. Create Fruiting Conditions: Move the bags to a location with more light and higher humidity. Indirect sunlight is ideal.
2. Increase Humidity: Oyster mushrooms need high humidity to fruit properly. You can achieve this by misting the bags several times a day with a spray bottle. If you’re using a fruiting chamber, mist the inside of the chamber regularly.
3. Provide Airflow: Make sure there’s adequate airflow around the bags. This helps prevent the buildup of carbon dioxide, which can inhibit fruiting.
4. Make Cuts: Cut slits or X’s in the bag where you want the mushrooms to grow. This provides an opening for the mushrooms to emerge.
5. Watch for Pins: Within a few days, you should start to see small mushroom “pins” forming at the cuts.
6. Harvest Time: The mushrooms will grow rapidly. Harvest them when the caps are fully developed but before they start to drop spores (you’ll see a powdery substance on the surrounding surfaces). Simply twist or cut the mushrooms off the substrate.
6. Subsequent Flushes
After harvesting your first flush of mushrooms, you can often get several more flushes from the same substrate.
1. Soak the Substrate: After harvesting, soak the substrate in water for 24 hours. This rehydrates the straw and encourages further fruiting.
2. Repeat Fruiting Conditions: Return the bags to the fruiting conditions (light, humidity, airflow).
3. Harvest Again: You should see another flush of mushrooms within a few weeks. You can repeat this process several times until the substrate is exhausted.
Troubleshooting
Even with the best intentions, things can sometimes go wrong. Here are a few common problems and how to address them:
* Contamination: If you see green, black, or other colored mold growing on your substrate, it’s likely contaminated. Unfortunately, there’s not much you can do at this point except discard the contaminated substrate. To prevent contamination, make sure to sanitize everything thoroughly and use clean spawn.
* Slow Colonization: If the mycelium is growing slowly, it could be due to low temperatures or poor spawn quality. Make sure the temperature is within the optimal range (65-75°F) and purchase your spawn from a reputable supplier.
* No Fruiting: If the substrate is fully colonized but you’re not seeing any mushrooms, it could be due to low humidity, poor airflow, or insufficient light. Increase humidity by misting more frequently, provide
Conclusion
So, there you have it! Growing mushrooms at home isn’t just a quirky hobby; it’s a rewarding experience that connects you to the natural world and provides you with a sustainable source of delicious, nutritious food. We’ve walked you through a simple, effective method that demystifies the process, making it accessible even for beginners.
Why is this DIY mushroom growing trick a must-try? Because it empowers you to take control of your food source, reduce your reliance on commercially grown options (often shipped long distances), and enjoy the unparalleled freshness and flavor of homegrown mushrooms. Imagine the satisfaction of harvesting your own oyster mushrooms, shiitakes, or even lion’s mane, knowing exactly where they came from and how they were grown. It’s a culinary adventure that starts in your own home!
Beyond the basic method outlined, there’s a whole world of mushroom growing variations to explore. Experiment with different substrates like straw, coffee grounds, or even cardboard. Try inoculating logs for a more natural, long-term growing solution. Consider different mushroom varieties, each with its unique flavor profile and growing requirements. Lion’s mane, with its delicate, seafood-like taste, is a fantastic option for those looking for something unique. Shiitake mushrooms offer a rich, umami flavor that elevates any dish. Oyster mushrooms are incredibly versatile and easy to grow, making them a great starting point.
Don’t be afraid to get creative! You can even build your own fruiting chamber using a plastic tub and some basic materials to control humidity and temperature. The possibilities are truly endless.
We understand that venturing into the world of mycology can seem daunting at first, but we encourage you to take the leap. Start small, be patient, and don’t be discouraged by initial setbacks. Every mistake is a learning opportunity. The joy of harvesting your first flush of homegrown mushrooms is an experience you won’t soon forget.
Ready to embark on your mushroom growing journey? We’re confident that with a little effort and the right guidance, you’ll be enjoying fresh, delicious mushrooms in no time.
We’d love to hear about your experiences! Share your successes, your challenges, and your tips in the comments below. Let’s build a community of home mushroom growers and learn from each other. Show us your mushroom photos! Let us know what substrate you used and what variety of mushroom you are growing.
Now go forth and grow mushrooms at home! You’ll be amazed at what you can achieve.
Frequently Asked Questions (FAQ)
What are the easiest mushrooms to grow at home for beginners?
Oyster mushrooms are generally considered the easiest mushrooms to grow for beginners. They are fast-growing, relatively tolerant of environmental fluctuations, and can thrive on a variety of substrates like straw, coffee grounds, and even cardboard. They are also quite forgiving, making them a great choice for those new to mycology. Shiitake mushrooms are another popular option, but they typically require a bit more patience and attention to detail.
What kind of substrate should I use for growing mushrooms?
The best substrate depends on the type of mushroom you’re growing. Oyster mushrooms do well on straw, coffee grounds, and cardboard. Shiitake mushrooms typically prefer hardwood sawdust or logs. Lion’s mane can be grown on hardwood sawdust or supplemented sawdust blocks. Research the specific requirements of the mushroom variety you’re interested in growing to determine the most suitable substrate. Proper pasteurization or sterilization of the substrate is crucial to prevent contamination.
How long does it take to grow mushrooms at home?
The time it takes to grow mushrooms varies depending on the species, the substrate, and the environmental conditions. Oyster mushrooms can often be harvested within a few weeks of inoculation. Shiitake mushrooms may take several months to fruit, especially when grown on logs. Lion’s mane typically fruits within a few weeks of the substrate being fully colonized. Patience is key!
What are the ideal environmental conditions for growing mushrooms?
Most mushrooms require a humid environment, typically between 80% and 90% relative humidity. They also need adequate ventilation to prevent the buildup of carbon dioxide. Temperature requirements vary depending on the species, but most mushrooms prefer temperatures between 60°F and 75°F (15°C and 24°C). Indirect light is also beneficial for fruiting.
How do I prevent contamination when growing mushrooms?
Contamination is a common challenge in mushroom growing. To minimize the risk of contamination, it’s essential to sterilize or pasteurize your substrate properly. Use clean equipment and work in a clean environment. Avoid introducing contaminants during inoculation and fruiting. Monitor your growing environment closely for signs of mold or other unwanted organisms. If contamination occurs, remove the affected area immediately to prevent it from spreading.
Where can I buy mushroom spawn or cultures?
Mushroom spawn and cultures can be purchased from a variety of online retailers and local suppliers specializing in mycology. Look for reputable sources that offer high-quality spawn and cultures. Be sure to choose a strain that is well-suited to your growing environment and experience level.
How do I know when my mushrooms are ready to harvest?
The optimal time to harvest mushrooms depends on the species. Oyster mushrooms are typically harvested when the caps are fully expanded but before they start to release spores. Shiitake mushrooms are harvested when the caps have flattened out and the edges have begun to curl upwards. Lion’s mane is harvested when the fruiting body is fully developed and has a slightly spongy texture.
Can I grow mushrooms indoors without a special setup?
Yes, you can grow mushrooms indoors without a special setup, especially with the methods described in this article. A simple fruiting chamber can be created using a plastic tub or container. You can also grow mushrooms in a humidified room, such as a bathroom or basement. Maintaining proper humidity and ventilation is key to success.
What are the benefits of growing my own mushrooms?
Growing your own mushrooms offers numerous benefits, including access to fresh, delicious, and nutritious food. It’s a sustainable and environmentally friendly way to obtain food. It can be a rewarding and educational hobby. It allows you to control the quality and safety of your food. And it can save you money compared to buying commercially grown mushrooms.
What if my mushrooms don’t grow?
Don’t be discouraged if your mushrooms don’t grow right away. Mushroom growing can be challenging, and it often takes some experimentation to find what works best for your environment. Review your growing conditions, substrate, and inoculation techniques. Make sure you’re providing adequate humidity, ventilation, and temperature. If you’re still having trouble, consult with experienced mushroom growers or online resources for guidance. Remember, every mistake is a learning opportunity!

Leave a Comment