

Grow Collard Greens Easily, even if you think you don’t have a green thumb! Have you ever dreamt of stepping into your backyard and harvesting fresh, vibrant greens for a delicious, healthy meal? It’s more attainable than you think, and this guide is your secret weapon. For generations, collard greens have been a staple in Southern cuisine, symbolizing prosperity and good health. From family gatherings to soul food feasts, these leafy greens hold a special place in culinary traditions.
But let’s be honest, sometimes gardening can feel intimidating. Maybe you’ve tried before and haven’t had the best luck, or perhaps you’re simply short on time and space. That’s where these DIY tricks and hacks come in! I’m here to show you how to grow collard greens easily, regardless of your experience level or garden size. We’ll cover everything from choosing the right seeds to protecting your plants from pests, ensuring you have a bountiful harvest.
Imagine the satisfaction of serving a dish made with ingredients you grew yourself. Not only will you enjoy the fresh, delicious flavor of homegrown collard greens, but you’ll also save money, reduce your carbon footprint, and connect with nature. So, grab your gardening gloves, and let’s get started on this exciting journey to growing your own collard greens!
Grow Cabbage Yourself the Easy Way: Your DIY Guide for a Bountiful Harvest
Hello garden friends! I love harvesting fresh vegetables directly from my garden, and cabbages are no exception. They are super healthy, versatile in the kitchen, and surprisingly easy to grow, even if you’re not an experienced gardener. In this article, I’ll show you step-by-step how to successfully grow cabbage in your own garden. Let’s get started!
What You Need for Growing Cabbage
Before we begin, here is a list of the things you will need:
- Cabbage seeds or seedlings: You can either sow seeds or buy pre-grown seedlings. Personally, I find seedlings easier for beginners.
- Good garden soil: Cabbages love nutrient-rich, well-draining soil.
- Compost or organic fertilizer: For an extra nutrient boost.
- Watering can or garden hose: For regular watering.
- Garden tools: Spade, rake, trowel.
- Mulch material: Straw, wood chips, or grass clippings to retain moisture in the soil and suppress weeds.
- Pest protection: Depending on your region, cabbage fly nets or organic pesticides might be useful.
The Right Preparation is Everything
A good start is half the battle! Before you plant your cabbages, you should prepare the soil properly.
- Choose the right location: Cabbages need a lot of sun, at least 6 hours per day. Make sure the location is well-ventilated.
- Prepare the soil: Loosen the soil with a spade and remove stones and weeds.
- Improve the soil quality: Mix plenty of compost or organic fertilizer into the soil. Cabbages are heavy feeders and need a lot of nutrients.
- Pay attention to the pH level: Cabbages prefer a slightly acidic to neutral pH (6.0 to 7.0). You can check the pH with a soil test and adjust it if necessary.
Sowing or Planting: The Start of a Cabbage’s Life
You have two options for growing your cabbages: by sowing seeds or by planting seedlings.
Sowing (optional)
If you decide to sow seeds, you should consider the following points:
- Choose the right time: Sowing usually takes place 6-8 weeks before the last frost in spring or in late summer for a fall harvest.
- Start the seeds indoors: Sow the seeds in seed trays or small pots.
- Keep the soil moist: The soil should always be slightly moist, but not wet.
- Prick out the seedlings: Once the seedlings are large enough (about 5-7 cm or 2-3 inches), transplant them into larger pots.
- Harden off the plants: Before you move the plants outdoors, you should harden them off for a few days by placing them outside during the day and bringing them back in at night.
Planting Seedlings
Planting seedlings is the easier method, especially for beginners.
- Choose healthy seedlings: Make sure the plants look strong and healthy. Avoid plants with yellow or brown leaves.
- Plant the seedlings: Dig holes that are slightly larger than the root balls of the plants. Plant them so that the top edge of the root ball is level with the soil surface.
- Water the plants well: After planting, you should water the plants thoroughly.
- Pay attention to spacing: The distance between plants should be about 45-60 cm (18-24 inches), depending on the variety.
The Right Care: How Your Cabbages Will Grow
After planting, proper care is crucial for a rich harvest.
- Regular watering: Cabbages need a lot of water, especially during the growing phase. Water the plants regularly, especially in dry weather. Make sure the soil is always slightly moist, but not wet.
- Fertilizing: Fertilize the plants regularly with an organic fertilizer or compost. Cabbages are heavy feeders and need a lot of nutrients.
- Weed control: Regularly remove weeds that compete with the cabbages for nutrients and water.
- Mulching: Cover the soil around the plants with mulch material (straw, wood chips, or grass clippings). This retains moisture in the soil, suppresses weeds, and protects the plants from soil splash.
- Pest control: Cabbages can be infested by various pests, such as cabbage flies, cabbage white butterflies, and snails. Check the plants regularly for pests and take action if necessary.
Protection from Pests: Your Cabbages Are Not Alone
Unfortunately, cabbages are very popular with pests. Here are some tips on how you can protect your plants:
- Cabbage fly nets: The most effective method to keep cabbage flies away is to cover the plants with cabbage fly nets.
- Organic pest control: There are various organic pesticides you can use to combat pests, e.g., Bacillus thuringiensis against cabbage white butterflies or nematodes against snails.
- Regular checks: Check the plants regularly for pests and remove them by hand if necessary.
- Encourage beneficial insects: Encourage beneficial insects in your garden, such as ladybugs, which eat aphids.
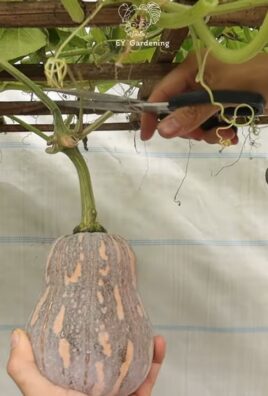
Harvest Time: The Reward for Your Effort
The harvest time depends on the variety and the time of planting. Generally, cabbages are ready for harvest 2-3 months after planting.
- Recognizing harvest time: The cabbage head is ready for harvest when it is firm and compact.
- Harvesting: Cut the cabbage head with a sharp knife or garden shears. Leave a few leaves on the stalk to extend its shelf life.
- Storage: Cabbages can be stored in the refrigerator for several weeks.
Additional Tips for a Successful Cabbage Harvest
- Practice crop rotation: Do not plant cabbages in the same location every year to prevent diseases and pests.
- Variety selection: Choose varieties that are suitable for your climate and soil conditions.
- Observation: Observe your plants regularly and react quickly to problems.
I hope this guide helps you to successfully grow cabbages in your own garden. Have fun gardening and enjoy your meal!
Conclusion
So, there you have it! Growing collard greens doesn’t have to be a daunting task reserved for seasoned gardeners. With this simple DIY trick, you can unlock a bountiful harvest of these nutritious and delicious leafy greens, even if you’re a complete beginner. We’ve shown you how to bypass the often-tricky seedling stage and get straight to enjoying the fruits (or rather, the leaves!) of your labor.
Why is this a must-try? Because it’s efficient, cost-effective, and incredibly rewarding. Imagine stepping out into your garden and harvesting fresh, vibrant collard greens whenever you need them. No more trips to the grocery store, no more worrying about pesticides or questionable freshness. Just pure, homegrown goodness.
But the beauty of this method lies in its adaptability. Feel free to experiment with different varieties of collard greens. Try Georgia Southern for its classic flavor, or perhaps Champion for its heat tolerance. You can also adjust the size of your container based on the space you have available. Even a small balcony can accommodate a few collard green plants using this technique.
Consider companion planting to further enhance your collard green garden. Marigolds can help deter pests, while herbs like rosemary and thyme can add a delightful aroma and attract beneficial insects. Don’t be afraid to get creative and personalize your growing experience.
We are confident that this DIY method for growing collard greens will transform your gardening experience. It’s a game-changer for anyone who wants to enjoy fresh, healthy produce without the hassle of traditional gardening methods.
Now, it’s your turn! We wholeheartedly encourage you to give this DIY trick a try. We’re certain you’ll be amazed at how easy it is to grow your own collard greens. And most importantly, we want to hear about your experience! Share your photos, tips, and stories in the comments below. Let’s build a community of collard green enthusiasts and inspire others to embrace the joy of homegrown food. Let us know what worked for you, what challenges you faced, and any variations you discovered along the way. Your feedback is invaluable and will help us refine this method even further. Happy gardening!
Frequently Asked Questions (FAQ)
What kind of container should I use?
The best container for growing collard greens using this DIY method is one that is at least 12 inches deep and 12 inches in diameter. This provides ample space for the roots to develop. You can use plastic pots, terracotta pots, or even repurposed containers like buckets or tubs. Just make sure the container has drainage holes to prevent waterlogging. The material of the container doesn’t matter as much as the size and drainage.
How often should I water my collard greens?
Collard greens need consistent moisture, especially during hot weather. Water deeply whenever the top inch of soil feels dry to the touch. Avoid overwatering, as this can lead to root rot. A good rule of thumb is to water every 2-3 days, but adjust based on the weather conditions and the moisture level of the soil. Check the soil moisture regularly, especially during the first few weeks after planting.
What kind of soil should I use?
Collard greens thrive in well-draining, fertile soil. A good potting mix is ideal. You can also amend your garden soil with compost or other organic matter to improve its drainage and nutrient content. The ideal soil pH for collard greens is between 6.0 and 7.5. If your soil is too acidic, you can add lime to raise the pH.
How much sunlight do collard greens need?
Collard greens need at least 6 hours of sunlight per day to thrive. Choose a location in your garden that receives full sun. If you live in a hot climate, some afternoon shade can be beneficial to prevent the leaves from scorching. If you’re growing collard greens indoors, you’ll need to supplement with grow lights to provide adequate light.
What are some common pests and diseases that affect collard greens?
Some common pests that affect collard greens include aphids, cabbage worms, and flea beetles. You can control these pests with organic insecticides like neem oil or insecticidal soap. Common diseases include black rot and downy mildew. Prevent these diseases by providing good air circulation and avoiding overwatering. Remove any infected leaves promptly to prevent the disease from spreading.
When is the best time to harvest collard greens?
You can start harvesting collard greens when the leaves are about 6-8 inches long. Harvest the outer leaves first, leaving the inner leaves to continue growing. This will allow you to harvest collard greens continuously throughout the growing season. The flavor of collard greens improves after a frost, so don’t be afraid to leave them in the garden until the weather turns cold.
Can I grow collard greens in containers indoors?
Yes, you can grow collard greens in containers indoors, but you’ll need to provide them with adequate light. Place the container near a sunny window or use grow lights to supplement the natural light. Make sure the container is large enough to accommodate the plant’s root system. Indoor collard greens may not grow as large as those grown outdoors, but you can still enjoy a decent harvest.
How do I fertilize my collard greens?
Collard greens are heavy feeders and benefit from regular fertilization. Use a balanced fertilizer, such as 10-10-10, or an organic fertilizer like compost tea or fish emulsion. Fertilize every 2-3 weeks during the growing season. Avoid over-fertilizing, as this can lead to excessive leaf growth and reduced flavor.
Can I save seeds from my collard greens?
Yes, you can save seeds from your collard greens, but it’s a bit more involved than saving seeds from some other vegetables. Collard greens are biennials, meaning they take two years to produce seeds. You’ll need to overwinter the plants and allow them to flower and produce seeds in the second year. Be aware that collard greens can cross-pollinate with other members of the Brassica family, such as kale and cabbage, so if you want to save true-to-type seeds, you’ll need to isolate your collard green plants from other Brassicas.
What are some ways to use collard greens in cooking?
Collard greens are a versatile vegetable that can be used in a variety of dishes. They are often braised with ham hocks or bacon for a traditional Southern dish. They can also be steamed, sautéed, or added to soups and stews. Collard greens are a good source of vitamins A, C, and K, as well as fiber and calcium. They are a healthy and delicious addition to any diet. You can even use them in smoothies for a nutrient boost!
Leave a Comment