

Grow Choi Sum at Home and unlock the secrets to fresh, delicious greens right outside your door! Have you ever dreamed of snipping vibrant, leafy vegetables just moments before adding them to your stir-fry? Well, dream no more! This DIY guide will empower you to cultivate your very own Choi Sum, even if you’re a complete beginner.
Choi Sum, also known as Chinese flowering cabbage, has been a staple in Asian cuisine for centuries. Its tender stalks and delicate flavor have graced countless family tables, bringing a touch of freshness and vitality to every meal. But you don’t need to rely on grocery stores to enjoy this culinary gem.
In today’s world, where access to fresh, affordable produce can be a challenge, learning to grow Choi Sum at home offers a fantastic solution. Not only will you save money, but you’ll also gain the satisfaction of nurturing your own food from seed to table. Plus, you’ll know exactly what’s going into your veggies – no harmful pesticides or hidden chemicals! So, let’s dive in and discover the simple steps to growing your own bountiful harvest of Choi Sum. I’m excited to share these easy-to-follow tips and tricks with you!
Growing Choi Sum at Home: Your DIY Guide for Crisp Greens
Hey garden friends! Do you fancy fresh, crisp Choi Sum straight from your own garden? Choi Sum, also known as Chinese flowering cabbage, is super easy to grow and provides a great harvest for delicious Asian dishes. I’ll show you how you can easily grow it at home, whether you have a large garden or just a small balcony. Let’s go!
What You Need: The Materials List
Before we start, here is a list of everything you will need:
- Choi Sum Seeds: Organic seeds are best to ensure you get healthy plants. You can find them in any garden center or online.
- Seed Starting Mix: Special seed starting mix is finer and lower in nutrients than regular potting soil and is ideal for seed germination.
- Pots or Seed Trays: For starting seeds indoors. They should have holes in the bottom to allow water to drain.
- Potting Soil: High-quality potting soil for later transplanting.
- Fertilizer: An organic fertilizer is perfect for supplying your Choi Sum plants with all the essential nutrients.
- Watering Can: For gently watering the plants.
- Trowel or Shovel: For transplanting.
- Garden Fleece (optional): For protection against pests and frost.
- Plant Labels: To keep track of what you sowed and when.
Preparation: The Foundation for a Bountiful Harvest
The right preparation is the key to a successful Choi Sum harvest. Here are the steps you should follow:
- Select Seeds: Make sure to use fresh seeds. The expiration date is usually on the package.
- Determine Location: Choi Sum loves the sun, but a partially shaded location is also fine, especially in the hot summer months.
- Prepare Soil: The soil should be loose, well-draining, and rich in nutrients. Mix compost or organic fertilizer into the potting soil to enrich it.
- Prepare Pots: Fill the pots or seed trays with seed starting mix.
Sowing: The Start to Choi Sum Happiness
Now it’s time to get down to business! Sowing is the first step to growing your own Choi Sum plants.
- Sow Seeds: Gently press the seeds into the seed starting mix. They should be about 0.5 to 1 cm deep.
- Cover: Cover the seeds with a thin layer of seed starting mix.
- Water: Moisten the soil carefully with a watering can. Avoid waterlogging.
- Location: Place the pots in a bright, warm place. A temperature of 18-22°C is ideal for germination.
- Moisture: Keep the soil moist, but not wet. You can cover the pots with plastic wrap to increase moisture. But don’t forget to ventilate regularly to prevent mold.
- Patience: The seeds usually germinate within 5-10 days.
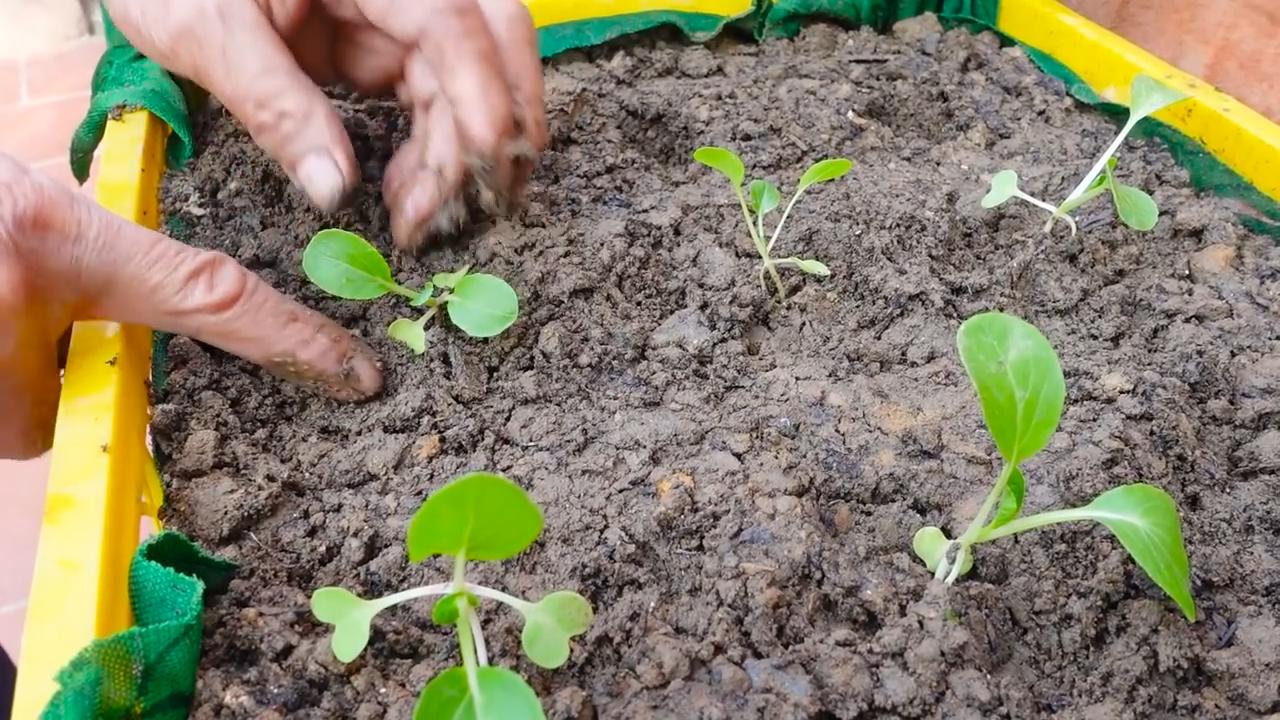
Rearing: Care for Strong Plants
As soon as the first small seedlings sprout from the soil, the actual rearing begins.
- Thinning: If the seedlings are too close together, you should thin them out. This means you remove the weaker seedlings so that the stronger ones have enough space to grow.
- Light: Ensure sufficient light. If the plants get too little light, they will become long and thin.
- Watering: Water regularly, but avoid waterlogging. The soil should always be slightly moist.
- Fertilizing: Start fertilizing about 2-3 weeks after germination. Use an organic fertilizer that is specifically for vegetables.
- Rotating: Rotate the pots regularly so that the plants grow evenly and do not bend towards the light.
Transplanting: A New Home for Your Choi Sum Plants
When the seedlings are large enough (about 5-7 cm high), it is time to transplant them into larger pots or into the garden bed.
- Preparation: Prepare the new pots or the bed. The soil should be loose and well-draining.
- Transplanting: Carefully lift the seedlings out of the seed trays. Be careful not to damage the roots.
- Planting: Place the seedlings in the new pots or in the bed. The distance between the plants should be about 20-30 cm.
- Watering In: Water the plants thoroughly after transplanting.
- Protection: Protect the young plants from direct sunlight and strong wind. A garden fleece can be very helpful here.
Care: So Your Choi Sum Plants Thrive
Proper care is crucial for a rich harvest. Here are a few tips you should follow:
- Watering: Water regularly, especially during dry periods. Choi Sum needs enough water to develop juicy leaves.
- Fertilizing: Fertilize the plants every 2-3 weeks with an organic fertilizer.
- Weed Removal: Keep the bed or pots free of weeds. Weeds compete with the Choi Sum plants for nutrients and water.
- Pests: Watch out for pests such as snails, aphids, or flea beetles. In case of an infestation, you can use natural pesticides.
- Soil Care: Loosen the soil regularly so that it is well aerated.
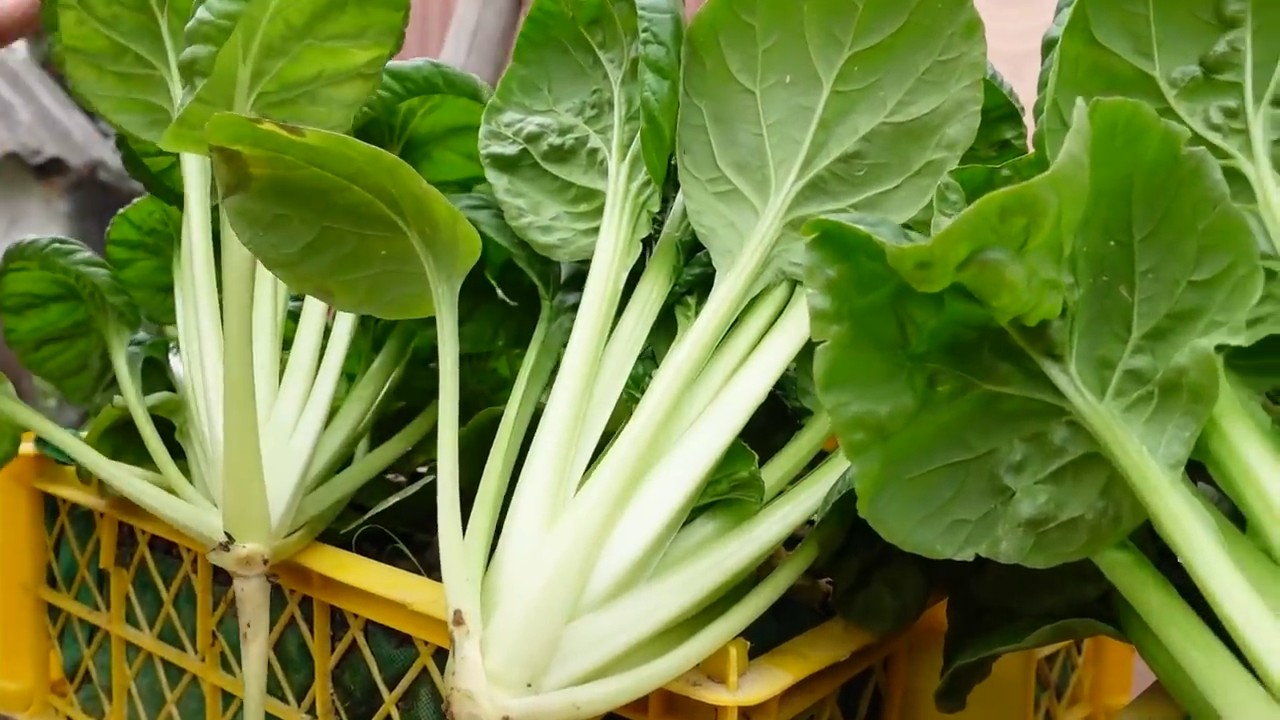
The Harvest: The Reward for Your Efforts
After about 4-6 weeks, you can start harvesting.
- Harvest Time: Harvest the Choi Sum plants when they are about 15-20 cm high.
- Harvesting Method: Cut the plants just above the ground. You can also harvest individual leaves, but harvesting the whole plant often stimulates faster regrowth.
- Storage: Choi Sum does not keep for long. It is best to process it immediately after harvesting. In the refrigerator, they will keep for a few days if you wrap them in a damp cloth.
Additional Tips for a Successful Choi Sum Harvest
- Practice Crop Rotation: Do not plant Choi Sum in the same location every year to prevent diseases and pests.
- Mulching: A layer of mulch made of straw or grass clippings helps to retain moisture in the soil and suppress weeds.
- Variety Selection: There are different varieties of Choi Sum. Try out different varieties to find out which one you like best and which grows best in your garden.
- Protection from Frost: Choi Sum is not frost-hardy. If there is a risk of frost, you should cover the plants with a garden fleece.
- Sowing Time: You can sow Choi Sum several times a year to ensure a continuous harvest. The best time for sowing is in spring (March/April) and late summer (August/September).
I hope this guide helps you to grow your own Choi Sum at home. It’s really easier than you think and the result is simply delicious! Happy gardening and enjoy your meal!
Conclusion
So, there you have it! Growing your own Choi Sum at home is not only achievable, but it’s also incredibly rewarding. From the vibrant green leaves gracing your garden or windowsill to the fresh, slightly sweet flavor enhancing your meals, the benefits are undeniable. Forget relying solely on grocery store produce, often shipped from afar and lacking that just-picked zest. With a little effort and the simple steps outlined, you can cultivate your own supply of this nutritious and delicious vegetable.
Why is this DIY trick a must-try? Because it empowers you to take control of your food source, ensuring freshness and quality. You know exactly what goes into growing your Choi Sum – no hidden pesticides or questionable practices. Plus, it’s a fantastic way to connect with nature, even if you only have a small balcony or patio. The satisfaction of harvesting your own vegetables is truly unparalleled.
But the fun doesn’t stop there! Feel free to experiment with different varieties of Choi Sum. Some are more heat-tolerant, while others boast unique flavor profiles. You can also try companion planting, pairing your Choi Sum with herbs like dill or chamomile to deter pests and enhance growth. Consider succession planting, sowing seeds every few weeks, to ensure a continuous harvest throughout the growing season. If you’re feeling adventurous, explore different cooking methods. While stir-fries are a classic, Choi Sum is also delicious steamed, blanched, or even added to soups and salads.
Don’t be intimidated if you’re a beginner gardener. Choi Sum is relatively easy to grow, making it a perfect choice for those just starting out. The key is to provide it with the right conditions: well-drained soil, plenty of sunlight, and consistent watering. With a little patience and attention, you’ll be harvesting your own delicious Choi Sum in no time.
We wholeheartedly encourage you to give this DIY trick a try. Imagine the pride of serving a meal featuring Choi Sum you grew yourself! It’s a conversation starter, a testament to your resourcefulness, and a delicious way to nourish yourself and your loved ones.
And most importantly, we want to hear about your experience! Share your tips, tricks, and triumphs in the comments below. Did you encounter any challenges? What varieties did you try? What are your favorite ways to cook with your homegrown Choi Sum? Your insights will not only inspire others but also help us all learn and grow together. Let’s create a community of home gardeners, sharing our knowledge and passion for fresh, homegrown produce. So, grab your seeds, get your hands dirty, and embark on this exciting journey of growing your own Choi Sum. You won’t regret it!
Frequently Asked Questions (FAQ)
What are the ideal growing conditions for Choi Sum?
Choi Sum thrives in well-drained soil that is rich in organic matter. A slightly acidic to neutral pH (around 6.0 to 7.0) is ideal. It prefers full sun, meaning at least 6 hours of direct sunlight per day, but can tolerate partial shade, especially in hotter climates. Consistent watering is crucial, especially during dry periods. Aim to keep the soil consistently moist but not waterlogged.
How long does it take to grow Choi Sum from seed?
Choi Sum is a fast-growing vegetable. You can expect to harvest your first crop in as little as 30 to 45 days after sowing the seeds. This makes it a great option for gardeners who want quick results. The exact time will depend on the variety, growing conditions, and climate.
What are some common pests and diseases that affect Choi Sum?
Common pests that can affect Choi Sum include aphids, cabbage worms, flea beetles, and slugs. Diseases can include downy mildew and clubroot. Regularly inspect your plants for signs of infestation or disease. Organic pest control methods, such as introducing beneficial insects or using insecticidal soap, can be effective. Ensure good air circulation to prevent fungal diseases. Crop rotation can also help to minimize the risk of soilborne diseases.
Can I grow Choi Sum in containers?
Yes, Choi Sum is well-suited for container gardening. Choose a container that is at least 6-8 inches deep and wide to allow sufficient room for root growth. Use a high-quality potting mix that drains well. Ensure the container has drainage holes to prevent waterlogging. Place the container in a sunny location and water regularly. Container-grown Choi Sum may require more frequent watering and fertilization than those grown in the ground.
How do I harvest Choi Sum?
Harvest Choi Sum when the flower stalks are just beginning to form, but before the flowers open. This is when the stems and leaves are at their most tender and flavorful. You can harvest the entire plant by cutting it off at the base, or you can harvest individual leaves as needed. Regular harvesting encourages continued production.
How do I store harvested Choi Sum?
To store harvested Choi Sum, rinse it gently and pat it dry. Wrap it loosely in a damp paper towel and place it in a plastic bag or container in the refrigerator. It will typically keep for 3-5 days. For longer storage, you can blanch the Choi Sum for a few minutes and then freeze it.
Can I eat the flowers of Choi Sum?
Yes, the flowers of Choi Sum are edible and have a slightly sweet, peppery flavor. They can be added to salads, stir-fries, or used as a garnish. However, once the flowers open, the stems and leaves may become tougher and less palatable.
What are some good companion plants for Choi Sum?
Good companion plants for Choi Sum include herbs like dill, chamomile, and rosemary, which can help to deter pests. Other beneficial companions include garlic, onions, and marigolds. Avoid planting Choi Sum near other members of the brassica family, such as cabbage, broccoli, and cauliflower, as they can attract the same pests and diseases.
How often should I fertilize my Choi Sum plants?
Fertilize your Choi Sum plants every 2-3 weeks with a balanced organic fertilizer. You can also use compost tea or fish emulsion to provide essential nutrients. Avoid over-fertilizing, as this can lead to excessive leaf growth and reduced flowering.
Is Choi Sum a cut-and-come-again vegetable?
Yes, Choi Sum can be harvested using the cut-and-come-again method. This involves harvesting individual leaves as needed, rather than harvesting the entire plant at once. This method allows you to enjoy a continuous harvest over a longer period. When harvesting individual leaves, be sure to leave the central growing point intact so that the plant can continue to produce new leaves.


Leave a Comment