

Grow Celery at Home – and ditch those sad, limp stalks from the grocery store! Have you ever dreamt of snipping fresh, crisp celery straight from your own backyard? I know I have! This isn’t just about saving money; it’s about experiencing the unparalleled flavor of homegrown produce.
Celery, believe it or not, has a rich history. Originating in the Mediterranean, it was initially valued more for its medicinal properties than its culinary uses. Over centuries, it transformed into the crunchy vegetable we know and love today. But the celery you buy in stores often lacks the vibrant taste and satisfying crunch of the homegrown variety.
That’s where this DIY guide comes in. Grow Celery at Home with these simple, effective tricks and hacks. We’ll walk you through everything, from choosing the right variety to troubleshooting common problems. Imagine adding freshly harvested celery to your soups, salads, and snacks – bursting with flavor and nutrients. Plus, you’ll reduce your carbon footprint by avoiding those plastic-wrapped supermarket options. Let’s get started and transform your garden into a celery haven!
Grow Your Own Celery at Home: A Comprehensive DIY Guide
Hey everyone! Have you ever wondered how you can grow fresh, crisp celery right in your kitchen or garden? I’ll show you how! It’s easier than you think and super satisfying when you can harvest your own homegrown celery stalks. Let’s get started!
What You’ll Need: Your Materials and Tools
Before we begin, make sure you have everything ready. Here is a list of the things you will need:
- A celery stalk base: Preferably from the supermarket, one that still has an intact base. Make sure it looks firm and healthy.
- A knife: A sharp knife is important to cut the stalk cleanly.
- A glass or bowl: To root the stalk in water.
- Water: Tap water is perfectly fine.
- Potting soil: High-quality potting soil is important for growth.
- A pot: Choose a pot that is large enough for the celery to have room to grow. A diameter of at least 15-20 cm is ideal.
- Optional: Liquid fertilizer: For additional growth and stronger plants.
- Optional: Spray bottle: To keep the leaves moist.
Phase 1: Rooting the Celery Stalk
This first step is crucial to ensure your celery has a good foundation for growth.
- Prepare the stalk: Take your celery stalk and cut it about 5-7 cm from the bottom end. You should keep the base with the root beginnings. You can, of course, use the upper stalks for soups, salads, or for snacking!
- Place in water: Fill your glass or bowl with about 2-3 cm of water. Place the celery stalk in the water with the cut side down. Make sure that only the lower side of the stalk is in the water, not the entire base.
- Place in a sunny spot: Place the glass or bowl in a bright, sunny spot, for example, on a windowsill. Celery needs a lot of light to grow well.
- Change the water: Change the water every 1-2 days to keep it fresh and clean. This prevents bacteria from forming and promotes root growth.
- Be patient: After about 5-7 days, you should see small roots sprouting from the bottom of the stalk. New green growth will also appear in the center of the stalk. That’s a good sign!
Phase 2: Planting the Rooted Celery
Once your celery stalk has formed roots, it’s time to plant it in soil.
- Prepare the pot: Fill your pot with potting soil. Leave about 2-3 cm of space to the rim of the pot.
- Dig a hole: Dig a small hole in the center of the soil, large enough to accommodate the celery stalk.
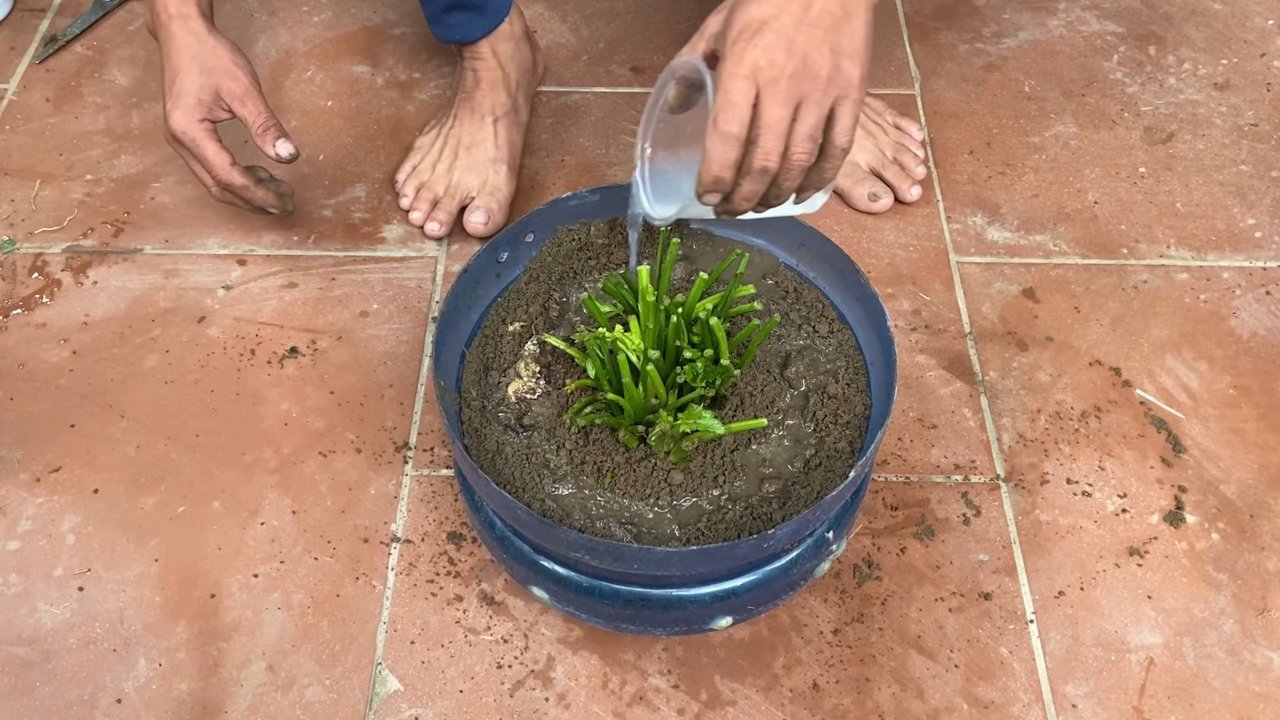
- Plant the celery: Carefully take the rooted celery stalk out of the water and place it in the hole. Be careful not to damage the roots.
- Cover with soil: Fill the hole with soil and press it down lightly to stabilize the celery stalk. The base of the stalk should be just above the soil.
- Water: Water the celery thoroughly until the water runs out of the drainage holes of the pot.
Phase 3: Care and Growth
Now that your celery is planted, it’s important to care for it properly so that it grows well.
- Location: Place the pot in a sunny spot. Celery needs at least 6 hours of sunlight per day. If you are growing it indoors, a plant lamp can be helpful.
- Watering: Keep the soil moist, but not soggy. Water the celery regularly, especially on hot days. Check the soil by sticking your finger about 2-3 cm deep into the soil. If it feels dry, it’s time to water.
- Fertilizing: Fertilize the celery every 2-3 weeks with a liquid fertilizer. Follow the instructions on the fertilizer package. This helps the celery to grow strong.
- Humidity: Celery likes high humidity. Spray the leaves regularly with water, especially if you are growing it indoors.
- Pests and diseases: Watch out for pests like aphids or slugs. If you spot any, you can combat them with a natural insecticide or by picking them off. Also, look for signs of diseases like powdery mildew. Ensure good ventilation and avoid wetting the leaves when watering to prevent diseases.
Phase 4: Harvest and Enjoyment
After about 80-100 days, you should be able to harvest your own celery!
- Harvest time: The celery is ready to harvest when the stalks have reached a decent size and are firm.
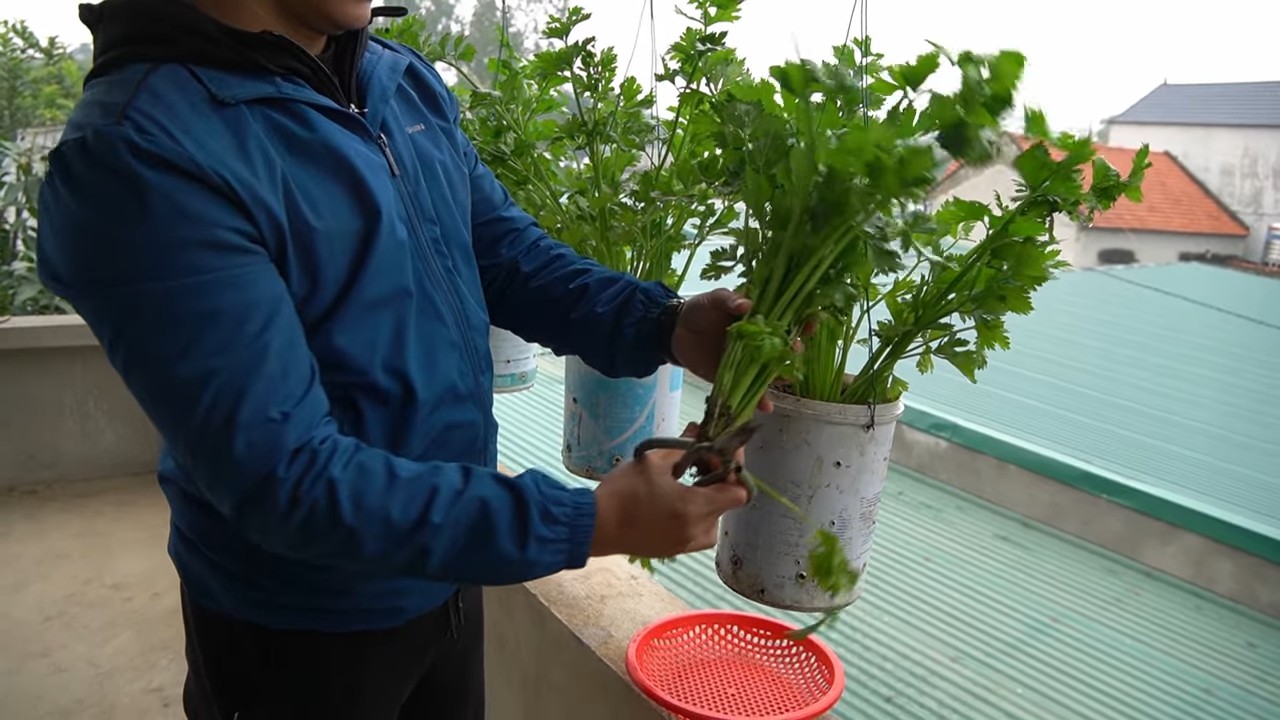
- Harvesting: You can either harvest the entire celery at once or cut individual stalks as needed. If you harvest individual stalks, cut them at the base.
- Enjoy: Wash the harvested celery thoroughly and enjoy it in salads, soups, as a snack with dip, or in other dishes.
Additional Tips and Tricks
- Blanching celery: If you want lighter, milder celery stalks, you can blanch them. This means you cover the stalks with soil or cardboard for a few weeks before harvesting to protect them from sunlight.
- Propagating celery: You can also propagate celery from seeds, but this is a bit more complex and takes longer.
- Growing celery outdoors: If you have a garden, you can also grow celery outdoors. Choose a sunny location with well-draining soil.
- Growing celery in winter: In mild climates, you can also grow celery in winter. Protect it from frost if necessary.
Common Problems and Solutions
- Yellow leaves: Yellow leaves can be a sign of overwatering, nutrient deficiency, or too little sunlight. Adjust your watering, fertilize the celery, and move it to a brighter location.
- Limp stalks: Limp stalks can be a sign of a lack of water. Water the celery thoroughly.
- Pests: Check the celery regularly for pests and combat them if necessary.
I hope this guide helps you grow your own celery at home. It’s a rewarding project that provides you with fresh, healthy ingredients right at your doorstep. Happy gardening
Conclusion
So, there you have it! Growing celery at home from scraps isn’t just a fun experiment; it’s a sustainable way to reduce food waste, enjoy fresh, flavorful celery, and connect with the natural world. It’s a surprisingly simple process that yields impressive results, turning what would otherwise be kitchen scraps into a vibrant, homegrown vegetable.
Why is this DIY trick a must-try? Because it empowers you to take control of your food source, even in a small way. Imagine the satisfaction of adding celery grown with your own hands to your soups, salads, or snacks. It’s fresher, often more flavorful than store-bought celery, and you know exactly where it came from and how it was grown. Plus, it’s incredibly rewarding to witness the transformation from a discarded celery base to a thriving plant.
But the benefits don’t stop there. Growing your own celery can also be a fantastic educational experience, especially for children. It teaches them about plant life cycles, the importance of sustainability, and the joy of nurturing something from seed (or in this case, scrap) to harvest.
Looking for variations? Consider experimenting with different types of celery. While the method works best with standard celery stalks, you can try it with other varieties like Pascal celery or even celeriac (though celeriac primarily focuses on root growth). You can also play around with different growing mediums. While water propagation is a great starting point, you can eventually transplant your celery into a pot with soil or even directly into your garden.
Another fun variation is to try growing celery in different locations. Experiment with placing your celery in a sunny windowsill, a partially shaded area, or even under grow lights. Observe how the different light conditions affect the plant’s growth and flavor.
Don’t be afraid to get creative with your celery growing setup. You can use recycled containers, decorate your pots, or even build a small raised bed for your celery plants. The possibilities are endless!
We wholeheartedly encourage you to give this DIY celery growing trick a try. It’s an easy, affordable, and rewarding way to add fresh, homegrown produce to your diet and reduce food waste. It’s a fantastic way to engage with nature, learn about plant life, and enjoy the delicious flavor of homegrown celery.
Once you’ve tried it, we’d love to hear about your experience! Share your photos, tips, and stories with us in the comments below. Let’s create a community of home celery growers and inspire others to embrace this sustainable and rewarding practice. Did you find a particular method worked better? Did you encounter any challenges? Your insights can help others succeed in their own celery growing adventures. Let’s all learn together and enjoy the fruits (or rather, vegetables) of our labor! This **grow celery at home** method is a game changer!
Frequently Asked Questions (FAQ)
1. What kind of celery works best for regrowing?
The best celery to use for regrowing is fresh, organic celery from the grocery store or farmer’s market. Look for stalks that are firm, crisp, and have a healthy-looking base with intact roots. Avoid celery that is wilted, discolored, or has a slimy texture, as these are less likely to regrow successfully. Standard green celery varieties tend to work best, but you can experiment with other types as well. The key is to start with a healthy celery base.
2. How long does it take to see new growth?
You should start to see new growth within a few days to a week after placing the celery base in water. Small leaves will begin to sprout from the center of the base. The speed of growth depends on factors such as temperature, light, and the overall health of the celery base. Be patient, and make sure to change the water regularly to prevent bacteria buildup.
3. Can I grow celery indoors year-round?
Yes, you can grow celery indoors year-round, provided you give it enough light. Celery needs at least 6 hours of sunlight per day, so if you don’t have a sunny windowsill, you may need to supplement with grow lights. Keep the temperature consistent, ideally between 60-70°F (15-21°C). With proper care, you can enjoy fresh, homegrown celery even during the winter months.
4. When should I transplant the celery to soil?
Once the celery base has developed a good root system and several inches of new growth, it’s time to transplant it to soil. This usually takes about 1-2 weeks. Choose a pot that is at least 6 inches in diameter and fill it with a well-draining potting mix. Gently remove the celery from the water and plant it in the pot, making sure to cover the roots with soil. Water thoroughly and place the pot in a sunny location.
5. What kind of soil is best for growing celery?
Celery prefers rich, well-draining soil that is high in organic matter. A good potting mix for celery should contain a blend of peat moss, perlite, and compost. You can also amend your soil with aged manure or other organic fertilizers to provide the celery with the nutrients it needs to thrive. Ensure the soil pH is slightly acidic to neutral, around 6.0 to 7.0.
6. How often should I water my celery plant?
Celery needs consistent moisture to grow well. Water your celery plant regularly, keeping the soil consistently moist but not waterlogged. Check the soil moisture level daily and water when the top inch of soil feels dry to the touch. Avoid letting the soil dry out completely, as this can stress the plant and stunt its growth.
7. What are some common problems when growing celery, and how can I fix them?
Some common problems when growing celery include pests, diseases, and nutrient deficiencies. Pests such as aphids and spider mites can be controlled with insecticidal soap or neem oil. Diseases such as celery blight can be prevented by providing good air circulation and avoiding overhead watering. Nutrient deficiencies can be addressed by fertilizing the plant with a balanced fertilizer.
8. How do I harvest my homegrown celery?
You can harvest your homegrown celery when the stalks are at least 6-8 inches long and have reached the desired thickness. To harvest, simply cut the stalks at the base of the plant with a sharp knife. You can harvest individual stalks as needed, or harvest the entire plant at once. After harvesting, store the celery in the refrigerator to keep it fresh.
9. Can I regrow celery multiple times from the same base?
While you can regrow celery multiple times from the same base, the subsequent harvests may be smaller and less flavorful than the first. The celery base will eventually exhaust its nutrient reserves and stop producing new growth. For best results, it’s recommended to start with a fresh celery base each time you want to grow celery.
10. Is homegrown celery more nutritious than store-bought celery?
Homegrown celery is often more nutritious than store-bought celery because it is fresher and hasn’t been exposed to the same level of processing and transportation. Homegrown celery also tends to have a more intense flavor and aroma. By growing your own celery, you can ensure that you are getting the freshest, most nutritious celery possible. Plus, you avoid any potential pesticides or chemicals used in commercial farming.


Leave a Comment