

Grow Celery at Home – and ditch those sad, wilted stalks from the grocery store! Have you ever dreamed of snipping fresh, crisp celery right from your own backyard? I know I have! There’s something incredibly satisfying about nurturing your own food, and celery is surprisingly easy to cultivate with a few clever tricks.
Celery, with its refreshing crunch, has a rich history. Originating in the Mediterranean, it was initially valued for its medicinal properties before becoming a culinary staple. Ancient Greeks and Romans used it to crown victors and flavor their dishes. Now, centuries later, we can easily grow celery at home, bringing that same fresh flavor to our tables.
But why bother with the effort? Well, store-bought celery can often be limp and lacking in flavor. Plus, it’s frequently treated with pesticides. By learning how to grow your own, you’ll have access to organic, flavorful celery whenever you need it. This DIY guide will provide you with simple, effective hacks to ensure a bountiful harvest, even if you have limited space. Imagine the delicious soups, salads, and snacks you can create with your homegrown celery! Let’s get started and transform your garden into a celery haven!
Grow Your Own Celery at Home: A Comprehensive DIY Guide
Hey garden friends! Have you ever wondered if you can easily grow celery at home? The answer is a resounding YES! And I’ll show you how. It’s easier than you think and you’ll be rewarded with fresh, crisp celery whenever you need it. Let’s get started!
What You Need: The Ingredients for Your Celery Success
Before we begin, make sure you have everything ready. Here is a list of the things you’ll need:
- A celery stalk base: Preferably from the supermarket, that still has an intact base. Make sure it looks firm and healthy.
- A knife: A sharp knife is important for clean cuts.
- A glass or a bowl: Large enough to hold the celery base.
- Water: Tap water is perfectly sufficient.
- Potting soil: High-quality potting soil for the later move into a pot.
- A pot: With drainage holes to prevent waterlogging.
- A sunny location: Celery loves light!
- Patience: The most important thing of all!
Phase 1: Bringing the Celery Base to Life
This phase is all about getting the celery base to grow new roots. This is the foundation for your own celery.
Step 1: Preparing the Celery Stalk
- Take your celery stalk and cut off the top part, leaving about 5-7 cm of the base. Make sure you make a clean cut.
- Remove the outer, wilted, or damaged stalks. The inner, young stalks should remain intact.
Step 2: Watering
- Place the celery base in a glass or a bowl.
- Fill the glass with water so that the base is about half-covered. Make sure the inner stalks are not in the water, as they could otherwise rot.
- Place the glass in a sunny location, e.g., on a windowsill.
Step 3: Patience and Care
- Change the water every 1-2 days to keep it fresh and prevent the formation of bacteria.
- Observe the celery base closely. After a few days, you should see small roots sprouting from the base.
- Be patient! It can take up to a week or longer for roots to form.
Phase 2: The Move into the Soil
Once the roots are sufficiently developed, it’s time to plant your celery in the soil.
Step 4: Preparing the Pot
- Choose a pot that is large enough to accommodate the celery base and the roots. A pot with a diameter of at least 15 cm is ideal.
- Fill the pot with high-quality potting soil.
- Make a hole in the center of the soil that is large enough to hold the celery base.
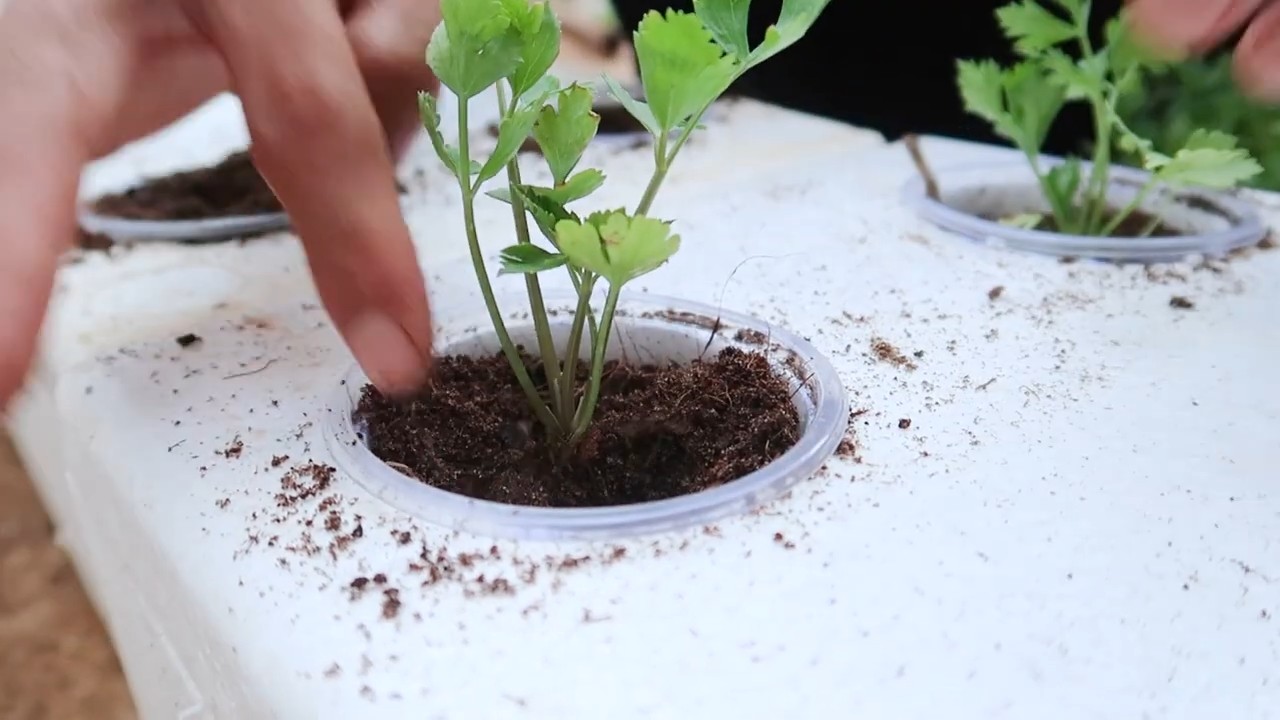
Step 5: Planting
- Carefully remove the celery base from the glass.
- Place the base in the hole in the soil. Be careful not to damage the roots.
- Fill the hole with soil and press the soil down lightly.
- Water the celery thoroughly.
Step 6: The Right Location
- Place the pot in a sunny location. Celery needs at least 6 hours of sunlight per day.
- Make sure the location is protected from strong winds.
Phase 3: Caring for Your Celery
Now that your celery is in the soil, it’s important to care for it properly so that it grows well.
Step 7: Watering
- Water the celery regularly, but avoid waterlogging. The soil should always be slightly moist.
- Check the soil regularly with your finger. If the top layer feels dry, it’s time to water.
Step 8: Fertilizing
- Fertilize the celery every 2-3 weeks with an organic liquid fertilizer.
- Follow the instructions on the fertilizer package.
Step 9: Pest Control
- Check the celery regularly for pests like aphids or snails.
- Remove pests manually or use an organic pesticide.
Step 10: Harvesting
- You can harvest the outer stalks of the celery as soon as they are large enough.
- Cut the stalks with a sharp knife.
- Let the inner stalks grow so that the celery can continue to grow.
Additional Tips for Celery Success
- Celery loves water: Make sure the soil is always moist, especially during hot summer days.
- Mulching helps: A layer of mulch around the celery plant helps to retain moisture in the soil and suppress weeds.
- Regular harvesting promotes growth: The more you harvest, the more the celery will produce.
- Celery in winter: In colder climates, you can bring the celery indoors in a pot and keep it in a bright window.
- Observe your plant: Look for changes in the color or texture of the leaves that could indicate problems.
Common Problems and Solutions
- Yellow leaves: Can indicate overwatering or nutrient deficiency. Adjust watering and fertilize the celery.
- Limp stalks: Can indicate a lack of water. Water the celery thoroughly.
- Pests: Check for pests regularly and treat them if necessary.
Why You Should Grow Your Own Celery
There are many reasons why it’s worth growing your own celery:
- Fresh taste: Homegrown celery tastes much better than store-bought.
- Sustainability: You reduce your ecological footprint by avoiding the transportation of celery from the supermarket.
- Cost-effectiveness: You save money by growing your own celery.
- Satisfaction: It’s a great feeling to grow and harvest something yourself.
I hope this guide helps you to grow your own celery at home. Happy gardening! And remember: patience is the key to success. With a little love and care, you will soon be able to harvest your own fresh celery. Good luck!
Conclusion
So, there you have it! Growing celery at home from scraps isn’t just a fun experiment; it’s a sustainable way to reduce food waste, enjoy fresh, flavorful celery, and connect with the natural world. It’s a surprisingly simple process that yields tangible results, offering a rewarding experience for gardeners of all levels. Forget buying bunches of celery that wilt in your fridge – with this easy DIY trick, you can have a continuous supply of crisp, homegrown stalks right at your fingertips.
Why is this a must-try? Because it’s economical, eco-friendly, and educational. You’re essentially getting “free” celery from the scraps you’d normally discard. You’re reducing your carbon footprint by minimizing trips to the grocery store and decreasing food waste that ends up in landfills. And you’re learning about plant propagation and the amazing resilience of nature. Plus, the taste of homegrown celery is noticeably fresher and more vibrant than store-bought varieties.
Don’t be afraid to experiment! Once you’ve mastered the basic technique, try different variations. Plant your celery in a raised bed for better drainage, or add compost to the soil for richer nutrients. You can even try growing different varieties of celery, such as Pascal celery for its classic flavor or red celery for its unique color and slightly sweeter taste. Consider companion planting with herbs like parsley or basil, which can help deter pests and enhance the flavor of your celery. Another fun variation is to try growing celery from seed alongside your regrown stalks to compare the growth rates and yields. This will give you a better understanding of the plant’s life cycle and help you refine your growing techniques.
Ready to ditch the store-bought celery and embrace the joys of homegrown? We encourage you to give this DIY trick a try. It’s a small step towards a more sustainable lifestyle and a delicious addition to your kitchen. The satisfaction of harvesting your own celery, knowing you nurtured it from a humble scrap, is truly unparalleled.
We’re confident that you’ll find this process both enjoyable and rewarding. But don’t just take our word for it – try it yourself! And most importantly, share your experience with us. We’d love to hear about your successes, your challenges, and any tips or tricks you discover along the way. Post photos of your homegrown celery on social media using [Insert relevant hashtag here] and let’s build a community of celery-growing enthusiasts! Your insights could inspire others to embark on their own celery-growing adventures. Let’s all work together to make the most of this simple, sustainable, and satisfying DIY project.
Frequently Asked Questions (FAQ)
How long does it take to grow celery from a base?
The time it takes to grow celery from a base can vary depending on several factors, including the variety of celery, the growing conditions (sunlight, water, temperature), and the quality of the initial celery base. Generally, you can expect to see new growth within a week or two after placing the base in water. After about 3-4 weeks, you should have enough root growth to transplant the celery into soil. From there, it can take another 2-3 months for the celery to mature and be ready for harvest. So, from start to finish, you’re looking at approximately 3-4 months to grow a full head of celery from a base. Remember to be patient and provide consistent care for the best results.
What kind of soil is best for growing celery?
Celery thrives in rich, well-draining soil that is high in organic matter. The ideal soil pH for celery is between 6.0 and 6.8. Before planting, amend your soil with compost, well-rotted manure, or other organic materials to improve its fertility and drainage. Celery also prefers soil that retains moisture, so consider adding peat moss or coconut coir to help with water retention. If your soil is heavy clay, incorporate sand or perlite to improve drainage and prevent root rot. A good soil mix for celery would be equal parts garden soil, compost, and peat moss. Regular fertilization with a balanced fertilizer will also help ensure healthy growth.
How much sunlight does celery need?
Celery needs at least 6 hours of direct sunlight per day to thrive. However, in hotter climates, it can benefit from some afternoon shade to prevent the leaves from scorching. If you’re growing celery indoors, place it near a sunny window or use grow lights to provide adequate light. Insufficient sunlight can result in leggy growth and smaller, less flavorful stalks. Observe your celery plants closely and adjust their location or lighting as needed to ensure they are receiving enough sunlight.
How often should I water my celery?
Celery is a water-loving plant and requires consistent moisture to grow properly. Water your celery deeply and regularly, especially during hot, dry weather. Aim to keep the soil consistently moist but not waterlogged. A good rule of thumb is to water when the top inch of soil feels dry to the touch. Depending on the weather and soil conditions, this may mean watering every day or every other day. Mulching around your celery plants can help retain moisture and reduce the need for frequent watering. Be careful not to overwater, as this can lead to root rot.
What are some common pests and diseases that affect celery?
Celery can be susceptible to several pests and diseases, including aphids, celery leaf miners, carrot weevils, early blight, and pink rot. Regularly inspect your plants for signs of infestation or disease. Aphids can be controlled with insecticidal soap or a strong stream of water. Celery leaf miners can be managed by removing and destroying infested leaves. Carrot weevils can be difficult to control, but row covers can help prevent them from reaching your plants. Early blight and pink rot are fungal diseases that can be prevented by ensuring good air circulation and avoiding overhead watering. If these diseases do occur, treat them with a fungicide. Practicing crop rotation and using disease-resistant varieties can also help prevent these problems.
Can I grow celery indoors year-round?
Yes, you can grow celery indoors year-round, provided you can meet its needs for sunlight, water, and nutrients. Choose a sunny location near a window or use grow lights to provide at least 6 hours of light per day. Use a well-draining potting mix and water regularly to keep the soil consistently moist. Fertilize your celery plants every 2-3 weeks with a balanced fertilizer. Be sure to provide adequate air circulation to prevent fungal diseases. With proper care, you can enjoy fresh, homegrown celery even during the winter months.
How do I know when my celery is ready to harvest?
Celery is typically ready to harvest when the stalks are at least 6-8 inches long and have reached a good size. The stalks should be firm and crisp, not limp or wilted. You can harvest individual stalks as needed, or you can harvest the entire plant at once. To harvest, simply cut the stalks at the base of the plant with a sharp knife. After harvesting, store your celery in the refrigerator to keep it fresh.
What can I do with my homegrown celery?
Homegrown celery can be used in a variety of ways. It’s delicious eaten raw as a snack or added to salads. It can also be used in soups, stews, and stir-fries. Celery is a key ingredient in many classic dishes, such as chicken noodle soup and mirepoix (a flavor base for many sauces and stocks). You can also use celery to make juice or smoothies. Don’t forget to use the celery leaves as well! They can be added to salads, soups, or used as a garnish.
Is growing celery from scraps really worth it?
Absolutely! While it might take a little longer to get a full head of celery compared to starting from seedlings, growing celery from scraps is a rewarding and sustainable practice. It reduces food waste, saves you money, and allows you to enjoy fresh, flavorful celery that you grew yourself. It’s a great way to learn about plant propagation and connect with nature. Plus, it’s a fun and educational activity for kids and adults alike. So, give it a try and see for yourself! You might be surprised at how easy and rewarding it is to grow your own celery from scraps.

Leave a Comment