

Grow carrots at home? Absolutely! Imagine plucking vibrant, sweet carrots straight from your own backyard, ready to be enjoyed in salads, soups, or as a healthy snack. Forget those bland, store-bought carrots – we’re talking about homegrown goodness bursting with flavor and nutrients.
For centuries, cultivating carrots has been a rewarding practice, dating back to ancient Persia where they were initially purple or white! Over time, through careful selection and cultivation, the vibrant orange variety we know and love emerged. Today, the joy of growing your own food, especially something as versatile as carrots, is experiencing a huge resurgence.
But let’s be honest, sometimes getting those perfect, plump carrots can feel like a challenge. That’s where these DIY tricks and hacks come in! I’m going to share some simple, yet effective methods to help you grow carrots at home successfully, even if you have limited space or gardening experience. We’ll cover everything from soil preparation and seed spacing to pest control and harvesting tips. So, ditch the grocery store carrots and get ready to experience the satisfaction of growing your own delicious, homegrown bounty!

DIY Concrete Countertops: A Weekend Project for a Stunning Kitchen Upgrade
Okay, so you’re thinking about concrete countertops, huh? Awesome! They’re seriously stylish, surprisingly durable, and a whole lot cheaper than granite or quartz if you DIY them. I’m going to walk you through the entire process, from building the molds to sealing the finished product. It might seem intimidating, but trust me, with a little patience and elbow grease, you can totally pull this off.
Materials You’ll Need
Before we dive in, let’s gather our supplies. This is crucial because you don’t want to be halfway through and realize you’re missing something!
* Melamine Boards: This is what we’ll use to build the molds. It’s smooth, non-porous, and releases easily from the concrete. Get enough to create the size and shape of your desired countertops, plus extra for the sides. I recommend 3/4″ thickness for strength.
* Concrete Mix: This is where things get a little tricky. You have a few options:
* High-Strength Concrete Mix: This is a good all-around choice. Look for a mix designed for countertops or patching.
* Fiber-Reinforced Concrete Mix: The fibers add extra strength and help prevent cracking. This is a great option if you’re worried about the countertops being thin or having cutouts.
* Self-Consolidating Concrete (SCC): This is the easiest to work with because it flows easily and doesn’t require as much vibration to remove air bubbles. However, it’s usually more expensive.
* White Concrete Mix: If you want a lighter colored countertop, this is the way to go. You can add pigments to customize the color.
* Consider a countertop specific mix: These mixes are designed for the specific needs of countertops and may include additives for strength, workability, and stain resistance.
Calculate the amount of concrete you need based on the dimensions of your countertops and the recommended thickness (usually 1.5″ to 2″). It’s always better to have a little extra than not enough!
* Concrete Pigment (Optional): If you want to add color to your concrete, choose a pigment specifically designed for concrete. Follow the manufacturer’s instructions for mixing ratios.
* Rebar or Wire Mesh: This will add extra strength to the countertops, especially if they’re large or have cutouts.
* Concrete Sealer: This is essential to protect the concrete from stains and water damage. Choose a food-safe sealer specifically designed for concrete countertops. I recommend a penetrating sealer followed by a topical sealer for maximum protection.
* Caulk: Use a silicone caulk to seal the seams of the molds.
* Screws: For assembling the molds.
* Mixing Buckets: You’ll need at least two large buckets for mixing the concrete.
* Drill with Screwdriver Bit: For assembling the molds.
* Trowel: For smoothing the concrete.
* Rubber Mallet: For tapping the molds to release air bubbles.
* Concrete Vibrator (Optional but Recommended): This will help remove air bubbles and consolidate the concrete. You can rent one from a tool rental store.
* Safety Glasses: Protect your eyes from concrete dust and splashes.
* Gloves: Protect your hands from the concrete.
* Dust Mask: Protect your lungs from concrete dust.
* Measuring Tape: For accurate measurements.
* Level: To ensure the countertops are level.
* Clamps: To hold the mold pieces together while the caulk dries.
* Sander with Sandpaper (Various Grits): For smoothing the concrete after it cures. Start with a coarse grit (80-120) and work your way up to a fine grit (220-400).
* Diamond Polishing Pads (Optional): For achieving a high-gloss finish.
* Concrete Cleaner: For cleaning the countertops before sealing.
* Rags: For wiping up spills and applying the sealer.
* Wax (Optional): For adding a final layer of protection and shine.
Phase 1: Building the Molds
This is arguably the most important step because the molds will determine the shape and size of your countertops. Take your time and be precise!
1. Measure and Cut the Melamine: Carefully measure the dimensions of your desired countertops. Remember to account for any overhangs or cutouts (like for a sink or cooktop). Cut the melamine boards to the correct sizes using a circular saw or table saw. I always double-check my measurements before cutting!
2. Assemble the Molds: Assemble the melamine boards to create the molds. The melamine side should be facing inward, as this will be the surface of your countertops. Use screws to secure the boards together. Make sure the corners are square and the seams are tight.
3. Caulk the Seams: Apply a bead of silicone caulk along all the seams of the molds, both inside and outside. This will prevent the concrete from leaking out and create a smooth, seamless edge on your countertops. Smooth the caulk with your finger or a caulk smoothing tool. Let the caulk dry completely according to the manufacturer’s instructions.
4. Reinforce the Molds: For larger countertops, you may want to reinforce the molds with additional supports. You can use wood scraps or metal brackets to add extra strength and prevent the molds from bowing under the weight of the concrete.
5. Create Cutouts (If Needed): If you need to create cutouts for a sink or cooktop, you can use foam board or wood to create the desired shape. Attach the cutout to the inside of the mold using screws or adhesive. Remember to seal the edges of the cutout with caulk to prevent the concrete from seeping underneath.
6. Consider a Backsplash: If you want an integrated backsplash, attach a piece of melamine to the back of the mold, extending upward to the desired height. Secure it with screws and caulk the seams.
Phase 2: Mixing and Pouring the Concrete
Now for the fun part! But remember, concrete sets relatively quickly, so you need to work efficiently.
1. Prepare the Concrete Mix: Follow the manufacturer’s instructions for mixing the concrete. Add water gradually until you achieve a thick, creamy consistency. Be careful not to add too much water, as this will weaken the concrete. If you’re using pigment, add it to the water before mixing it with the concrete.
2. Add Reinforcement: Place the rebar or wire mesh inside the molds, ensuring it’s evenly distributed and doesn’t touch the sides or bottom of the mold. This will provide extra strength and prevent cracking. You can use small pieces of concrete to prop up the rebar or mesh.
3. Pour the Concrete: Carefully pour the concrete into the molds, filling them to the top. Use a trowel to spread the concrete evenly and remove any large air pockets.
4. Vibrate the Concrete: This is a crucial step to remove air bubbles and consolidate the concrete. Use a concrete vibrator to vibrate the concrete for a few minutes. If you don’t have a vibrator, you can tap the sides of the molds with a rubber mallet.
5. Screed the Surface: Use a straightedge (like a piece of wood or metal) to screed the surface of the concrete, removing any excess concrete and creating a level surface.
6. Trowel the Surface: Use a trowel to smooth the surface of the concrete. You can use a steel trowel for a smooth, polished finish or a wooden trowel for a more textured finish.
7. Cover and Cure: Cover the molds with plastic sheeting to prevent the concrete from drying out too quickly. This will help prevent cracking. Let the concrete cure for at least 7 days, or longer if possible. The longer it cures, the stronger it will be. I usually wait 10-14 days just to be safe.
Phase 3: Demolding and Finishing
Almost there! This is where you’ll see your hard work pay off.
1. Demold the Countertops: Carefully remove the screws from the molds and gently pry the melamine boards away from the concrete. Be patient and avoid using excessive force, as this could damage the countertops.
2. Sand the Surface: Once the countertops are demolded, you’ll need to sand the surface to remove any imperfections and create a smooth finish. Start with a coarse grit sandpaper (80-120) and work your way up to a fine grit (220-400). Use a sanding block or orbital sander for best results.
3. Fill Voids (If Needed): If there are any small voids or air pockets in the concrete, you can fill them with a concrete patching compound. Follow the manufacturer’s instructions for application.
4.
Conclusion
So, there you have it! Growing carrots at home, especially with our simple DIY trick, is not just a gardening project; it’s an investment in fresh, flavorful produce and a rewarding connection with nature. Forget those bland, store-bought carrots that lack the vibrant sweetness of homegrown varieties. With a little effort and our easy-to-follow guide, you can cultivate a bounty of crisp, delicious carrots right in your own backyard, balcony, or even on a sunny windowsill.
This DIY approach isn’t just about saving money (although that’s certainly a perk!). It’s about controlling the quality of your food, knowing exactly what goes into your garden, and enjoying the unparalleled taste of freshly harvested vegetables. Plus, it’s incredibly satisfying to watch those tiny seeds sprout and transform into vibrant orange roots.
But don’t just take our word for it! We encourage you to give this DIY trick a try. Experiment with different carrot varieties – Nantes for their classic sweetness, Chantenay for their short, stout shape, or even colorful heirloom varieties like Purple Haze or Yellow Stone. You can also adjust the soil mix to suit your specific growing conditions. If your soil is heavy clay, consider adding more sand and compost to improve drainage. If you’re growing in containers, make sure they’re deep enough to accommodate the carrot roots.
Consider companion planting! Marigolds can help deter nematodes, while rosemary can repel carrot flies. These natural pest control methods can help you grow healthy, thriving carrots without the need for harsh chemicals.
And remember, gardening is a journey, not a destination. Don’t be discouraged if your first attempt isn’t perfect. Learn from your mistakes, adapt your approach, and keep experimenting. The more you grow, the more you’ll learn about the unique needs of your plants and the secrets to successful gardening.
We’re confident that you’ll be amazed by the results. Imagine the satisfaction of pulling up your own homegrown carrots, washing them off, and enjoying their fresh, earthy flavor. Whether you’re roasting them with herbs, adding them to salads, or simply snacking on them raw, homegrown carrots are a delicious and nutritious treat.
So, grab your seeds, prepare your soil, and get ready to experience the joy of growing your own carrots at home. And most importantly, don’t forget to share your experiences with us! We’d love to hear about your successes, your challenges, and any variations you’ve tried. Share your photos and stories on our social media pages or in the comments section below. Let’s build a community of passionate gardeners and inspire others to discover the magic of growing their own food. Happy gardening!
Frequently Asked Questions (FAQ)
What is the best time of year to plant carrots?
The best time to plant carrots depends on your climate. In general, carrots are a cool-season crop, meaning they thrive in temperatures between 60°F and 70°F (15°C and 21°C). For most regions, this means planting in early spring or late summer/early fall.
* **Spring Planting:** Plant carrot seeds 2-3 weeks before the last expected frost. This will give them enough time to mature before the summer heat arrives.
* **Fall Planting:** Plant carrot seeds 10-12 weeks before the first expected frost. This will allow them to mature during the cooler fall months.
If you live in a region with mild winters, you may be able to grow carrots year-round. Just be sure to provide them with adequate protection from extreme temperatures.
What kind of soil is best for growing carrots?
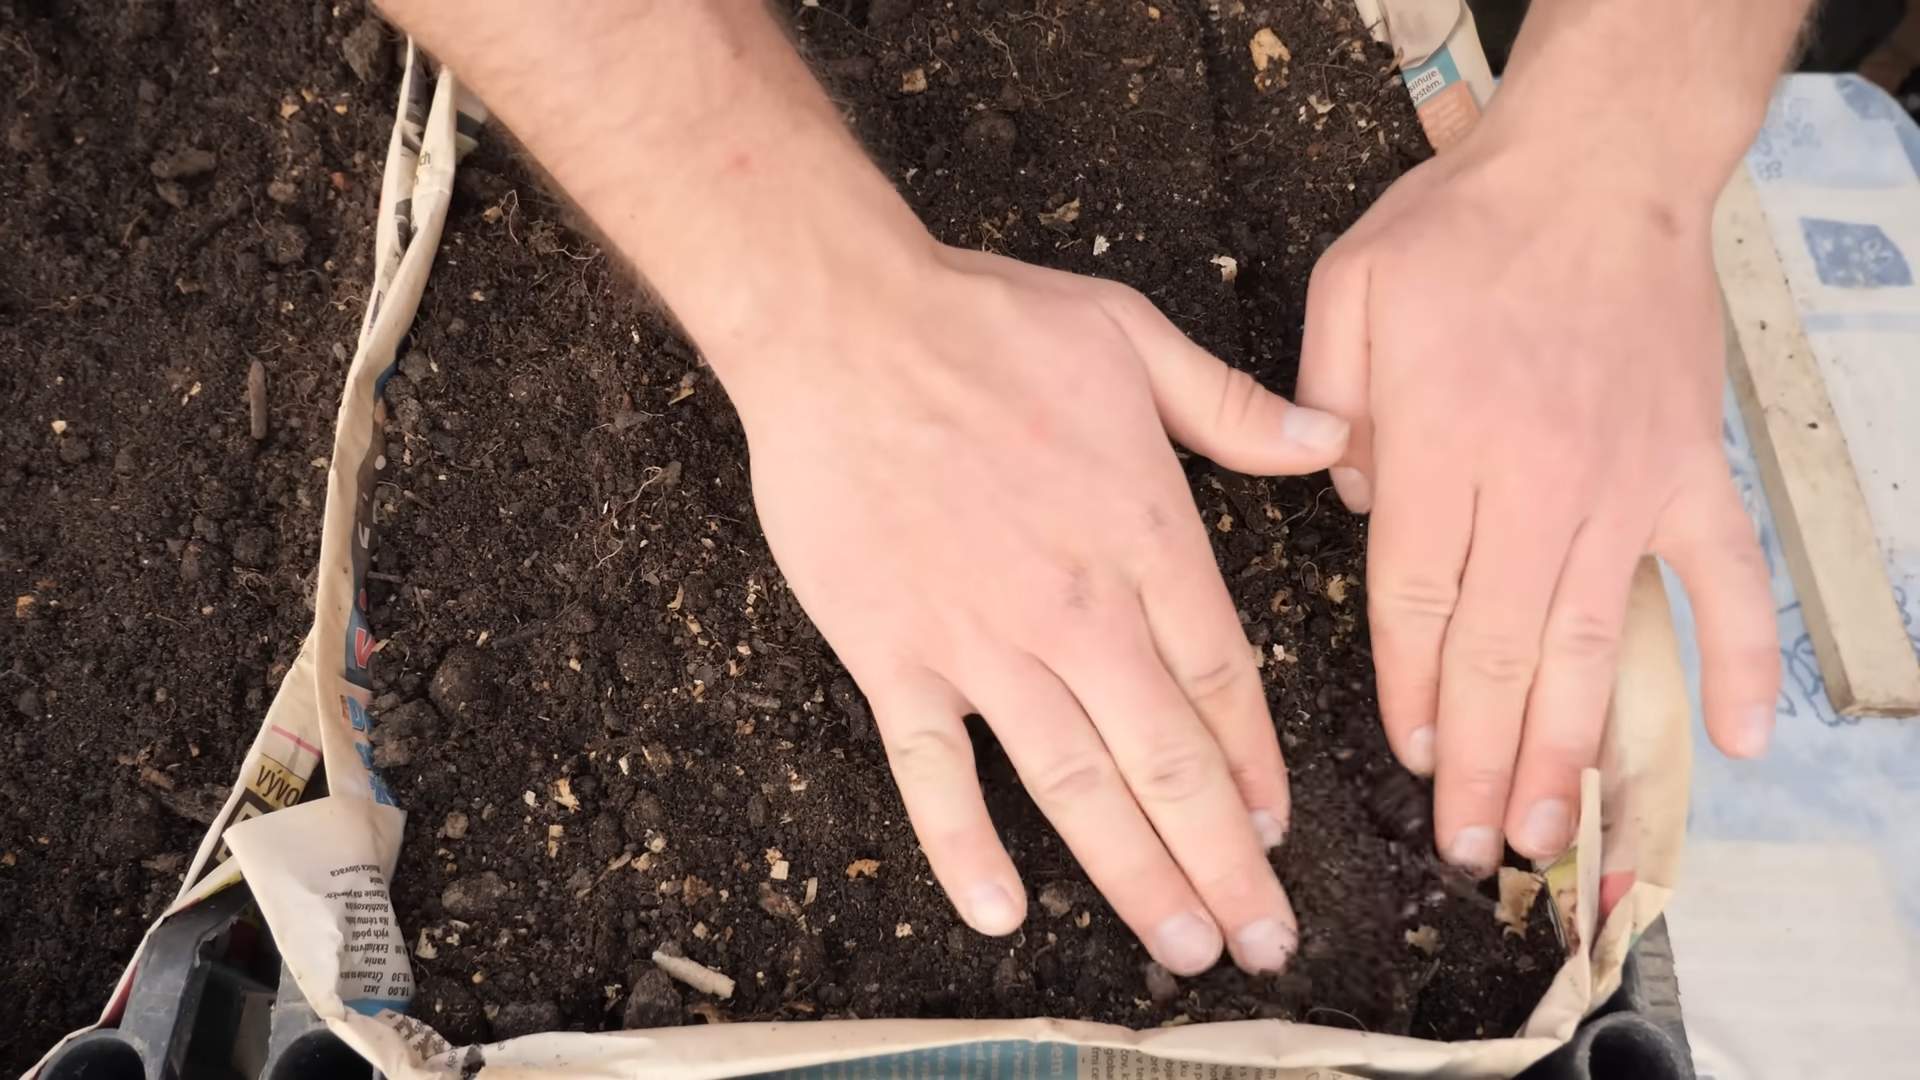
Carrots need loose, well-drained soil to grow properly. Rocky or compacted soil can cause them to become stunted or misshapen. The ideal soil for carrots is sandy loam, which is a mixture of sand, silt, and clay.
* **Soil Preparation:** Before planting, loosen the soil to a depth of at least 12 inches. Remove any rocks, stones, or debris that could impede root growth. Amend the soil with compost or other organic matter to improve drainage and fertility.
* **pH Level:** Carrots prefer a soil pH between 6.0 and 6.8. You can test your soil pH with a home testing kit or by sending a sample to your local agricultural extension office. If your soil is too acidic, you can add lime to raise the pH. If it’s too alkaline, you can add sulfur to lower the pH.
How often should I water my carrots?
Carrots need consistent moisture to grow properly. Water them deeply whenever the top inch of soil feels dry to the touch. Avoid overwatering, as this can lead to root rot.
* **Watering Frequency:** The frequency of watering will depend on the weather and the type of soil you have. In general, you’ll need to water more often during hot, dry weather and less often during cool, wet weather.
* **Watering Method:** Water carrots slowly and deeply, using a watering can or a soaker hose. Avoid overhead watering, as this can spread fungal diseases.
How much sunlight do carrots need?
Carrots need at least 6 hours of sunlight per day to grow properly. Choose a planting location that receives full sun.
* **Sunlight Requirements:** If you live in a hot climate, you may need to provide your carrots with some afternoon shade to prevent them from overheating.
* **Artificial Light:** If you’re growing carrots indoors, you’ll need to provide them with artificial light. Use grow lights that emit a full spectrum of light.
What are some common pests and diseases that affect carrots?
Carrots are susceptible to a variety of pests and diseases, including carrot flies, nematodes, aphids, and fungal diseases.
* **Pest Control:** To prevent pest infestations, practice good garden hygiene. Remove any weeds or debris that could harbor pests. Use row covers to protect your carrots from carrot flies. Introduce beneficial insects, such as ladybugs and lacewings, to control aphids.
* **Disease Prevention:** To prevent fungal diseases, avoid overwatering and provide good air circulation. Use disease-resistant carrot varieties. Apply a fungicide if necessary.
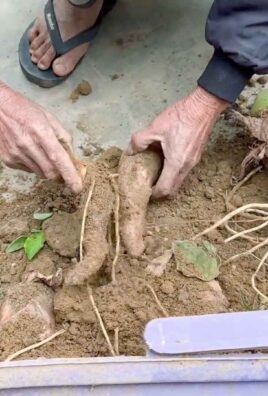
How do I know when my carrots are ready to harvest?
Carrots are typically ready to harvest 60-80 days after planting. The exact time will depend on the variety of carrot you’re growing.
* **Harvesting Signs:** Look for carrots that are about 1-2 inches in diameter at the top. You can also gently pull back the soil around the base of the carrot to check its size.
* **Harvesting Method:** To harvest carrots, loosen the soil around the base of the plant with a garden fork. Gently pull the carrot out of the ground, twisting it slightly as you pull.
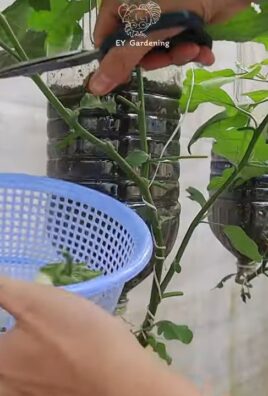
Can I grow carrots in containers?
Yes, you can grow carrots in containers, but you’ll need to choose a container that is deep enough to accommodate the carrot roots. A container that is at least 12 inches deep is ideal.
* **Container Selection:** Choose a container that has drainage holes to prevent waterlogging.
* **Potting Mix:** Use a high-quality potting mix that is well-draining.
* **Watering and Fertilizing:** Water and fertilize your container-grown carrots regularly.
What are some different varieties of carrots I can grow?
There are many different varieties of carrots to choose from, each with its own unique characteristics.
* **Nantes:** A classic variety with sweet, tender roots.
* **Chantenay:** A short, stout variety that is good for heavy soils.
* **Danvers:** A long, tapered variety that is good for slicing and dicing.
* **Purple Haze:** A colorful heirloom variety with purple skin and orange flesh.
* **Yellow Stone:** A yellow variety with a mild, sweet flavor.
Experiment with different varieties to find the ones you like best.
How can I store my harvested carrots?
Carrots can be stored in the refrigerator for several weeks.
* **Storage Method:** Remove the green tops from the carrots and wash them thoroughly. Wrap the carrots in a damp paper towel and store them in a plastic bag in the refrigerator.
* **Long-Term Storage:** For longer-term storage, you can freeze or can your carrots.
What are the benefits of growing carrots at home?
Growing carrots at home offers many benefits, including:
* **Fresh, Flavorful Produce:** Homegrown carrots taste much better than store-bought carrots.
* **Control Over Quality:** You can control the quality of your food by growing your own carrots.
* **Cost Savings:** Growing your own carrots can save you money on groceries.
* **Connection with Nature:** Gardening is a rewarding way to connect with nature.
* **Healthy Activity:** Gardening is a great way to get exercise and fresh air.

Leave a Comment